
Owners Manual
Page 1
Color television OWNER'S MANUAL MODELS: 30FS4D 32FS4D-UC R TruSurround XT Please read this manual carefully and completely before operating your dealer if you require service. Retain this information to your TV. Record model number and serial number of the TV in the spaces provided below. Model Number : Serial Number : LG Electronics U.S.A., Inc. See the label attached on the back cover and relate this manual for future reference.
Color television OWNER'S MANUAL MODELS: 30FS4D 32FS4D-UC R TruSurround XT Please read this manual carefully and completely before operating your dealer if you require service. Retain this information to your TV. Record model number and serial number of the TV in the spaces provided below. Model Number : Serial Number : LG Electronics U.S.A., Inc. See the label attached on the back cover and relate this manual for future reference.
Owners Manual
Page 2
.... The code provides guidelines for a Class B digital device, pursuant to provide reasonable protection against harmful interference when the equipment is : LG Electronics U.S.A., Inc 1000 Sylvan Avenue, Englewood Cliffs, NJ 07632 1-800-243-0000 http://www.lgusa.com PAGE 2 These limits are designed... instructions in any way without written authorization from BBE Sound, Inc. connected. • Consult the dealer or an experienced radio/TV technician for compliance could void the user's authority to radio or television reception, which can radiate radio frequency energy and, if not...
.... The code provides guidelines for a Class B digital device, pursuant to provide reasonable protection against harmful interference when the equipment is : LG Electronics U.S.A., Inc 1000 Sylvan Avenue, Englewood Cliffs, NJ 07632 1-800-243-0000 http://www.lgusa.com PAGE 2 These limits are designed... instructions in any way without written authorization from BBE Sound, Inc. connected. • Consult the dealer or an experienced radio/TV technician for compliance could void the user's authority to radio or television reception, which can radiate radio frequency energy and, if not...
Owners Manual
Page 5
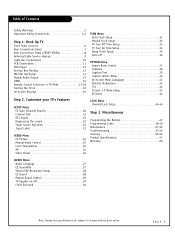
... 11 DVD Player 12 Set-top Box Hookup 13 Monitor Out Setup 14 Digital Audio Output 15 HDMI 16 Remote Control Functions in TV Mode 17-18 Turning the TV on /off 36 OPTION Menu Aspect Ratio Control 37 Captions 38 Caption/Text 39 Caption Option Menu 40 On-Screen Menu Languages... 24 Manual Video Control 25 Color Temperature 26 XD 26 Video Preset 26 TIME Menu Auto Clock Setup 31 Manual Clock Setup 32 TV Turn Off Time Setup 33 TV Turn On Time Setup 34 Sleep Timer Setup 35 Auto off 29 Front Surround 30 Note: Design and specifications are subject to...
... 11 DVD Player 12 Set-top Box Hookup 13 Monitor Out Setup 14 Digital Audio Output 15 HDMI 16 Remote Control Functions in TV Mode 17-18 Turning the TV on /off 36 OPTION Menu Aspect Ratio Control 37 Captions 38 Caption/Text 39 Caption Option Menu 40 On-Screen Menu Languages... 24 Manual Video Control 25 Color Temperature 26 XD 26 Video Preset 26 TIME Menu Auto Clock Setup 31 Manual Clock Setup 32 TV Turn Off Time Setup 33 TV Turn On Time Setup 34 Sleep Timer Setup 35 Auto off 29 Front Surround 30 Note: Design and specifications are subject to...
Owners Manual
Page 6
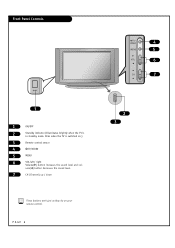
Dims when the TV is in standby mode. ume(F) button decreases the sound level. 7 CH (Channel) up / down These buttons work just as they do on .) 3 Remote control sensor 4 TV/VIDEO 5 MENU 6 VOL left/ right Volume(G) button increases the sound level and vol- PAGE 6 TV/ VIDEO 4 MENU 5 VOL 6 CH 7 2 3 Front Panel Controls ON/OFF 1 1 ON/OFF 2 Standby indicator (Illuminates brightly when the TV is switched on your remote control.
Dims when the TV is in standby mode. ume(F) button decreases the sound level. 7 CH (Channel) up / down These buttons work just as they do on .) 3 Remote control sensor 4 TV/VIDEO 5 MENU 6 VOL left/ right Volume(G) button increases the sound level and vol- PAGE 6 TV/ VIDEO 4 MENU 5 VOL 6 CH 7 2 3 Front Panel Controls ON/OFF 1 1 ON/OFF 2 Standby indicator (Illuminates brightly when the TV is switched on your remote control.
Owners Manual
Page 7
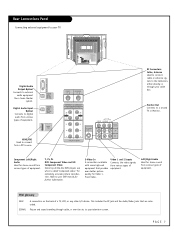
...: Cable, Antenna Used to connect cable or antenna signals to the television, either directly or through cable, or over the air, to your TV. Refer to your cable box. Left/Right Audio Used for Video 1, Front Video. This includes the RF jack and the Audio/Video jacks ... PR AUDIO VIDEO L(MONO) R MONITOR OUTPUT S-VIDEO PB INPUT IN2 Y Y DVD/DTV INPUT IN1 VARIABLE AUDIO L AUDIO R Digital Audio Output Optical Connects to a second TV or Monitor. Y, PB, PR DVD Component Video and HD Component Video Some top-of-the-line DVD players use what is called "component video," for...
...: Cable, Antenna Used to connect cable or antenna signals to the television, either directly or through cable, or over the air, to your TV. Refer to your cable box. Left/Right Audio Used for Video 1, Front Video. This includes the RF jack and the Audio/Video jacks ... PR AUDIO VIDEO L(MONO) R MONITOR OUTPUT S-VIDEO PB INPUT IN2 Y Y DVD/DTV INPUT IN1 VARIABLE AUDIO L AUDIO R Digital Audio Output Optical Connects to a second TV or Monitor. Y, PB, PR DVD Component Video and HD Component Video Some top-of-the-line DVD players use what is called "component video," for...

Owners Manual
Page 8
... page 25. Video in the Input source menu. Side Connections Panel (FRONT VIDEO) There are four jacks on the lower-right front side of your TV that provides better picture quality than video input. They will be connected to the Side connection panel (FRONT VIDEO). Connect either Video or S-Video only...
... page 25. Video in the Input source menu. Side Connections Panel (FRONT VIDEO) There are four jacks on the lower-right front side of your TV that provides better picture quality than video input. They will be connected to the Side connection panel (FRONT VIDEO). Connect either Video or S-Video only...
Owners Manual
Page 9
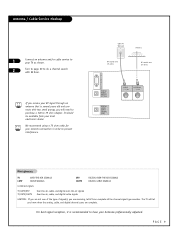
... do a channel search with two small prongs, you receive your RF signal through an antenna that is recommended to 75 ohm adapter. The TV will need to purchase a 300 to have your Antenna professionally adjusted. If you will let you are complete. For best signal reception, it... years old and connects with EZ Scan. Antenna / Cable Service Hookup 1 Connect an antenna and/or cable service to your TV as shown. 2 Turn to page 20 to prevent interference. Cable TV Wall jack Antenna RF coaxial wire (75 ohm) RF coaxial wire (75 ohm) C A L I B R A T I O N DIGITAL AUDIO OUTPUT ...
... do a channel search with two small prongs, you receive your RF signal through an antenna that is recommended to 75 ohm adapter. The TV will need to purchase a 300 to have your Antenna professionally adjusted. If you will let you are complete. For best signal reception, it... years old and connects with EZ Scan. Antenna / Cable Service Hookup 1 Connect an antenna and/or cable service to your TV as shown. 2 Turn to page 20 to prevent interference. Cable TV Wall jack Antenna RF coaxial wire (75 ohm) RF coaxial wire (75 ohm) C A L I B R A T I O N DIGITAL AUDIO OUTPUT ...

Owners Manual
Page 10
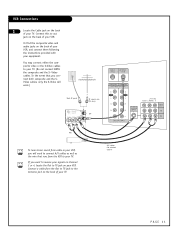
This can be combined with your equipment. Cable box Back AV panel Audio Video LR TV VCR Cable box Out In Output Switch 3 4 RF coaxial wire (75 ohm) CABLE +75 Ω ANTENNA +75 Ω COMPONENT1 ...IN2 IN1 If you may want to hook up. Or find the composite video and audio jacks on the back of your TV. Cable Box Connections 1 Locate the output jack on the back of your cable box to change channels. PAGE 10 Connect this...them following the instructions provided with any other equipment you 're using a cable box, leave the TV on channel 3 or 4 and use your cable box.
This can be combined with your equipment. Cable box Back AV panel Audio Video LR TV VCR Cable box Out In Output Switch 3 4 RF coaxial wire (75 ohm) CABLE +75 Ω ANTENNA +75 Ω COMPONENT1 ...IN2 IN1 If you may want to hook up. Or find the composite video and audio jacks on the back of your TV. Cable Box Connections 1 Locate the output jack on the back of your cable box to change channels. PAGE 10 Connect this...them following the instructions provided with any other equipment you 're using a cable box, leave the TV on channel 3 or 4 and use your cable box.
Owners Manual
Page 11
... jack on the back of your VCR, and connect them following the instructions provided with TV PAGE 11 You may connect either the composite video or the S-Video cables to TV jack on the back of your TV. If you will need to connect A/V cables as well as the wire that you connect... jack on the back of your VCR. Connect a cable from the VCR to out jack on the back of your equipment. Connect this to your TV. A/V cables not included with your TV. Or find the composite video and audio jacks on your TV. (Do not connect BOTH the composite and the S- Video cables.
... jack on the back of your VCR, and connect them following the instructions provided with TV PAGE 11 You may connect either the composite video or the S-Video cables to TV jack on the back of your TV. If you will need to connect A/V cables as well as the wire that you connect... jack on the back of your VCR. Connect a cable from the VCR to out jack on the back of your equipment. Connect this to your TV. A/V cables not included with your TV. Or find the composite video and audio jacks on your TV. (Do not connect BOTH the composite and the S- Video cables.
Owners Manual
Page 12
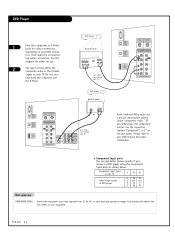
...the composite video or the S-Video cables to your equipment. DVD player Back AV panel Digital Audio Audio Component Video Optical L R A/V cables not included with TV C A L I B R A T I O N DIGITAL AUDIO OUTPUT OPTICAL DIGITAL AUDIO INPUT OPTICAL (DVI) HDMI /DVI DVD player CABLE +75 Ω...1080i) R AUDIO L R AUDIO L PR PR S-VIDEO PB PB INPUT Y Y DVD/DTV INPUT AUDIO VIDEO L(MONO) R MONITOR OUTPUT IN2 IN1 A/V cables not included with TV C A L I B R A T I O N DIGITAL AUDIO OUTPUT OPTICAL DIGITAL AUDIO INPUT OPTICAL (DVI) HDMI /DVI CABLE +75 Ω ANTENNA +75 Ω ...
...the composite video or the S-Video cables to your equipment. DVD player Back AV panel Digital Audio Audio Component Video Optical L R A/V cables not included with TV C A L I B R A T I O N DIGITAL AUDIO OUTPUT OPTICAL DIGITAL AUDIO INPUT OPTICAL (DVI) HDMI /DVI DVD player CABLE +75 Ω...1080i) R AUDIO L R AUDIO L PR PR S-VIDEO PB PB INPUT Y Y DVD/DTV INPUT AUDIO VIDEO L(MONO) R MONITOR OUTPUT IN2 IN1 A/V cables not included with TV C A L I B R A T I O N DIGITAL AUDIO OUTPUT OPTICAL DIGITAL AUDIO INPUT OPTICAL (DVI) HDMI /DVI CABLE +75 Ω ANTENNA +75 Ω ...
Owners Manual
Page 13
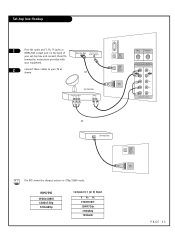
... Hookup 1 Find the audio and Y, PB, PR jacks or HDMI/DVI output port on the back of Set-top Box Digital Audio Optical Output your TV as shown.
... Hookup 1 Find the audio and Y, PB, PR jacks or HDMI/DVI output port on the back of Set-top Box Digital Audio Optical Output your TV as shown.
Owners Manual
Page 14
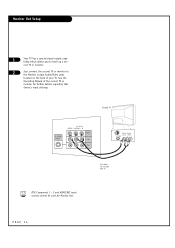
...to the Monitor output Audio/Video jacks located on the back of the second TV or monitor for Monitor Out. PAGE 14 ond TV or monitor. 2 Just connect the second TV or monitor to hook up a sec- Second TV S-VIDEO INPUT AUDIO VIDEO L(MONO) R MONITOR OUTPUT IN2 IN1 Video Audio... S-Video input input LR A/V cables not included with TV DTV, Component 1 - 2 and HDMI/DVI ...
...to the Monitor output Audio/Video jacks located on the back of the second TV or monitor for Monitor Out. PAGE 14 ond TV or monitor. 2 Just connect the second TV or monitor to hook up a sec- Second TV S-VIDEO INPUT AUDIO VIDEO L(MONO) R MONITOR OUTPUT IN2 IN1 Video Audio... S-Video input input LR A/V cables not included with TV DTV, Component 1 - 2 and HDMI/DVI ...
Owners Manual
Page 15
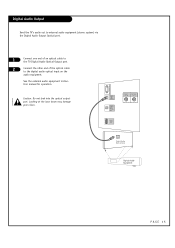
... PAGE 15 Looking at the laser beam may damage your vision. Caution: Do not look into the optical output port. Digital Audio Output Send the TV's audio out to external audio equipment (stereo system) via the Digital Audio Output Optical port. 1 Connect one end of an optical cable to the... TV Digital Audio Optical Output port. 2 Connect the other end of the optical cable to the digital audio optical input on the audio equipment. See the ...
... PAGE 15 Looking at the laser beam may damage your vision. Caution: Do not look into the optical output port. Digital Audio Output Send the TV's audio out to external audio equipment (stereo system) via the Digital Audio Output Optical port. 1 Connect one end of an optical cable to the... TV Digital Audio Optical Output port. 2 Connect the other end of the optical cable to the digital audio optical input on the audio equipment. See the ...
Owners Manual
Page 16
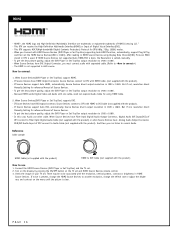
...High-Definition Multimedia Interface(HDMI) or Input of Source Devices. - Connect the HDMI Source Devices (DVD Player or Set Top Box) and the TV set . After reading in DTV is clear. When Source Devices have DVI Output Connector, Source Devices connect to DTV with HDMI to DVI Cable... until the picture is used. Reference Cable sample HDMI Cable (not supplied with the product) HDMI to normal Audio. Check the image on your TV set . 2. When Source Devices(DVD Player or Set Top Box) supports DVI. - This DTV supports HDCP(High-bandwidth Digital Contents Protection) Protocol...
...High-Definition Multimedia Interface(HDMI) or Input of Source Devices. - Connect the HDMI Source Devices (DVD Player or Set Top Box) and the TV set . After reading in DTV is clear. When Source Devices have DVI Output Connector, Source Devices connect to DTV with HDMI to DVI Cable... until the picture is used. Reference Cable sample HDMI Cable (not supplied with the product) HDMI to normal Audio. Check the image on your TV set . 2. When Source Devices(DVD Player or Set Top Box) supports DVI. - This DTV supports HDCP(High-bandwidth Digital Contents Protection) Protocol...
Owners Manual
Page 17
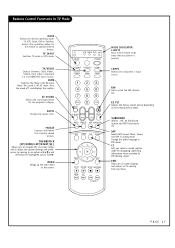
... picture. MENU Brings up the main menu to an option withF D E G and selecting the highlighted option with . TV VCR CABLE DVD SAT MODE * POWER TV INPUT TV/VIDEO COMP1 COMP2 HDMI FRONT 123 456 789 DASH(-) 0 MUTE FLASHBK FAV EZ SOUND VOL EZ PIC CH RATIO FREEZE ...Select other operating modes, for the program's category. EXIT Clears all on the viewing environment. Remote Control Functions in DTV mode. TV INPUT Switches TV mode or CATV mode. EZ SOUND Selects the sound appropriate for the remote to scroll the FAV channel list. RATIO Changes the aspect...
... picture. MENU Brings up the main menu to an option withF D E G and selecting the highlighted option with . TV VCR CABLE DVD SAT MODE * POWER TV INPUT TV/VIDEO COMP1 COMP2 HDMI FRONT 123 456 789 DASH(-) 0 MUTE FLASHBK FAV EZ SOUND VOL EZ PIC CH RATIO FREEZE ...Select other operating modes, for the program's category. EXIT Clears all on the viewing environment. Remote Control Functions in DTV mode. TV INPUT Switches TV mode or CATV mode. EZ SOUND Selects the sound appropriate for the remote to scroll the FAV channel list. RATIO Changes the aspect...
Owners Manual
Page 18
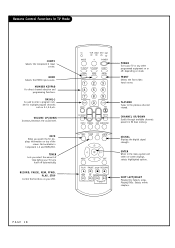
NUMBER KEYPAD For direct channel selection and programming functions. INFO When you select the amount of the screen. TV VCR CABLE DVD SAT MODE * POWER TV INPUT TV/VIDEO COMP1 COMP2 HDMI FRONT 123 456 789 DASH(-) 0 MUTE FLASHBK FAV EZ SOUND VOL EZ PIC CH RATIO FREEZE SAP SURROUND INFO TIMER CC... SIGNAL MENU EXIT PLAY PAUSE STOP RECORD REW FF SKIP POWER Turns your TV or any other on your TV turns itself off , depending on top of time before your VCR. FRONT Selects the front video input source. SIGNAL Displays the ...
NUMBER KEYPAD For direct channel selection and programming functions. INFO When you select the amount of the screen. TV VCR CABLE DVD SAT MODE * POWER TV INPUT TV/VIDEO COMP1 COMP2 HDMI FRONT 123 456 789 DASH(-) 0 MUTE FLASHBK FAV EZ SOUND VOL EZ PIC CH RATIO FREEZE SAP SURROUND INFO TIMER CC... SIGNAL MENU EXIT PLAY PAUSE STOP RECORD REW FF SKIP POWER Turns your TV or any other on your TV turns itself off , depending on top of time before your VCR. FRONT Selects the front video input source. SIGNAL Displays the ...
Owners Manual
Page 19
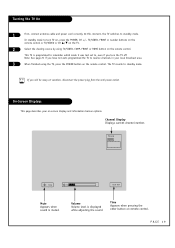
... when sound is displayed while adjusting the sound. PAGE 19 At this moment, the TV switches to standby mode. On-Screen Displays This page describes your local broadcast area. 3 When finished using TV/VIDEO, COMP, FRONT or HDMI button on the remote control. Channel Display Displays current... channel number. Time Appears when pressing the enter button on remote control. The TV reverts to standby mode. Turning the TV On 1 First, connect antenna cable and power cord correctly. This TV is programmed to remember which mode it was last set to receive channels in your on...
... when sound is displayed while adjusting the sound. PAGE 19 At this moment, the TV switches to standby mode. On-Screen Displays This page describes your local broadcast area. 3 When finished using TV/VIDEO, COMP, FRONT or HDMI button on the remote control. Channel Display Displays current... channel number. Time Appears when pressing the enter button on remote control. The TV reverts to standby mode. Turning the TV On 1 First, connect antenna cable and power cord correctly. This TV is programmed to remember which mode it was last set to receive channels in your on...
Owners Manual
Page 20
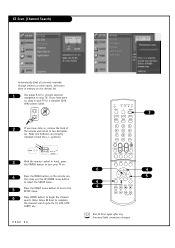
... channels available through antenna or cable inputs, and stores them in memory on the channel list. 1 Use pages 9-16 to connect external equipment to your TV on. 4 Press the MENU button on the remote control, then use the UP/DOWN arrow button to select the SETUP menu. 5 Press the RIGHT arrow... power outlet. 2 If you have done so, remove the back of remote 3 With the remote control in hand, press the POWER button to turn your TV. If you have done so, plug in two AA batter- Make sure batteries are properly installed (check the +/-
... channels available through antenna or cable inputs, and stores them in memory on the channel list. 1 Use pages 9-16 to connect external equipment to your TV on. 4 Press the MENU button on the remote control, then use the UP/DOWN arrow button to select the SETUP menu. 5 Press the RIGHT arrow... power outlet. 2 If you have done so, remove the back of remote 3 With the remote control in hand, press the POWER button to turn your TV. If you have done so, plug in two AA batter- Make sure batteries are properly installed (check the +/-
Owners Manual
Page 21
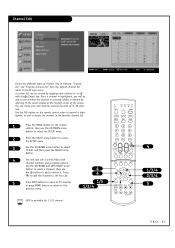
..., then use the button to add or delete it. Press FAV to add the channel to the Fav List. 5 Press EXIT button to return to TV viewing or press MENU button to return to the small window at the top-left corner of channel lists in memory: "Custom list" and "Favorite... with channel numbers and a preview picture. Use the FAV button on the remote control when a channel is available for 1-135 channel. TV VCR CABLE DVD SAT MODE * POWER TV INPUT TV/VIDEO COMP1 COMP2 HDMI FRONT 123 456 789 DASH(-) 0 MUTE FLASHBK FAV EZ SOUND VOL EZ PIC CH RATIO FREEZE SAP SURROUND...
..., then use the button to add or delete it. Press FAV to add the channel to the Fav List. 5 Press EXIT button to return to TV viewing or press MENU button to return to the small window at the top-left corner of channel lists in memory: "Custom list" and "Favorite... with channel numbers and a preview picture. Use the FAV button on the remote control when a channel is available for 1-135 channel. TV VCR CABLE DVD SAT MODE * POWER TV INPUT TV/VIDEO COMP1 COMP2 HDMI FRONT 123 456 789 DASH(-) 0 MUTE FLASHBK FAV EZ SOUND VOL EZ PIC CH RATIO FREEZE SAP SURROUND...
Owners Manual
Page 22
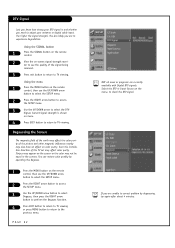
...button on the remote control. 2 View the on menu. 4 Press EXIT button to return to TV viewing. Current signal strength is and whether you are unable to correct problem by operating the Degauss.... press the RIGHT arrow button to perform the Degauss function. 4 Press EXIT button to return to TV viewing or press MENU button to return to the previous menu. PAGE 22 NOT all areas or ...purity. Degaussing the Screen The magnetic field of the earth may affect the color purity of the TV set may also have an affect on the remote control, then use the UP/DOWN arrow button...
...button on the remote control. 2 View the on menu. 4 Press EXIT button to return to TV viewing. Current signal strength is and whether you are unable to correct problem by operating the Degauss.... press the RIGHT arrow button to perform the Degauss function. 4 Press EXIT button to return to TV viewing or press MENU button to return to the previous menu. PAGE 22 NOT all areas or ...purity. Degaussing the Screen The magnetic field of the earth may affect the color purity of the TV set may also have an affect on the remote control, then use the UP/DOWN arrow button...


