
Owners Manual
Page 5
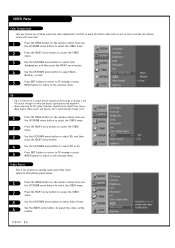
...screen 22 Input Source Selection 23 Input Label 23 VIDEO Menu EZ Picture 24 Manual Video Control 25 Color Temperature 26 XD 26 Video Preset 26 TIME Menu Auto Clock Setup 31 ...30 Note: Design and specifications are subject to change without prior notice. Miscellaneous Programming the Remote 47 Programming Codes 48-50 Maintenance 51-52 Troubleshooting 53-54 Glossary 55-56 Product Specifications...Setup 14 Digital Audio Output 15 HDMI 16 Remote Control Functions in TV Mode 17-18 Turning the TV on /off 36 OPTION Menu Aspect Ratio Control 37 Captions 38 Caption/Text 39 Caption ...
...screen 22 Input Source Selection 23 Input Label 23 VIDEO Menu EZ Picture 24 Manual Video Control 25 Color Temperature 26 XD 26 Video Preset 26 TIME Menu Auto Clock Setup 31 ...30 Note: Design and specifications are subject to change without prior notice. Miscellaneous Programming the Remote 47 Programming Codes 48-50 Maintenance 51-52 Troubleshooting 53-54 Glossary 55-56 Product Specifications...Setup 14 Digital Audio Output 15 HDMI 16 Remote Control Functions in TV Mode 17-18 Turning the TV on /off 36 OPTION Menu Aspect Ratio Control 37 Captions 38 Caption/Text 39 Caption ...
Owners Manual
Page 6
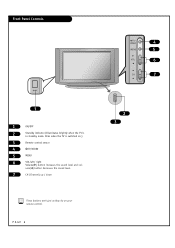
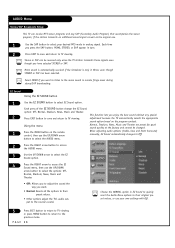
PAGE 6 TV/ VIDEO 4 MENU 5 VOL 6 CH 7 2 3 Dims when the TV is in standby mode. ume(F) button decreases the sound level. 7 CH (Channel) up / down These buttons work just as they do on .) 3 Remote control sensor 4 TV/VIDEO 5 MENU 6 VOL left/ right Volume(G) button increases the sound level and vol- Front Panel Controls ON/OFF 1 1 ON/OFF 2 Standby indicator (Illuminates brightly when the TV is switched on your remote control.
PAGE 6 TV/ VIDEO 4 MENU 5 VOL 6 CH 7 2 3 Dims when the TV is in standby mode. ume(F) button decreases the sound level. 7 CH (Channel) up / down These buttons work just as they do on .) 3 Remote control sensor 4 TV/VIDEO 5 MENU 6 VOL left/ right Volume(G) button increases the sound level and vol- Front Panel Controls ON/OFF 1 1 ON/OFF 2 Standby indicator (Illuminates brightly when the TV is switched on your remote control.
Owners Manual
Page 16
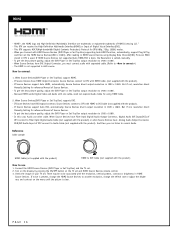
... with HDMI Source Devices (DVD Player or Set Top Box) supporting Auto HDMI function, automatically, support Plug & Play and then set and HDMI Source Devices remote control. 3. Reference Cable sample HDMI Cable (not supplied with the product) HDMI to DVI Cable (not supplied with the product) or when Source Devices have DVI...
... with HDMI Source Devices (DVD Player or Set Top Box) supporting Auto HDMI function, automatically, support Plug & Play and then set and HDMI Source Devices remote control. 3. Reference Cable sample HDMI Cable (not supplied with the product) HDMI to DVI Cable (not supplied with the product) or when Source Devices have DVI...
Owners Manual
Page 17
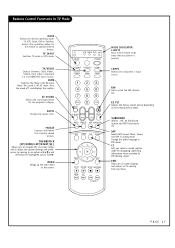
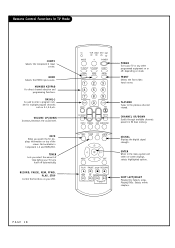
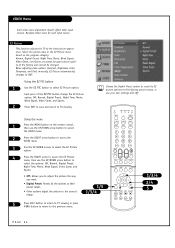
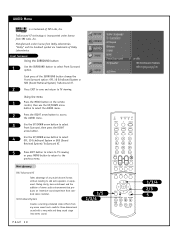
Remote Control Functions in analog mode. EZ SOUND Selects the sound appropriate for the remote to TV viewing from any button is off , and displays the caption. MENU Brings up the main menu to scroll the FAV channel list. SAP Selects MTS sound: Mono, Stereo, and SAP in TV Mode MODE Selects the remote...PIC CH RATIO FREEZE SAP SURROUND INFO TIMER CC SIGNAL MENU EXIT PLAY PAUSE STOP RECORD REW FF SKIP MODE INDICATOR LIGHTS Show active remote mode every time any menu. ences, by moving to adjust the system settings and prefer- RATIO Changes the aspect ratio. Change ...
Remote Control Functions in analog mode. EZ SOUND Selects the sound appropriate for the remote to TV viewing from any button is off , and displays the caption. MENU Brings up the main menu to scroll the FAV channel list. SAP Selects MTS sound: Mono, Stereo, and SAP in TV Mode MODE Selects the remote...PIC CH RATIO FREEZE SAP SURROUND INFO TIMER CC SIGNAL MENU EXIT PLAY PAUSE STOP RECORD REW FF SKIP MODE INDICATOR LIGHTS Show active remote mode every time any menu. ences, by moving to adjust the system settings and prefer- RATIO Changes the aspect ratio. Change ...
Owners Manual
Page 18
Remote Control Functions in EZ Scan memory. SKIP LEFT/RIGHT Playing CDs: Selects songs. HDMI Selects the HDMI input source. NUMBER KEYPAD For direct channel selection and ... level. FLASHBK Tunes to enter a program number for multiple program channels such as 2-1,2-2,etc. Playing DVDs: Selects movie chapters. RECORD, PAUSE, REW, FFWD, PLAY, STOP Control the functions on -screen displays, selects highlighted options. Not available in the menu system and other programmed equipment on or off automatically. TIMER Lets you...
Remote Control Functions in EZ Scan memory. SKIP LEFT/RIGHT Playing CDs: Selects songs. HDMI Selects the HDMI input source. NUMBER KEYPAD For direct channel selection and ... level. FLASHBK Tunes to enter a program number for multiple program channels such as 2-1,2-2,etc. Playing DVDs: Selects movie chapters. RECORD, PAUSE, REW, FFWD, PLAY, STOP Control the functions on -screen displays, selects highlighted options. Not available in the menu system and other programmed equipment on or off automatically. TIMER Lets you...
Owners Manual
Page 19
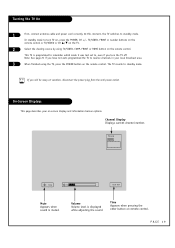
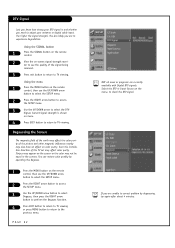
... power cord correctly. On-Screen Displays This page describes your local broadcast area. 3 When finished using TV/VIDEO, COMP, FRONT or HDMI button on the remote control. TV 2-0 MONO Mute 10 10:00 AM Mute Appears when sound is displayed while adjusting the sound. Time Appears when pressing the enter button on...Display Displays current channel number. PAGE 19 At this moment, the TV switches to standby mode. In standby mode to receive channels in your on remote control. Note: See page 21 if you turn TV on, press the POWER, CH +/-, TV/VIDEO, FRONT or number buttons on the...
... power cord correctly. On-Screen Displays This page describes your local broadcast area. 3 When finished using TV/VIDEO, COMP, FRONT or HDMI button on the remote control. TV 2-0 MONO Mute 10 10:00 AM Mute Appears when sound is displayed while adjusting the sound. Time Appears when pressing the enter button on...Display Displays current channel number. PAGE 19 At this moment, the TV switches to standby mode. In standby mode to receive channels in your on remote control. Note: See page 21 if you turn TV on, press the POWER, CH +/-, TV/VIDEO, FRONT or number buttons on the...
Owners Manual
Page 20
...check the +/- symbols). Note: Allow EZ Scan to turn your TV. ies. back of the remote and install in two AA batter- PAGE 20 TV VCR CABLE DVD SAT MODE * POWER 3 ... 1 Use pages 9-16 to connect external equipment to your TV on. 4 Press the MENU button on the remote control, then use the UP/DOWN arrow button to select the SETUP menu. 5 Press the RIGHT arrow button to ..., 60Hz power outlet. 2 If you have done so, remove the back of remote 3 With the remote control in hand, press the POWER button to complete the channel search cycle for TV, DTV, CATV, CADTV, ...
...check the +/- symbols). Note: Allow EZ Scan to turn your TV. ies. back of the remote and install in two AA batter- PAGE 20 TV VCR CABLE DVD SAT MODE * POWER 3 ... 1 Use pages 9-16 to connect external equipment to your TV on. 4 Press the MENU button on the remote control, then use the UP/DOWN arrow button to select the SETUP menu. 5 Press the RIGHT arrow button to ..., 60Hz power outlet. 2 If you have done so, remove the back of remote 3 With the remote control in hand, press the POWER button to complete the channel search cycle for TV, DTV, CATV, CADTV, ...
Owners Manual
Page 21
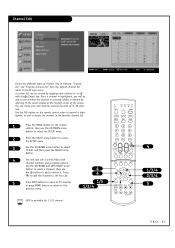
... arrow button to access the SETUP menu. 3 Use the UP/DOWN arrow button to add or delete it. Use the FAV button on the remote control when a channel is available for 1-135 channel. TV VCR CABLE DVD SAT MODE * POWER TV INPUT TV/VIDEO COMP1 COMP2 HDMI FRONT 123 ... 1/3/4 2/3/4 5 PAGE 21 Once a channel is highlighted, you will now see whether the channel is currently added or deleted by toggling each channel on the remote control, then use the button to select Ch.Edit and then press the RIGHT arrow button. 4 You will be created by referring to the previous menu...
... arrow button to access the SETUP menu. 3 Use the UP/DOWN arrow button to add or delete it. Use the FAV button on the remote control when a channel is available for 1-135 channel. TV VCR CABLE DVD SAT MODE * POWER TV INPUT TV/VIDEO COMP1 COMP2 HDMI FRONT 123 ... 1/3/4 2/3/4 5 PAGE 21 Once a channel is highlighted, you will now see whether the channel is currently added or deleted by toggling each channel on the remote control, then use the button to select Ch.Edit and then press the RIGHT arrow button. 4 You will be created by referring to the previous menu...
Owners Manual
Page 22
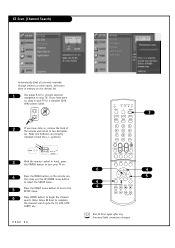
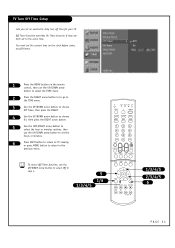
Using the SIGNAL button 1 Press the SIGNAL button on the remote control. 2 View the on the remote control, then use the UP/DOWN arrow button to select the SETUP menu. 2 Press the RIGHT arrow button to access the SETUP menu. 3 Use the UP/... you are currently available with Digital DTV signals. Current signal strength is and whether you need to adjust your DTV signal is shown on the remote control, then use the UP/DOWN arrow button to select the SETUP menu. 2 Press the RIGHT arrow button to access the SETUP menu. 3 Use the UP...
Using the SIGNAL button 1 Press the SIGNAL button on the remote control. 2 View the on the remote control, then use the UP/DOWN arrow button to select the SETUP menu. 2 Press the RIGHT arrow button to access the SETUP menu. 3 Use the UP/... you are currently available with Digital DTV signals. Current signal strength is and whether you need to adjust your DTV signal is shown on the remote control, then use the UP/DOWN arrow button to select the SETUP menu. 2 Press the RIGHT arrow button to access the SETUP menu. 3 Use the UP...
Owners Manual
Page 23
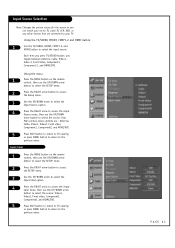
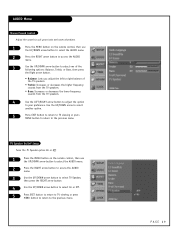
PAGE 23 Your Main picture source options are connected to your TV. Input label 1 Press the MENU button on the remote control, then use the UP/DOWN arrow button to select the SETUP menu. 2 Press the RIGHT arrow button to access the SETUP menu. 3 Use the UP/... between Antenna, Cable, Video1, Video 2, Front Video, Component1, Component 2, and HDMI/DVI. Each time you press TV/VIDEO button, you can watch your on the remote control, then use the UP/DOWN arrow button to select the SETUP menu. 2 Press the RIGHT arrow button to access the Setup menu. 3 Use the UP...
PAGE 23 Your Main picture source options are connected to your TV. Input label 1 Press the MENU button on the remote control, then use the UP/DOWN arrow button to select the SETUP menu. 2 Press the RIGHT arrow button to access the SETUP menu. 3 Use the UP/... between Antenna, Cable, Video1, Video 2, Front Video, Component1, Component 2, and HDMI/DVI. Each time you press TV/VIDEO button, you can watch your on the remote control, then use the UP/DOWN arrow button to select the SETUP menu. 2 Press the RIGHT arrow button to access the Setup menu. 3 Use the UP...
Owners Manual
Page 24
... DVD SAT Using the menu 1 Press the MENU button on the program category. Select the preset value in the EZ Picture menu based on the remote control, then use the UP/DOWN arrow button to select the VIDEO menu. 2 Press the RIGHT arrow button to access the VIDEO menu. 3 Use the UP...
... DVD SAT Using the menu 1 Press the MENU button on the program category. Select the preset value in the EZ Picture menu based on the remote control, then use the UP/DOWN arrow button to select the VIDEO menu. 2 Press the RIGHT arrow button to access the VIDEO menu. 3 Use the UP...
Owners Manual
Page 25
VIDEO Menu Manual Video Control Adjust the picture appearance to suit your preference. You can manually adjust the levels of crispness in the edges between the red and green levels. 4 ... EXIT button to return to TV viewing or press MENU button to return to your preference and viewing situations. 1 Press the MENU button on the remote control, then use the UP/DOWN arrow button to select the VIDEO menu. 2 Press the RIGHT arrow button to access the VIDEO menu. 3 Use the UP...
VIDEO Menu Manual Video Control Adjust the picture appearance to suit your preference. You can manually adjust the levels of crispness in the edges between the red and green levels. 4 ... EXIT button to return to TV viewing or press MENU button to return to your preference and viewing situations. 1 Press the MENU button on the remote control, then use the UP/DOWN arrow button to select the VIDEO menu. 2 Press the RIGHT arrow button to access the VIDEO menu. 3 Use the UP...
Owners Manual
Page 26
..., Weak Signal, Video Game, and Sports), XD is automatically change to On. 1 Press the MENU button on the remote control, then use the UP/DOWN arrow button to select the VIDEO menu. 2 Press the RIGHT arrow button to access the... to quickly reset every Video menu option to their factory preset values. 1 Press the MENU button on the remote control, then use the UP/DOWN arrow button to select the VIDEO menu. 2 Press the RIGHT arrow button to... digital signal processing algorithm. - PAGE 26 Video Preset This is LG Electronic's unique picture improving technology to the previous menu.
..., Weak Signal, Video Game, and Sports), XD is automatically change to On. 1 Press the MENU button on the remote control, then use the UP/DOWN arrow button to select the VIDEO menu. 2 Press the RIGHT arrow button to access the... to quickly reset every Video menu option to their factory preset values. 1 Press the MENU button on the remote control, then use the UP/DOWN arrow button to select the VIDEO menu. 2 Press the RIGHT arrow button to... digital signal processing algorithm. - PAGE 26 Video Preset This is LG Electronic's unique picture improving technology to the previous menu.

Owners Manual
Page 27
... sure that the volume level will be available only if a digital signal is being sent by the broadcasting station. 1 Press the MENU button on the remote control, then use the UP/DOWN arrow button to select the AUDIO menu. 2 Press the RIGHT arrow button to access the AUDIO menu. 3 Use the ... button. 4 Use the UP/DOWN arrow button to select the language you are watching a commercial or a regular TV program. 1 Press the MENU button on the remote control, then use the UP/DOWN arrow button to select the AUDIO menu. 2 Press the RIGHT arrow button to access the AUDIO menu. 3 Use the UP...
... sure that the volume level will be available only if a digital signal is being sent by the broadcasting station. 1 Press the MENU button on the remote control, then use the UP/DOWN arrow button to select the AUDIO menu. 2 Press the RIGHT arrow button to access the AUDIO menu. 3 Use the ... button. 4 Use the UP/DOWN arrow button to select the language you are watching a commercial or a regular TV program. 1 Press the MENU button on the remote control, then use the UP/DOWN arrow button to select the AUDIO menu. 2 Press the RIGHT arrow button to access the AUDIO menu. 3 Use the UP...
Owners Manual
Page 28
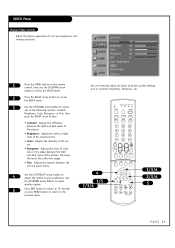
...button to return to the source's sound. EZ Sound Using the EZ SOUND button 1 Use the EZ SOUND button to the mono sound in remote fringe areas during stereo/SAP broadcasting. button to select the AUDIO menu. 2 Press the RIGHT arrow button to access the AUDIO menu. 3 Use... and any special 2 Press EXIT button to save and return to Off. adjustment because the TV automatically selects the appropriate sound option based on the remote control, then use the UP/DOWN arrow button to select the options: Off, Normal, Stadium, News, Music and Theater. • Off: Allows you...
...button to return to the source's sound. EZ Sound Using the EZ SOUND button 1 Use the EZ SOUND button to the mono sound in remote fringe areas during stereo/SAP broadcasting. button to select the AUDIO menu. 2 Press the RIGHT arrow button to access the AUDIO menu. 3 Use... and any special 2 Press EXIT button to save and return to Off. adjustment because the TV automatically selects the appropriate sound option based on the remote control, then use the UP/DOWN arrow button to select the options: Off, Normal, Stadium, News, Music and Theater. • Off: Allows you...
Owners Manual
Page 29
... to return to the previous menu. TV Speaker On/Off Setup Turns the TV Speaker option On or Off. 1 Press the MENU button on the remote control, then use the UP/DOWN arrow button to select the AUDIO menu. 2 Press the RIGHT arrow button to access the AUDIO menu. 3 Use the UP... the TV speakers. 4 Use the LEFT/RIGHT arrow button to adjust the option to your taste and room situations. 1 Press the MENU button on the remote control, then use the UP/DOWN arrow button to select the AUDIO menu. 2 Press the RIGHT arrow button to access the AUDIO menu. 3 Use the UP...
... to return to the previous menu. TV Speaker On/Off Setup Turns the TV Speaker option On or Off. 1 Press the MENU button on the remote control, then use the UP/DOWN arrow button to select the AUDIO menu. 2 Press the RIGHT arrow button to access the AUDIO menu. 3 Use the UP... the TV speakers. 4 Use the LEFT/RIGHT arrow button to adjust the option to your taste and room situations. 1 Press the MENU button on the remote control, then use the UP/DOWN arrow button to select the AUDIO menu. 2 Press the RIGHT arrow button to access the AUDIO menu. 3 Use the UP...
Owners Manual
Page 30
... FREEZE SAP SURROUND INFO TIMER CC SIGNAL MENU EXIT PLAY PAUSE STOP RECORD REW FF SKIP 1/3/4 2/3 5 Using the menu 1 Press the MENU button on the remote control, then use the UP/DOWN arrow button to select the AUDIO menu. 2 Press the RIGHT arrow button to access the AUDIO menu. 3 Use the UP...
... FREEZE SAP SURROUND INFO TIMER CC SIGNAL MENU EXIT PLAY PAUSE STOP RECORD REW FF SKIP 1/3/4 2/3 5 Using the menu 1 Press the MENU button on the remote control, then use the UP/DOWN arrow button to select the AUDIO menu. 2 Press the RIGHT arrow button to access the AUDIO menu. 3 Use the UP...
Owners Manual
Page 31
...(-) 0 MUTE FLASHBK FAV EZ SOUND VOL EZ PIC CH RATIO FREEZE SAP SURROUND INFO TIMER CC SIGNAL • Select Auto, Off, On, depending on the remote control, then use the UP/DOWN arrow button to select the TIME menu option. 2 Press the RIGHT arrow button to go to the TIME menu. 3 Use...
...(-) 0 MUTE FLASHBK FAV EZ SOUND VOL EZ PIC CH RATIO FREEZE SAP SURROUND INFO TIMER CC SIGNAL • Select Auto, Off, On, depending on the remote control, then use the UP/DOWN arrow button to select the TIME menu option. 2 Press the RIGHT arrow button to go to the TIME menu. 3 Use...
Owners Manual
Page 32
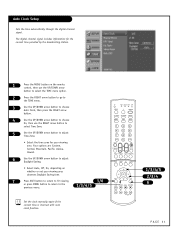
... Clock Setup If current time setting is erased by a power failure or if TV is unplugged, reset the clock. 1 Press the MENU button on the remote control, then use the UP/DOWN arrow button to set the year, date or time option. 5 Press EXIT button to return to TV viewing or press...
... Clock Setup If current time setting is erased by a power failure or if TV is unplugged, reset the clock. 1 Press the MENU button on the remote control, then use the UP/DOWN arrow button to set the year, date or time option. 5 Press EXIT button to return to TV viewing or press...
Owners Manual
Page 33
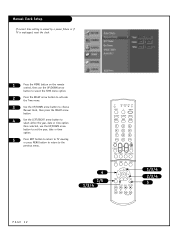
... the previous menu. Off Timer function overrides On Timer function if they are both set the current time on the clock before using on the remote control, then use the UP/DOWN arrow button to select the TIME menu. 2 Press the RIGHT arrow button to to go to the TIME menu. 3 Use...
... the previous menu. Off Timer function overrides On Timer function if they are both set the current time on the clock before using on the remote control, then use the UP/DOWN arrow button to select the TIME menu. 2 Press the RIGHT arrow button to to go to the TIME menu. 3 Use...


