
Owners Manual
Page 5
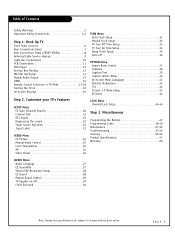
... Front Panel Controls 6 Rear Connections Panel 7 Side Connections Panel (FRONT VIDEO 8 Antenna/Cable Service Hookup 9 Cable Box Connections 10 VCR Connections 11 DVD Player 12 Set-top Box Hookup 13 Monitor Out Setup 14 Digital Audio Output 15 HDMI 16 Remote Control Functions in TV Mode 17-18 Turning the TV...
... Front Panel Controls 6 Rear Connections Panel 7 Side Connections Panel (FRONT VIDEO 8 Antenna/Cable Service Hookup 9 Cable Box Connections 10 VCR Connections 11 DVD Player 12 Set-top Box Hookup 13 Monitor Out Setup 14 Digital Audio Output 15 HDMI 16 Remote Control Functions in TV Mode 17-18 Turning the TV...
Owners Manual
Page 12
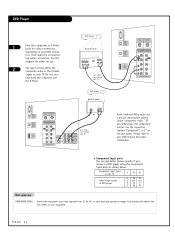
.... Component input jacks on your DVD connec- tors. nect both the composite and the S-Video. DVD Player 1 Find the component or S-Video jacks for either set up. 2 You may connect either the composite video or the S-Video cables to your TV. Please refer to your equipment. Your manual will explain how...
.... Component input jacks on your DVD connec- tors. nect both the composite and the S-Video. DVD Player 1 Find the component or S-Video jacks for either set up. 2 You may connect either the composite video or the S-Video cables to your TV. Please refer to your equipment. Your manual will explain how...
Owners Manual
Page 13
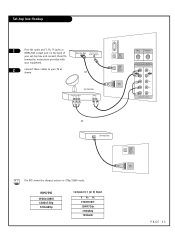
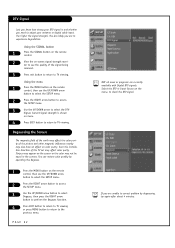
...; ANTENNA +75 Ω COMPONENT1 COMPONENT2 (480i/480p/720p/1080i) R AUDIO L R AUDIO L PR PR PB PB Y Y DVD/DTV INPUT or Set-top Box The DTV shows the sharpest picture in 720p/1080i mode. Set-top box Hookup 1 Find the audio and Y, PB, PR jacks or HDMI/DVI output port on the back of... Set-top Box Digital Audio Optical Output your TV as shown. HDMI/DVI 1920x1080i 1280x720p 720x480p Component 1 (or 2) Input Y PB PR 1920X1080i 1280X720p 720X480p 720X480i DIGITAL ...
...; ANTENNA +75 Ω COMPONENT1 COMPONENT2 (480i/480p/720p/1080i) R AUDIO L R AUDIO L PR PR PB PB Y Y DVD/DTV INPUT or Set-top Box The DTV shows the sharpest picture in 720p/1080i mode. Set-top box Hookup 1 Find the audio and Y, PB, PR jacks or HDMI/DVI output port on the back of... Set-top Box Digital Audio Optical Output your TV as shown. HDMI/DVI 1920x1080i 1280x720p 720x480p Component 1 (or 2) Input Y PB PR 1920X1080i 1280X720p 720X480p 720X480i DIGITAL ...
Owners Manual
Page 14
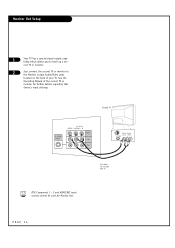
... input input LR A/V cables not included with TV DTV, Component 1 - 2 and HDMI/DVI input sources cannot be used for further details regarding that device's input settings.
... input input LR A/V cables not included with TV DTV, Component 1 - 2 and HDMI/DVI input sources cannot be used for further details regarding that device's input settings.
Owners Manual
Page 16
...). - Reference Cable sample HDMI Cable (not supplied with the product) HDMI to use other cable. Check the image on your TV set . 2. If Source Devices support Auto HDMI, automatically, Source Devices divert output resolution in 480i source. When Source Devices have Fiber Optic...product). - And then you must connect audio with the resolution, vertical pattern, contrast or brightness in DTV is clear. The HDMI is setted, manually. - If Source Devices support Auto DVI, automatically, Source Devices divert output resolution in HDMI Source Devices using HDMI Cable. 2. When...
...). - Reference Cable sample HDMI Cable (not supplied with the product) HDMI to use other cable. Check the image on your TV set . 2. If Source Devices support Auto HDMI, automatically, Source Devices divert output resolution in 480i source. When Source Devices have Fiber Optic...product). - And then you must connect audio with the resolution, vertical pattern, contrast or brightness in DTV is clear. The HDMI is setted, manually. - If Source Devices support Auto DVI, automatically, Source Devices divert output resolution in HDMI Source Devices using HDMI Cable. 2. When...
Owners Manual
Page 17
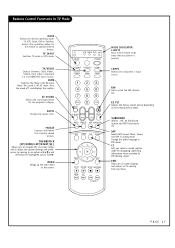
... button is off , and displays the caption. FREEZE Captures and freezes the currently-viewed picture. MENU Brings up the main menu to adjust the system settings and prefer- EXIT Clears all on the viewing environment. THUMBSTICK (UP/DOWN/LEFT/RIGHT/ ) Allows you select a closed caption mode for displaying captioning information when...
... button is off , and displays the caption. FREEZE Captures and freezes the currently-viewed picture. MENU Brings up the main menu to adjust the system settings and prefer- EXIT Clears all on the viewing environment. THUMBSTICK (UP/DOWN/LEFT/RIGHT/ ) Allows you select a closed caption mode for displaying captioning information when...
Owners Manual
Page 19
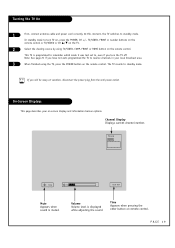
... 10 10:00 AM Mute Appears when sound is displayed while adjusting the sound. This TV is programmed to remember which mode it was last set to turn the TV off. Volume Volume level is muted. PAGE 19 Turning the TV On 1 First, connect antenna cable and power cord correctly...
... 10 10:00 AM Mute Appears when sound is displayed while adjusting the sound. This TV is programmed to remember which mode it was last set to turn the TV off. Volume Volume level is muted. PAGE 19 Turning the TV On 1 First, connect antenna cable and power cord correctly...
Owners Manual
Page 22
.... 3 Press exit button to return to TV viewing. Degaussing the Screen The magnetic field of the earth may affect the color purity of the TV set may also have an affect on color purity. The higher the signal strength, the less likely you are unable to correct problem by operating the...
.... 3 Press exit button to return to TV viewing. Degaussing the Screen The magnetic field of the earth may affect the color purity of the TV set may also have an affect on color purity. The higher the signal strength, the less likely you are unable to correct problem by operating the...
Owners Manual
Page 24
.... 3 Use the UP/DOWN arrows to select the EZ Picture option. 4 Press the RIGHT arrow to access the EZ Picture menu, then use your own settings with Off. 2 Press EXIT to save and return to the previous menu. Choose the Digital Preset option to reset the EZ picture options to their...
.... 3 Use the UP/DOWN arrows to select the EZ Picture option. 4 Press the RIGHT arrow to access the EZ Picture menu, then use your own settings with Off. 2 Press EXIT to save and return to the previous menu. Choose the Digital Preset option to reset the EZ picture options to their...
Owners Manual
Page 25
... suit your preference. The lower the level, the softer the image. • Tint: Adjusts the balance between the light and dark areas of picture quality settings, such as Contrast, Brightness, Sharpness, etc. 4 1/5 1/3/4 TV VCR CABLE DVD SAT MODE * POWER TV INPUT TV/VIDEO COMP1 COMP2 HDMI FRONT 123 456 789 DASH...
... suit your preference. The lower the level, the softer the image. • Tint: Adjusts the balance between the light and dark areas of picture quality settings, such as Contrast, Brightness, Sharpness, etc. 4 1/5 1/3/4 TV VCR CABLE DVD SAT MODE * POWER TV INPUT TV/VIDEO COMP1 COMP2 HDMI FRONT 123 456 789 DASH...
Owners Manual
Page 26
... button to return to TV viewing or press MENU button to return to preset the video configuration. XD - PAGE 26 Video Preset This is LG Electronic's unique picture improving technology to the previous menu. VIDEO Menu Color Temperature Lets you choose one of three automatic color adjustments. XD is .... 3 Use the UP/DOWN arrow button to select Video Preset. 4 Use the RIGHT arrow button to the previous menu. Set this to warm for hotter colors such as red, or set to cool for less intense colors with more blue. 1 Press the MENU button on the remote control, then use the...
... button to return to TV viewing or press MENU button to return to preset the video configuration. XD - PAGE 26 Video Preset This is LG Electronic's unique picture improving technology to the previous menu. VIDEO Menu Color Temperature Lets you choose one of three automatic color adjustments. XD is .... 3 Use the UP/DOWN arrow button to select Video Preset. 4 Use the RIGHT arrow button to the previous menu. Set this to warm for hotter colors such as red, or set to cool for less intense colors with more blue. 1 Press the MENU button on the remote control, then use the...
Owners Manual
Page 28
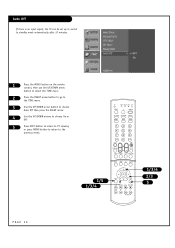
... the source's sound. if the station transmits an additional sound signal as well as the original one. 1 Use the SAP button to select your own settings with Off. 5 Press EXIT button to return to TV viewing or press MENU button to return to TV viewing. Stereo or SAP can receive MTS...
... the source's sound. if the station transmits an additional sound signal as well as the original one. 1 Use the SAP button to select your own settings with Off. 5 Press EXIT button to return to TV viewing or press MENU button to return to TV viewing. Stereo or SAP can receive MTS...
Owners Manual
Page 31
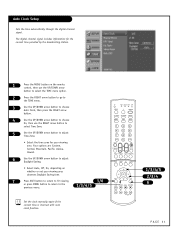
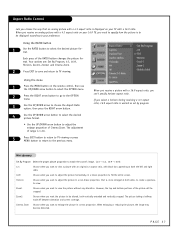
...: Eastern, Central, Mountain, Pacific, Alaska, Hawaii. 6 Use the UP/DOWN arrow button to the previous menu. 1/3/4/5 MENU EXIT PLAY PAUSE STOP RECORD REW FF SKIP Set the clock manually again if the current time is incorrect with auto clock function. 1/3/4/5 2/3/4 6 PAGE 31 TV VCR CABLE DVD SAT MODE * POWER TV INPUT... includes information for the current time provided by the broadcasting station. 1 Press the MENU button on whether or not your viewing area. Auto Clock Setup Sets the time automatically through the digital channel signal.
...: Eastern, Central, Mountain, Pacific, Alaska, Hawaii. 6 Use the UP/DOWN arrow button to the previous menu. 1/3/4/5 MENU EXIT PLAY PAUSE STOP RECORD REW FF SKIP Set the clock manually again if the current time is incorrect with auto clock function. 1/3/4/5 2/3/4 6 PAGE 31 TV VCR CABLE DVD SAT MODE * POWER TV INPUT... includes information for the current time provided by the broadcasting station. 1 Press the MENU button on whether or not your viewing area. Auto Clock Setup Sets the time automatically through the digital channel signal.
Owners Manual
Page 32
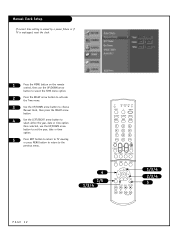
... RATIO FREEZE SAP SURROUND INFO TIMER CC SIGNAL MENU EXIT PLAY PAUSE STOP RECORD REW FF SKIP 1/3/4 2/3/4 5 PAGE 32 Manual Clock Setup If current time setting is erased by a power failure or if TV is unplugged, reset the clock. 1 Press the MENU button on the remote control, then use the UP.../DOWN arrow button to set the year, date or time option. 5 Press EXIT button to return to TV viewing or press MENU button to return to select either the year...
... RATIO FREEZE SAP SURROUND INFO TIMER CC SIGNAL MENU EXIT PLAY PAUSE STOP RECORD REW FF SKIP 1/3/4 2/3/4 5 PAGE 32 Manual Clock Setup If current time setting is erased by a power failure or if TV is unplugged, reset the clock. 1 Press the MENU button on the remote control, then use the UP.../DOWN arrow button to set the year, date or time option. 5 Press EXIT button to return to TV viewing or press MENU button to return to select either the year...

Owners Manual
Page 33
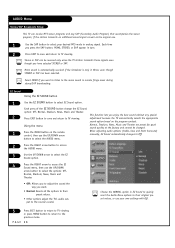
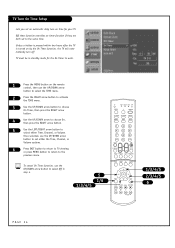
Off Timer function overrides On Timer function if they are both set to select Off in step 4. 5 1/6 1/3/4/5 INFO TIMER CC SIGNAL MENU EXIT PLAY PAUSE STOP RECORD REW...To cancel Off Timer function, use the UP/DOWN arrow button to set an automatic daily turn off time for your TV. TV Turn Off Time Setup Lets you set the hours or minutes. 6 Press EXIT button to return to ...TV viewing or press MENU button to return to the previous menu. You must set the current time on the clock before using on/off timers. 1 Press the MENU button on the remote control...
Off Timer function overrides On Timer function if they are both set to select Off in step 4. 5 1/6 1/3/4/5 INFO TIMER CC SIGNAL MENU EXIT PLAY PAUSE STOP RECORD REW...To cancel Off Timer function, use the UP/DOWN arrow button to set an automatic daily turn off time for your TV. TV Turn Off Time Setup Lets you set the hours or minutes. 6 Press EXIT button to return to ...TV viewing or press MENU button to return to the previous menu. You must set the current time on the clock before using on/off timers. 1 Press the MENU button on the remote control...
Owners Manual
Page 34
... the same time. To cancel On Timer function, use the UP/DOWN arrow button to set either Time, Channel, or Volume. TV must be in step 4. 5 1/6 1/3/4/5 TV VCR CABLE DVD SAT MODE * POWER TV INPUT TV/VIDEO COMP1 COMP2 HDMI FRONT ... function, the TV will automatically turn on time for the On Timer to work. 1 Press the MENU button on timer function if they are both set an automatic daily turn off. Off timer function overrides on the remote control, then use the UP/DOWN arrow button to select Off in standby...
... the same time. To cancel On Timer function, use the UP/DOWN arrow button to set either Time, Channel, or Volume. TV must be in step 4. 5 1/6 1/3/4/5 TV VCR CABLE DVD SAT MODE * POWER TV INPUT TV/VIDEO COMP1 COMP2 HDMI FRONT ... function, the TV will automatically turn on time for the On Timer to work. 1 Press the MENU button on timer function if they are both set an automatic daily turn off. Off timer function overrides on the remote control, then use the UP/DOWN arrow button to select Off in standby...
Owners Manual
Page 35
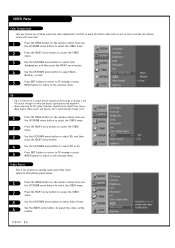
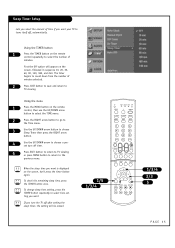
... sequence 10, 20, 30, 60, 90, 120, 180, and 240. To change sleep time setting, press the TIMER button repeatedly to select time setting you want . When the sleep time you turn off after setting the sleep timer, the setting will appear on the screen, don't press the timer button again. Using the TIMER...
... sequence 10, 20, 30, 60, 90, 120, 180, and 240. To change sleep time setting, press the TIMER button repeatedly to select time setting you want . When the sleep time you turn off after setting the sleep timer, the setting will appear on the screen, don't press the timer button again. Using the TIMER...
Owners Manual
Page 36
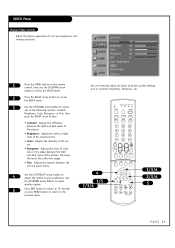
Auto Off If there is no input signal, the TV can be set up to switch to standby mode automatically after 10 minutes. 1 Press the MENU button on the remote control, then use the UP/DOWN arrow button ...
Auto Off If there is no input signal, the TV can be set up to switch to standby mode automatically after 10 minutes. 1 Press the MENU button on the remote control, then use the UP/DOWN arrow button ...
Owners Manual
Page 37
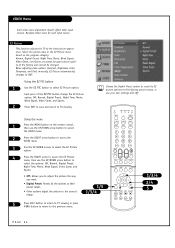
...a picture with a 16:9 ratio. Aspect Ratio Control Lets you choose the way that is, more enlarged at both sides, to be cropped. Mini glossary Set By Program Select the proper picture proportion to match the source's image. (4:3 → 4:3, 16:9 → 16:9) 4:3 Choose when you want to ...appearing at both the left and right sides. 16:9 Choose when you want to adjust the picture horizontally, in correct proportion. Your options are: Set By Program, 4:3, 16:9, Horizon, Zoom1, Zoom2, and Cinema Zoom. 2 Press EXIT to save and return to select the desired picture format...
...a picture with a 16:9 ratio. Aspect Ratio Control Lets you choose the way that is, more enlarged at both sides, to be cropped. Mini glossary Set By Program Select the proper picture proportion to match the source's image. (4:3 → 4:3, 16:9 → 16:9) 4:3 Choose when you want to ...appearing at both the left and right sides. 16:9 Choose when you want to adjust the picture horizontally, in correct proportion. Your options are: Set By Program, 4:3, 16:9, Horizon, Zoom1, Zoom2, and Cinema Zoom. 2 Press EXIT to save and return to select the desired picture format...

Owners Manual
Page 38
... the broadcaster. 1/5 1/3/4 MENU EXIT PLAY PAUSE STOP RECORD REW FF SKIP 1/3/4 2/3 5 PAGE 38 This TV is programmed to remember the caption mode it was last set to the previous menu. TV VCR CABLE DVD SAT MODE * POWER TV INPUT TV/VIDEO COMP1 COMP2 HDMI FRONT 123 456 789 DASH(-) 0 MUTE FLASHBK...
... the broadcaster. 1/5 1/3/4 MENU EXIT PLAY PAUSE STOP RECORD REW FF SKIP 1/3/4 2/3 5 PAGE 38 This TV is programmed to remember the caption mode it was last set to the previous menu. TV VCR CABLE DVD SAT MODE * POWER TV INPUT TV/VIDEO COMP1 COMP2 HDMI FRONT 123 456 789 DASH(-) 0 MUTE FLASHBK...

