

Owner's Manual
Page 3
CONTENTS Description of controls 4 ~ 6 Basic TV operation ...7 Turning on/off the TV ...7 Selecting the on screen language 7 Memorizing Channels ...8 Memorizing the Channels by AUTO PROGRAM 8 Memorizing the Channels by MANUAL PROGRAM 9 Selecting the Channel 9 Adjusting the Volume ...9 ...
CONTENTS Description of controls 4 ~ 6 Basic TV operation ...7 Turning on/off the TV ...7 Selecting the on screen language 7 Memorizing Channels ...8 Memorizing the Channels by AUTO PROGRAM 8 Memorizing the Channels by MANUAL PROGRAM 9 Selecting the Channel 9 Adjusting the Volume ...9 ...
Owner's Manual
Page 4
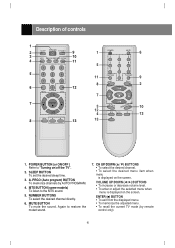
... ENTER (A) BUTTON • To exit from the displayed menu. • To memorize the adjusted menu. • To recall the current TV mode (by AUTO PROGRAM. 4. SLEEP BUTTON To set the desired sleep time. 3. MTS BUTTON (some models) To listen to "Turning on/off the... the screen. NUMBER BUTTONS To select the desired channel directly. 6. POWER BUTTON (or ON/OFF ) Refer to the MTS sound. 5. Description of controls 1 2 SLEEP POWER TV/VIDEO 9 3 10 MTS A.PROG MEMORY/ERASE CAPTION 4 11 1 2 3 5 4 5 6 7 8 9 6 0 12 MUTE FCR CH 7 VOL ENTER VOL CH MENU 8 13 POWER...
... ENTER (A) BUTTON • To exit from the displayed menu. • To memorize the adjusted menu. • To recall the current TV mode (by AUTO PROGRAM. 4. SLEEP BUTTON To set the desired sleep time. 3. MTS BUTTON (some models) To listen to "Turning on/off the... the screen. NUMBER BUTTONS To select the desired channel directly. 6. POWER BUTTON (or ON/OFF ) Refer to the MTS sound. 5. Description of controls 1 2 SLEEP POWER TV/VIDEO 9 3 10 MTS A.PROG MEMORY/ERASE CAPTION 4 11 1 2 3 5 4 5 6 7 8 9 6 0 12 MUTE FCR CH 7 VOL ENTER VOL CH MENU 8 13 POWER...
Owner's Manual
Page 5
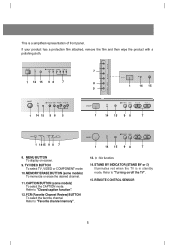
... to "Favorite channel memory". 13. : No function. 14. REMOTE CONTROL SENSOR 5 STAND BY INDICATOR (STAND BY or r) Illuminates red when the TV is a simplified representation of front panel. If your product has a protection film attached, remove the film and then wipe the product with a polishing cloth.... TV/VIDEO BUTTON To select TV, VIDEO or COMPONENT mode. 10. CAPTION BUTTON (some models) To memorize or erase the desired channel. 11. FCR (Favorite Channel Review...
... to "Favorite channel memory". 13. : No function. 14. REMOTE CONTROL SENSOR 5 STAND BY INDICATOR (STAND BY or r) Illuminates red when the TV is a simplified representation of front panel. If your product has a protection film attached, remove the film and then wipe the product with a polishing cloth.... TV/VIDEO BUTTON To select TV, VIDEO or COMPONENT mode. 10. CAPTION BUTTON (some models) To memorize or erase the desired channel. 11. FCR (Favorite Channel Review...
Owner's Manual
Page 7
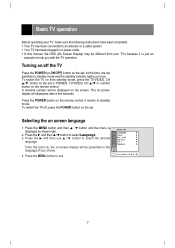
... in the language of your choice. 4. From this point on, the on the remote control. To switch the TV on from your TV's because it is displayed as shown right. 2. To switch the TV off the TV Press the POWER (or ON/OFF) button on the remote control. Press the G and then use D / E ... in a power outlet. • In this manual, the OSD (On Screen Display) may be different from standby mode, press the TV/VIDEO, CH D/E button on the set or POWER, TV/VIDEO, CH D/E or number button on -screen display will be displayed on the set. Turning on/off , press the POWER button...
... in the language of your choice. 4. From this point on, the on the remote control. To switch the TV on from your TV's because it is displayed as shown right. 2. To switch the TV off the TV Press the POWER (or ON/OFF) button on the remote control. Press the G and then use D / E ... in a power outlet. • In this manual, the OSD (On Screen Display) may be different from standby mode, press the TV/VIDEO, CH D/E button on the set or POWER, TV/VIDEO, CH D/E or number button on -screen display will be displayed on the set. Turning on/off , press the POWER button...
Owner's Manual
Page 8
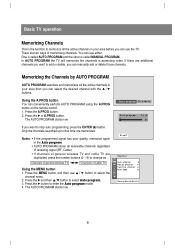
...of receiving signal (RF, Cable). • If channels of general wireless TV and cable TV are two ways of Cable TV Using the MENU button 1. Press the MENU button and then use either. Basic TV operation Memorizing Channels This is called AUTO PROGRAM and the other is the function... to select Auto program. 3. One is called MANUAL PROGRAM. Channels of general wireless TV Channels of memorizing channels. There are duplicated, press the number buttons (0 ~ 9) to select the channel menu. 2. Using the A.PROG button ...
...of receiving signal (RF, Cable). • If channels of general wireless TV and cable TV are two ways of Cable TV Using the MENU button 1. Press the MENU button and then use either. Basic TV operation Memorizing Channels This is called AUTO PROGRAM and the other is the function... to select Auto program. 3. One is called MANUAL PROGRAM. Channels of general wireless TV Channels of memorizing channels. There are duplicated, press the number buttons (0 ~ 9) to select the channel menu. 2. Using the A.PROG button ...
Owner's Manual
Page 10
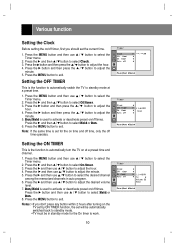
...3. Timer CH. Press the G and then use D / E button to select the Timer menu. 2. Run/Hold is the function to automatically turn the TV on time and off time, only the off timer, first you should set the current time. 1. Press the MENU button and then use D / E...Clock OOffff__ttiimmeerr On+_timer Auto+_off+ { {{ _1_1:40+PAMM { 0Hold { Move++Next+{+Back} Note: If the same time is the function to automatically switch the TV to standby mode at a preset time and channel. 1. Clock Off_timer OOnn_+_ttiimmeerr Auto+_off+ { { {{ 1_1_:40+PAMM { TV0000006 Volume030 Hold Move++Next+{+Back}...
...3. Timer CH. Press the G and then use D / E button to select the Timer menu. 2. Run/Hold is the function to automatically turn the TV on time and off time, only the off timer, first you should set the current time. 1. Press the MENU button and then use D / E...Clock OOffff__ttiimmeerr On+_timer Auto+_off+ { {{ _1_1:40+PAMM { 0Hold { Move++Next+{+Back} Note: If the same time is the function to automatically switch the TV to standby mode at a preset time and channel. 1. Clock Off_timer OOnn_+_ttiimmeerr Auto+_off+ { { {{ 1_1_:40+PAMM { TV0000006 Volume030 Hold Move++Next+{+Back}...
Owner's Manual
Page 11
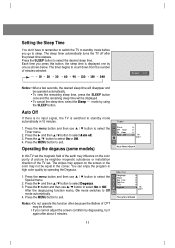
... mode before you cannot adjust the screen condition by degaussing, try it again after the preset time elapses. The sleep timer automatically turns the TV off . 3. Press the SLEEP button to select Degauss. 3. Timer 1. CH. The stripes may appear on the screen or the color ...may influence on the color purity of the TV set. Language Input Special menu. Key+lock 2. Press the G and then D/ E button to select the desired sleep time. Press the G button and ...
... mode before you cannot adjust the screen condition by degaussing, try it again after the preset time elapses. The sleep timer automatically turns the TV off . 3. Press the SLEEP button to select Degauss. 3. Timer 1. CH. The stripes may appear on the screen or the color ...may influence on the color purity of the TV set. Language Input Special menu. Key+lock 2. Press the G and then D/ E button to select the desired sleep time. Press the G button and ...
Owner's Manual
Page 12
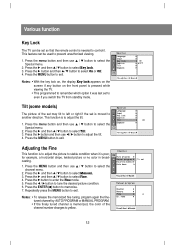
... to control it is memorized, the color of the set may tilt to left or right if the set to even if you switch the TV from standby mode. Press the G and then D/ E button to select Key lock. Move++Next+{+Back} 4. Press the ENTER (A) button to select Fine. 4. ...exit. Tilt (some models) Special CH. Press the MENU button to select Manual.. 3. Press the G and then D/ E button to exit. Various function Key Lock The TV can be set 0 12 Caption+ Tilt+ Degauss 3. Key+lock Caption+ Tilt+ 1. Press the G button and then use D / E button to adjust the tilt. Adjusting...
... to control it is memorized, the color of the set may tilt to left or right if the set to even if you switch the TV from standby mode. Press the G and then D/ E button to select Key lock. Move++Next+{+Back} 4. Press the ENTER (A) button to select Fine. 4. ...exit. Tilt (some models) Special CH. Press the MENU button to select Manual.. 3. Press the G and then D/ E button to exit. Various function Key Lock The TV can be set 0 12 Caption+ Tilt+ Degauss 3. Key+lock Caption+ Tilt+ 1. Press the G button and then use D / E button to adjust the tilt. Adjusting...

Owner's Manual
Page 13
...refer to enter the game mode. Press the G button and then use D / E button to select the Channel menu. 2. Eight channels programmed appear on the TV set . 1. CH. Degauss GGaammee { {{ To+start a game. Use the F / G button to select a favorite channel position. 4. Press the MENU ... demonstration reaches the last display, it starts again from the beginning. To stop auto demonstration, press any button. Game (some models) You can enjoy the TV game with this set . 1. Language { Input { 2. Key+lock { Caption+ { Tilt+ { 4. Press the D /E button to return the game ...
...refer to enter the game mode. Press the G button and then use D / E button to select the Channel menu. 2. Eight channels programmed appear on the TV set . 1. CH. Degauss GGaammee { {{ To+start a game. Use the F / G button to select a favorite channel position. 4. Press the MENU ... demonstration reaches the last display, it starts again from the beginning. To stop auto demonstration, press any button. Game (some models) You can enjoy the TV game with this set . 1. Language { Input { 2. Key+lock { Caption+ { Tilt+ { 4. Press the D /E button to return the game ...
Owner's Manual
Page 16
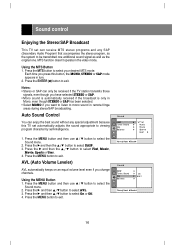
... Off. 4. Using the MENU Button 1. Press the G and then D/ E button to select Flat, Music, Movie, Sports or User. 4. Each time you press this TV set can receive MTS stereo programs and any special adjustment because this button, the MONO, STEREO or SAP mode appears in the video mode. Sound...AVL. 3. Notes: • Stereo or SAP can only be transmitted one additional sound signal as well as the system to be received if the TV station transmits those signals, even though you have selected STEREO or SAP. • Mono sound is automatically received if the broadcast is only in ...
... Off. 4. Using the MENU Button 1. Press the G and then D/ E button to select Flat, Music, Movie, Sports or User. 4. Each time you press this TV set can receive MTS stereo programs and any special adjustment because this button, the MONO, STEREO or SAP mode appears in the video mode. Sound...AVL. 3. Notes: • Stereo or SAP can only be transmitted one additional sound signal as well as the system to be received if the TV station transmits those signals, even though you have selected STEREO or SAP. • Mono sound is automatically received if the broadcast is only in ...
Owner's Manual
Page 17
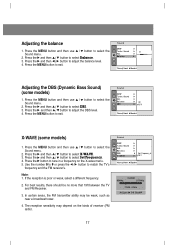
... DBS level. 4. Sound CH. If the reception is poor or weak, select a different frequency. 2. The reception sensitivity may be no more that 19ft between the TV and FM Receiver. 3. Press the MENU button and then use D / E button to select the Sound menu. 2. DASP ++{ Turbo+Sound AVL { 050 {\ Balance { Move++Next+{+Back... the F / G button to tune in a frequency on the kinds of receiver (FM radio). 17 Adjusting the balance 1. Sound CH. Press the G button to match the TV's frequency and the FM receiver's. Press the G and then D/ E button to select the Sound menu. 2.
... DBS level. 4. Sound CH. If the reception is poor or weak, select a different frequency. 2. The reception sensitivity may be no more that 19ft between the TV and FM Receiver. 3. Press the MENU button and then use D / E button to select the Sound menu. 2. DASP ++{ Turbo+Sound AVL { 050 {\ Balance { Move++Next+{+Back... the F / G button to tune in a frequency on the kinds of receiver (FM radio). 17 Adjusting the balance 1. Sound CH. Press the G button to match the TV's frequency and the FM receiver's. Press the G and then D/ E button to select the Sound menu. 2.
Owner's Manual
Page 19
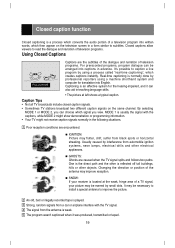
...signal you view. Usually caused by small dots. A GHOSTS: Ghosts are caused when the TV signal splits and follows two paths. Real-time captioning is usually the signal with the TV signal. 4 The signal from black spots or horizontal streaking. It may improve reception. Changing... for the hearing-impaired, and it was produced, transmitted or taped. 19 Caption Tips • Not all TV broadcasts include closed caption signals. • Sometimes TV stations broadcast two different caption signals on the television screen in advance. Closed caption function Closed captioning is a ...
...signal you view. Usually caused by small dots. A GHOSTS: Ghosts are caused when the TV signal splits and follows two paths. Real-time captioning is usually the signal with the TV signal. 4 The signal from black spots or horizontal streaking. It may improve reception. Changing... for the hearing-impaired, and it was produced, transmitted or taped. 19 Caption Tips • Not all TV broadcasts include closed caption signals. • Sometimes TV stations broadcast two different caption signals on the television screen in advance. Closed caption function Closed captioning is a ...
Owner's Manual
Page 20
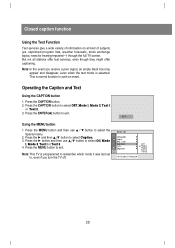
...+ Tilt+ Degauss { { { { +++Off { +++Mode1 { +++Mode2 +++Text1 +++Text2 Move++Next+{+Back} 20 Note: In the event you turn the TV off. SSOff Using the MENU button 1. Note: This TV is programmed to remember which mode it was last set to, even if you receive a poor signal, an empty black box... the CAPTION button 1. Press the CAPTION button. 2. captioned program lists, weather forecasts, stock exchange topics, news for hearing-impaired---) through the full TV screen. Closed caption function Using the Text Function Text services give a wide variety of subjects (ex.
...+ Tilt+ Degauss { { { { +++Off { +++Mode1 { +++Mode2 +++Text1 +++Text2 Move++Next+{+Back} 20 Note: In the event you turn the TV off. SSOff Using the MENU button 1. Note: This TV is programmed to remember which mode it was last set to, even if you receive a poor signal, an empty black box... the CAPTION button 1. Press the CAPTION button. 2. captioned program lists, weather forecasts, stock exchange topics, news for hearing-impaired---) through the full TV screen. Closed caption function Using the Text Function Text services give a wide variety of subjects (ex.
Owner's Manual
Page 21
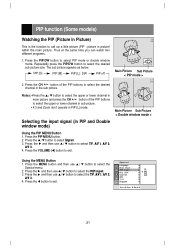
...1, AV 2, AV 3. 4. Press the PIP MENU button. 2. Language Main+Input PIP+Input+ Key+lock Caption+ ARC+ Tilt+ Degauss { { { { +++TV +++AV1 +++AV2 { +++AV3 { { { Move++Next+{+Back} 21 Repeatedly press the PIP/DW button to select the desired channel in the sub picture. button... of the PIP buttons to select the desired sub picture size. Press the G and then use D / E button to select TV, AV 1, AV 2, AV 3. 4. Special CH. Press the CH +/- Press the D/ E button to exit. Using the MENU Button 1. Press the VOLUME (F) button to select Input...
...1, AV 2, AV 3. 4. Press the PIP MENU button. 2. Language Main+Input PIP+Input+ Key+lock Caption+ ARC+ Tilt+ Degauss { { { { +++TV +++AV1 +++AV2 { +++AV3 { { { Move++Next+{+Back} 21 Repeatedly press the PIP/DW button to select the desired channel in the sub picture. button... of the PIP buttons to select the desired sub picture size. Press the G and then use D / E button to select TV, AV 1, AV 2, AV 3. 4. Special CH. Press the CH +/- Press the D/ E button to exit. Using the MENU Button 1. Press the VOLUME (F) button to select Input...
Owner's Manual
Page 23
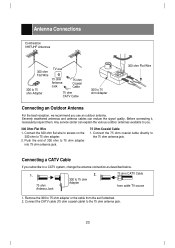
... the 300 ohm to the 75 ohm antenna jack. 23 Antenna Connections Combination VHF/UHF Antennas 300 ohm Flat Wire 300 to 75 ohm Adapter TV rear 75 ohm Antenna Jack 75 ohm Coaxial Cable 75 ohm CATV Cable 300 to 75 ohm Adapter 300 ohm Flat Wire Connecting an Outdoor... to 75 ohm Adapter 75 ohm CATV Cable from the set if attached. 2. Remove the 300 to 75 ohm adapter or the cable from cable TV source 1.
... the 300 ohm to the 75 ohm antenna jack. 23 Antenna Connections Combination VHF/UHF Antennas 300 ohm Flat Wire 300 to 75 ohm Adapter TV rear 75 ohm Antenna Jack 75 ohm Coaxial Cable 75 ohm CATV Cable 300 to 75 ohm Adapter 300 ohm Flat Wire Connecting an Outdoor... to 75 ohm Adapter 75 ohm CATV Cable from the set if attached. 2. Remove the 300 to 75 ohm adapter or the cable from cable TV source 1.
Owner's Manual
Page 24
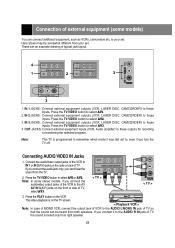
...camcorders etc. IN 2 JACKS : Connect external equipment outputs (VCR, LASER DISC, CAMCORDER) to these inputs. to the AUDIO R IN jack of TV so that the sound can be somewhat different from right speaker. 24 VIDEO L/MONO AUDIO R 4 OUT COMPONENT Y PB PR DVD IN(480i)...1. IN 1 JACKS : Connect external equipment outputs (VCR, LASER DISC, CAMCORDER) to these outputs for recording or monitering the selected program. Press the TV/VIDEO button to these inputs. OUT JACKS: Connect external equipment inputs (VCR, Audio amplifier) to select AV3. 4. If you connect the audio jack ...
...camcorders etc. IN 2 JACKS : Connect external equipment outputs (VCR, LASER DISC, CAMCORDER) to these inputs. to the AUDIO R IN jack of TV so that the sound can be somewhat different from right speaker. 24 VIDEO L/MONO AUDIO R 4 OUT COMPONENT Y PB PR DVD IN(480i)...1. IN 1 JACKS : Connect external equipment outputs (VCR, LASER DISC, CAMCORDER) to these outputs for recording or monitering the selected program. Press the TV/VIDEO button to these inputs. OUT JACKS: Connect external equipment inputs (VCR, Audio amplifier) to select AV3. 4. If you connect the audio jack ...
Owner's Manual
Page 25
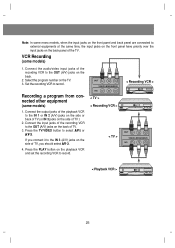
... jacks of the recording VCR to the OUT (A/V) jacks on the side of TV, you connect it to the IN 3 (A/V) jacks on the back of TV. 3. Press the PLAY button on the TV. 3. OUT VIDEO(L/MONO)AUDIO(R) IN1 < TV > < Recording VCR > < TV > < Recording VCR > OUT VIDEO(L/MONO)AUDIO(R) IN1 < Playback VCR > 25 VCR Recording (some... the audio/video input jacks of the recording VCR to the IN 1 or IN 2 (A/V) jacks on the side or back of TV (or IN 3 jacks on the side of the TV. Set the recording VCR to select AV-1 or AV-2. Connect the output jacks of the playback VCR to the OUT (A/V) jacks...
... jacks of the recording VCR to the OUT (A/V) jacks on the side of TV, you connect it to the IN 3 (A/V) jacks on the back of TV. 3. Press the PLAY button on the TV. 3. OUT VIDEO(L/MONO)AUDIO(R) IN1 < TV > < Recording VCR > < TV > < Recording VCR > OUT VIDEO(L/MONO)AUDIO(R) IN1 < Playback VCR > 25 VCR Recording (some... the audio/video input jacks of the recording VCR to the IN 1 or IN 2 (A/V) jacks on the side or back of TV (or IN 3 jacks on the side of the TV. Set the recording VCR to select AV-1 or AV-2. Connect the output jacks of the playback VCR to the OUT (A/V) jacks...
Owner's Manual
Page 26
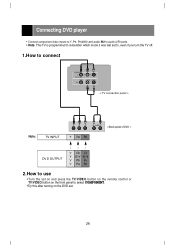
... programmed to remember which mode it was last set to, even if you turn the TV off. 1.How to connect COMPONENT Y PB PR DVD IN (480i) VIDEO IN2 (L/MONO) AUDIO(R) < TV connection panel > Note: TV INPUT Y PB PR (R) AUDIO (L) < Back panel of DVD > Y PB PR DV D OUTPUT Y Cb Cr Y B -Y R -Y Y Pb Pr Y PB PR... 2.How to use • Turn the set on and press the TV/VIDEO button on the remote control or TV/VIDEO button on the front panel to select COMPONENT. •Try this after turning on the DVD set. 26
... programmed to remember which mode it was last set to, even if you turn the TV off. 1.How to connect COMPONENT Y PB PR DVD IN (480i) VIDEO IN2 (L/MONO) AUDIO(R) < TV connection panel > Note: TV INPUT Y PB PR (R) AUDIO (L) < Back panel of DVD > Y PB PR DV D OUTPUT Y Cb Cr Y B -Y R -Y Y Pb Pr Y PB PR... 2.How to use • Turn the set on and press the TV/VIDEO button on the remote control or TV/VIDEO button on the front panel to select COMPONENT. •Try this after turning on the DVD set. 26


