
Owners Manual
Page 2
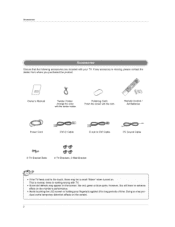
...the screen with the cloth, Remote Control / AA Batteries Power Cord DVI-D Cable D sub to DVI Cable @@ 2-TV Bracket Bolts 2-TV Brackets, 2-Walt Bracket PC Sound Cable • If the TV feels cold to the touch, there may be a small "flicker' when turned on the screen. 2 This is...twister holder. Doing so may appear on the monitor's performance. • Avoid touching the LCD screen or hotding your TV. If any accessory is nothing wrong with TV, • Some dot defects may produce some temporary distortion effects on . Accessor_s Ensure that the following accessories are ...
...the screen with the cloth, Remote Control / AA Batteries Power Cord DVI-D Cable D sub to DVI Cable @@ 2-TV Bracket Bolts 2-TV Brackets, 2-Walt Bracket PC Sound Cable • If the TV feels cold to the touch, there may be a small "flicker' when turned on the screen. 2 This is...twister holder. Doing so may appear on the monitor's performance. • Avoid touching the LCD screen or hotding your TV. If any accessory is nothing wrong with TV, • Some dot defects may produce some temporary distortion effects on . Accessor_s Ensure that the following accessories are ...
Owners Manual
Page 4
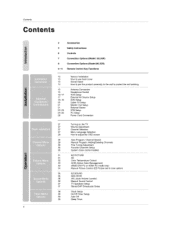
Contents 4 2 3 6 7 8 9_1;1 Acc_essori_ Safety Instructions Controls Connection Options (Model: 32LX2R) Connection Options (Model:26LX2R) Remote Control Key Functions 12 13 13 14 15 15 16-17 17 18_19 20 21 21 22--23 24_25 26 Various Installation How to ... protect the set tumbling Antenna Connection Headphone Socket VCR Setup ExternaJ AV Source Setup DVD Setup CabJe TV Setup Monitor Out Setup ExtemaJ Stereo ST8 Setup PC Setup Power Cord Connec_on 27 Turning on the TV 27 Volu_ Adjustment 27 Channel Selection 27 Menu Language Sol.ion 28 How to adjust the...
Contents 4 2 3 6 7 8 9_1;1 Acc_essori_ Safety Instructions Controls Connection Options (Model: 32LX2R) Connection Options (Model:26LX2R) Remote Control Key Functions 12 13 13 14 15 15 16-17 17 18_19 20 21 21 22--23 24_25 26 Various Installation How to ... protect the set tumbling Antenna Connection Headphone Socket VCR Setup ExternaJ AV Source Setup DVD Setup CabJe TV Setup Monitor Out Setup ExtemaJ Stereo ST8 Setup PC Setup Power Cord Connec_on 27 Turning on the TV 27 Volu_ Adjustment 27 Channel Selection 27 Menu Language Sol.ion 28 How to adjust the...
Owners Manual
Page 5
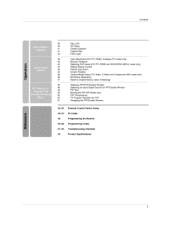
... XGA mo_ (DW PC (RGB) and XGAJ_NXGA (60Hz) mode o_y) 44 Setting Picture Format 45 Picture Size Zoom 45 Screen Position 46 Cinema Mode Setup (TV, Video, SoVi_o and Cotangent 480i mode only) 46 NR (Noise Reduction) 47 Reset to original factory va_ue (_nitializing) 48 Watching PtP/_P/Double Window 48... Selecting an Input Signal Source for PIP/Double Window 49 PiP Size 49 Moving the PIP (PIP Mode on_y) 50 PIP Transparency 50 TV Program Selection for P_P 51 Swapping the PIP/Double Window 52~55 56~57 58 59~60 61 ~62 63 External Control Device Setup IR...
... XGA mo_ (DW PC (RGB) and XGAJ_NXGA (60Hz) mode o_y) 44 Setting Picture Format 45 Picture Size Zoom 45 Screen Position 46 Cinema Mode Setup (TV, Video, SoVi_o and Cotangent 480i mode only) 46 NR (Noise Reduction) 47 Reset to original factory va_ue (_nitializing) 48 Watching PtP/_P/Double Window 48... Selecting an Input Signal Source for PIP/Double Window 49 PiP Size 49 Moving the PIP (PIP Mode on_y) 50 PIP Transparency 50 TV Program Selection for P_P 51 Swapping the PIP/Double Window 52~55 56~57 58 59~60 61 ~62 63 External Control Device Setup IR...
Owners Manual
Page 6
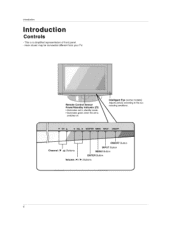
Introduction This is switched on, Intelligent Eye (some Adjusts picture according rounding conditions. ON/OFF Button Channel (TfA) Buttons INPUT Button MENU Button ENTER Button Volume (4 / I_) But:tons 6 Remote Control Sensor Power/S_ndby indicator ((b) * i_[uminatesred in standby mode. * illuminates green when the set is a simplified representation of front panel Here shown may be somewhat different from your TV. models) to the sur-
Introduction This is switched on, Intelligent Eye (some Adjusts picture according rounding conditions. ON/OFF Button Channel (TfA) Buttons INPUT Button MENU Button ENTER Button Volume (4 / I_) But:tons 6 Remote Control Sensor Power/S_ndby indicator ((b) * i_[uminatesred in standby mode. * illuminates green when the set is a simplified representation of front panel Here shown may be somewhat different from your TV. models) to the sur-
Owners Manual
Page 10
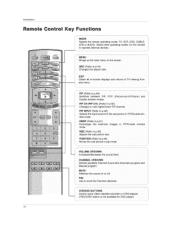
...(Refer to p,49} Moves the sub picture in PI P/Double window mode, SWAP (Refer to p,51) Exchanges the main/sub mode. disptays and returns to TV viewing from PIP (Refer to p,48) Switches oetween P[R POP (Picture-out=of=Picture) and Double window modes, PIP CH4PIP CH+ (Refer to p,50) ...channel PIP INPUT [Refer to p.48) Selects the _nput source for DVD ptayer). 10 Introduction Remote Control Key Functions MODE Selects the remote operating mode: TV, VCR, DVD, CABLE, STB or AUDIO Select other operating modes, for the remote to operate external devices, MENU Brings up the main menu to...
...(Refer to p,49} Moves the sub picture in PI P/Double window mode, SWAP (Refer to p,51) Exchanges the main/sub mode. disptays and returns to TV viewing from PIP (Refer to p,48) Switches oetween P[R POP (Picture-out=of=Picture) and Double window modes, PIP CH4PIP CH+ (Refer to p,50) ...channel PIP INPUT [Refer to p.48) Selects the _nput source for DVD ptayer). 10 Introduction Remote Control Key Functions MODE Selects the remote operating mode: TV, VCR, DVD, CABLE, STB or AUDIO Select other operating modes, for the remote to operate external devices, MENU Brings up the main menu to...
Owners Manual
Page 13
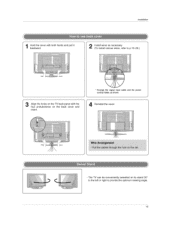
o The TV can be conveniently swivelled on the back cover and insert. * Arrange De signaJ input cane and the _wer cord by }'_der, _ sh_n, Reinstall the cover. lnsL_flation bHaoclkdwathred. cover with both hands and pull it (tTnostaintlswtailrtevsaarisounsecweisressa,ryr,efer to p.15~26.) ij Align the holes on the TV back panet with the four protuberance on its stand 30 ° to the left or right to provide the optimum viewing angle. 13
o The TV can be conveniently swivelled on the back cover and insert. * Arrange De signaJ input cane and the _wer cord by }'_der, _ sh_n, Reinstall the cover. lnsL_flation bHaoclkdwathred. cover with both hands and pull it (tTnostaintlswtailrtevsaarisounsecweisressa,ryr,efer to p.15~26.) ij Align the holes on the TV back panet with the four protuberance on its stand 30 ° to the left or right to provide the optimum viewing angle. 13
Owners Manual
Page 15
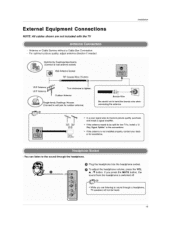
... antenna needs to improve picture quality, purchase and install a signal amplifier, - External E qu_ ipn ment Connections NOTE: All cables shown are not included with the TV Antenna or Cable Service without a Cable Box Connection. - For optimum picture quality, adjust antenna direction if needed, Mufti-family Dwellings/Apartments _Conneot to wat_ antenna...
... antenna needs to improve picture quality, purchase and install a signal amplifier, - External E qu_ ipn ment Connections NOTE: All cables shown are not included with the TV Antenna or Cable Service without a Cable Box Connection. - For optimum picture quality, adjust antenna direction if needed, Mufti-family Dwellings/Apartments _Conneot to wat_ antenna...
Owners Manual
Page 16
... button on the remote control 16 the fixed images of the screen may remain visible on the VCR. _Refer to the VCR 0wneris rnanuail) TV Back panel (32inch) TV Back panel (26inch) Q VCR VCR Connect the AUDIO/VIDEO jacks between the VCR and TM. Match the jack colors (Video = yellow, Audio Left... Insert a video tape into the VCR a_d press PLAY On the VCR, (Refer to the VCR owner's manuaL_ 49 Select Video input source with the TV - If the 4:3 picture format is used; Typically a frozen still picture from a VCR. on the sides 0 _nsert a video tape into the VCR and press PLAY on...
... button on the remote control 16 the fixed images of the screen may remain visible on the VCR. _Refer to the VCR 0wneris rnanuail) TV Back panel (32inch) TV Back panel (26inch) Q VCR VCR Connect the AUDIO/VIDEO jacks between the VCR and TM. Match the jack colors (Video = yellow, Audio Left... Insert a video tape into the VCR a_d press PLAY On the VCR, (Refer to the VCR owner's manuaL_ 49 Select Video input source with the TV - If the 4:3 picture format is used; Typically a frozen still picture from a VCR. on the sides 0 _nsert a video tape into the VCR and press PLAY on...

Owners Manual
Page 17
... owneCs manual ) Select S-Video input source with using the INPUT button on the remote control I Operate the co[responding external equipment. "_'_J _&_ _[_ [%T_'_;_ _ TV Sack panel (32inch) O " , TV Back paneJ (26inch) g VCR VCR O Connect the an S-VIDEO output of the VCR to the AUDIO input jacks on the set_ insert a video tape...
... owneCs manual ) Select S-Video input source with using the INPUT button on the remote control I Operate the co[responding external equipment. "_'_J _&_ _[_ [%T_'_;_ _ TV Sack panel (32inch) O " , TV Back paneJ (26inch) g VCR VCR O Connect the an S-VIDEO output of the VCR to the AUDIO input jacks on the set_ insert a video tape...

Owners Manual
Page 18
Installation ;o input sour_ w!th using the INPUT bu_on on the remote cont[oL TV Back panel (32inch) o m 1 DVD OVD TV Back panel (26|rich} Connect the HDMI output of the DVD to the HDM| jack ot_ the set. ,Select FIDMI DTV input source with using the INPUT button on _:he remote control Refer to the DVD player's manual for operating instructions. _can receive the wdeo and audio _ignal s_multaneously w_th using a HDMI cable. ) 18
Installation ;o input sour_ w!th using the INPUT bu_on on the remote cont[oL TV Back panel (32inch) o m 1 DVD OVD TV Back panel (26|rich} Connect the HDMI output of the DVD to the HDM| jack ot_ the set. ,Select FIDMI DTV input source with using the INPUT button on _:he remote control Refer to the DVD player's manual for operating instructions. _can receive the wdeo and audio _ignal s_multaneously w_th using a HDMI cable. ) 18

Owners Manual
Page 19
... on the remote control - Select: Component 1 input source with using the INPUT button on the DVD player, insert a DVD. '_ _ _ T _;_ _T_ _ __ TV Back panel (32irmh} lnsL_flation TV Back panel (26inch) [ TV side panel (32, 26inch) DVD DVD DVO Connect the v4deo outputs (Y, PB, PR) of the DVD to the COM_ PONIENT1 AUDIO jacks...
... on the remote control - Select: Component 1 input source with using the INPUT button on the DVD player, insert a DVD. '_ _ _ T _;_ _T_ _ __ TV Back panel (32irmh} lnsL_flation TV Back panel (26inch) [ TV side panel (32, 26inch) DVD DVD DVO Connect the v4deo outputs (Y, PB, PR) of the DVD to the COM_ PONIENT1 AUDIO jacks...
Owners Manual
Page 20
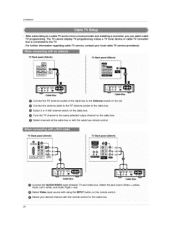
... RF antenna socket of the cable box. Installation - After subscribing to the TV. - The TV cannot display TV programming unless a TV tuner device or cable TV converter box is connected to a cable TV service from a local provider and installing a converter, you can watch cable TV programming. Select channels at the cable box or with channe_ switch on...
... RF antenna socket of the cable box. Installation - After subscribing to the TV. - The TV cannot display TV programming unless a TV tuner device or cable TV converter box is connected to a cable TV service from a local provider and installing a converter, you can watch cable TV programming. Select channels at the cable box or with channe_ switch on...
Owners Manual
Page 21
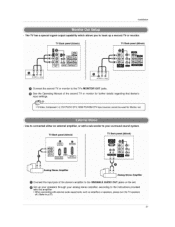
... output capability which allows you to p,37) 21 Use to connected either an external amplifier, or add a sub-woofer to your surround sound system, TV Back panel (32inch) Q Q TV Back panel (26inch) _ Analog Stereo Amplifier 0 Connect the input jack of the stereo's amplifier to the VARIABLE AUDIO OUT jacks on the seL... stereo amplifier, according to the instructions provided with the amplifier • When connecting with extem_ audte equipments such as amplifiers or speaker's, please turn the TV s_aker_ off, (Refer to hook up a second...
... output capability which allows you to p,37) 21 Use to connected either an external amplifier, or add a sub-woofer to your surround sound system, TV Back panel (32inch) Q Q TV Back panel (26inch) _ Analog Stereo Amplifier 0 Connect the input jack of the stereo's amplifier to the VARIABLE AUDIO OUT jacks on the seL... stereo amplifier, according to the instructions provided with the amplifier • When connecting with extem_ audte equipments such as amplifiers or speaker's, please turn the TV s_aker_ off, (Refer to hook up a second...
Owners Manual
Page 22
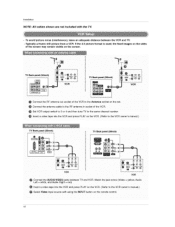
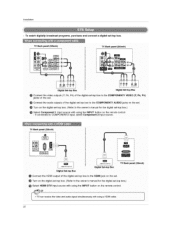
Dig_al _4op Box Connect the HDMI ou_ut of the digital set . Installation - To w_ch digRally broadcast programs, purchase and connect a digital set4op box. jack on the set -top box to the owner's manual for the digital set-top box,) Select HDMI DTV nput source w_th using the iNPUT button on the digital set-top box_ _Refer to the HDM! Turn on the remote control 22 TV Back panel (32inch) Q D|gita| Set-top Box TV Sack pane! (26_nch) !
Dig_al _4op Box Connect the HDMI ou_ut of the digital set . Installation - To w_ch digRally broadcast programs, purchase and connect a digital set4op box. jack on the set -top box to the owner's manual for the digital set-top box,) Select HDMI DTV nput source w_th using the iNPUT button on the digital set-top box_ _Refer to the HDM! Turn on the remote control 22 TV Back panel (32inch) Q D|gita| Set-top Box TV Sack pane! (26_nch) !
Owners Manual
Page 23
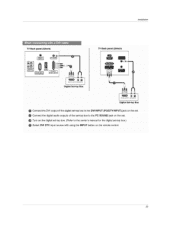
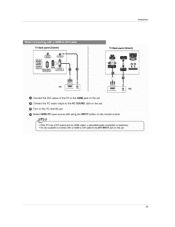
TV Back panel (32inch) O lnsL_/lation TV B_k panel (26inch) 1 i e 1 Digital Set-top Box Connect the DVL output of the dig4tai set-top box to the DVI INPUT (PC/DTV INPUT) jack on the set Connect the digital audio outputs of the set*top box to the PC SOUND jack on the set, Turn on the digital set-top box (Refer to the owner's manual for the digital set-top box,_ SeEect DMI DTV input source with using the INPUT button on the remote control. 23
TV Back panel (32inch) O lnsL_/lation TV B_k panel (26inch) 1 i e 1 Digital Set-top Box Connect the DVL output of the dig4tai set-top box to the DVI INPUT (PC/DTV INPUT) jack on the set Connect the digital audio outputs of the set*top box to the PC SOUND jack on the set, Turn on the digital set-top box (Refer to the owner's manual for the digital set-top box,_ SeEect DMI DTV input source with using the INPUT button on the remote control. 23

Owners Manual
Page 24
... the set . Select DV_ PC in put source with Using the iNPUT bUttOn on the remote control * Connect the signal cable (DVI-D cable. Installation - This TV provides Plug and Play capability, meaning that the PC adjusts automatically to the PC SOUND jack on the set, Turn on the set . Connect the... PC audio outputs to the TV*s settings, TV Back panel (321nc_} o TV Back paae| (261ach) m OO PC Connect the DV] output of the PC tO the DVi INPUT (POIDTV INPUT)jack on the set e conne_...
... the set . Select DV_ PC in put source with Using the iNPUT bUttOn on the remote control * Connect the signal cable (DVI-D cable. Installation - This TV provides Plug and Play capability, meaning that the PC adjusts automatically to the PC SOUND jack on the set, Turn on the set . Connect the... PC audio outputs to the TV*s settings, TV Back panel (321nc_} o TV Back paae| (261ach) m OO PC Connect the DV] output of the PC tO the DVi INPUT (POIDTV INPUT)jack on the set e conne_...
Owners Manual
Page 25
TV Back panel (32inch) Q lnsL_/lation TV Back panel (26Lnch) m ! I • ff the PC has a DV_ output and no HDMI oL_put, a separated audio connection is neces_ny, L -Et's not available to connect with using the INPUT button on the remote control. PC PC O Connect the DVl output of the PC to the HDMI jack on the set_ Connect the PC audio output to the BY| |NPtY[ jack on the set Select HDMI PC input source with a H DMI to DV_cable to the PC SOUND jack on the _et, # 25 Turn on the PC and the set .
TV Back panel (32inch) Q lnsL_/lation TV Back panel (26Lnch) m ! I • ff the PC has a DV_ output and no HDMI oL_put, a separated audio connection is neces_ny, L -Et's not available to connect with using the INPUT button on the remote control. PC PC O Connect the DVl output of the PC to the HDMI jack on the set_ Connect the PC audio output to the BY| |NPtY[ jack on the set Select HDMI PC input source with a H DMI to DV_cable to the PC SOUND jack on the _et, # 25 Turn on the PC and the set .

Owners Manual
Page 27
.... First select your desired language. Select the viewing source by pressing the MUTE or VOL ,I V button on the TV or press the POWER, TV_ INPUT, CH A / T, Number (0 ~ 9) button on . 2. From this moment, the TV switches to select your language. At this point on, the on-screen menus will turn on the remote... control and then the TV will be shown on the remote centroi. Press the ON/OFF, INPUT, CH A I , / V button. Press the OH ,i, / T or NUMBER buttons to , even if the power ...
.... First select your desired language. Select the viewing source by pressing the MUTE or VOL ,I V button on the TV or press the POWER, TV_ INPUT, CH A / T, Number (0 ~ 9) button on . 2. From this moment, the TV switches to select your language. At this point on, the on-screen menus will turn on the remote... control and then the TV will be shown on the remote centroi. Press the ON/OFF, INPUT, CH A I , / V button. Press the OH ,i, / T or NUMBER buttons to , even if the power ...
Owners Manual
Page 29
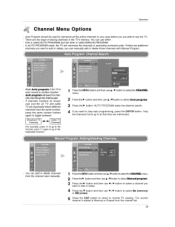
...erase. 4 Press the T button and then use < / I_ button to select On (memory) or _ (erase). 5 Press the EXIT button to return to normal TV viewing, The current channel is called MANUALPROGRAM. o Redo Auto progrc_rn ff the TVis ever moved to set_t _e CHANNEL menu. 2 Press the I,,, button and then... use the TV. - cast overdhe air TV and cable TV are able to use A lT button to select Auto progr_, 3 Press the I_ button AUTO PROGRAM starts the channel search, 4 If ...
...erase. 4 Press the T button and then use < / I_ button to select On (memory) or _ (erase). 5 Press the EXIT button to return to normal TV viewing, The current channel is called MANUALPROGRAM. o Redo Auto progrc_rn ff the TVis ever moved to set_t _e CHANNEL menu. 2 Press the I,,, button and then... use the TV. - cast overdhe air TV and cable TV are able to use A lT button to select Auto progr_, 3 Press the I_ button AUTO PROGRAM starts the channel search, 4 If ...

Owners Manual
Page 30
...V button to select P,&L4_, PAL-N, NTSC ou MulH_ 4 Press the EXIT button to return to normal TV viewing. Use this function. - It's avaiable to use this function in TV mode. (This function doesn't work for sub picture in numerical order, 1 Press_eMENUbuttonandthenuseA/V buttonto_ecttheC_L&NNlll_menu. 2 Press... V button to seiect the first favorite channel position. 4 Use the 4/1_ button to set the d_ired channel nurnbe_ for the TV to normal TV viewing. - Favorite Channels is poor, To remove fine tuning from a channel, reprogram the finelytuned channel with Auto program or Manual ...
...V button to select P,&L4_, PAL-N, NTSC ou MulH_ 4 Press the EXIT button to return to normal TV viewing. Use this function. - It's avaiable to use this function in TV mode. (This function doesn't work for sub picture in numerical order, 1 Press_eMENUbuttonandthenuseA/V buttonto_ecttheC_L&NNlll_menu. 2 Press... V button to seiect the first favorite channel position. 4 Use the 4/1_ button to set the d_ired channel nurnbe_ for the TV to normal TV viewing. - Favorite Channels is poor, To remove fine tuning from a channel, reprogram the finelytuned channel with Auto program or Manual ...


