
Owners Manual
Page 4
... Setup Power Cord Connec_on 27 Turning on the TV 27 Volu_ Adjustment 27 Channel Selection 27 Menu Language Sol.ion 28 How to adjust the OSD screen 29 Auto Program: Channel _arch 29 Manu_ Program: Addir_g/De_et_ng Chaanels 30 Fine Tuning Adjustment 30 Favorite Cha_nets Setup 30 System Color (some models) + + ++ + 31 EZ PICTURE 31 XD 32 Co,or Temperature Control 33 ACM (Active Co_or Management) 33 sRG8 (DVI PC or HDMI...
... Setup Power Cord Connec_on 27 Turning on the TV 27 Volu_ Adjustment 27 Channel Selection 27 Menu Language Sol.ion 28 How to adjust the OSD screen 29 Auto Program: Channel _arch 29 Manu_ Program: Addir_g/De_et_ng Chaanels 30 Fine Tuning Adjustment 30 Favorite Cha_nets Setup 30 System Color (some models) + + ++ + 31 EZ PICTURE 31 XD 32 Co,or Temperature Control 33 ACM (Active Co_or Management) 33 sRG8 (DVI PC or HDMI...
Owners Manual
Page 5
Contents 40 Key Lock 40 XD Demo 41 Closed Captions 41 Caption/Text 42 Front Light 43 Auto Adjustment (DW PC (RGB), A_a_ogue PC mode only) 43 Manual Configure 44 Selecting XGA mo_ (DW PC (RGB) and XGAJ_NXGA (60Hz) mode o_y) 44 Setting Picture Format 45 Picture Size Zoom 45 Screen Position 46 Cinema Mode Setup (TV, Video, SoVi_o and Cotangent 480i mode only) 46 NR (Noise Reduction) 47 Reset to original factory va_ue (_nitializing...
Contents 40 Key Lock 40 XD Demo 41 Closed Captions 41 Caption/Text 42 Front Light 43 Auto Adjustment (DW PC (RGB), A_a_ogue PC mode only) 43 Manual Configure 44 Selecting XGA mo_ (DW PC (RGB) and XGAJ_NXGA (60Hz) mode o_y) 44 Setting Picture Format 45 Picture Size Zoom 45 Screen Position 46 Cinema Mode Setup (TV, Video, SoVi_o and Cotangent 480i mode only) 46 NR (Noise Reduction) 47 Reset to original factory va_ue (_nitializing...
Owners Manual
Page 6
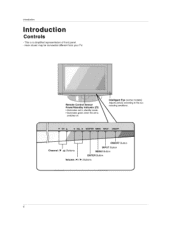
Remote Control Sensor Power/S_ndby indicator ((b) * i_[uminatesred in standby mode. * illuminates green when the set is a simplified representation of front panel Here shown may be somewhat different from your TV. ON/OFF Button Channel (TfA) Buttons INPUT Button MENU Button ENTER Button Volume (4 / I_) But:tons 6 Introduction This is switched on, Intelligent Eye (some Adjusts picture according rounding conditions. models) to the sur-
Remote Control Sensor Power/S_ndby indicator ((b) * i_[uminatesred in standby mode. * illuminates green when the set is a simplified representation of front panel Here shown may be somewhat different from your TV. ON/OFF Button Channel (TfA) Buttons INPUT Button MENU Button ENTER Button Volume (4 / I_) But:tons 6 Introduction This is switched on, Intelligent Eye (some Adjusts picture according rounding conditions. models) to the sur-
Owners Manual
Page 10
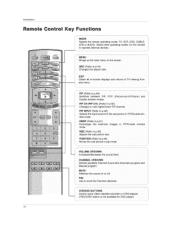
... MODE Selects the remote operating mode: TV, VCR, DVD, CABLE, STB or AUDIO Select other operating modes, for the remote to operate external devices, MENU Brings up the main menu to the screen, ARC (Refer to p,44) Changes the aspect ratio EXIT Clears aJl on or off FAV Use to scroll the Favorite channels, VCR/DVD BUTTONS Control some video cassette recorders or DVD pJayers ("RECORD" button is not available for the sub picture in pip mode VOLUME UPK)OWN Increases/decreases the sound Ilevel, CHANNEL...
... MODE Selects the remote operating mode: TV, VCR, DVD, CABLE, STB or AUDIO Select other operating modes, for the remote to operate external devices, MENU Brings up the main menu to the screen, ARC (Refer to p,44) Changes the aspect ratio EXIT Clears aJl on or off FAV Use to scroll the Favorite channels, VCR/DVD BUTTONS Control some video cassette recorders or DVD pJayers ("RECORD" button is not available for the sub picture in pip mode VOLUME UPK)OWN Increases/decreases the sound Ilevel, CHANNEL...
Owners Manual
Page 15
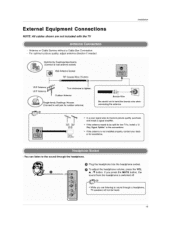
... to wall jack 'for outdoor sntenno) Bronze Wire careful not to _nd the bronze wire when connecting the antenna Arab #1_¢ • _n a peer sign_ area to be sp_Jt for assistance, 15 a "2- I{ the antenna needs to improve picture quality, purchase and install a signal amplifier, - External E qu_ ipn ment Connections NOTE: All cables shown are not included with the TV Antenna or Cable Service without a Cable Box Connection. -
... to wall jack 'for outdoor sntenno) Bronze Wire careful not to _nd the bronze wire when connecting the antenna Arab #1_¢ • _n a peer sign_ area to be sp_Jt for assistance, 15 a "2- I{ the antenna needs to improve picture quality, purchase and install a signal amplifier, - External E qu_ ipn ment Connections NOTE: All cables shown are not included with the TV Antenna or Cable Service without a Cable Box Connection. -
Owners Manual
Page 16
... cables shown are not included with using the INPUT button on the screen. the fixed images of the screen may remain visible on the remote control 16 Typically a frozen still picture from a VCR. on the sides 0 _nsert a video tape into the VCR and press PLAY on the VCR. _Refer to the VCR 0wneris rnanuail) TV Back panel (32inch) TV Back panel (26inch) Q VCR VCR Connect the AUDIO/VIDEO jacks between the VCR and TM. Match the jack colors (Video...
... cables shown are not included with using the INPUT button on the screen. the fixed images of the screen may remain visible on the remote control 16 Typically a frozen still picture from a VCR. on the sides 0 _nsert a video tape into the VCR and press PLAY on the VCR. _Refer to the VCR 0wneris rnanuail) TV Back panel (32inch) TV Back panel (26inch) Q VCR VCR Connect the AUDIO/VIDEO jacks between the VCR and TM. Match the jack colors (Video...

Owners Manual
Page 19
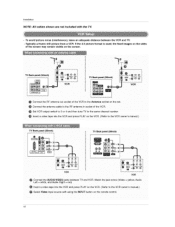
Connect the audio outputs of the DVD to the COMPONENT1 VIDEO (Y, PB, PR) jacks on the set . Turn on the remote control - Select: Component 1 input source with using the INPUT button on the DVD player, insert a DVD. Video output ports on DVD payer 'Y Y Y •¥ Pb Pr B_Y _:__;_ Ob 19 select Component2 input source. Refer to the DVD player's manual for operating instructions, • Component input ports To get better picture qualit't, connect a DVD player to COMPONENT2. '_ _ _ T _;_ _T_ _ __ TV Back panel (32irmh} lnsL_flation TV Back panel (26inch) [ TV...
Connect the audio outputs of the DVD to the COMPONENT1 VIDEO (Y, PB, PR) jacks on the set . Turn on the remote control - Select: Component 1 input source with using the INPUT button on the DVD player, insert a DVD. Video output ports on DVD payer 'Y Y Y •¥ Pb Pr B_Y _:__;_ Ob 19 select Component2 input source. Refer to the DVD player's manual for operating instructions, • Component input ports To get better picture qualit't, connect a DVD player to COMPONENT2. '_ _ _ T _;_ _T_ _ __ TV Back panel (32irmh} lnsL_flation TV Back panel (26inch) [ TV...
Owners Manual
Page 22
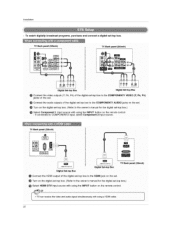
jack on the remote control 22 TV Back panel (32inch) Q D|gita| Set-top Box TV Sack pane! (26_nch) ! To w_ch digRally broadcast programs, purchase and connect a digital set4op box. Dig_al _4op Box Connect the HDMI ou_ut of the digital set . Installation - Turn on the digital set-top box_ _Refer to the owner's manual for the digital set-top box,) Select HDMI DTV nput source w_th using the iNPUT button on the set -top box to the HDM!
jack on the remote control 22 TV Back panel (32inch) Q D|gita| Set-top Box TV Sack pane! (26_nch) ! To w_ch digRally broadcast programs, purchase and connect a digital set4op box. Dig_al _4op Box Connect the HDMI ou_ut of the digital set . Installation - Turn on the digital set-top box_ _Refer to the owner's manual for the digital set-top box,) Select HDMI DTV nput source w_th using the iNPUT button on the set -top box to the HDM!
Owners Manual
Page 23
TV Back panel (32inch) O lnsL_/lation TV B_k panel (26inch) 1 i e 1 Digital Set-top Box Connect the DVL output of the dig4tai set-top box to the DVI INPUT (PC/DTV INPUT) jack on the set Connect the digital audio outputs of the set*top box to the PC SOUND jack on the set, Turn on the digital set-top box (Refer to the owner's manual for the digital set-top box,_ SeEect DMI DTV input source with using the INPUT button on the remote control. 23
TV Back panel (32inch) O lnsL_/lation TV B_k panel (26inch) 1 i e 1 Digital Set-top Box Connect the DVL output of the dig4tai set-top box to the DVI INPUT (PC/DTV INPUT) jack on the set Connect the digital audio outputs of the set*top box to the PC SOUND jack on the set, Turn on the digital set-top box (Refer to the owner's manual for the digital set-top box,_ SeEect DMI DTV input source with using the INPUT button on the remote control. 23

Owners Manual
Page 24
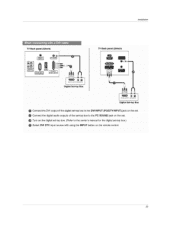
... set e conne_ ihe PC audio outpatS tothe PC SOUND jack on the seL @Seiect DV|PC input SoUrce with using the INPUT button on the set . This TV provides Plug and Play capability, meaning that the PC adjusts automatically to the TV*s settings, TV Back panel (321nc_} o TV Back paae| (261ach) m OO PC Connect the DV] output of the PC tO the DVi INPUT (POIDTV INPUT)jack on the remote control * Connect the signal cable (DVI-D cable. Installation...
... set e conne_ ihe PC audio outpatS tothe PC SOUND jack on the seL @Seiect DV|PC input SoUrce with using the INPUT button on the set . This TV provides Plug and Play capability, meaning that the PC adjusts automatically to the TV*s settings, TV Back panel (321nc_} o TV Back paae| (261ach) m OO PC Connect the DV] output of the PC tO the DVi INPUT (POIDTV INPUT)jack on the remote control * Connect the signal cable (DVI-D cable. Installation...

Owners Manual
Page 27
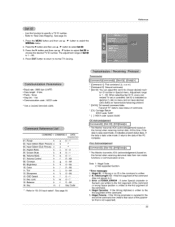
... to standby mode. 1, Press the VOL ,i / T button to adiust the volume, 2, If you want to , even if the power cord is out. 3. First select your desired language. From this function by using the TV, press the POWER button on the remote centroi. Ope[afio_ Basic operation 1. First, connect power cord correctly. This TV is programmed to remember which power state it was last set to switch the sound off...
... to standby mode. 1, Press the VOL ,i / T button to adiust the volume, 2, If you want to , even if the power cord is out. 3. First select your desired language. From this function by using the TV, press the POWER button on the remote centroi. Ope[afio_ Basic operation 1. First, connect power cord correctly. This TV is programmed to remember which power state it was last set to switch the sound off...
Owners Manual
Page 31
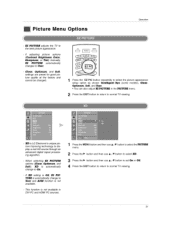
... normal TV viewing. 31 If _ setting is OIL, EZ PICT_ isautomatically change to User and ACM function is not available in the PICTURE menu. 2 Press the EXIT button to return to normal TV viewing_ - _ is automatically change to On, - EZ PICTURE adjusts the TV to the best picture appearance. -If adjusting picture options (Contrast, Brightness, Color, Sharpness, or Tint) manually, EZ PIC_RE automatically changes to select 3 Press the...
... normal TV viewing. 31 If _ setting is OIL, EZ PICT_ isautomatically change to User and ACM function is not available in the PICTURE menu. 2 Press the EXIT button to return to normal TV viewing_ - _ is automatically change to On, - EZ PICTURE adjusts the TV to the best picture appearance. -If adjusting picture options (Contrast, Brightness, Color, Sharpness, or Tint) manually, EZ PIC_RE automatically changes to select 3 Press the...

Owners Manual
Page 32
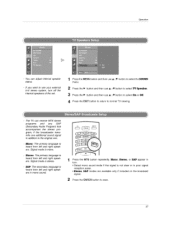
... viewing. 32 Press the MENU button and then use A/V button to select the PICTURE menu 2 Press the I_ button and then use ,1, t T button to select ACC 3 Press the 1_ button and then use A / V button to select User. 4 Press the I_ button and then use A t T button to select either: Cool (Preset) Normal (Default)_ or Warm (Preset) 4 Press the EXIT button to return to normal TV viewing, * Manual Color Temperature Control (_C set to any color temperature you prefer. You can adjust red...
... viewing. 32 Press the MENU button and then use A/V button to select the PICTURE menu 2 Press the I_ button and then use ,1, t T button to select ACC 3 Press the 1_ button and then use A / V button to select User. 4 Press the I_ button and then use A t T button to select either: Cool (Preset) Normal (Default)_ or Warm (Preset) 4 Press the EXIT button to return to normal TV viewing, * Manual Color Temperature Control (_C set to any color temperature you prefer. You can adjust red...
Owners Manual
Page 37
... speakers, Signal mode is stereo. - if you want to use A / T button to select On or Off 4 Press the EXIT button to return to select TV Speaker. 3 Press the i_ button and then use your extemal hi-fi stereo system, turn off the internal speakers of the set. mits one additional sound signal in mono sound: ) 1 Press the MTS button repeatedly. You can receive MTS stereo programs and any SAP (Secondary Audio Program...
... speakers, Signal mode is stereo. - if you want to use A / T button to select On or Off 4 Press the EXIT button to return to select TV Speaker. 3 Press the i_ button and then use your extemal hi-fi stereo system, turn off the internal speakers of the set. mits one additional sound signal in mono sound: ) 1 Press the MTS button repeatedly. You can receive MTS stereo programs and any SAP (Secondary Audio Program...
Owners Manual
Page 44
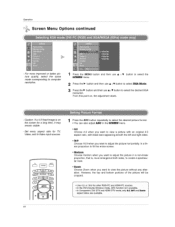
... view a picture with an original 4:3 aspect ratio, with black bars appearing at both the left and right sides. • 16.9 Choose 16:9 when you want to adjust the picture horizontally, ear proportion to select the desired XGA resolution. Horizon Choose Horizon when you ,want to adjust the picture in a nonqinear proportion, that is on , the adjustment starts, - Video input sources. 1 Press the ARC button repeatedly to select...
... view a picture with an original 4:3 aspect ratio, with black bars appearing at both the left and right sides. • 16.9 Choose 16:9 when you want to adjust the picture horizontally, ear proportion to select the desired XGA resolution. Horizon Choose Horizon when you ,want to adjust the picture in a nonqinear proportion, that is on , the adjustment starts, - Video input sources. 1 Press the ARC button repeatedly to select...
Owners Manual
Page 45
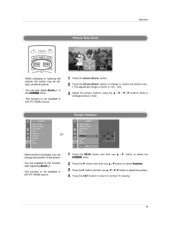
... Zoom+/Zoom- Operation When enlarging or reducing the picture, the _reen may be display unnatural picture, o You can change the position of Zoom is 100 ~ 300_ 3 Adjust the picture position using the ,& t T /'_ /I_ buttons while in enlarged picture mode. - When screen is not available in DV! This function is not available in the SCREEN menu, - PC (RGB) source. button to normat TV viewing, 45 You are...
... Zoom+/Zoom- Operation When enlarging or reducing the picture, the _reen may be display unnatural picture, o You can change the position of Zoom is 100 ~ 300_ 3 Adjust the picture position using the ,& t T /'_ /I_ buttons while in enlarged picture mode. - When screen is not available in DV! This function is not available in the SCREEN menu, - PC (RGB) source. button to normat TV viewing, 45 You are...
Owners Manual
Page 53
... L 3 0& Screen Mute k d 0~1 The Monitor transm&s ACK (acknowledgement) based on transmission!receiving protocol, [DATA]: To transmit command data. Briqhtness k h Data 1 : tltegal Co_ 2: Not supported function 10. Key Lock 15 Balance k [ 0- 1 k m 0- 1 k t 0 ~ 64 2. Input Select (Sub Picture) x y * 04. Co,or k i 0 ~ 64 **Error messages 18, _b_[Pne L k 1, Illegal ID : If Wrong or no ID in Specia_ menu. Press the MENU button and then use A s _' button to select the SPECIAL menu...
... L 3 0& Screen Mute k d 0~1 The Monitor transm&s ACK (acknowledgement) based on transmission!receiving protocol, [DATA]: To transmit command data. Briqhtness k h Data 1 : tltegal Co_ 2: Not supported function 10. Key Lock 15 Balance k [ 0- 1 k m 0- 1 k t 0 ~ 64 2. Input Select (Sub Picture) x y * 04. Co,or k i 0 ~ 64 **Error messages 18, _b_[Pne L k 1, Illegal ID : If Wrong or no ID in Specia_ menu. Press the MENU button and then use A s _' button to select the SPECIAL menu...
Owners Manual
Page 54
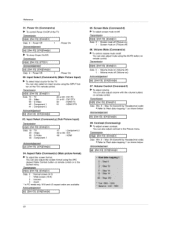
...[d][ ][Set IDI[ ][Dat, a][Cr] ] Data 0 : Screen mute off (Picture on) 1 : Screen mute on (Picture off (Volume on (Volume off) 1 : Volume mute off ) _. input Select Transmission (Command:y) [[xl[y][ l[Set toll ][Datal[Cr] Data 10 : TV 20 : Video 30 : S-Video 40 : Component 1 (Sub Picture Input) ] 41 : Component 2 50 or 60 : DVl go : HDMI Acknowledgement 04. Aspect Ratio (Command:c) (Main picture format) I_ To adjust the screen format You can aim select an input source using the ARC (_pect Ratio Control) button on the TV's remote control...
...[d][ ][Set IDI[ ][Dat, a][Cr] ] Data 0 : Screen mute off (Picture on) 1 : Screen mute on (Picture off (Volume on (Volume off) 1 : Volume mute off ) _. input Select Transmission (Command:y) [[xl[y][ l[Set toll ][Datal[Cr] Data 10 : TV 20 : Video 30 : S-Video 40 : Component 1 (Sub Picture Input) ] 41 : Component 2 50 or 60 : DVl go : HDMI Acknowledgement 04. Aspect Ratio (Command:c) (Main picture format) I_ To adjust the screen format You can aim select an input source using the ARC (_pect Ratio Control) button on the TV's remote control...
Owners Manual
Page 61
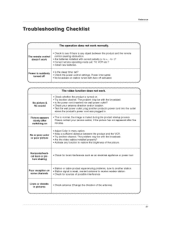
... and the remote control causing obstruction • Are batteries installed with Auto off • Is the sleep timer set : TV, VCR etc,? • Install new batteries. Power is weak_ reorient antenna to receive weaker station. ° Check for local interference such as an electrical appliance or power tool. No or poor color or poor picture • Adjust Color in pictures • Check antenna (Change the direction of the picture. Poor reception...
... and the remote control causing obstruction • Are batteries installed with Auto off • Is the sleep timer set : TV, VCR etc,? • Install new batteries. Power is weak_ reorient antenna to receive weaker station. ° Check for local interference such as an electrical appliance or power tool. No or poor color or poor picture • Adjust Color in pictures • Check antenna (Change the direction of the picture. Poor reception...
Owners Manual
Page 62
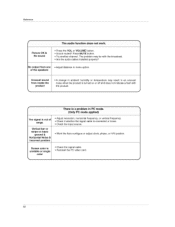
... range. Press MUTE button. ° Try another channel, The problem may result in menu option. ground & Horizontal Noise & Incorrect posffion • Adjust resolution horizontal frequency_ or vertical frequency. ° Check it whether the signal cable is connected or loose • Check the input source. * Work the Auto configure or adjust clock, phase, or H/V position Screen color is turned on back- of the speakers Unusual sound from one °...
... range. Press MUTE button. ° Try another channel, The problem may result in menu option. ground & Horizontal Noise & Incorrect posffion • Adjust resolution horizontal frequency_ or vertical frequency. ° Check it whether the signal cable is connected or loose • Check the input source. * Work the Auto configure or adjust clock, phase, or H/V position Screen color is turned on back- of the speakers Unusual sound from one °...


