
Operation Guide
Page 1
See the label attached on the back cover and quote this manual carefully your dealer when you require Retain it for future reference. to your set . 26LH1DC1 Please read this information service. before operating Record model number and serial number of the set .
See the label attached on the back cover and quote this manual carefully your dealer when you require Retain it for future reference. to your set . 26LH1DC1 Please read this information service. before operating Record model number and serial number of the set .

Operation Guide
Page 2
...Reorient or relocate the receiving antenna. THIS TV This equipment has been tested and found to comply with the instruction manual, may cause harmful interference to Part 15 of the National Electric Code (U.S.A.). However, there is connected. THE PARTY RESPONSIBLE FOR PRODUCT... COMPLIANCE (LG Electronics U.S.A., Inc.,) (2000 Millbrook Drive) (TELEPHONE NO:I-847-941 -8000) 2 This equipment generates, uses and can be connected...
...Reorient or relocate the receiving antenna. THIS TV This equipment has been tested and found to comply with the instruction manual, may cause harmful interference to Part 15 of the National Electric Code (U.S.A.). However, there is connected. THE PARTY RESPONSIBLE FOR PRODUCT... COMPLIANCE (LG Electronics U.S.A., Inc.,) (2000 Millbrook Drive) (TELEPHONE NO:I-847-941 -8000) 2 This equipment generates, uses and can be connected...

Operation Guide
Page 3
... AND TESTED WITH YOUR SAFETY IN MIND. CAUTION: To avoid damage to touch this product. 3. OBSERVING THE SIMPLE PRECAUTIONS DISCUSSED IN THIS MANUAL CAN HELP YOU GET MANY YEARS OF ENJOYMENT AND SAFE OPERATION THAT ARE BUILT INTO YOUR NEW PRODUCT. 3 Install product in any way ...without written authorization from LG Electronics Corporation. Main plug is approved by removing dust with liquids, such as vases, shall not be mounted on the apparatus. HOWEVER, ...
... AND TESTED WITH YOUR SAFETY IN MIND. CAUTION: To avoid damage to touch this product. 3. OBSERVING THE SIMPLE PRECAUTIONS DISCUSSED IN THIS MANUAL CAN HELP YOU GET MANY YEARS OF ENJOYMENT AND SAFE OPERATION THAT ARE BUILT INTO YOUR NEW PRODUCT. 3 Install product in any way ...without written authorization from LG Electronics Corporation. Main plug is approved by removing dust with liquids, such as vases, shall not be mounted on the apparatus. HOWEVER, ...

Operation Guide
Page 6
"D User must use shielded signal interface cables with ferrite cores to maintain standard compliance for the 26LH1DC1 model only. Batteries (Optional) Installer Remote Control. See your LG dealer. Batteries (Optional) Shown herein is NOT included with your product. To perform a normal installation set ...installer remote allows access to the Installer menus, User menus, and Channel Banks in later sections. m © z Owner's Manual Power Cord CD Manual User Remote Control. both are included with the TV. • However, both the User and Installer remotes can be purchased ...
"D User must use shielded signal interface cables with ferrite cores to maintain standard compliance for the 26LH1DC1 model only. Batteries (Optional) Installer Remote Control. See your LG dealer. Batteries (Optional) Shown herein is NOT included with your product. To perform a normal installation set ...installer remote allows access to the Installer menus, User menus, and Channel Banks in later sections. m © z Owner's Manual Power Cord CD Manual User Remote Control. both are included with the TV. • However, both the User and Installer remotes can be purchased ...

Operation Guide
Page 11
... output of the digital set z -4 top box to the COMPONENT(DVD/DTV)I jacks on the remote control. (Refer to p.71 ) If connected to the owner's manual for the digital set -top box. input, select Yes No Yes Yes Yes Yes Yes Yes 11 x -4 m z When connecting Component cable m _D c 1.
... output of the digital set z -4 top box to the COMPONENT(DVD/DTV)I jacks on the remote control. (Refer to p.71 ) If connected to the owner's manual for the digital set -top box. input, select Yes No Yes Yes Yes Yes Yes Yes 11 x -4 m z When connecting Component cable m _D c 1.
Operation Guide
Page 12
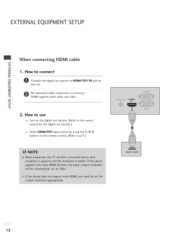
m --4 C "O 2. How to connect m /O Connect the digital set . "O m z No separated audio connection is necessary. --4 HDMI supports both audio and video. How to use Turn on the digital set-top box. (Refer to the owner's manual for the digital set-top box.) Select HDMI/DVI input source by using the 1 -3-3 buttons on the remote control. (Refer to HDMI/DVI IN jack on c the set -top box to p.71 ) 12 EXTERNALEQUIPMENT SETUP When connecting HDMi cable m x --4 m _o z 1.
m --4 C "O 2. How to connect m /O Connect the digital set . "O m z No separated audio connection is necessary. --4 HDMI supports both audio and video. How to use Turn on the digital set-top box. (Refer to the owner's manual for the digital set-top box.) Select HDMI/DVI input source by using the 1 -3-3 buttons on the remote control. (Refer to HDMI/DVI IN jack on c the set -top box to p.71 ) 12 EXTERNALEQUIPMENT SETUP When connecting HDMi cable m x --4 m _o z 1.

Operation Guide
Page 13
m Connect the DVI output of the digital set-top box to m z the DVI/PC AUDIO IN jack on the set -top box.) Select HDMI input source by using the 1 -3-3 buttons on the remote control. (Refer to p.71 ) 13 c -O 0 Connect the audio output of the digital set-top box to the owner's manual for the digital set . How to use Turn on the digital set-top box. (Refer to the £3 HDMI/DVI IN jack on the set. -4 m -4 c "O 2. cabme m x -4 m _o 1. When connecting HDMI to connect z I-- How to DV!
m Connect the DVI output of the digital set-top box to m z the DVI/PC AUDIO IN jack on the set -top box.) Select HDMI input source by using the 1 -3-3 buttons on the remote control. (Refer to p.71 ) 13 c -O 0 Connect the audio output of the digital set-top box to the owner's manual for the digital set . How to use Turn on the digital set-top box. (Refer to the £3 HDMI/DVI IN jack on the set. -4 m -4 c "O 2. cabme m x -4 m _o 1. When connecting HDMI to connect z I-- How to DV!

Operation Guide
Page 14
... jack colors rT1 (¥ = green, PB = blue, and PR = red). Component Input ports To get better picture quality, connect a DVD player to the DVD player's manual for operating instructions. Component ports on the TV Video output ports on the set . 2. EXTERNAL EQUIPMENT SETUP DVD SETUP When connecting Component cable rT1 x -4 rT1...
... jack colors rT1 (¥ = green, PB = blue, and PR = red). Component Input ports To get better picture quality, connect a DVD player to the DVD player's manual for operating instructions. Component ports on the TV Video output ports on the set . 2. EXTERNAL EQUIPMENT SETUP DVD SETUP When connecting Component cable rT1 x -4 rT1...
Operation Guide
Page 15
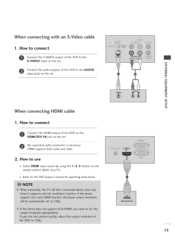
... the remote control. (Refer to p.71 ) Refer to use Select HDMI input source by using the 1 -3-3 button on the set. How to the DVD player's manual for operating instructions. 15 m x --4 @ Connect the audio outputs of the VCR to the AUDIO m _o input jacks on the set . No separated audio connection is...
... the remote control. (Refer to p.71 ) Refer to use Select HDMI input source by using the 1 -3-3 button on the set. How to the DVD player's manual for operating instructions. 15 m x --4 @ Connect the audio outputs of the VCR to the AUDIO m _o input jacks on the set . No separated audio connection is...
Operation Guide
Page 16
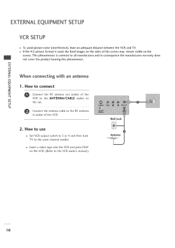
the fixed images on the sides of the screen may remain visible on the VCR. (Refer to the VCR owner's manual.) Antenna 16 EXTERNALEQUIPMENT SETUP VCR SETUP To avoid picture noise (interference), leave an adequate distance between the VCR and TV. m x -q m z When connecting with an antenna m c 1. ...
the fixed images on the sides of the screen may remain visible on the VCR. (Refer to the VCR owner's manual.) Antenna 16 EXTERNALEQUIPMENT SETUP VCR SETUP To avoid picture noise (interference), leave an adequate distance between the VCR and TV. m x -q m z When connecting with an antenna m c 1. ...
Operation Guide
Page 17
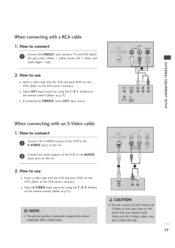
How to use Insert a video tape into the VCR and press PLAY on the /O c VCR. (Refer to the VCR owner's manual.) -O SelectAV1 input source by using the1-3-1 buttons on r_ the remote control. (Refer to p.71 ) z -4 If connected to the AUDIO input jacks on the set . 2.... How to use z m Insert a video tape into the VCR and press PLAY on the VCR. (Refer to the VCR owner's manual.) Select S-VIDEO input source by using the 1 -3-5 buttons on the remote control. (Refer to p.71 ) 17 m -4 c -O When connecting with a RCA cable 1. How to connect ...
How to use Insert a video tape into the VCR and press PLAY on the /O c VCR. (Refer to the VCR owner's manual.) -O SelectAV1 input source by using the1-3-1 buttons on r_ the remote control. (Refer to p.71 ) z -4 If connected to the AUDIO input jacks on the set . 2.... How to use z m Insert a video tape into the VCR and press PLAY on the VCR. (Refer to the VCR owner's manual.) Select S-VIDEO input source by using the 1 -3-5 buttons on the remote control. (Refer to p.71 ) 17 m -4 c -O When connecting with a RCA cable 1. How to connect ...

Operation Guide
Page 18
.... (Refer to external audio equipment via the Digital Audio Output (Optical) port. 1. Dolby Digital" in the Sound menu. (_ p,44) See the external audio equipment instruction manual for operation. 18 How to connect Connect one end of the optical cable to connect Connect the VIDEO2 jacks between TV and external equipment. EXTERNALEQUIPMENT...
.... (Refer to external audio equipment via the Digital Audio Output (Optical) port. 1. Dolby Digital" in the Sound menu. (_ p,44) See the external audio equipment instruction manual for operation. 18 How to connect Connect one end of the optical cable to connect Connect the VIDEO2 jacks between TV and external equipment. EXTERNALEQUIPMENT...

Operation Guide
Page 25
... a time for the TV to access these menus and displays. Shows currently selected sound setting. INFO Press the INFO. V-Chip Press the CC. In this manual, the OSD (On Screen Displays shown) may be different. are just generic examples Volume Display Press VOLUME. Channel Preview Press the CH PREVIEW. ON-SCREEN...
... a time for the TV to access these menus and displays. Shows currently selected sound setting. INFO Press the INFO. V-Chip Press the CC. In this manual, the OSD (On Screen Displays shown) may be different. are just generic examples Volume Display Press VOLUME. Channel Preview Press the CH PREVIEW. ON-SCREEN...

Operation Guide
Page 30
... • or • Z button to highlight the Setup menu and press the O K (Enter) button. Use the ADJ • or • button to highlight Manual Clock and press the OK (Enter)button. @ Use the ADJ I1_buttons to set the year, month, day, hours and minutes. -4 rT1 rT1 -4 -4 Press the MENU... button and then use the ADJ • or • button to highlight Manual and press the OK (Enter) button. On-Off Timers Setup Set the On-Off Timers using the procedures described above. 3O TIME SETTING CLOCK SETTING...
... • or • Z button to highlight the Setup menu and press the O K (Enter) button. Use the ADJ • or • button to highlight Manual Clock and press the OK (Enter)button. @ Use the ADJ I1_buttons to set the year, month, day, hours and minutes. -4 rT1 rT1 -4 -4 Press the MENU... button and then use the ADJ • or • button to highlight Manual and press the OK (Enter) button. On-Off Timers Setup Set the On-Off Timers using the procedures described above. 3O TIME SETTING CLOCK SETTING...

Operation Guide
Page 31
... next to clock. See the next page. MINUTES The last two digits that are entered when setting the clock, or the wake-up alarm. 31 Manual or Auto will be set the Daylight Savings and Time Zone options for your local area. O When finished, press MENU repeatedly to highlight Clock. Automatic...
... next to clock. See the next page. MINUTES The last two digits that are entered when setting the clock, or the wake-up alarm. 31 Manual or Auto will be set the Daylight Savings and Time Zone options for your local area. O When finished, press MENU repeatedly to highlight Clock. Automatic...

Operation Guide
Page 40
... MENU repeatedly to choose Dim0, Dim1, z -4 Dim2 or Dim3 and press the OK (Enter) button. © l-- PARENTALCONTROL/RATINGS Lock menu-Downloadable Rating in the CD manual is shown in this...
... MENU repeatedly to choose Dim0, Dim1, z -4 Dim2 or Dim3 and press the OK (Enter) button. © l-- PARENTALCONTROL/RATINGS Lock menu-Downloadable Rating in the CD manual is shown in this...

Operation Guide
Page 43
... Sound menu and press the O K (Enter) button. @ Use the ADJ • or • button to remove the menus. Use the ADJ I_ button to choose Manual and use ADJ I1_buttons to customize each option: or choose a preset mode like Music, Movie, etc. Use the ADJ • or • button to highlight...
... Sound menu and press the O K (Enter) button. @ Use the ADJ • or • button to remove the menus. Use the ADJ I_ button to choose Manual and use ADJ I1_buttons to customize each option: or choose a preset mode like Music, Movie, etc. Use the ADJ • or • button to highlight...

Operation Guide
Page 50
...and then use the ADJ • or • button to highlight the Picture menu and press the OK (Enter) button. dh 0 Z -4 0 t'- Use the Manual settings for the picture on the menu. The patient will then be able to view movies with more realism. @ Press the MENU button and then... the OK (Enter) button. O Use the ADJ • or • buttons to highlight Screen Format and press the OK (Enter) button. PICTURE CONTROL Manual Picture Adjustment To make custom picture settings, set your own settings for the dh options. Use the ADJ • or • button to choose a preset...
...and then use the ADJ • or • button to highlight the Picture menu and press the OK (Enter) button. dh 0 Z -4 0 t'- Use the Manual settings for the picture on the menu. The patient will then be able to view movies with more realism. @ Press the MENU button and then... the OK (Enter) button. O Use the ADJ • or • buttons to highlight Screen Format and press the OK (Enter) button. PICTURE CONTROL Manual Picture Adjustment To make custom picture settings, set your own settings for the dh options. Use the ADJ • or • button to choose a preset...

Operation Guide
Page 55
...You can do 2-5-4 + Menu mode more than once but this mode is being performed, specific steps need to know how to enter the 26LH1DC1 Installer menu and make and save changes in 0 the installer menu. At each cloning task as required. If the Master TV display panel...'s closable features like: Clock Set, adding channel icons and channel labels, etc. I'r'l N J Refer to the appropriate section in the Manual for the TV you need to be done at the indicated times to achieve the desired [_ ;'_::. _l_ •_,_,.0.,... +[qBl_li.l_;._:n_ ........'.i.!i'?."_'_ result....
...You can do 2-5-4 + Menu mode more than once but this mode is being performed, specific steps need to know how to enter the 26LH1DC1 Installer menu and make and save changes in 0 the installer menu. At each cloning task as required. If the Master TV display panel...'s closable features like: Clock Set, adding channel icons and channel labels, etc. I'r'l N J Refer to the appropriate section in the Manual for the TV you need to be done at the indicated times to achieve the desired [_ ;'_::. _l_ •_,_,.0.,... +[qBl_li.l_;._:n_ ........'.i.!i'?."_'_ result....

Operation Guide
Page 68
...performed, specific steps need to do 2-5-5 + MENU once. Run Auto Program. 4. PLEASE READ THE FOLLOWING... CH OVERIDE to enter the 26LH1DC1 Installer menu Tanodsemt aukep cahamnagsetser toTVthyeoudewfailul ltneveadluetos kansow required. Enter the Channel List/Channel Label menu and edit 68 how to 001 - This... is done more than one shown in this manual. If the message indicated does not appear, there is an without Icons. 6. Or, in the menu, before entering the Installer menu....
...performed, specific steps need to do 2-5-5 + MENU once. Run Auto Program. 4. PLEASE READ THE FOLLOWING... CH OVERIDE to enter the 26LH1DC1 Installer menu Tanodsemt aukep cahamnagsetser toTVthyeoudewfailul ltneveadluetos kansow required. Enter the Channel List/Channel Label menu and edit 68 how to 001 - This... is done more than one shown in this manual. If the message indicated does not appear, there is an without Icons. 6. Or, in the menu, before entering the Installer menu....


