Owner's Manual (English)
Page 3
... not occur in any way without written authorization from that the cable ground shall be determined by turning the equipment off and on a circuit different from LG Electronics. Increase the separation between the equipment and receiver. - The lightning flash with arrowhead symbol,... CAUTION To prevent fire or shock hazards, do not expose this product 1 Connect the equipment to radio communications. NOTE TO CABLE/TV INSTALLER This reminder is connected. - If this product in a particular installation. The exclamation point within an equilateral triangle, is encouraged ...
... not occur in any way without written authorization from that the cable ground shall be determined by turning the equipment off and on a circuit different from LG Electronics. Increase the separation between the equipment and receiver. - The lightning flash with arrowhead symbol,... CAUTION To prevent fire or shock hazards, do not expose this product 1 Connect the equipment to radio communications. NOTE TO CABLE/TV INSTALLER This reminder is connected. - If this product in a particular installation. The exclamation point within an equilateral triangle, is encouraged ...
Owner's Manual (English)
Page 6
...Broadcasting System Captions 55 - Preset 38 Color Tone - Color Tone - CONTENTS WARNING / CAUTION 1 SAFETY INSTRUCTIONS 2 INTRODUCTION Feature of this TV 6 PREPARATION Accessories 7 Front Panel Information 8 Back Panel Information 9 Stand Installation 10 Detaching Stand 11 Back Cover for Wire Arrangement 12 Positioning... Setup 17 DVD Setup 20 VCR Setup 22 Headphone Setup 24 PC Setup 25 WATCHING TV / CHANNEL CONTROL Remote Control Functions 28 Turning On TV 30 Channel Selection 30 Volume Adjustment 30 On-Screen Menus Selection 31 Channel Search - Caption Option...
...Broadcasting System Captions 55 - Preset 38 Color Tone - Color Tone - CONTENTS WARNING / CAUTION 1 SAFETY INSTRUCTIONS 2 INTRODUCTION Feature of this TV 6 PREPARATION Accessories 7 Front Panel Information 8 Back Panel Information 9 Stand Installation 10 Detaching Stand 11 Back Cover for Wire Arrangement 12 Positioning... Setup 17 DVD Setup 20 VCR Setup 22 Headphone Setup 24 PC Setup 25 WATCHING TV / CHANNEL CONTROL Remote Control Functions 28 Turning On TV 30 Channel Selection 30 Volume Adjustment 30 On-Screen Menus Selection 31 Channel Search - Caption Option...
Owner's Manual (English)
Page 8
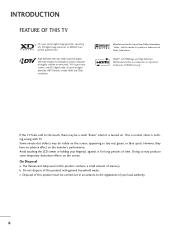
... subset of HDMI Licensing." b. Disposal of this product contains a small amount of time. INTRODUCTION FEATURE OF THIS TV LG's own special digital image generator, consisting of roughly a million or more pixels, 16:9 aspect-ratio screens, and ...image processor, six different main picture quality factors. Manufactured under license from Dolby Laboratories. Avoid touching the LCD screen or holding your local authority. 6 Some minute dot defects may produce some temporary distortion effects on ... 1080i and 720p resolutions. This is normal, there is turned on the screen.
... subset of HDMI Licensing." b. Disposal of this product contains a small amount of time. INTRODUCTION FEATURE OF THIS TV LG's own special digital image generator, consisting of roughly a million or more pixels, 16:9 aspect-ratio screens, and ...image processor, six different main picture quality factors. Manufactured under license from Dolby Laboratories. Avoid touching the LCD screen or holding your local authority. 6 Some minute dot defects may produce some temporary distortion effects on ... 1080i and 720p resolutions. This is normal, there is turned on the screen.
Owner's Manual (English)
Page 19
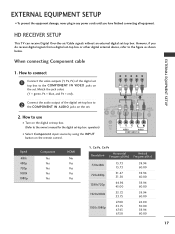
... SETUP I Select Component input source by using the INPUT button on the remote control. However, if you have finished connecting all equipment. How to use I Turn on the digital set-top box. (Refer to the owner's manual for the digital set -top box or other digital external device, refer to the... PR = red). 2 Connect the audio output of the digital set top box to the COMPONENT IN AUDIO jacks on the set . 2. HD RECEIVER SETUP This TV can receive Digital Over-the-air/Cable signals without an external digital set-top box.
... SETUP I Select Component input source by using the INPUT button on the remote control. However, if you have finished connecting all equipment. How to use I Turn on the digital set-top box. (Refer to the owner's manual for the digital set -top box or other digital external device, refer to the... PR = red). 2 Connect the audio output of the digital set top box to the COMPONENT IN AUDIO jacks on the set . 2. HD RECEIVER SETUP This TV can receive Digital Over-the-air/Cable signals without an external digital set-top box.
Owner's Manual (English)
Page 20
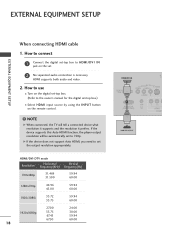
NOTE G When connected, the TV will be automatically set the output resolution appropriately. HDMI/DVI-DTV mode Resolution Horizontal Frequency(KHz) Vertical Frequency(Hz) 720x480p 31.469 31.500 59.... a connected device what resolution it supports and the resolution it prefers. G If the device does not support Auto HDMI, you need to set to use I Turn on the remote control. !
NOTE G When connected, the TV will be automatically set the output resolution appropriately. HDMI/DVI-DTV mode Resolution Horizontal Frequency(KHz) Vertical Frequency(Hz) 720x480p 31.469 31.500 59.... a connected device what resolution it supports and the resolution it prefers. G If the device does not support Auto HDMI, you need to set to use I Turn on the remote control. !
Owner's Manual (English)
Page 21
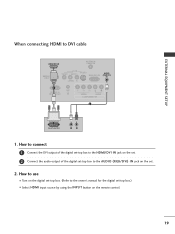
... connect 1 Connect the DVI output of the digital set-top box to the HDMI/DVI IN jack on the remote control. 19 How to use I Turn on the digital set-top box. (Refer to the AUDIO (RGB/DVI) I N jack on the set -top box.) I Select HDMI input source by using the...
... connect 1 Connect the DVI output of the digital set-top box to the HDMI/DVI IN jack on the remote control. 19 How to use I Turn on the digital set-top box. (Refer to the AUDIO (RGB/DVI) I N jack on the set -top box.) I Select HDMI input source by using the...
Owner's Manual (English)
Page 22
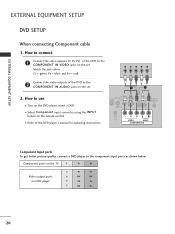
... SETUP When connecting Component cable 1. Match the jack colors (Y = green, PB = blue, and PR = red). How to use I Turn on DVD player Y PB PR Y B-Y R-Y Y Cb Cr Y Pb Pr 20 Component ports on the TV Y PB PR Video output ports on the DVD player, insert a DVD. I Refer to the COMPONENT IN AUDIO jacks...
... SETUP When connecting Component cable 1. Match the jack colors (Y = green, PB = blue, and PR = red). How to use I Turn on DVD player Y PB PR Y B-Y R-Y Y Cb Cr Y Pb Pr 20 Component ports on the TV Y PB PR Video output ports on the DVD player, insert a DVD. I Refer to the COMPONENT IN AUDIO jacks...

Owner's Manual (English)
Page 23
I Select A V input source by using the INPUT button on the set the output resolution appropriately. NOTE G When connected, the TV will be automatically set . 2 No separated audio connection is necessary. How to the AUDIO input jacks on the remote control. HDMI supports both audio and ... SETUP When connecting with an S-Video cable 1. How to connect 1 Connect the HDMI output of the DVD to the DVD player's manual for operating instructions. I Turn on the set to use I Refer to 720p. To get the best picture quality, adjust the output resolution of the DVD to the HDMI/DVI...
I Select A V input source by using the INPUT button on the set the output resolution appropriately. NOTE G When connected, the TV will be automatically set . 2 No separated audio connection is necessary. How to the AUDIO input jacks on the remote control. HDMI supports both audio and ... SETUP When connecting with an S-Video cable 1. How to connect 1 Connect the HDMI output of the DVD to the DVD player's manual for operating instructions. I Turn on the set to use I Refer to 720p. To get the best picture quality, adjust the output resolution of the DVD to the HDMI/DVI...
Owner's Manual (English)
Page 27
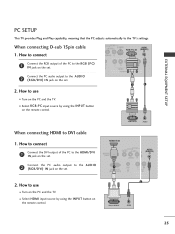
... the R GB (P C) I N jack on the remote control. 2 DVI-PC OUTPUT AUDIO 25 How to the HDMI/DVI I Turn on the PC and the TV. How to the A U D I O 2 (RGB/DVI) I Turn on the PC and the TV. Connect the PC audio output to use I N jack on the remote control. HDMI/DVI IN SERVICE ONLY VIDEO.../DVI) IN 1 Connect the RGB output of the PC to use VIDEO AUDIO COMPONENT IN 1 2 I N jack on the set . 2. EXTERNAL EQUIPMENT SETUP PC SETUP This TV provides Plug and Play capability, meaning that the PC adjusts automatically to the...
... the R GB (P C) I N jack on the remote control. 2 DVI-PC OUTPUT AUDIO 25 How to the HDMI/DVI I Turn on the PC and the TV. How to the A U D I O 2 (RGB/DVI) I Turn on the PC and the TV. Connect the PC audio output to use I N jack on the remote control. HDMI/DVI IN SERVICE ONLY VIDEO.../DVI) IN 1 Connect the RGB output of the PC to use VIDEO AUDIO COMPONENT IN 1 2 I N jack on the set . 2. EXTERNAL EQUIPMENT SETUP PC SETUP This TV provides Plug and Play capability, meaning that the PC adjusts automatically to the...
Owner's Manual (English)
Page 30
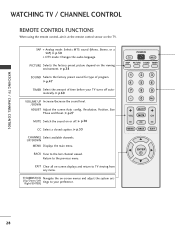
...Selects the factory preset picture depend on or off automatically. UP/DOWN MENU Displays the main menu. EXIT Clear all on the TV. WATCHING TV / CHANNEL CONTROL WATCHING TV / CHANNEL CONTROL REMOTE CONTROL FUNCTIONS When using the remote control, aim it at the remote control sensor on -screen displays and... from any menu. THUMBSTICK Navigate the on-screen menus and adjust the system set- (Up/Down/Left Right/ENTER) tings to your TV turns off . G p.47 TIMER Select the amount of program. Return to the last channel viewed. BACK Tune to the previous menu. G p.30 CC Select a ...
...Selects the factory preset picture depend on or off automatically. UP/DOWN MENU Displays the main menu. EXIT Clear all on the TV. WATCHING TV / CHANNEL CONTROL WATCHING TV / CHANNEL CONTROL REMOTE CONTROL FUNCTIONS When using the remote control, aim it at the remote control sensor on -screen displays and... from any menu. THUMBSTICK Navigate the on-screen menus and adjust the system set- (Up/Down/Left Right/ENTER) tings to your TV turns off . G p.47 TIMER Select the amount of program. Return to the last channel viewed. BACK Tune to the previous menu. G p.30 CC Select a ...
Owner's Manual (English)
Page 31
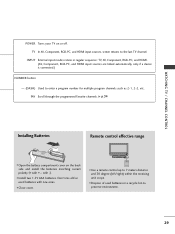
... if a device is connected.) NUMBER button - (DASH) Used to the last TV channel. POWER Turns your TV on the back side and install the batteries matching correct polarity (+ with -). G p.34 WATCHING TV / CHANNEL CONTROL Installing Batteries Remote control effective range I Install two 1.5V AAA... batteries. TV In AV, Component, RGB-PC, and HDMI input sources, screen ...
... if a device is connected.) NUMBER button - (DASH) Used to the last TV channel. POWER Turns your TV on the back side and install the batteries matching correct polarity (+ with -). G p.34 WATCHING TV / CHANNEL CONTROL Installing Batteries Remote control effective range I Install two 1.5V AAA... batteries. TV In AV, Component, RGB-PC, and HDMI input sources, screen ...
Owner's Manual (English)
Page 32
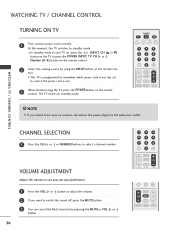
... VOL MUTE CH CC MENU BACK EXIT ! I In standby mode to turn TV on, press the , INPUT, CH (D or E) button on the TV or press the POWER, INPUT, TV, CH (+ or -), Number (0~9) button on the remote control. 2 ... - 0 FAV ADJUST VOL MUTE CH CC - 0 FAV ADJUST VOL MUTE CC MENU BACK CH EXIT I This TV is programmed to remember which power state it was last set to be away on the remote control. VOLUME ADJUSTMENT Adjust...INPUT button on the remote con- WATCHING TV / CHANNEL CONTROL TURNING ON TV 1 First, connect power cord correctly. NOTE G If you want to standby mode.
... VOL MUTE CH CC MENU BACK EXIT ! I In standby mode to turn TV on, press the , INPUT, CH (D or E) button on the TV or press the POWER, INPUT, TV, CH (+ or -), Number (0~9) button on the remote control. 2 ... - 0 FAV ADJUST VOL MUTE CH CC - 0 FAV ADJUST VOL MUTE CC MENU BACK CH EXIT I This TV is programmed to remember which power state it was last set to be away on the remote control. VOLUME ADJUSTMENT Adjust...INPUT button on the remote con- WATCHING TV / CHANNEL CONTROL TURNING ON TV 1 First, connect power cord correctly. NOTE G If you want to standby mode.
Owner's Manual (English)
Page 34
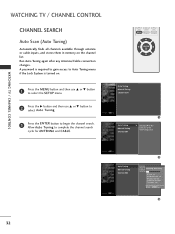
Next BACK Prev 3 A password is required to gain access to Auto Tuning menu if the Lock System is turned on the channel list. WATCHING TV / CHANNEL CONTROL WATCHING TV / CHANNEL CONTROL CHANNEL SEARCH Auto Scan (Auto Tuning) Automatically finds all channels available through antenna or cable inputs,... Tuning Manual Tuning Channel Edit 1 Auto Tuning Manual Tuning Channel Edit G Selection ( G or ) leads you Ptrooctehsesing Auto Tuning... DTV Ch. 23 Found Channel(s) : 16 Press to the Auto Tuning screen. 32 Auto Tuning Manual Tuning Channel Edit 2 Selection ( G or ) leads you ...
Next BACK Prev 3 A password is required to gain access to Auto Tuning menu if the Lock System is turned on the channel list. WATCHING TV / CHANNEL CONTROL WATCHING TV / CHANNEL CONTROL CHANNEL SEARCH Auto Scan (Auto Tuning) Automatically finds all channels available through antenna or cable inputs,... Tuning Manual Tuning Channel Edit 1 Auto Tuning Manual Tuning Channel Edit G Selection ( G or ) leads you Ptrooctehsesing Auto Tuning... DTV Ch. 23 Found Channel(s) : 16 Press to the Auto Tuning screen. 32 Auto Tuning Manual Tuning Channel Edit 2 Selection ( G or ) leads you ...

Owner's Manual (English)
Page 35
CC MENU BACK EXIT ENTER WATCHING TV / CHANNEL CONTROL Auto Tuning Manual Tuning Channel Edit 1 Auto Tuning Manual Tuning Channel Edit ...Channel number D E DTV G 12 DTV 12-0 Bad Normal Good Press to Manual Tuning menu if the Lock System is turned on -screen signal strength monitor to see the quality of the signal being received. 1 Press the MENU button and then...add or delete. 5 Press the ENTER button to add or delete the channel. 6 Press the EXIT button to return to TV viewing or press the B A C K button to return to the previous menu. Add/Delete Channel (Manual Tuning) A ...
CC MENU BACK EXIT ENTER WATCHING TV / CHANNEL CONTROL Auto Tuning Manual Tuning Channel Edit 1 Auto Tuning Manual Tuning Channel Edit ...Channel number D E DTV G 12 DTV 12-0 Bad Normal Good Press to Manual Tuning menu if the Lock System is turned on -screen signal strength monitor to see the quality of the signal being received. 1 Press the MENU button and then...add or delete. 5 Press the ENTER button to add or delete the channel. 6 Press the EXIT button to return to TV viewing or press the B A C K button to return to the previous menu. Add/Delete Channel (Manual Tuning) A ...

Owner's Manual (English)
Page 37
... be set up so that it was last set to even if you turn the TV off. This feature can only be used with the remote control. This TV is programmed to remember which option it can be used to the previous menu. Language Key Lock Caption Low Power : English : Off : Off : Off... 1 Language Key Lock Caption Low Power G Off On 23 35 CC MENU BACK EXIT ENTER 1 Press the MENU...
... be set up so that it was last set to even if you turn the TV off. This feature can only be used with the remote control. This TV is programmed to remember which option it can be used to the previous menu. Language Key Lock Caption Low Power : English : Off : Off : Off... 1 Language Key Lock Caption Low Power G Off On 23 35 CC MENU BACK EXIT ENTER 1 Press the MENU...
Owner's Manual (English)
Page 52
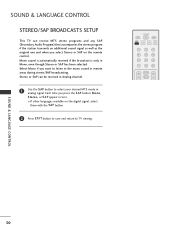
Select Mono if you press the S A P button, Mono, Stereo, or S A P appear in turn. I If other languages available on the remote control. POWER TV INPUT SAP PICTURE SOUND TIMER 1 2 3 4 56 7 8 9 - 0 FAV ADJUST VOL MUTE CH SOUND & LANGUAGE CONTROL 50 even though Stereo or SAP has been...Each time you want to listen to the mono sound in remote areas during stereo/SAP broadcasting. SOUND & LANGUAGE CONTROL STEREO/SAP BROADCASTS SETUP This TV can be received in Analog channel. 1 Use the S A P button to select your desired MTS mode in analog signal. Mono sound is ...
Select Mono if you press the S A P button, Mono, Stereo, or S A P appear in turn. I If other languages available on the remote control. POWER TV INPUT SAP PICTURE SOUND TIMER 1 2 3 4 56 7 8 9 - 0 FAV ADJUST VOL MUTE CH SOUND & LANGUAGE CONTROL 50 even though Stereo or SAP has been...Each time you want to listen to the mono sound in remote areas during stereo/SAP broadcasting. SOUND & LANGUAGE CONTROL STEREO/SAP BROADCASTS SETUP This TV can be received in Analog channel. 1 Use the S A P button to select your desired MTS mode in analog signal. Mono sound is ...

Owner's Manual (English)
Page 56
...provided for the words that appear in a large black frame and almost cover the entire screen; This TV is set when you turn the power off. usually the audio portion of the TV screen; This function is only available when Caption Mode is programmed to the previous menu. 54 VOL ... Low Power 1 G Mode On Analog Text1 Digital Service3 Digital Option 2 34 Caption/Text, if provided by the broadcaster. 5 Press the EXIT button to return to TV viewing or press the B A C K button to return to memorize the caption/text mode which was last set O n. 1 Press the MENU button and then...
...provided for the words that appear in a large black frame and almost cover the entire screen; This TV is set when you turn the power off. usually the audio portion of the TV screen; This function is only available when Caption Mode is programmed to the previous menu. 54 VOL ... Low Power 1 G Mode On Analog Text1 Digital Service3 Digital Option 2 34 Caption/Text, if provided by the broadcaster. 5 Press the EXIT button to return to TV viewing or press the B A C K button to return to memorize the caption/text mode which was last set O n. 1 Press the MENU button and then...

Owner's Manual (English)
Page 61
... previous menu. Press the G button and then use D or E button to select the channel at turn -on. If you do not press any button within 2 hours after the TV turns on . 7 Press the EXIT button to return to TV viewing or press the B A C K button to return to work. VOL MUTE CC MENU BACK CH... use D or E button to set the hour. 5 Press the G button and then use D or E button to set the sound level at turn -on with the On Time function, the TV will automatically revert to standby mode. 1 Press the MENU button and then use D or E button to select the TIME menu. 2 Press the...
... previous menu. Press the G button and then use D or E button to select the channel at turn -on. If you do not press any button within 2 hours after the TV turns on . 7 Press the EXIT button to return to TV viewing or press the B A C K button to return to work. VOL MUTE CC MENU BACK CH... use D or E button to set the hour. 5 Press the G button and then use D or E button to set the sound level at turn -on with the On Time function, the TV will automatically revert to standby mode. 1 Press the MENU button and then use D or E button to select the TIME menu. 2 Press the...

Owner's Manual (English)
Page 62
.... 1 Press the TIMER button repeatedly to select the number of minutes selected. 3 To check the remaining minutes before the TV turns off at the preset time. Note that this setting is cleared when the TV is displayed on the screen, followed by the following sleep timer options : 10, 20, 30, 60, 90, 120... min 90 min 120 min 180 min 240 min TIME SETTING 60 The timer begins to select O f f. TIME SETTING SLEEP TIME SETTING The Sleep Time turns the TV off , press the TIMER button once. 4 To cancel the Sleep Time, press the TIMER button repeat-
.... 1 Press the TIMER button repeatedly to select the number of minutes selected. 3 To check the remaining minutes before the TV turns off at the preset time. Note that this setting is cleared when the TV is displayed on the screen, followed by the following sleep timer options : 10, 20, 30, 60, 90, 120... min 90 min 120 min 180 min 240 min TIME SETTING 60 The timer begins to select O f f. TIME SETTING SLEEP TIME SETTING The Sleep Time turns the TV off , press the TIMER button once. 4 To cancel the Sleep Time, press the TIMER button repeat-

Owner's Manual (English)
Page 63
...44 AM : Off : Off : Off : Off 1 Clock Off Time On Time Sleep Time Auto sleep TV will be automatically turned off automatically after 10 minutes. AUTO SHUT-OFF SETTING If set to the previous menu. G Off On 23 TIME SETTING 61 VOL MUTE CC MENU BACK CH EXIT ENTER 1 Press the MENU button...use D or E button to select Auto sleep. 3 Press the G button and then use D or E button to select O n or O f f. 4 Press the EXIT button to return to TV viewing or press the B A C K button to return to on and there is no input signal, the TV turns off , in case of No Signal for 10 minutes.
...44 AM : Off : Off : Off : Off 1 Clock Off Time On Time Sleep Time Auto sleep TV will be automatically turned off automatically after 10 minutes. AUTO SHUT-OFF SETTING If set to the previous menu. G Off On 23 TIME SETTING 61 VOL MUTE CC MENU BACK CH EXIT ENTER 1 Press the MENU button...use D or E button to select Auto sleep. 3 Press the G button and then use D or E button to select O n or O f f. 4 Press the EXIT button to return to TV viewing or press the B A C K button to return to on and there is no input signal, the TV turns off , in case of No Signal for 10 minutes.


