
Brochure
Page 5
..., and if its appearance indicates damage or deterioration, unplug it to be placed upon . The plug must remain readily operable. 3 8 Use only with the cart, stand, tripod, bracket, or table specified by connecting it , discontinue use of the appliance, and have the cord replaced 14 GROUNDING Ensure that appliance and has...
..., and if its appearance indicates damage or deterioration, unplug it to be placed upon . The plug must remain readily operable. 3 8 Use only with the cart, stand, tripod, bracket, or table specified by connecting it , discontinue use of the appliance, and have the cord replaced 14 GROUNDING Ensure that appliance and has...

Brochure
Page 6
... Captions 53 Caption Option 54 CONTENTS WARNING / CAUTION 1 SAFETY INSTRUCTIONS 2 INTRODUCTION 6 Feature of this TV 6 PREPARATION Accessories 7 Front Panel Information 8 Back Panel Information 9 Stand Installation 10 Detaching Stand 11 Back Cover for Wire Arrangement 12 Positioning your display 13 VESA Wall Mounting 14 Desktop Pedestal Installation 14 Kensington Security System 15 Attaching...
... Captions 53 Caption Option 54 CONTENTS WARNING / CAUTION 1 SAFETY INSTRUCTIONS 2 INTRODUCTION 6 Feature of this TV 6 PREPARATION Accessories 7 Front Panel Information 8 Back Panel Information 9 Stand Installation 10 Detaching Stand 11 Back Cover for Wire Arrangement 12 Positioning your display 13 VESA Wall Mounting 14 Desktop Pedestal Installation 14 Kensington Security System 15 Attaching...

Brochure
Page 10
NOTE G If your TV. Then wipe the stand with polishing cloth. 8 When the TV is turned on, the indicator blinks green and then illuminates green before the picture is displayed. ! PREPARATION PREPARATION FRONT PANEL INFORMATION I INPUT MENU ENTER VOL CH Remote Control Sensor Power Standby Indicator Illuminates red in standby mode. POWER INPUT MENU ENTER VOLUME CHANNEL Button Button Button Button (F,G)Buttons (E,D)Buttons /I Here shown may be somewhat different from your TV stand has a protection film, remove it attached to the stand.
NOTE G If your TV. Then wipe the stand with polishing cloth. 8 When the TV is turned on, the indicator blinks green and then illuminates green before the picture is displayed. ! PREPARATION PREPARATION FRONT PANEL INFORMATION I INPUT MENU ENTER VOL CH Remote Control Sensor Power Standby Indicator Illuminates red in standby mode. POWER INPUT MENU ENTER VOLUME CHANNEL Button Button Button Button (F,G)Buttons (E,D)Buttons /I Here shown may be somewhat different from your TV stand has a protection film, remove it attached to the stand.

Brochure
Page 12
stand body cover base 2 Carefully place the product screen side down on a cushioned surface that will protect product and screen from your TV. 1 Assemble parts of the stand body with cover base of the stand. Insert the stand body into a cover base until clicking sound. PREPARATION PREPARATION STAND INSTALLATION I Here shown may be somewhat different from damage. 3 Place the product stand on the product as shown. 10
stand body cover base 2 Carefully place the product screen side down on a cushioned surface that will protect product and screen from your TV. 1 Assemble parts of the stand body with cover base of the stand. Insert the stand body into a cover base until clicking sound. PREPARATION PREPARATION STAND INSTALLATION I Here shown may be somewhat different from damage. 3 Place the product stand on the product as shown. 10

Brochure
Page 13
PREPARATION DETACHING STAND I Here shown may be somewhat different from your TV. 1 Carefully place the product screen side down on a cushioned surface that will protect product and screen from damage. 2 Pull cover base backward while pressing button on stand body. 3 Shake the base while pulling, it will separate from stand body. 4 Hold the stand and bend it upward. 5 Pull stand body to separate from set while press- ing the 2 latches. 11
PREPARATION DETACHING STAND I Here shown may be somewhat different from your TV. 1 Carefully place the product screen side down on a cushioned surface that will protect product and screen from damage. 2 Pull cover base backward while pressing button on stand body. 3 Shake the base while pulling, it will separate from stand body. 4 Hold the stand and bend it upward. 5 Pull stand body to separate from set while press- ing the 2 latches. 11

Brochure
Page 17
.... The Kensington Security System is equipped with the Kensington Security System. For further information, contact http://www.kensington.com, the internet homepage of the product) Stand Desk WARNING G This apparatus must be securely attached to the user's guide provided with a Kensington Security System connector on the back panel. NOTE - ATTACHING THE...
.... The Kensington Security System is equipped with the Kensington Security System. For further information, contact http://www.kensington.com, the internet homepage of the product) Stand Desk WARNING G This apparatus must be securely attached to the user's guide provided with a Kensington Security System connector on the back panel. NOTE - ATTACHING THE...
Brochure
Page 71
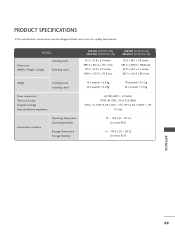
... (Width x Height x Depth) Including stand Excluding stand 20LS7D (20LS7D-UB) 20LS7DC (20LS7DC-UB) 19.7 x 15.8 x 6.9 inches 499.4 x 401.2 x 175.1 mm 19.7 x 14.0 x 2.9 inches 499.4 x 355.0 x 72.9 mm 23LS7D (23LS7D-UB) 23LS7DC (23LS7DC-UB) 22.9 x 18.1 x 7.8 inches 581.3 x 458.9 x 198.8 mm 22.9 x 16.3 x 3.3 inches 581.3 x 412.9 x 83.9 mm Weight including stand excluding stand 14.1 pounds / 6.4 kg 13...
... (Width x Height x Depth) Including stand Excluding stand 20LS7D (20LS7D-UB) 20LS7DC (20LS7DC-UB) 19.7 x 15.8 x 6.9 inches 499.4 x 401.2 x 175.1 mm 19.7 x 14.0 x 2.9 inches 499.4 x 355.0 x 72.9 mm 23LS7D (23LS7D-UB) 23LS7DC (23LS7DC-UB) 22.9 x 18.1 x 7.8 inches 581.3 x 458.9 x 198.8 mm 22.9 x 16.3 x 3.3 inches 581.3 x 412.9 x 83.9 mm Weight including stand excluding stand 14.1 pounds / 6.4 kg 13...


