
Data Security Kit (E) Operation Guide
Page 7
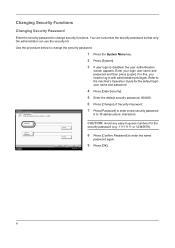
... Security Password Enter the security password to change the security password. 1 Press the System Menu key. 2 Press [System]. 3 If user login is disabled, the user authentication screen appears. Confirm Password Status # Keys Cancel OK 10/10/2008 10:10 8 Press [Confirm Password] ...this, you need to -guess numbers for the default login user name and password. 4 Press [Data Security]. 5 Enter the default security password, 000000. 6 Press [Change] of Security Password. Enter your login user name and password and then press [Login]. Password CAUTION: Avoid any easy-to log in...
... Security Password Enter the security password to change the security password. 1 Press the System Menu key. 2 Press [System]. 3 If user login is disabled, the user authentication screen appears. Confirm Password Status # Keys Cancel OK 10/10/2008 10:10 8 Press [Confirm Password] ...this, you need to -guess numbers for the default login user name and password. 4 Press [Data Security]. 5 Enter the default security password, 000000. 6 Press [Change] of Security Password. Enter your login user name and password and then press [Login]. Password CAUTION: Avoid any easy-to log in...
Data Security Kit (E) Operation Guide
Page 8
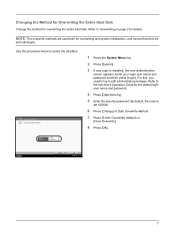
...set 000000. 6 Press [Change] of Data Overwrite Method. 7 Press [3-time Overwrite] (default) or [Once Overwrite]. 8 Press [OK]. Enter your login user name and password and then press [Login]. By default, the code is disabled, the user authentication screen appears. Use the procedure below to log .... System - Refer to Overwriting on page 2 for overwriting the entire hard disk. NOTE: The overwrite methods are used both for the default login user name and password. 4 Press [Data Security]. 5 Enter the security password. Once Overwrite 3-time Overwrite Status Cancel OK 10/10/...
...set 000000. 6 Press [Change] of Data Overwrite Method. 7 Press [3-time Overwrite] (default) or [Once Overwrite]. 8 Press [OK]. Enter your login user name and password and then press [Login]. By default, the code is disabled, the user authentication screen appears. Use the procedure below to log .... System - Refer to Overwriting on page 2 for overwriting the entire hard disk. NOTE: The overwrite methods are used both for the default login user name and password. 4 Press [Data Security]. 5 Enter the security password. Once Overwrite 3-time Overwrite Status Cancel OK 10/10/...

420i/520i Operation Guide
Page 49
...75. 1 Press the System Menu key. Press [+] or [-] in the header of installation. Refer to view the next region. Date/Timer - If user login administration is used. Summer Time 1/13 Off On Cancel OK 08/08/2009 10:10 10 Day 4 Press [Off] or [On] of Time Zone. ...at the place of the E-mail message. For details, refer to Optional Functions on page 11-5 for the default login user name and password. Enter a login user name and password, and press [Login]. Time Zone Set time zone. Select the location nearest you select a region that does not utilize summer time...
...75. 1 Press the System Menu key. Press [+] or [-] in the header of installation. Refer to view the next region. Date/Timer - If user login administration is used. Summer Time 1/13 Off On Cancel OK 08/08/2009 10:10 10 Day 4 Press [Off] or [On] of Time Zone. ...at the place of the E-mail message. For details, refer to Optional Functions on page 11-5 for the default login user name and password. Enter a login user name and password, and press [Login]. Time Zone Set time zone. Select the location nearest you select a region that does not utilize summer time...
420i/520i Operation Guide
Page 50
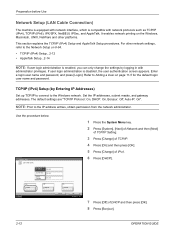
..., the user authentication screen appears. Set the IP addresses, subnet masks, and gateway addresses. Enter a login user name and password, and press [Login]. IPv4 Set TCP/IP (IPv4). The default settings are "TCP/IP Protocol: On, DHCP: On, Bonjour: Off, Auto-IP: On". Preparation ... [Change] of DHCP and then press [OK]. 8 Press [Bonjour]. 2-12 OPERATION GUIDE It enables network printing on page 11-5 for the default login user name and password. Use the procedure below. NOTE: Prior to Adding a User on the Windows, Macintosh, UNIX, NetWare and other network settings...
..., the user authentication screen appears. Set the IP addresses, subnet masks, and gateway addresses. Enter a login user name and password, and press [Login]. IPv4 Set TCP/IP (IPv4). The default settings are "TCP/IP Protocol: On, DHCP: On, Bonjour: Off, Auto-IP: On". Preparation ... [Change] of DHCP and then press [OK]. 8 Press [Bonjour]. 2-12 OPERATION GUIDE It enables network printing on page 11-5 for the default login user name and password. Use the procedure below. NOTE: Prior to Adding a User on the Windows, Macintosh, UNIX, NetWare and other network settings...
420i/520i Operation Guide
Page 290
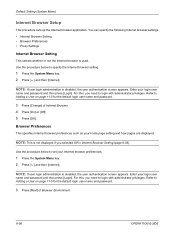
... is disabled, the user authentication screen appears. NOTE: If user login administration is used. Enter your login user name and password and then press [Login]. For this , you need to Adding a User on page 11-5 for the default login user name and password. 3 Press [Change] of Browser Environment....]. Refer to set your home page setting and how pages are displayed. Use the procedure below to Adding a User on page 11-5 for the default login user name and password. 3 Press [Next] of Internet Browser. 4 Press [On] or [Off]. 5 Press [OK]. Browser Preferences This specifies...
... is disabled, the user authentication screen appears. NOTE: If user login administration is used. Enter your login user name and password and then press [Login]. For this , you need to Adding a User on page 11-5 for the default login user name and password. 3 Press [Change] of Browser Environment....]. Refer to set your home page setting and how pages are displayed. Use the procedure below to Adding a User on page 11-5 for the default login user name and password. 3 Press [Next] of Internet Browser. 4 Press [On] or [Off]. 5 Press [OK]. Browser Preferences This specifies...
420i/520i Operation Guide
Page 291
... administrator privileges. NOTE: Refer to the Character Entry Method on Appendix-10 for details on page 11-5 for the default login user name and password. 3 Press [Change] of Proxy and then press [On]. To set a proxy server (HTTP) 1 Press [Keyboard] of Proxy Server (...User on entering characters. 5 To set the display mode, press [Change] of Display Mode, select [Normal], [Just-Fit Rendering] or [Smart- NOTE: If user login administration is used 1 Press [Keyboard] of Home Page, press [URL], enter the URL and then press [OK]. Enter your home page, press [Change] of Do...
... administrator privileges. NOTE: Refer to the Character Entry Method on Appendix-10 for details on page 11-5 for the default login user name and password. 3 Press [Change] of Proxy and then press [On]. To set a proxy server (HTTP) 1 Press [Keyboard] of Proxy Server (...User on entering characters. 5 To set the display mode, press [Change] of Display Mode, select [Normal], [Just-Fit Rendering] or [Smart- NOTE: If user login administration is used 1 Press [Keyboard] of Home Page, press [URL], enter the URL and then press [OK]. Enter your home page, press [Change] of Do...

420i/520i Operation Guide
Page 292
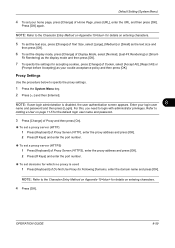
...the application being installed, the installation may take some time. Default Setting (System Menu) Applications You can install and use applications that will make your login user name and password and then press [Login]. NOTE: If Removable Memory is disabled, the user authentication... application by pressing [Detail]. 6 When the confirmation screen appears, press [Yes]. Displaying files. Refer to Adding a User on page 11-5 for the default login user name and password. 4 Press [Add]. 5 Select the application to Activate. appears, press [No]. 2 Press the System Menu key. 3 Press...
...the application being installed, the installation may take some time. Default Setting (System Menu) Applications You can install and use applications that will make your login user name and password and then press [Login]. NOTE: If Removable Memory is disabled, the user authentication... application by pressing [Detail]. 6 When the confirmation screen appears, press [Yes]. Displaying files. Refer to Adding a User on page 11-5 for the default login user name and password. 4 Press [Add]. 5 Select the application to Activate. appears, press [No]. 2 Press the System Menu key. 3 Press...
420i/520i Operation Guide
Page 293
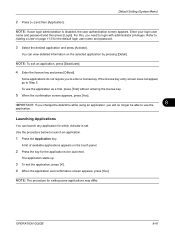
...;]. 4 When the application exit confirmation screen appears, press [Yes]. Use the procedure below to Step 5. NOTE: The procedure for the default login user name and password. 3 Select the desired application and press [Activate]. Default Setting (System Menu) 2 Press [ ] and then [Application]. Some applications do not require you need to use the application as...
...;]. 4 When the application exit confirmation screen appears, press [Yes]. Use the procedure below to Step 5. NOTE: The procedure for the default login user name and password. 3 Select the desired application and press [Activate]. Default Setting (System Menu) 2 Press [ ] and then [Application]. Some applications do not require you need to use the application as...
420i/520i Operation Guide
Page 294
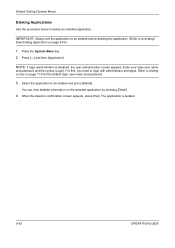
... Application on the selected application by pressing [Detail]. 4 When the deletion confirmation screen appears, press [Yes]. Refer to Adding a User on page 11-5 for the default login user name and password. 3 Select the application to be deleted before deleting the application. (Refer to be deleted and press [Delete...
... Application on the selected application by pressing [Detail]. 4 When the deletion confirmation screen appears, press [Yes]. Refer to Adding a User on page 11-5 for the default login user name and password. 3 Select the application to be deleted before deleting the application. (Refer to be deleted and press [Delete...
420i/520i Operation Guide
Page 295
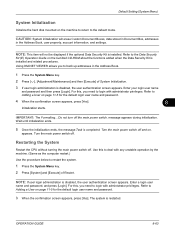
... password. 4 When the confirmation screen appears, press [Yes]. 8 Initialization starts. Refer to login with administrator privileges. appears. Refer to the default mode. OPERATION GUIDE 8-63 Default Setting (System Menu) System Initialization Initialize the hard disk mounted on page 11-5 for the default login user name and password. 3 When the confirmation screen appears, press [Yes]. Refer...
... password. 4 When the confirmation screen appears, press [Yes]. 8 Initialization starts. Refer to login with administrator privileges. appears. Refer to the default mode. OPERATION GUIDE 8-63 Default Setting (System Menu) System Initialization Initialize the hard disk mounted on page 11-5 for the default login user name and password. 3 When the confirmation screen appears, press [Yes]. Refer...
420i/520i Operation Guide
Page 303
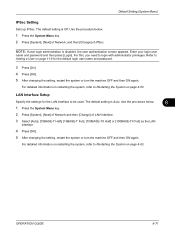
Default Setting (System Menu) IPSec Setting Sets up IPSec. Enter your login user name and password and then press [Login]. For detailed information on restarting the system, refer to Restarting the System on page 8-63. OPERATION GUIDE 8-71 Use the .... 2 Press [System], [Next] of Network and then [Change] of IPSec. The default setting is Off. NOTE: If user login administration is disabled, the user authentication screen appears. LAN Interface Setup Specify the settings for the default login user name and password. 3 Press [On]. 4 Press [OK]. 5 After changing the...
Default Setting (System Menu) IPSec Setting Sets up IPSec. Enter your login user name and password and then press [Login]. For detailed information on restarting the system, refer to Restarting the System on page 8-63. OPERATION GUIDE 8-71 Use the .... 2 Press [System], [Next] of Network and then [Change] of IPSec. The default setting is Off. NOTE: If user login administration is disabled, the user authentication screen appears. LAN Interface Setup Specify the settings for the default login user name and password. 3 Press [On]. 4 Press [OK]. 5 After changing the...
420i/520i Operation Guide
Page 304
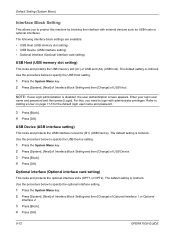
... [Block]. 4 Press [OK]. 8-72 OPERATION GUIDE Default Setting (System Menu) Interface Block Setting This allows you to protect this , you need to login with external devices such as USB hosts or optional interfaces. NOTE: If user login administration is Unblock. Refer to specify the USB Device ...Press [Block]. 4 Press [OK]. Enter your login user name and password and then press [Login]. Use the procedure below to Adding a User on page 11-5 for the default login user name and password. 3 Press [Block]. 4 Press [OK]. The default setting is disabled, the user authentication screen appears. ...
... [Block]. 4 Press [OK]. 8-72 OPERATION GUIDE Default Setting (System Menu) Interface Block Setting This allows you to protect this , you need to login with external devices such as USB hosts or optional interfaces. NOTE: If user login administration is Unblock. Refer to specify the USB Device ...Press [Block]. 4 Press [OK]. Enter your login user name and password and then press [Login]. Use the procedure below to Adding a User on page 11-5 for the default login user name and password. 3 Press [Block]. 4 Press [OK]. The default setting is disabled, the user authentication screen appears. ...
420i/520i Operation Guide
Page 306
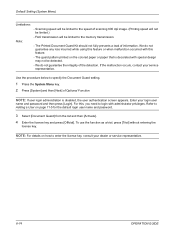
... 2 Press [System] and then [Next] of information. The Printed Document Guard Kit should not fully prevents a leak of Optional Function. NOTE: If user login administration is decorated with special design may not be detected. - To use the function as a trial, press [Trial] without entering the license key. Enter ... of scanning 600 dpi image. (Printing speed will be limited.) - For this, you need to Adding a User on page 11-5 for the default login user name and password. 3 Select [Document Guard] from the list and then [Activate]. 4 Enter the license key and press [Official...
... 2 Press [System] and then [Next] of information. The Printed Document Guard Kit should not fully prevents a leak of Optional Function. NOTE: If user login administration is decorated with special design may not be detected. - To use the function as a trial, press [Trial] without entering the license key. Enter ... of scanning 600 dpi image. (Printing speed will be limited.) - For this, you need to Adding a User on page 11-5 for the default login user name and password. 3 Select [Document Guard] from the list and then [Activate]. 4 Enter the license key and press [Official...

420i/520i Operation Guide
Page 307
... you need to copy or send that contain important confidential or personal information. OPERATION GUIDE 8-75 You can use these applications for the default login user name and password. 3 Select the desired application and press [Activate]. To use the application as the number of Optional Function. ... and/or transmission of the Applications The applications listed below to start using an application, you to Step 5. Default Setting (System Menu) Optional Functions You can use the optional applications installed on this feature imprints a special pattern on the document.
... you need to copy or send that contain important confidential or personal information. OPERATION GUIDE 8-75 You can use these applications for the default login user name and password. 3 Select the desired application and press [Activate]. To use the application as the number of Optional Function. ... and/or transmission of the Applications The applications listed below to start using an application, you to Step 5. Default Setting (System Menu) Optional Functions You can use the optional applications installed on this feature imprints a special pattern on the document.

420i/520i Operation Guide
Page 308
... is disabled, the user authentication screen appears. You can now view detailed information on page 11-5 for the default login user name and password. 3 Select the application you need to login with administrator privileges. Default Setting (System Menu) Checking Application Details Use the procedure below to check the details of an application. 1 Press the...
... is disabled, the user authentication screen appears. You can now view detailed information on page 11-5 for the default login user name and password. 3 Select the application you need to login with administrator privileges. Default Setting (System Menu) Checking Application Details Use the procedure below to check the details of an application. 1 Press the...
420i/520i Operation Guide
Page 356
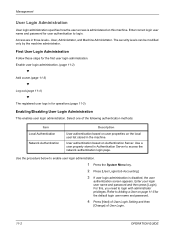
User, Administrator, and Machine Administrator. First User Login Administration Follow these steps for the default login user name and password. 4 Press [Next] of User Login Setting and then [Change] of the following authentication methods: Item Local Authentication Network Authentication Description User authentication based on user properties on Authentication Server. Use a ...
User, Administrator, and Machine Administrator. First User Login Administration Follow these steps for the default login user name and password. 4 Press [Next] of User Login Setting and then [Change] of the following authentication methods: Item Local Authentication Network Authentication Description User authentication based on user properties on Authentication Server. Use a ...

420i/520i Operation Guide
Page 359
... recommended to 1,000 users (including the default login user name). You can login without entering the account ID. The same login user name cannot be registered. The user can register his /her E-mail address. Enter the login user name to login (up to 64 characters). Item Description User Name* Login User Name* Login Password* Access Level* Account Name...
... recommended to 1,000 users (including the default login user name). You can login without entering the account ID. The same login user name cannot be registered. The user can register his /her E-mail address. Enter the login user name to login (up to 64 characters). Item Description User Name* Login User Name* Login Password* Access Level* Account Name...
420i/520i Operation Guide
Page 360
NOTE: Refer to the Character Entry Method on Appendix-10 for the default login user name and password. 5 Press [Next] of User Login Setting, [Register/Edit] of Local User List, and then [Add]. 6 Press [Change] of Account Name. 17 Select the account and press [OK]. Press [Search(... 7 Enter the user name and press [OK]. NOTE: Select [Name] and [ID] from the Sort pull-down menu to login with administrator privileges. For this user will be attached. Management User: User Name: 01 User Login User Name: 0099 Access Level: User E-mail Address: [email protected] Change Change Change Change...
NOTE: Refer to the Character Entry Method on Appendix-10 for the default login user name and password. 5 Press [Next] of User Login Setting, [Register/Edit] of Local User List, and then [Add]. 6 Press [Change] of Account Name. 17 Select the account and press [OK]. Press [Search(... 7 Enter the user name and press [OK]. NOTE: Select [Name] and [ID] from the Sort pull-down menu to login with administrator privileges. For this user will be attached. Management User: User Name: 01 User Login User Name: 0099 Access Level: User E-mail Address: [email protected] Change Change Change Change...

420i/520i Operation Guide
Page 361
...System Menu key. 2 Press [User Login/Job Accounting]. 3 If user login administration is changed. For this, you wish to change a user property. 3 Press [Register]. 4 Press [Yes] in User properties can be changed may be different depending on page 11-5 for the default login user name and password. 4 Press... [Next] of User Login Setting and [Register/ Edit] of user properties that could be changed and users can be edited. User: User Name...
...System Menu key. 2 Press [User Login/Job Accounting]. 3 If user login administration is changed. For this, you wish to change a user property. 3 Press [Register]. 4 Press [Yes] in User properties can be changed may be different depending on page 11-5 for the default login user name and password. 4 Press... [Next] of User Login Setting and [Register/ Edit] of user properties that could be changed and users can be edited. User: User Name...
420i/520i Operation Guide
Page 363
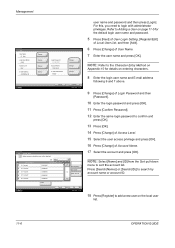
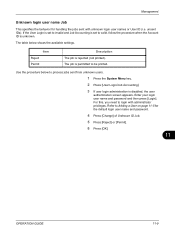
... ID (i.e. Item Reject Permit Description The job is disabled, the user authentication screen appears. Enter your login user name and password and then press [Login]. Management Unknown login user name Job This specifies the behavior for the default login user name and password. 4 Press [Change] of Unknown ID Job. 5 Press [Reject] or [Permit]. 6 Press [OK...
... ID (i.e. Item Reject Permit Description The job is disabled, the user authentication screen appears. Enter your login user name and password and then press [Login]. Management Unknown login user name Job This specifies the behavior for the default login user name and password. 4 Press [Change] of Unknown ID Job. 5 Press [Reject] or [Permit]. 6 Press [OK...


