Kyocera TASKalfa 3500i Drum
View Results Below
Free Kyocera TASKalfa 3500i manuals!
Problems with Kyocera TASKalfa 3500i?
Ask a Question
Free Kyocera TASKalfa 3500i manuals!
Problems with Kyocera TASKalfa 3500i?
Ask a Question
Related Manual Pages


Similar Questions

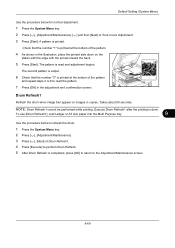
Drum Resetting
step by step way of doing kyocera 2050 drum reset
step by step way of doing kyocera 2050 drum reset
(Posted by vivianjude070 2 years ago)

How To Know If Drum Needs Replaced?
My Kyocera 1820 prints black lines/smidges copies. Tried replacing toner. Drum?
My Kyocera 1820 prints black lines/smidges copies. Tried replacing toner. Drum?
(Posted by brupe 10 years ago)

How To Replace Km1500 Drum
i need to replace my km 1500 drum but i dont know the procedures
i need to replace my km 1500 drum but i dont know the procedures
(Posted by arnoldbutchdiopenes 11 years ago)