

Data Security Kit (E) Operation Guide Rev-2 2011.2
Page 7
Disposal If the machine is unused and demolished, obtain directions for the procedures. Refer to page 7 for disposal from the dealer (from which you can change the security password as well as required, either at installation or later. The changes could be given as the method for overwriting the entire hard disk. After Installation After installing the security kit, you purchsed the machine) or a Kyocera Mita representative. 6
Disposal If the machine is unused and demolished, obtain directions for the procedures. Refer to page 7 for disposal from the dealer (from which you can change the security password as well as required, either at installation or later. The changes could be given as the method for overwriting the entire hard disk. After Installation After installing the security kit, you purchsed the machine) or a Kyocera Mita representative. 6
Data Security Kit (E) Operation Guide Rev-2 2011.2
Page 8
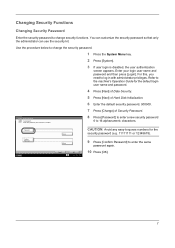
.... 10 Press [OK]. 7 Refer to the machine's Operation Guide for the # Keys security password (e.g. 11111111 or 12345678). System - Confirm Password Status # Keys Cancel OK 9 Press [Confirm Password] to change security functions. Changing Security Functions Changing Security Password Enter the security password to log in with administrator privileges. For this, you need to change the security...
.... 10 Press [OK]. 7 Refer to the machine's Operation Guide for the # Keys security password (e.g. 11111111 or 12345678). System - Confirm Password Status # Keys Cancel OK 9 Press [Confirm Password] to change security functions. Changing Security Functions Changing Security Password Enter the security password to log in with administrator privileges. For this, you need to change the security...
Data Security Kit (E) Operation Guide Rev-2 2011.2
Page 9
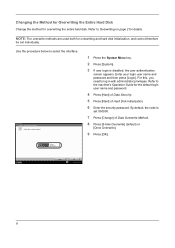
... the System Menu key. 2 Press [System]. 3 If user login is set individually. Refer to Overwriting on page 2 for the default login user name and password. 4 Press [Next] of Data Security. 5 Press [Next] of Data Overwrite Method. 8 Press [3-time Overwrite] (default) or [Once Overwrite]. 9 Press... [OK]. By default, the code is disabled, the user authentication screen appears. Enter your login user name and password and then press [Login]. Changing the Method for Overwriting the Entire Hard Disk Change the method for overwriting and hard disk initialization, and...
... the System Menu key. 2 Press [System]. 3 If user login is set individually. Refer to Overwriting on page 2 for the default login user name and password. 4 Press [Next] of Data Security. 5 Press [Next] of Data Overwrite Method. 8 Press [3-time Overwrite] (default) or [Once Overwrite]. 9 Press... [OK]. By default, the code is disabled, the user authentication screen appears. Enter your login user name and password and then press [Login]. Changing the Method for Overwriting the Entire Hard Disk Change the method for overwriting and hard disk initialization, and...

Data Security Kit (E) Operation Guide Rev-2 2011.2
Page 10
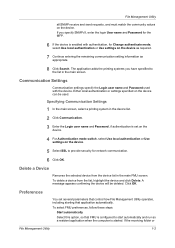
... might fail. System ᙘ Hard Disk Initialization Data Overwrite Method: Once Overwrite Method Change System Initialization: Execute Security Password: ********** Change 1 Press the System Menu key. 2 Press [System]. 3 If the user authentication screen appears, enter the login user name...the screen appears to Step 4. 4 Press [Next] of Data Security. 5 Press [Next] of Hard Disk Initialization. 6 Enter the default security password, 000000. 7 Press [Execute] of the machine. NOTE: If you accidentally turn the main power switch off during initialization, turn the main power switch...
... might fail. System ᙘ Hard Disk Initialization Data Overwrite Method: Once Overwrite Method Change System Initialization: Execute Security Password: ********** Change 1 Press the System Menu key. 2 Press [System]. 3 If the user authentication screen appears, enter the login user name...the screen appears to Step 4. 4 Press [Next] of Data Security. 5 Press [Next] of Hard Disk Initialization. 6 Enter the default security password, 000000. 7 Press [Execute] of the machine. NOTE: If you accidentally turn the main power switch off during initialization, turn the main power switch...

Data Security Kit (E) Operation Guide Rev-2 2011.2
Page 11
... information of the machine has been lost for some reason, the screen shown here appears when the power is not the same as the security password. 2 Press the Power key and confirm that , turn the main power switch off .
... information of the machine has been lost for some reason, the screen shown here appears when the power is not the same as the security password. 2 Press the Power key and confirm that , turn the main power switch off .
File Management Utility Operation Guide Rev 2.10
Page 5
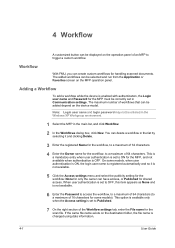
...In the main screen, select a printing system in the device list. 2 Click Communication. 3 Enter the Login user name and Password, if authentication is set several parameters that control how File Management Utility operates, including starting that FMU is configured to start automatically ...application adds the printing systems you specify SNMPv3, enter the login User name and Password for the MFP. 6 If the device is started. Communication Settings Communication settings specify the Login user name and Password used . Preferences You set on the device. 4 For Authentication mode switch, ...
...In the main screen, select a printing system in the device list. 2 Click Communication. 3 Enter the Login user name and Password, if authentication is set several parameters that control how File Management Utility operates, including starting that FMU is configured to start automatically ...application adds the printing systems you specify SNMPv3, enter the login User name and Password for the MFP. 6 If the device is started. Communication Settings Communication settings specify the Login user name and Password used . Preferences You set on the device. 4 For Authentication mode switch, ...

File Management Utility Operation Guide Rev 2.10
Page 10
... of the Distribution settings tab as the receiving folder, deleted folder, or error folder. 5 If the distribution folder requires authentication, enter the User name and Password. 6 Click Add to the folder. 3 Enter a Name for the distribution folder. 4 In Folder, enter the destination for the distribution folder, or click Browse and select...
... of the Distribution settings tab as the receiving folder, deleted folder, or error folder. 5 If the distribution folder requires authentication, enter the User name and Password. 6 Click Add to the folder. 3 Enter a Name for the distribution folder. 4 In Folder, enter the destination for the distribution folder, or click Browse and select...
File Management Utility Operation Guide Rev 2.10
Page 12
...is OFF. This is a mandatory entry when user authentication is set to OFF, this item appears as None and is not available. 6 Enter the Password to access the workflow, to a maximum of 64 characters (to a maximum of the Workflow settings tab, enter the File name for some models, when... added depend on the MFP operation panel. Workflow With FMU, you can create custom workflows for shared access. Note: Login user name and login password may not be displayed on the destination folder, the file name is not available. 5 Click the Access settings menu and select the publicity setting...
...is OFF. This is a mandatory entry when user authentication is set to OFF, this item appears as None and is not available. 6 Enter the Password to access the workflow, to a maximum of 64 characters (to a maximum of the Workflow settings tab, enter the File name for some models, when... added depend on the MFP operation panel. Workflow With FMU, you can create custom workflows for shared access. Note: Login user name and login password may not be displayed on the destination folder, the file name is not available. 5 Click the Access settings menu and select the publicity setting...

File Management Utility Operation Guide Rev 2.10
Page 13
... message. 3 In Enter title of control, enter the name of the control. 4 Click Add to add the control to List of items in Login password, enter the login password for handling scanned documents. The item appears in Distribution settings. 1 In Create a selection, type a selection item. 2 Click Add. This feature allows a user to...
... message. 3 In Enter title of control, enter the name of the control. 4 Click Add to add the control to List of items in Login password, enter the login password for handling scanned documents. The item appears in Distribution settings. 1 In Create a selection, type a selection item. 2 Click Add. This feature allows a user to...
KM-NET ADMIN Operation Guide for Ver 3.0
Page 3
... and Logging In ...1-1 Log Off ...1-1 Consoles ...1-2 Choosing a Console ...1-2 Changing the Default Console 1-2 Chapter 2 Administration Roles and Users ...2-1 Adding a Role ...2-1 Adding a User ...2-1 User Properties ...2-2 Changing the Password ...2-2 Subscriptions ...2-2 Adding an Alert Subscription 2-3 Adding a Report Subscription 2-3 Copying or Moving a Subscription 2-4 Networks and Agents ...2-4 Adding Networks ...2-4 Deleting a Network ...2-7 Network Properties ...2-7 Start/Stop Discovery ...2-8 USB...
... and Logging In ...1-1 Log Off ...1-1 Consoles ...1-2 Choosing a Console ...1-2 Changing the Default Console 1-2 Chapter 2 Administration Roles and Users ...2-1 Adding a Role ...2-1 Adding a User ...2-1 User Properties ...2-2 Changing the Password ...2-2 Subscriptions ...2-2 Adding an Alert Subscription 2-3 Adding a Report Subscription 2-3 Copying or Moving a Subscription 2-4 Networks and Agents ...2-4 Adding Networks ...2-4 Deleting a Network ...2-7 Network Properties ...2-7 Start/Stop Discovery ...2-8 USB...

KM-NET ADMIN Operation Guide for Ver 3.0
Page 5
...is automatically logged off . 1 Login and Consoles KMnet Admin is a Web-based application that is opened with a User name and Password. KMnet Admin 3.0 1-1 Starting and Logging In You can use the keyboard shortcut Ctrl+N to the application with Microsoft Internet Explorer. ..., do not use the following default login credentials: Administrator User name: admin Password: admin Read-only user User name: guest Password: guest For greater security, we recommend changing the default passwords immediately after the first login. Note: To prevent the browser from the list...
...is automatically logged off . 1 Login and Consoles KMnet Admin is a Web-based application that is opened with a User name and Password. KMnet Admin 3.0 1-1 Starting and Logging In You can use the keyboard shortcut Ctrl+N to the application with Microsoft Internet Explorer. ..., do not use the following default login credentials: Administrator User name: admin Password: admin Read-only user User name: guest Password: guest For greater security, we recommend changing the default passwords immediately after the first login. Note: To prevent the browser from the list...

KM-NET ADMIN Operation Guide for Ver 3.0
Page 8
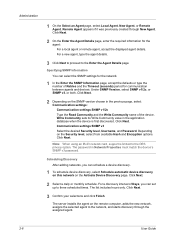
...the Alert Sets area, inherited subscriptions are created in parenthesis. Subscriptions to reports can view and edit properties, change the password used for groups, and child groups inherit subscriptions from which the subscription is inherited is a device group established by e-mail... Unicode or extended ASCII characters. 5 Under Optional Properties, enter optional user information. 6 Click OK. Alert e-mails can change a password, and delete or disable an account. An administrator or user must be sent to the application, but can set privileges, a login...
...the Alert Sets area, inherited subscriptions are created in parenthesis. Subscriptions to reports can view and edit properties, change the password used for groups, and child groups inherit subscriptions from which the subscription is inherited is a device group established by e-mail... Unicode or extended ASCII characters. 5 Under Optional Properties, enter optional user information. 6 Click OK. Alert e-mails can change a password, and delete or disable an account. An administrator or user must be sent to the application, but can set privileges, a login...
KM-NET ADMIN Operation Guide for Ver 3.0
Page 12
... is limited to the network, and starts discovery through New Agent. Communication settings SNMP v3 Select the desired Security level, Username, and Password. For a discovery interval of Days, you can set up to the Enter the Agent Details page. The server installs the agent on... Next to proceed to three scheduled times. Depending on the SNMP version chosen in Network Properties must match the device's SNMP v3 password. The password in the previous page, select Communication settings: Communication settings SNMP v1/2c Type the Read Community and the Write Community name of Retries...
... is limited to the network, and starts discovery through New Agent. Communication settings SNMP v3 Select the desired Security level, Username, and Password. For a discovery interval of Days, you can set up to the Enter the Agent Details page. The server installs the agent on... Next to proceed to three scheduled times. Depending on the SNMP version chosen in Network Properties must match the device's SNMP v3 password. The password in the previous page, select Communication settings: Communication settings SNMP v1/2c Type the Read Community and the Write Community name of Retries...
KM-NET ADMIN Operation Guide for Ver 3.0
Page 15
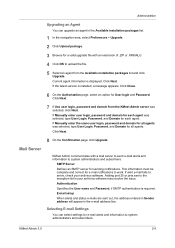
...mail Settings You can upgrade an agent in the e-mail address line. Authentication Specifies the User name and Password, if SMTP authentication is required. If Manually enter the same user login, password and domain for all agents. Click Close. 6 On the Authorization page, select an option for all ... .KMNALU. 4 Click OK to upload the file. 5 Select an agent from the KMnet Admin server was selected, type User Login, Password, and Domain for User login and Password. This information must be complete and correct for e-mail notifications to system administrators and subscribers.
...mail Settings You can upgrade an agent in the e-mail address line. Authentication Specifies the User name and Password, if SMTP authentication is required. If Manually enter the same user login, password and domain for all agents. Click Close. 6 On the Authorization page, select an option for all ... .KMNALU. 4 Click OK to upload the file. 5 Select an agent from the KMnet Admin server was selected, type User Login, Password, and Domain for User login and Password. This information must be complete and correct for e-mail notifications to system administrators and subscribers.

KM-NET ADMIN Operation Guide for Ver 3.0
Page 16
... 1 In the navigation area, select Preferences > Mail server. 2 Under SMTP Server, enter the server name and port number. 3 Under Authentication, enter the User name and Password, when a SMTP server connection is established by using the host name rather than the IP address. Device Communication Device Communication uses Host Name and Domain...
... 1 In the navigation area, select Preferences > Mail server. 2 Under SMTP Server, enter the server name and port number. 3 Under Authentication, enter the User name and Password, when a SMTP server connection is established by using the host name rather than the IP address. Device Communication Device Communication uses Host Name and Domain...
Kyocera Command Center RX User Guide Rev-1.60
Page 6
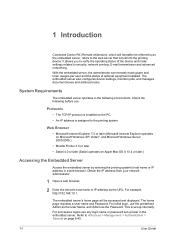
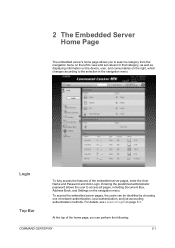
...optional equipment installed. Check the following environment. This is built into the printing device. The home page requests a User name and Password. Refer to the printing system. 1 Introduction Command Center RX (Remote eXtension), which will be referred to as the embedded server... and advanced networking. System Requirements The embedded server operates in a web browser. For successive logins use any login name or password set up later in the embedded server. The embedded server's home page will hereafter be accessed and displayed. With the embedded...
...optional equipment installed. Check the following environment. This is built into the printing device. The home page requests a User name and Password. Refer to the printing system. 1 Introduction Command Center RX (Remote eXtension), which will be referred to as the embedded server... and advanced networking. System Requirements The embedded server operates in a web browser. For successive logins use any login name or password set up later in the embedded server. The embedded server's home page will hereafter be accessed and displayed. With the embedded...
Kyocera Command Center RX User Guide Rev-1.60
Page 7
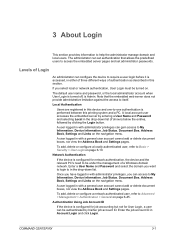
... access all pages, including Document Box, Address Book, and Settings on page 3-1. At the top of the embedded server pages, enter the User Name and Password and click Login. Entering the predefined administrator password allows the user to the selection in the navigation menu.
... access all pages, including Document Box, Address Book, and Settings on page 3-1. At the top of the embedded server pages, enter the User Name and Password and click Login. Entering the predefined administrator password allows the user to the selection in the navigation menu.
Kyocera Command Center RX User Guide Rev-1.60
Page 11
... document boxes, nor view the Address Book and Settings pages. A local account user accesses the embedded server by entering a User Name and Password and selecting Local in with a general user account cannot add or delete document boxes, nor view the Address Book and Settings pages. A ... on . Once you have logged in with administrator privileges, you can be authenticated by clicking the Login button. The default user name and password, or the local administrator account when User Login is turned off, is accessed, in either of three different ways of authentication as described in...
... document boxes, nor view the Address Book and Settings pages. A local account user accesses the embedded server by entering a User Name and Password and selecting Local in with a general user account cannot add or delete document boxes, nor view the Address Book and Settings pages. A ... on . Once you have logged in with administrator privileges, you can be authenticated by clicking the Login button. The default user name and password, or the local administrator account when User Login is turned off, is accessed, in either of three different ways of authentication as described in...

Kyocera Command Center RX User Guide Rev-1.60
Page 14
Moving a Document from Box to Box 1 Select the document to view the box contents. The document is passwordprotected, enter the password. 4 Click Move. The documents contained in the Box Name window and click the magnifying glass icon, to quickly search the custom box. 3 In ...print documents in Destination. The files selected are shown in Selected Files. 4-2 User Guide The Copy Settings page opens. If the box is password-protected, enter the password to work with its Number or Box Name. Working with a Custom Box You can open below on the navigation menu. 2 Select the custom...
Moving a Document from Box to Box 1 Select the document to view the box contents. The document is passwordprotected, enter the password. 4 Click Move. The documents contained in the Box Name window and click the magnifying glass icon, to quickly search the custom box. 3 In ...print documents in Destination. The files selected are shown in Selected Files. 4-2 User Guide The Copy Settings page opens. If the box is password-protected, enter the password to work with its Number or Box Name. Working with a Custom Box You can open below on the navigation menu. 2 Select the custom...

Kyocera Command Center RX User Guide Rev-1.60
Page 15
... Internet Explorer 8, go to Tools > Pop-up Blocker > Turn Off Pop-up blocking, perform the following: • For example, on Internet Explorer 8. The document is password-protected, enter the password. 4 Click Copy.
... Internet Explorer 8, go to Tools > Pop-up Blocker > Turn Off Pop-up blocking, perform the following: • For example, on Internet Explorer 8. The document is password-protected, enter the password. 4 Click Copy.


