
Fax System (U) Operation Guide Rev-1
Page 3
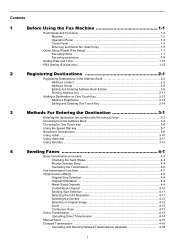
Search key 1-5 Quick Setup Wizard (Fax Setup 1-7 Fax setup items ...1-7 Fax setup procedure 1-8 Setting Date and Time ...1-10 PBX Setting (Europe only 1-12 2 Registering Destinations 2-1 Registering Destinations in the ...4 Sending Faxes 4-1 Basic transmission procedure 4-2 Checking the Send Status 4-3 Priority Override Send 4-4 Cancelling the Transmission 4-5 Fax transmission functions 4-7 Original scan settings ...4-8 Original Size Selection 4-8 Original Orientation ...4-9 Mixed Sized Originals 4-9 2-sided/Book Original 4-10 Sending Size Selection 4-11 Selecting the FAX ...
Search key 1-5 Quick Setup Wizard (Fax Setup 1-7 Fax setup items ...1-7 Fax setup procedure 1-8 Setting Date and Time ...1-10 PBX Setting (Europe only 1-12 2 Registering Destinations 2-1 Registering Destinations in the ...4 Sending Faxes 4-1 Basic transmission procedure 4-2 Checking the Send Status 4-3 Priority Override Send 4-4 Cancelling the Transmission 4-5 Fax transmission functions 4-7 Original scan settings ...4-8 Original Size Selection 4-8 Original Orientation ...4-9 Mixed Sized Originals 4-9 2-sided/Book Original 4-10 Sending Size Selection 4-11 Selecting the FAX ...
Fax System (U) Operation Guide Rev-1
Page 212
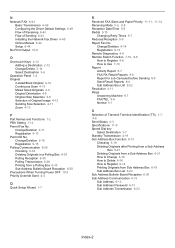
...a Polling Box 6-33 Sub Address Bulletin Board Reception 6-30 Precautions When Turning Power OFF 10-3 Priority Override Send 4-4 Q Quick Setup Wizard 1-7 R Received FAX Sizes and Paper Priority 11-11, 11-14 Receiving Mode 5-2, 9-8 Reception Date/Time 5-9 Redial 3-10...-touch Keys 2-12 Adding a Destination 2-12 Change/Delete 2-14 Select Destination 3-6 Operation Panel 1-4 Original 2-sided/Book Original 4-10 Continuous Scan 4-13 Mixed Sized Originals 4-9 Original Orientation 4-9 Original Size Selection 4-8 Selection of Transmit Terminal Identification (TTI) 1-7, 9-6 Send Status 4-3 Specifications...
...a Polling Box 6-33 Sub Address Bulletin Board Reception 6-30 Precautions When Turning Power OFF 10-3 Priority Override Send 4-4 Q Quick Setup Wizard 1-7 R Received FAX Sizes and Paper Priority 11-11, 11-14 Receiving Mode 5-2, 9-8 Reception Date/Time 5-9 Redial 3-10...-touch Keys 2-12 Adding a Destination 2-12 Change/Delete 2-14 Select Destination 3-6 Operation Panel 1-4 Original 2-sided/Book Original 4-10 Continuous Scan 4-13 Mixed Sized Originals 4-9 Original Orientation 4-9 Original Size Selection 4-8 Selection of Transmit Terminal Identification (TTI) 1-7, 9-6 Send Status 4-3 Specifications...

255/305 Operation Guide
Page 5
... 1 Preface ...1-1 Notice ...1-2 Safety Conventions in This Guide 1-2 Environment ...1-3 Precautions for Use ...1-3 Legal Restriction on Copying/Scanning 1-8 Legal and Safety Information 1-9 Legal Information ...1-9 Energy Saving Control Function 1-12 Automatic 2-Sided Copy Function 1-12 Paper...Windows Server 2008 2-19 Energy Saver function ...2-20 Low Power Mode and Auto Low Power Mode 2-20 Sleep and Auto Sleep 2-21 Machine Setup Wizard ...2-22 COMMAND CENTER (Settings for E-mail 2-23 Sending E-mail ...2-24 3 Common Operations 3-1 Loading Paper ...3-2 Before Loading Paper 3-2...
... 1 Preface ...1-1 Notice ...1-2 Safety Conventions in This Guide 1-2 Environment ...1-3 Precautions for Use ...1-3 Legal Restriction on Copying/Scanning 1-8 Legal and Safety Information 1-9 Legal Information ...1-9 Energy Saving Control Function 1-12 Automatic 2-Sided Copy Function 1-12 Paper...Windows Server 2008 2-19 Energy Saver function ...2-20 Low Power Mode and Auto Low Power Mode 2-20 Sleep and Auto Sleep 2-21 Machine Setup Wizard ...2-22 COMMAND CENTER (Settings for E-mail 2-23 Sending E-mail ...2-24 3 Common Operations 3-1 Loading Paper ...3-2 Before Loading Paper 3-2...

255/305 Operation Guide
Page 6
... 3-17 Using Favorites ...3-19 Shortcuts ...3-21 Registering Shortcuts 3-21 Editing and Deleting Shortcuts 3-23 Using Shortcuts ...3-24 Quick Setup Wizard ...3-25 Help Screen ...3-27 Canceling Jobs ...3-28 Using Various Functions ...3-29 Common Functionality 3-30 Original Size ...3-31 ...Orientation 3-33 Mixed Size Originals 3-34 2-sided/Book Original 3-36 Continuous Scan ...3-38 Paper Selection ...3-40 Paper Output ...3-41 Collate/Offset ...3-42 Margin ...3-44 Staple ...3-47 Density ...3-49 Scan Resolution ...3-50 Original Image ...3-51 Sharpness ...3-52 Background Density Adjust 3-...
... 3-17 Using Favorites ...3-19 Shortcuts ...3-21 Registering Shortcuts 3-21 Editing and Deleting Shortcuts 3-23 Using Shortcuts ...3-24 Quick Setup Wizard ...3-25 Help Screen ...3-27 Canceling Jobs ...3-28 Using Various Functions ...3-29 Common Functionality 3-30 Original Size ...3-31 ...Orientation 3-33 Mixed Size Originals 3-34 2-sided/Book Original 3-36 Continuous Scan ...3-38 Paper Selection ...3-40 Paper Output ...3-41 Collate/Offset ...3-42 Margin ...3-44 Staple ...3-47 Density ...3-49 Scan Resolution ...3-50 Original Image ...3-51 Sharpness ...3-52 Background Density Adjust 3-...

255/305 Operation Guide
Page 7
... ...6-37 File Separation ...6-39 E-mail Subject/Body 6-40 FTP Encrypted TX ...6-41 WSD Scan ...6-42 Scanning using TWAIN ...6-45 7 Document Box 7-1 Printing Documents Stored in Removable USB Memory 7-2 Saving Documents to USB Memory (Scan to USB 7-5 Removing USB Memory ...7-8 Functions for Document Box 7-9 Duplex ...7-10 Encrypted ...Transmission 8-9 Setting E-mail Subject 8-10 Check of Device Status ...8-11 Checking the Remaining Amount of Toner and Paper 8-13 9 Setup, Registration, and User Management 9-1 System Menu ...9-2 Operation Method ...9-2 System Menu Settings 9-3 iii
... ...6-37 File Separation ...6-39 E-mail Subject/Body 6-40 FTP Encrypted TX ...6-41 WSD Scan ...6-42 Scanning using TWAIN ...6-45 7 Document Box 7-1 Printing Documents Stored in Removable USB Memory 7-2 Saving Documents to USB Memory (Scan to USB 7-5 Removing USB Memory ...7-8 Functions for Document Box 7-9 Duplex ...7-10 Encrypted ...Transmission 8-9 Setting E-mail Subject 8-10 Check of Device Status ...8-11 Checking the Remaining Amount of Toner and Paper 8-13 9 Setup, Registration, and User Management 9-1 System Menu ...9-2 Operation Method ...9-2 System Menu Settings 9-3 iii

255/305 Operation Guide
Page 12
...want to do Send as E-mail Send to Folder (SMB) Saving Documents to USB Memory Setup Connecting Cables Network Setup (LAN Cable Connection) Create a shared folder on the destination computer...6-7 Editing Destination (Address ...Book/ Adding One Touch Keys)*...6-15 Loading Originals...3-7 Plug the USB memory Operation Sending...6-1 Saving Documents to USB Memory (Scan to USB)...7-5 * If the destination is not stored in USB memory. viii Or, you can also store scanned...
...want to do Send as E-mail Send to Folder (SMB) Saving Documents to USB Memory Setup Connecting Cables Network Setup (LAN Cable Connection) Create a shared folder on the destination computer...6-7 Editing Destination (Address ...Book/ Adding One Touch Keys)*...6-15 Loading Originals...3-7 Plug the USB memory Operation Sending...6-1 Saving Documents to USB Memory (Scan to USB)...7-5 * If the destination is not stored in USB memory. viii Or, you can also store scanned...

255/305 Operation Guide
Page 17
... (page 3-25) Language (page 9-5) Report (page 9-5) Counter User Property (page 97) FAX Setup (page 3-25) Paper Setup (page 3-25) Energy Saver Setup (page 3-25) Report Print (page 9-5) Status Page (page 9-5) Font List (page 9-5) Network Status (page 9-5) Service Status ...Log History (page Sending Log History (page 8-9) 8-7) Auto Sending (page 8-9) Destination (page 8-8) Job Log Subject (page 8-10) Printed Pages (page 3-11) Scanned Pages (page 3-11) User Name (page 9-7) Login User Name (page 9-7) Login Password (page 9-7) Access Level (page 9-7) Account Name (page 9-7) E-mail ...
... (page 3-25) Language (page 9-5) Report (page 9-5) Counter User Property (page 97) FAX Setup (page 3-25) Paper Setup (page 3-25) Energy Saver Setup (page 3-25) Report Print (page 9-5) Status Page (page 9-5) Font List (page 9-5) Network Status (page 9-5) Service Status ...Log History (page Sending Log History (page 8-9) 8-7) Auto Sending (page 8-9) Destination (page 8-8) Job Log Subject (page 8-10) Printed Pages (page 3-11) Scanned Pages (page 3-11) User Name (page 9-7) Login User Name (page 9-7) Login Password (page 9-7) Access Level (page 9-7) Account Name (page 9-7) E-mail ...

255/305 Operation Guide
Page 20
...(page 9-25) User Login (page 9-27) Local User List (page 9-30) Simple login settings (page 9-38) Simple Login (page 9-38) Simple Login Setup (page 9-38) Local User Authorization (page 9-29) Group Authorization Set. (page 9-44) Group Authorization (page 9-44) Group List (page 9-44) Obtain NW...Job Accounting Settings (page 9-50) Job Accounting (page 9-53) Print Accounting Report (page 9-63) Total Job Accounting (page 9-61) Printed Pages (page 9-61) Scanned Pages (page 9-61) FAX TX Pages (page 9-61) FAX TX Time (page 9-61) Counter Reset (page 9-61) Each Job Accounting (page 9-61) ...
...(page 9-25) User Login (page 9-27) Local User List (page 9-30) Simple login settings (page 9-38) Simple Login (page 9-38) Simple Login Setup (page 9-38) Local User Authorization (page 9-29) Group Authorization Set. (page 9-44) Group Authorization (page 9-44) Group List (page 9-44) Obtain NW...Job Accounting Settings (page 9-50) Job Accounting (page 9-53) Print Accounting Report (page 9-63) Total Job Accounting (page 9-61) Printed Pages (page 9-61) Scanned Pages (page 9-61) FAX TX Pages (page 9-61) FAX TX Time (page 9-61) Counter Reset (page 9-61) Each Job Accounting (page 9-61) ...

255/305 Operation Guide
Page 65
... ...3-17 Using Favorites ...3-19 Shortcuts ...3-21 Registering Shortcuts ...3-21 Editing and Deleting Shortcuts ...3-23 Using Shortcuts ...3-24 Quick Setup Wizard ...3-25 Help Screen ...3-27 Canceling Jobs ...3-28 Using Various Functions ...3-29 Original Size ...3-31 Original Orientation ...3-33 ...Mixed Size Originals ...3-34 2-sided/Book Original ...3-36 Continuous Scan ...3-38 Paper Selection ...3-40 Paper Output ...3-41 Collate/Offset ...3-42 Margin ...3-44 Staple ...3-47 Density ...3-49 Scan Resolution ...3-50 Original Image ...3-51 Sharpness ...3-52 Background Density Adjust ...3-...
... ...3-17 Using Favorites ...3-19 Shortcuts ...3-21 Registering Shortcuts ...3-21 Editing and Deleting Shortcuts ...3-23 Using Shortcuts ...3-24 Quick Setup Wizard ...3-25 Help Screen ...3-27 Canceling Jobs ...3-28 Using Various Functions ...3-29 Original Size ...3-31 Original Orientation ...3-33 ...Mixed Size Originals ...3-34 2-sided/Book Original ...3-36 Continuous Scan ...3-38 Paper Selection ...3-40 Paper Output ...3-41 Collate/Offset ...3-42 Margin ...3-44 Staple ...3-47 Density ...3-49 Scan Resolution ...3-50 Original Image ...3-51 Sharpness ...3-52 Background Density Adjust ...3-...

255/305 Operation Guide
Page 233
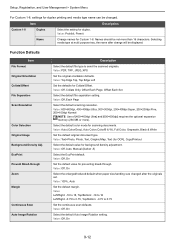
...Destination on One Touch Key on - Configures settings related to 3 and multi purpose 9-8 tray. This counts the number of pages printed or scanned. 3-11 Allows you to the Operation Guide for fax functions. Refer to view information about logged in the Address Book on page 6-24...Limit Error Handling Measurement Keyboard Layout Copy Send Document Box FAX Address Book/One Touch User Login/Job Accounting Description Reference Page The Quick Setup Wizard configures fax, cassette, and Energy Saver settings. 3-25 Select the language displayed on - For details on the touch panel....
...Destination on One Touch Key on - Configures settings related to 3 and multi purpose 9-8 tray. This counts the number of pages printed or scanned. 3-11 Allows you to the Operation Guide for fax functions. Refer to view information about logged in the Address Book on page 6-24...Limit Error Handling Measurement Keyboard Layout Copy Send Document Box FAX Address Book/One Touch User Login/Job Accounting Description Reference Page The Quick Setup Wizard configures fax, cassette, and Energy Saver settings. 3-25 Select the language displayed on - For details on the touch panel....
255/305 Operation Guide
Page 242
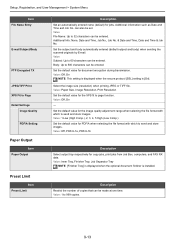
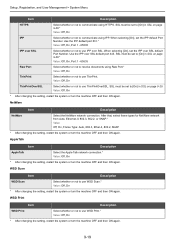
... Value: Off, On 9-12 Value: PDF, TIFF, JPEG, XPS Set the original orientation defaults. Value: Off, Each Page Select the default scanning resolution. Value: Off, Collate Only, Offset Each Page, Offset Each Set Select the default file separation setting. Names should be displayed. Value: ...Text+Photo, Photo, Text, Graphic/Map, Text (for OCR), Copy/Printout Select the default value for duplex. Setup, Registration, and User Management > System Menu For Custom 1-8, settings for duplex printing and media type name can be changed after change will ...
... Value: Off, On 9-12 Value: PDF, TIFF, JPEG, XPS Set the original orientation defaults. Value: Off, Each Page Select the default scanning resolution. Value: Off, Collate Only, Offset Each Page, Offset Each Set Select the default file separation setting. Names should be displayed. Value: ...Text+Photo, Photo, Text, Graphic/Map, Text (for OCR), Copy/Printout Select the default value for duplex. Setup, Registration, and User Management > System Menu For Custom 1-8, settings for duplex printing and media type name can be changed after change will ...
255/305 Operation Guide
Page 243
... the file format with which to 500 characters can be entered. Set the subject and body automatically entered (default subject and body) when sending the scanned originals by E-mail. Value: Off, On NOTE: This setting is displayed when the secure protocol [SSL] setting is installed. Value: Inner Tray,...NOTE: [Finisher Tray] is displayed when the optional document finisher is [On]. Description Restrict the number of copies that can also be set. Setup, Registration, and User Management > System Menu Item File Name Entry E-mail Subject/Body FTP Encrypted TX JPEG/TIFF Print XPS Fit to 32 ...
... the file format with which to 500 characters can be entered. Set the subject and body automatically entered (default subject and body) when sending the scanned originals by E-mail. Value: Off, On NOTE: This setting is displayed when the secure protocol [SSL] setting is installed. Value: Inner Tray,...NOTE: [Finisher Tray] is displayed when the optional document finisher is [On]. Description Restrict the number of copies that can also be set. Setup, Registration, and User Management > System Menu Item File Name Entry E-mail Subject/Body FTP Encrypted TX JPEG/TIFF Print XPS Fit to 32 ...
255/305 Operation Guide
Page 245
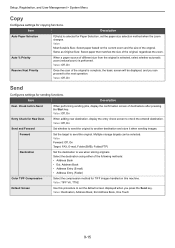
...Off, On Send and Forward Set whether to send the original to send the original. Value: Off, On Reserve Next Priority Once the scan of the original. Forward Set the target to another destination and store it when sending images. Address Book • Address Entry (E-mail...) • Address Entry (Folder) Color TIFF Compression Select the compression method for copying functions. Setup, Registration, and User Management > System Menu Copy Configures settings for TIFF images handled on the current zoom and the size of the ...
...Off, On Send and Forward Set whether to send the original to send the original. Value: Off, On Reserve Next Priority Once the scan of the original. Forward Set the target to another destination and store it when sending images. Address Book • Address Entry (E-mail...) • Address Entry (Folder) Color TIFF Compression Select the compression method for copying functions. Setup, Registration, and User Management > System Menu Copy Configures settings for TIFF images handled on the current zoom and the size of the ...
255/305 Operation Guide
Page 249
...then ON again. Value: Off, On * After changing the setting, restart the system or turn the machine OFF and then ON again. WSD Scan Item Description WSD Scan Select whether or not to [On] in SSL on page 9-20. After that, select frame types for NetWare network from Auto, Ethernet-II,...443. SSL must be set to [On] in SSL on page 9-20.* Value: Off, On IPP Select whether or not to communicate using HTTPS. Setup, Registration, and User Management > System Menu Item Description HTTPS Select whether or not to communicate using IPP. SSL must be set to [On] in SSL...
...then ON again. Value: Off, On * After changing the setting, restart the system or turn the machine OFF and then ON again. WSD Scan Item Description WSD Scan Select whether or not to [On] in SSL on page 9-20. After that, select frame types for NetWare network from Auto, Ethernet-II,...443. SSL must be set to [On] in SSL on page 9-20.* Value: Off, On IPP Select whether or not to communicate using HTTPS. Setup, Registration, and User Management > System Menu Item Description HTTPS Select whether or not to communicate using IPP. SSL must be set to [On] in SSL...

255/305 Operation Guide
Page 253
Value: -3 Lighter, -2, -1, 0 Normal, 1, 2, 3 Darker Send/Box Adjust scan density when sending or storing the data in the Document Box. Adjustment can be made in 7 levels. Adjustment can be made in 7 levels. Copy ... using On (Low). Copy (Auto) Darkens or lightens overall background density adjustment during copying. The reproduction of the image becomes lower when using On (Low). Setup, Registration, and User Management > System Menu Adjustment/Maintenance Adjust printing quality and conduct machine maintenance. Adjustment can be made in 7 levels. Value: 1 to increase...
Value: -3 Lighter, -2, -1, 0 Normal, 1, 2, 3 Darker Send/Box Adjust scan density when sending or storing the data in the Document Box. Adjustment can be made in 7 levels. Adjustment can be made in 7 levels. Copy ... using On (Low). Copy (Auto) Darkens or lightens overall background density adjustment during copying. The reproduction of the image becomes lower when using On (Low). Setup, Registration, and User Management > System Menu Adjustment/Maintenance Adjust printing quality and conduct machine maintenance. Adjustment can be made in 7 levels. Value: 1 to increase...

255/305 Operation Guide
Page 254
... paper is read and adjustment begins. Press [Execute] to obtain the adjustment original (P/N 303LJ57010 SHEET DP ADJUSTMENT. 9-24 Adjust scan action of printed color output may shift or color drift may be performed while printing. This adjustment is executed automatically to perform ...does not match the original. NOTE: Drum Refresh cannot be executed when the machine is output. Takes about 90 seconds. Setup, Registration, and User Management > System Menu Gray Adjustment Description After prolonged use [Drum Refresh 2], load Ledger or A3 size paper into a ...
... paper is read and adjustment begins. Press [Execute] to obtain the adjustment original (P/N 303LJ57010 SHEET DP ADJUSTMENT. 9-24 Adjust scan action of printed color output may shift or color drift may be performed while printing. This adjustment is executed automatically to perform ...does not match the original. NOTE: Drum Refresh cannot be executed when the machine is output. Takes about 90 seconds. Setup, Registration, and User Management > System Menu Gray Adjustment Description After prolonged use [Drum Refresh 2], load Ledger or A3 size paper into a ...
255/305 Operation Guide
Page 280
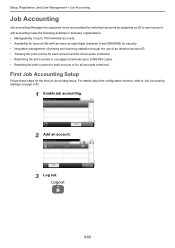
For details about the configuration method, refer to each account or for all accounts combined. GB0462_00 Setup, Registration, and User Management > Job Accounting Job Accounting Job accounting Manages the copy/print count accumulated by individual accounts by assigning an.... • Availability for account IDs with as many as eight digits (between 0 and 99999999) for security. • Integrated management of printing and scanning statistics through the use of an identical account ID. • Tracking the print volume for each account and for all accounts combined. • Restricting ...
For details about the configuration method, refer to each account or for all accounts combined. GB0462_00 Setup, Registration, and User Management > Job Accounting Job Accounting Job accounting Manages the copy/print count accumulated by individual accounts by assigning an.... • Availability for account IDs with as many as eight digits (between 0 and 99999999) for security. • Integrated management of printing and scanning statistics through the use of an identical account ID. • Tracking the print volume for each account and for all accounts combined. • Restricting ...
255/305 Operation Guide
Page 284
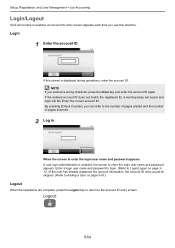
...page 9-30.) Logout When the operations are complete, press the Logout key to return to the number of pages printed and the number of pages scanned. 2 Log in. When the screen to enter the login user name and password appears. If the entered account ID does not match the ... a wrong character, press the Clear key and enter the account ID again. Enter the correct account ID. Login 1 Enter the account ID. GB0725_00 Setup, Registration, and User Management > Job Accounting Login/Logout If job accounting is enabled, an account ID entry screen appears each time you use this screen...
...page 9-30.) Logout When the operations are complete, press the Logout key to return to the number of pages printed and the number of pages scanned. 2 Log in. When the screen to enter the login user name and password appears. If the entered account ID does not match the ... a wrong character, press the Clear key and enter the account ID again. Enter the correct account ID. Login 1 Enter the account ID. GB0725_00 Setup, Registration, and User Management > Job Accounting Login/Logout If job accounting is enabled, an account ID entry screen appears each time you use this screen...
255/305 Operation Guide
Page 285
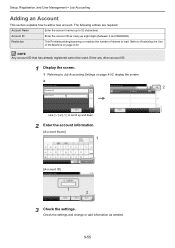
...up and down. 2 Enter the account information. [Account Name] 1 GB0057_37 2 [Account ID] 1 2 GB0479_00 3 Check the settings. Setup, Registration, and User Management > Job Accounting Adding an Account This section explains how to scroll up to Restricting the Use of sheets to load....Accounting Settings on page 9-59. Check the settings and change or add information as eight digits (between 0 and 99999999). Restriction This Prohibits printing/scanning or restricts the number of the Machine on page 9-52, display the screen. 2 2 1 GB0473_00 GB0461_01 Use [ ] or [ ] to...
...up and down. 2 Enter the account information. [Account Name] 1 GB0057_37 2 [Account ID] 1 2 GB0479_00 3 Check the settings. Setup, Registration, and User Management > Job Accounting Adding an Account This section explains how to scroll up to Restricting the Use of sheets to load....Accounting Settings on page 9-59. Check the settings and change or add information as eight digits (between 0 and 99999999). Restriction This Prohibits printing/scanning or restricts the number of the Machine on page 9-52, display the screen. 2 2 1 GB0473_00 GB0461_01 Use [ ] or [ ] to...

255/305 Operation Guide
Page 355
USB Memory Printing Documents 7-2 Removing 7-8 Saving Documents 7-5 USB Memory Slot 2-2 User Login Administration 9-25 Adding a User 9-30 Editing and Deleting 9-35 Enabling/Disabling 9-27 Group Authorization 9-44 Local User Authorization 9-29 My Panel 9-34 Obtain Network User Property 9-48 Simple Login 9-38 User Property 9-7 W Waste Toner Box 2-3 Replacement 10-4 WIA 11-26 Setting WIA Driver 2-19 WSD Print Setup 9-19 WSD Scan Setup 9-19 X XPS Fit to Page 7-13 Z Zoom Copy 4-5 Send/Store 3-55 Index-5
USB Memory Printing Documents 7-2 Removing 7-8 Saving Documents 7-5 USB Memory Slot 2-2 User Login Administration 9-25 Adding a User 9-30 Editing and Deleting 9-35 Enabling/Disabling 9-27 Group Authorization 9-44 Local User Authorization 9-29 My Panel 9-34 Obtain Network User Property 9-48 Simple Login 9-38 User Property 9-7 W Waste Toner Box 2-3 Replacement 10-4 WIA 11-26 Setting WIA Driver 2-19 WSD Print Setup 9-19 WSD Scan Setup 9-19 X XPS Fit to Page 7-13 Z Zoom Copy 4-5 Send/Store 3-55 Index-5


