KM-NET ADMIN Operation Guide for Ver 2.0
Page 9
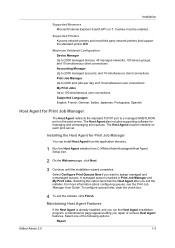
Cookies must be enabled. Supported Printers Kyocera network printers and most third party network printers that support the standard printer MIB Maximum Validated Configuration Device Manager Up to 2000 managed devices, 45 managed networks, 100 device groups, and 10 simultaneous client connections Accounting Manager Up to 2000 managed accounts, and 10 ...Job Manager You can install Host Agent from the application directory. 1 Run the Host Agent installer from C:\KMnet Admin\hostagent\Host Agent Setup.exe. 2 On the Welcome page, click Next. 3 Continue until the installation wizard completes.
Cookies must be enabled. Supported Printers Kyocera network printers and most third party network printers that support the standard printer MIB Maximum Validated Configuration Device Manager Up to 2000 managed devices, 45 managed networks, 100 device groups, and 10 simultaneous client connections Accounting Manager Up to 2000 managed accounts, and 10 ...Job Manager You can install Host Agent from the application directory. 1 Run the Host Agent installer from C:\KMnet Admin\hostagent\Host Agent Setup.exe. 2 On the Welcome page, click Next. 3 Continue until the installation wizard completes.
KM-NET ADMIN Operation Guide for Ver 2.0
Page 18
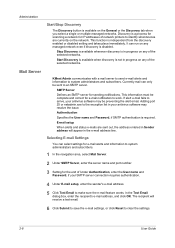
... if discovery is independent from the discovery enabled or disabled setting and takes place immediately. E-mail setup When alerts and status e-mails are currently on the network. In the Test Email dialog box, enter the recipient's e-mail address, and click OK. This function is ...feature works. The recipient will appear in progress on the General or the Discovery tab when you select a single or multiple managed networks. Currently mail can select settings for sending notifications. Authentication Specifies the User name and Password, if SMTP authentication is in the ...
... if discovery is independent from the discovery enabled or disabled setting and takes place immediately. E-mail setup When alerts and status e-mails are currently on the network. In the Test Email dialog box, enter the recipient's e-mail address, and click OK. This function is ...feature works. The recipient will appear in progress on the General or the Discovery tab when you select a single or multiple managed networks. Currently mail can select settings for sending notifications. Authentication Specifies the User name and Password, if SMTP authentication is in the ...
Kyocera Command Center Operation Guide Rev 6.3
Page 17
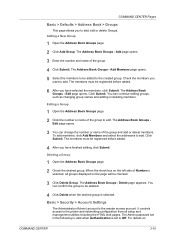
... you want to add. You can change the number or name of Number is set in the following is valid when Authentication is selected, all setup and management utilities including the HTML web pages. To add members, click Add Members and select the addresses to Off. Click Submit. Edit page ... added. 6 After you have selected the members, click Submit. Delete page appears. You can confirm the group to be added to the printer and networking configuration from all groups displayed on COMMAND CENTER 3-10 It controls access to the created group. The Admin password set to add.
... you want to add. You can change the number or name of Number is set in the following is valid when Authentication is selected, all setup and management utilities including the HTML web pages. To add members, click Add Members and select the addresses to Off. Click Submit. Edit page ... added. 6 After you have selected the members, click Submit. Delete page appears. You can confirm the group to be added to the printer and networking configuration from all groups displayed on COMMAND CENTER 3-10 It controls access to the created group. The Admin password set to add.

Kyocera Command Center Operation Guide Rev 6.3
Page 46
... to send a control code after directly outputting to On bi-directional printing. NetWare setup requires installation of the following client software and login with the AdminManager NetWare Setup Wizard requires the NetWare Client from the printer returned to the client when printing with...Enables or disables Bindery Mode. Frame Type Sets the Frame type. Password (optional) Enter the Password, if required. For Admin Privileges, network operations (creating queues etc.) require 'admin' or 'supervisor' privileges (or equivalent). You can choose from either print server mode or remote...
... to send a control code after directly outputting to On bi-directional printing. NetWare setup requires installation of the following client software and login with the AdminManager NetWare Setup Wizard requires the NetWare Client from the printer returned to the client when printing with...Enables or disables Bindery Mode. Frame Type Sets the Frame type. Password (optional) Enter the Password, if required. For Admin Privileges, network operations (creating queues etc.) require 'admin' or 'supervisor' privileges (or equivalent). You can choose from either print server mode or remote...
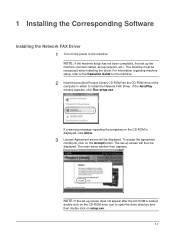
FS-C2126MFP Network Fax Driver Operation Guide Rev. 3
Page 7
...-ROM drive icon to open the drive directory and then double click on setup.exe. 1-1 To accept the agreement conditions, click on the power to install the Network FAX Driver. If a warning message regarding machine setup, refer to the Operation Guide for the machine. 2 Insert the provided ...drive of the computer in which to the machine. NOTE: If the machine setup has not been completed, first set up the machine (connect cables, set -up network, etc.). 1 Installing the Corresponding Software Installing the Network FAX Driver 1 Turn on the Accept button. The machine must be recognized ...
...-ROM drive icon to open the drive directory and then double click on setup.exe. 1-1 To accept the agreement conditions, click on the power to install the Network FAX Driver. If a warning message regarding machine setup, refer to the Operation Guide for the machine. 2 Insert the provided ...drive of the computer in which to the machine. NOTE: If the machine setup has not been completed, first set up the machine (connect cables, set -up network, etc.). 1 Installing the Corresponding Software Installing the Network FAX Driver 1 Turn on the Accept button. The machine must be recognized ...
Scan To SMB (PC) Setup Guide Rev-3
Page 3
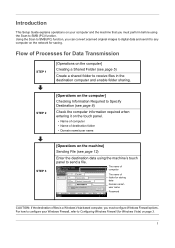
... Data Transmission STEP 1 [Operations on the computer] Creating a Shared Folder (see page 8) Check the computer information required when entering it to any computer on the network for Windows Vista) on the destination computer. STEP 2 [Operations on the computer] Checking Information Required to Specify Destination (see page 5) Create a shared folder to receive...
... Data Transmission STEP 1 [Operations on the computer] Creating a Shared Folder (see page 8) Check the computer information required when entering it to any computer on the network for Windows Vista) on the destination computer. STEP 2 [Operations on the computer] Checking Information Required to Specify Destination (see page 5) Create a shared folder to receive...

Scan To SMB (PC) Setup Guide Rev-3
Page 17
...the Operation Guide and COMMAND CENTER Operation Guide. page 8 of this Setup Guide page 10 of this Setup Guide page 11 of this Setup Guide page 13 of COMMAND CENTER On? Corrective Actions Connect the network cable and set up properly? Check the host name of shared folder.... and domain user name. Check the login password. Is SMB of this Setup Guide Refer to the Operation Guide. 15 Enable SMB protocol setting. Troubleshooting If a network connection fails (ex. Checkpoints Are the machine's network settings set up TCP/IP properly. Is folder sharing set properly? Check...
...the Operation Guide and COMMAND CENTER Operation Guide. page 8 of this Setup Guide page 10 of this Setup Guide page 11 of this Setup Guide page 13 of COMMAND CENTER On? Corrective Actions Connect the network cable and set up properly? Check the host name of shared folder.... and domain user name. Check the login password. Is SMB of this Setup Guide Refer to the Operation Guide. 15 Enable SMB protocol setting. Troubleshooting If a network connection fails (ex. Checkpoints Are the machine's network settings set up TCP/IP properly. Is folder sharing set properly? Check...

181/221 Operation Guide Rev-2
Page 4
...2-2 Determining the Connection Method and Preparing Cables 2-3 Connecting Cables 2-5 Switching the Language for Display [Language 2-7 Setting Date and Time 2-8 Network (TCP/IP) Setup 2-10 Installing Software 2-13 Loading Paper 2-14 Loading Originals 2-25 3 Basic Operation Power On/Off 3-2 Low Power Mode and Auto Low...4-28 Auto Image Rotation 4-29 Interrupt Mode 4-30 Program Function 4-32 5 Printing Functions Using This Machine as a Network Printer 5-2 Status Page Printing 5-3 e-MPS Function 5-4 Interface 5-11 Emulation 5-16 Font 5-19 ii OPERATION GUIDE
...2-2 Determining the Connection Method and Preparing Cables 2-3 Connecting Cables 2-5 Switching the Language for Display [Language 2-7 Setting Date and Time 2-8 Network (TCP/IP) Setup 2-10 Installing Software 2-13 Loading Paper 2-14 Loading Originals 2-25 3 Basic Operation Power On/Off 3-2 Low Power Mode and Auto Low...4-28 Auto Image Rotation 4-29 Interrupt Mode 4-30 Program Function 4-32 5 Printing Functions Using This Machine as a Network Printer 5-2 Status Page Printing 5-3 e-MPS Function 5-4 Interface 5-11 Emulation 5-16 Font 5-19 ii OPERATION GUIDE
181/221 Operation Guide Rev-2
Page 29
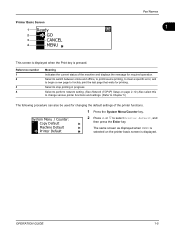
... displayed. Select to switch between online and offline, to print/resume printing, to clear a specific error, and to begin a new page to perform network setting. (See Network (TCP/IP) Setup on the printer basic screen is pressed. Reference number 1 2 3 4 Meaning Indicates the current status of the printer functions. 1 Press the System Menu/Counter...
... displayed. Select to switch between online and offline, to print/resume printing, to clear a specific error, and to begin a new page to perform network setting. (See Network (TCP/IP) Setup on the printer basic screen is pressed. Reference number 1 2 3 4 Meaning Indicates the current status of the printer functions. 1 Press the System Menu/Counter...
181/221 Operation Guide Rev-2
Page 33
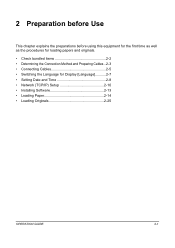
2 Preparation before Use This chapter explains the preparations before using this equipment for the first time as well as the procedures for loading papers and originals. • Check bundled items 2-2 • Determining the Connection Method and Preparing Cables ..2-3 • Connecting Cables 2-5 • Switching the Language for Display [Language]...........2-7 • Setting Date and Time 2-8 • Network (TCP/IP) Setup 2-10 • Installing Software 2-13 • Loading Paper 2-14 • Loading Originals 2-25 OPERATION GUIDE 2-1
2 Preparation before Use This chapter explains the preparations before using this equipment for the first time as well as the procedures for loading papers and originals. • Check bundled items 2-2 • Determining the Connection Method and Preparing Cables ..2-3 • Connecting Cables 2-5 • Switching the Language for Display [Language]...........2-7 • Setting Date and Time 2-8 • Network (TCP/IP) Setup 2-10 • Installing Software 2-13 • Loading Paper 2-14 • Loading Originals 2-25 OPERATION GUIDE 2-1
181/221 Operation Guide Rev-2
Page 37
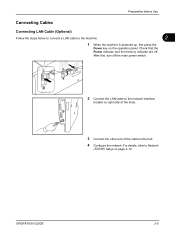
After this, turn off . OPERATION GUIDE 2-5 Preparation before Use Connecting Cables Connecting LAN Cable (Optional) Follow the steps below to connect a LAN cable to the machine. 2 1 When the machine is powered up, first press the Power key on right side of the body. 3 Connect the other end of the cable to the hub. 4 Configure the network. For details, refer to the network interface located on the operation panel. Check that the Power indicator and the memory indicator are off the main power switch. 2 Connect the LAN cable to Network (TCP/IP) Setup on page 2-10.
After this, turn off . OPERATION GUIDE 2-5 Preparation before Use Connecting Cables Connecting LAN Cable (Optional) Follow the steps below to connect a LAN cable to the machine. 2 1 When the machine is powered up, first press the Power key on right side of the body. 3 Connect the other end of the cable to the hub. 4 Configure the network. For details, refer to the network interface located on the operation panel. Check that the Power indicator and the memory indicator are off the main power switch. 2 Connect the LAN cable to Network (TCP/IP) Setup on page 2-10.
181/221 Operation Guide Rev-2
Page 42
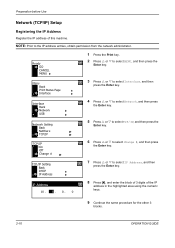
... press the Enter key. Preparation before Use Network (TCP/IP) Setup Registering the IP Address Register the IP address of the IP address in the highlighted area using the numeric keys. 9 Continue the same procedure for the other 3 blocks. 2-10 OPERATION GUIDE Interface Back Network USB Network Setting Back NetWare TCP/IP TCP/IP...
... press the Enter key. Preparation before Use Network (TCP/IP) Setup Registering the IP Address Register the IP address of the IP address in the highlighted area using the numeric keys. 9 Continue the same procedure for the other 3 blocks. 2-10 OPERATION GUIDE Interface Back Network USB Network Setting Back NetWare TCP/IP TCP/IP...
181/221 Operation Guide Rev-2
Page 43
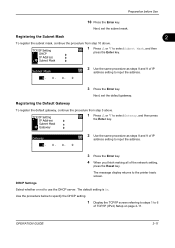
...above . The default setting is On. Next, set the default gateway. Subnet Mask 0. 0. 0. 0 2 Use the same procedure as steps 8 and 9 of TCP/IP (IPv4) Setup on page 2-11. Gateway 0. 0. 0. 0 2 Use the same procedure as steps 8 and 9 of IP address setting to input the address. 3 Press the Enter key. 4 ...When you finish making all of the network setting, press the Reset key. Use the procedure below to specify the DHCP setting. 1 Display the TCP/IP screen referring to steps 1 to the ...
...above . The default setting is On. Next, set the default gateway. Subnet Mask 0. 0. 0. 0 2 Use the same procedure as steps 8 and 9 of TCP/IP (IPv4) Setup on page 2-11. Gateway 0. 0. 0. 0 2 Use the same procedure as steps 8 and 9 of IP address setting to input the address. 3 Press the Enter key. 4 ...When you finish making all of the network setting, press the Reset key. Use the procedure below to specify the DHCP setting. 1 Display the TCP/IP screen referring to steps 1 to the ...

Fax System (R) Operation Guide
Page 6
... the Ultra fine resolution mode and thus allows even clearer fax transmission and reception of documents. 9 Network FAX Settings (Option) This section contains explanations on the setup procedure and settings to be seen by third parties.In addition, this fax contains Subaddress Communication capabilities... of error. Use this section to perform the settings and registration most appropriate to how you use the Network FAX functions available when the optional Network scanner is installed on this fax machine. Introduction 5 Other Features of this Fax This section contains explanations on...
... the Ultra fine resolution mode and thus allows even clearer fax transmission and reception of documents. 9 Network FAX Settings (Option) This section contains explanations on the setup procedure and settings to be seen by third parties.In addition, this fax contains Subaddress Communication capabilities... of error. Use this section to perform the settings and registration most appropriate to how you use the Network FAX functions available when the optional Network scanner is installed on this fax machine. Introduction 5 Other Features of this Fax This section contains explanations on...

Fax System (R) Operation Guide
Page 10
... Turning Bulk Fax Reception ON/OFF ("Fax bulk reception" setting 7-20 8 Optional Equipment 8-1 Duplex Unit ...8-1 Turning Duplex Reception ON/OFF (Duplex RX setting 8-1 Optional Memory ...8-2 9 Network FAX Settings (Option 9-1 Performing the Setup Procedure 9-2 Connecting the Fax Machine and the Computer 9-3 Making the Initial Settings on the Fax Machine 9-4 Turning...
... Turning Bulk Fax Reception ON/OFF ("Fax bulk reception" setting 7-20 8 Optional Equipment 8-1 Duplex Unit ...8-1 Turning Duplex Reception ON/OFF (Duplex RX setting 8-1 Optional Memory ...8-2 9 Network FAX Settings (Option 9-1 Performing the Setup Procedure 9-2 Connecting the Fax Machine and the Computer 9-3 Making the Initial Settings on the Fax Machine 9-4 Turning...
Fax System (R) Operation Guide
Page 191
If you insert the CD-ROM, open the CD-ROM window to be performed on the [setup.exe] file. 3 In the Main Menu screen, click Software Documentation. 4 Select Network FAX Driver Operation Guide. About the On-Line Manual A PDF format On-Line Manual is installed on this Fax machine and in ...particular on the setup procedure and settings to access its contents and double-click on the machine. ...
If you insert the CD-ROM, open the CD-ROM window to be performed on the [setup.exe] file. 3 In the Main Menu screen, click Software Documentation. 4 Select Network FAX Driver Operation Guide. About the On-Line Manual A PDF format On-Line Manual is installed on this Fax machine and in ...particular on the setup procedure and settings to access its contents and double-click on the machine. ...
Fax System (R) Operation Guide
Page 192
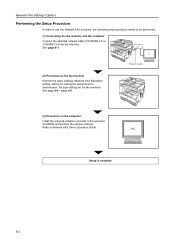
... ~ page 9-6. (3) Procedure on the fax machine. Hub PC (2) Procedure on the fax machine Perform the basic settings (Network FAX Reception setting, setting for saving the documents for transmission, file type setting) on the computer Install the required software (included... CD-ROM) and perform the various settings Refer to the fax machine. PC Setup is complete 9-2 Network FAX Settings (Option) Performing the Setup Procedure In order to use the Network FAX functions, the following setup procedure needs to be performed. (1) Connecting the fax machine and the computer Connect...
... ~ page 9-6. (3) Procedure on the fax machine. Hub PC (2) Procedure on the fax machine Perform the basic settings (Network FAX Reception setting, setting for saving the documents for transmission, file type setting) on the computer Install the required software (included... CD-ROM) and perform the various settings Refer to the fax machine. PC Setup is complete 9-2 Network FAX Settings (Option) Performing the Setup Procedure In order to use the Network FAX functions, the following setup procedure needs to be performed. (1) Connecting the fax machine and the computer Connect...
Scan System (F) B Operation Guide (Functions Edition)
Page 22
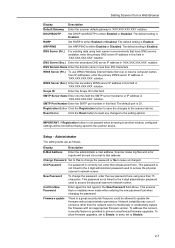
... again later. 2-2 Task Based Index The following before using a web browser to a computer. Purpose Description Reference Page Configuring the Network. Register a destination PC. This section explains how to them when entering text. Confirm the following table is not correctly entered. as...go back to the startup screen (Ready to manage the scanner functions from a web browser. Modifications to network settings, scanner default settings, and Scan to Operation Guide Setup Edition.) • Scanning operations may take a few minutes. Setting Scanner from a Web Browser Web Page...
... again later. 2-2 Task Based Index The following before using a web browser to a computer. Purpose Description Reference Page Configuring the Network. Register a destination PC. This section explains how to them when entering text. Confirm the following table is not correctly entered. as...go back to the startup screen (Ready to manage the scanner functions from a web browser. Modifications to network settings, scanner default settings, and Scan to Operation Guide Setup Edition.) • Scanning operations may take a few minutes. Setting Scanner from a Web Browser Web Page...
Scan System (F) B Operation Guide (Functions Edition)
Page 26
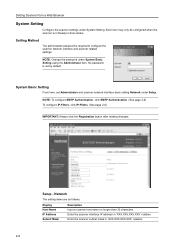
... item may only be configured when the scanner is set Administrator and scanner network interface basic setting Network under System Basic Setting using the Administrator item. Setup - Network The setting items are as follows. Enter the scanner interface IP address in 'XXX.XXX.XXX.XXX' notation. 2-6...Filters. (See page 2-8) IMPORTANT: Always click the Registration button after making changes. No password is in Ready to configure the scanner network interface and scanner related settings. System Basic Setting From here, set by default. Enter the scanner subnet mask in 'XXX.XXX.XXX....
... item may only be configured when the scanner is set Administrator and scanner network interface basic setting Network under System Basic Setting using the Administrator item. Setup - Network The setting items are as follows. Enter the scanner interface IP address in 'XXX.XXX.XXX.XXX' notation. 2-6...Filters. (See page 2-8) IMPORTANT: Always click the Registration button after making changes. No password is in Ready to configure the scanner network interface and scanner related settings. System Basic Setting From here, set by default. Enter the scanner subnet mask in 'XXX.XXX.XXX....
Scan System (F) B Operation Guide (Functions Edition)
Page 27
...in this field. SMTP Port Number Enter the SMTP port number in this field. Setup - This password is a great security risk if anyone could be allowed to access the physical scanner's network screen. This ensures that old password here. The default setting is Enabled. DNS Server...this address. The default port is Enabled. Reset Button Click the Reset button to reset any changes to access the physical scanner's network screen. Administrator The setting items are as follows. Display Description E-Mail Address Enter the administrator e-mail address. Scanner status log ...
...in this field. SMTP Port Number Enter the SMTP port number in this field. Setup - This password is a great security risk if anyone could be allowed to access the physical scanner's network screen. This ensures that old password here. The default setting is Enabled. DNS Server...this address. The default port is Enabled. Reset Button Click the Reset button to reset any changes to access the physical scanner's network screen. Administrator The setting items are as follows. Display Description E-Mail Address Enter the administrator e-mail address. Scanner status log ...


