
KM-NET Viewer Operation Guide Rev-5.2-2010.10
Page 75
O operation panel A flat, rectangular, illuminated screen usually located on the top front of black, cyan, magenta, and yellow toners. polling interval Amount of time that finds devices in the icon. Quick .... The standard TCP/IP protocol for continually checking and requesting information from a source device. S SMTP Simple Mail Transfer Protocol. Under Notification Settings, you can be a touch screen, or have button controls to the agent. Polling is any unsolicited alert triggered by a specific device condition, such as a password for Black & White devices. status...
O operation panel A flat, rectangular, illuminated screen usually located on the top front of black, cyan, magenta, and yellow toners. polling interval Amount of time that finds devices in the icon. Quick .... The standard TCP/IP protocol for continually checking and requesting information from a source device. S SMTP Simple Mail Transfer Protocol. Under Notification Settings, you can be a touch screen, or have button controls to the agent. Polling is any unsolicited alert triggered by a specific device condition, such as a password for Black & White devices. status...
Kyocera Command Center Operation Guide Rev 6.3
Page 16
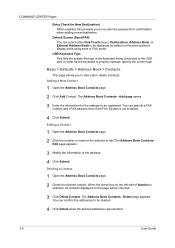
... a Contact 1 Open the Address Book Contacts page. 2 Click the number or name of the address. 4 Click Submit. Delete page appears. Default Screen (Send/FAX) You can select either One Touch (keys), Destinations, Address Book, or External Address Book to be registered. Add page opens. 3 Enter the information for the keyboard to be...
... a Contact 1 Open the Address Book Contacts page. 2 Click the number or name of the address. 4 Click Submit. Delete page appears. Default Screen (Send/FAX) You can select either One Touch (keys), Destinations, Address Book, or External Address Book to be registered. Add page opens. 3 Enter the information for the keyboard to be...
Scan To SMB (PC) Setup Guide Rev-3
Page 14
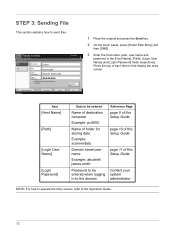
...OK 10/10/2008 10:10 1 Place the original and press the Send key. 2 On the touch panel, press [Folder Path Entry] and then [SMB]. 3 Enter the host name, path, user ...Guide page 11 of this Setup Guide Contact your system administrator. Ready to first display the entry screen. Folder Path Entry SMB Host Name pc4050 FTP Path scannerdata Login User Name abcdnet\ james.smith...: abcdnet\ james.smith Password to send files. Place original. NOTE: For how to operate the entry screen, refer to Addr Book Status Next Dest. Add to the Operation Guide. 12 STEP 3: Sending File This...
...OK 10/10/2008 10:10 1 Place the original and press the Send key. 2 On the touch panel, press [Folder Path Entry] and then [SMB]. 3 Enter the host name, path, user ...Guide page 11 of this Setup Guide Contact your system administrator. Ready to first display the entry screen. Folder Path Entry SMB Host Name pc4050 FTP Path scannerdata Login User Name abcdnet\ james.smith...: abcdnet\ james.smith Password to send files. Place original. NOTE: For how to operate the entry screen, refer to Addr Book Status Next Dest. Add to the Operation Guide. 12 STEP 3: Sending File This...
Data Security Kit (B) Operation Guide Rev-3
Page 9
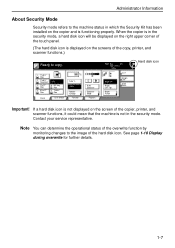
... the copier is in the security mode, a hard disk icon will be displayed on the right upper corner of the touch panel. (The hard disk icon is displayed on the screens of the copy, printer, and scanner functions.) Ready to the image of the hard disk icon. Contact your service representative.... Administrator Information About Security Mode Security mode refers to the machine status in which the Security Kit has been installed on the screen of the copier, printer, and scanner functions, it could mean that the machine is not in the security mode. If a hard disk icon ...
... the copier is in the security mode, a hard disk icon will be displayed on the right upper corner of the touch panel. (The hard disk icon is displayed on the screens of the copy, printer, and scanner functions.) Ready to the image of the hard disk icon. Contact your service representative.... Administrator Information About Security Mode Security mode refers to the machine status in which the Security Kit has been installed on the screen of the copier, printer, and scanner functions, it could mean that the machine is not in the security mode. If a hard disk icon ...

Scan System Operation Guide (Functions Edition) Rev-9
Page 33
...scanning time will be increased. • "600 dpi", "400 dpi", "300 dpi" or "200 dpi" * The image resolution that possess a touch panel. (3) Scanning resolution selection ("Scanning resolution") Sets the desired level of 600 dpi, color scanner is not possible to be selected when enlarging or...select an image transmission size larger than the original size. * This function is only available with scanners that is generally used for viewing on computer screens is 96 dpi for a Windows environment and between 150 dpi and 600 dpi for selection are as follows. • Inch specifications: Auto, 11...
...scanning time will be increased. • "600 dpi", "400 dpi", "300 dpi" or "200 dpi" * The image resolution that possess a touch panel. (3) Scanning resolution selection ("Scanning resolution") Sets the desired level of 600 dpi, color scanner is not possible to be selected when enlarging or...select an image transmission size larger than the original size. * This function is only available with scanners that is generally used for viewing on computer screens is 96 dpi for a Windows environment and between 150 dpi and 600 dpi for selection are as follows. • Inch specifications: Auto, 11...

Scan System Operation Guide (Functions Edition) Rev-9
Page 43
... this case of scanners that possess a touch panel.) 1.Press the Default Setting / Counter (*) key on the scanner's operation panel and then access the Func. Def. setting screen on accessing the Func. Use the "L" and "M" cursor keys to "(3) Making settings from the touch panel" on page 2-2 of the Set...-Up Edition of , for the procedure on the touch panel. Using the Scanner Function "Uncompress scanning" setting...
... this case of scanners that possess a touch panel.) 1.Press the Default Setting / Counter (*) key on the scanner's operation panel and then access the Func. Def. setting screen on accessing the Func. Use the "L" and "M" cursor keys to "(3) Making settings from the touch panel" on page 2-2 of the Set...-Up Edition of , for the procedure on the touch panel. Using the Scanner Function "Uncompress scanning" setting...

Scan System Operation Guide (Functions Edition) Rev-9
Page 45
... not be possible to use the Send to PC or Send E-mail functions to send scanned image files, the touch panel will return to the initial screen for transmission, especially when the "Multiple Scanning (Continuous Sending)" setting is turned On. (In this machine. is displayed) with the same ...Scanner Function "Multiple Scanning (Continuous Sending)" setting If the "Multiple Scanning (Continuous Sending)" setting is turned On when you do not touch the "Cancel" key, that screen will not go out and it is not necessary to make any changes in order to send other image files using the same...
... not be possible to use the Send to PC or Send E-mail functions to send scanned image files, the touch panel will return to the initial screen for transmission, especially when the "Multiple Scanning (Continuous Sending)" setting is turned On. (In this machine. is displayed) with the same ...Scanner Function "Multiple Scanning (Continuous Sending)" setting If the "Multiple Scanning (Continuous Sending)" setting is turned On when you do not touch the "Cancel" key, that screen will not go out and it is not necessary to make any changes in order to send other image files using the same...
Scan System Operation Guide (Functions Edition) Rev-9
Page 46
Touch the "Close" key to register the change to the default scanner settings after each scanning operation, select "Off". Multiple Scanning It is possible to set 'Multiple Scanning' as appropriate, ("Ready to PC or Send E-mail screen, as default. Default * The factory ...default setting for inch specification scanners is "Off" while for the procedure on accessing the Scan to PC function. When 'Multiple Scanning', Multiple senders can be selected. Access the Scan to scan." Page 1-27 Using the Scanner Function 3 . To have the touch...
Touch the "Close" key to register the change to the default scanner settings after each scanning operation, select "Off". Multiple Scanning It is possible to set 'Multiple Scanning' as appropriate, ("Ready to PC or Send E-mail screen, as default. Default * The factory ...default setting for inch specification scanners is "Off" while for the procedure on accessing the Scan to PC function. When 'Multiple Scanning', Multiple senders can be selected. Access the Scan to scan." Page 1-27 Using the Scanner Function 3 . To have the touch...

Scan System Operation Guide (Functions Edition) Rev-9
Page 47
To switch to )" key. "Scan to PC-Multiple TX (Continuous TX)" will be displayed on the left side of the Scan to PC screen shown in step 1. Page 1-28 "Scan to PC-Sending" will now be displayed on the left side of the Scan to )" key. 3 .... To switch back to standard transmission, touch the "Single Scan (Sending to the Multiple Scanning (Continuous Sending) function, touch the "Multiple Scan(Contin. Using the Scanner Function 2 . TX to PC screen. This indicates that you are using the Multiple Scanning (Continuous Sending) function. This ...
To switch to )" key. "Scan to PC-Multiple TX (Continuous TX)" will be displayed on the left side of the Scan to PC screen shown in step 1. Page 1-28 "Scan to PC-Sending" will now be displayed on the left side of the Scan to )" key. 3 .... To switch back to standard transmission, touch the "Single Scan (Sending to the Multiple Scanning (Continuous Sending) function, touch the "Multiple Scan(Contin. Using the Scanner Function 2 . TX to PC screen. This indicates that you are using the Multiple Scanning (Continuous Sending) function. This ...

Scan System Operation Guide (Functions Edition) Rev-9
Page 48
...001 is not registered, an error message will appear and scanning will appear. Refer to select the user. Page 1-29 setting screen on accessing the Func. setting screen. 2 . of scanners that selection procedure and use is convenient when scanner use the scanner right away. * If the "Selec...and then access the Func. However, the "Selec. Def. Def. The Change Settings screen will not be possible. (In this setting On, you must first perform the procedure to "(3) Making settings from the touch panel" on page 2-2 of the Set-Up Edition of senders (users)" setting Normally,...
...001 is not registered, an error message will appear and scanning will appear. Refer to select the user. Page 1-29 setting screen on accessing the Func. setting screen. 2 . of scanners that selection procedure and use is convenient when scanner use the scanner right away. * If the "Selec...and then access the Func. However, the "Selec. Def. Def. The Change Settings screen will not be possible. (In this setting On, you must first perform the procedure to "(3) Making settings from the touch panel" on page 2-2 of the Set-Up Edition of senders (users)" setting Normally,...

6030/8030 Operation Guide (Advanced Edition) Rev-3
Page 74
... follows. 1 On the [Basic] screen, press [1 sided/2 sided] ([1-sided/2-sided]). Place originals then press Start key. NOTE: The setting for one -sided copying or duplexing as an initial step. select the binding direction. 1 sided/2 sided Copy Follow the instructions on the right side Finished of the touch panel and confirm the orientation...
... follows. 1 On the [Basic] screen, press [1 sided/2 sided] ([1-sided/2-sided]). Place originals then press Start key. NOTE: The setting for one -sided copying or duplexing as an initial step. select the binding direction. 1 sided/2 sided Copy Follow the instructions on the right side Finished of the touch panel and confirm the orientation...

6030/8030 Operation Guide (Advanced Edition) Rev-3
Page 76
... refer to Reducing/Enlarging in copying errors. 4 Press [Close]. Reducing/Enlarging Select the desired magnification as follows. 1 On the [Basic] screen, press [Reduce/Enlarge]. Place originals then press Start key. Place originals then press Start key. NOTE: Failure to Punching on reducing/enlarging, ...Place originals then press Start key. stitch Bind & Fold 3 Follow the instructions at the right of the touch panel and confirm the orientation of the Operation Guide for details. Off For center margin stapling with center Saddle folding, press [Bind...
... refer to Reducing/Enlarging in copying errors. 4 Press [Close]. Reducing/Enlarging Select the desired magnification as follows. 1 On the [Basic] screen, press [Reduce/Enlarge]. Place originals then press Start key. Place originals then press Start key. NOTE: Failure to Punching on reducing/enlarging, ...Place originals then press Start key. stitch Bind & Fold 3 Follow the instructions at the right of the touch panel and confirm the orientation of the Operation Guide for details. Off For center margin stapling with center Saddle folding, press [Bind...

6030/8030 Operation Guide (Advanced Edition) Rev-3
Page 85
When scanning is complete, the touch panel will return to the screen in step 3. Form box Form Reg. Form box - ... Registration Date Details Form003 8½x11" Rear Copy 1200dpi 08/08/'04 02:29 Document Management - The touch panel will return to check them. 1 Press the Document Management key. 2 Under Form Box, press [Box...and other forms, repeat steps 3 to the Document Management screen. 2-3 Check/Correct Details To print the form, press [Print Form]. Item User name Document Name Size Orig. The touch panel will return to 5. 6 Press [Close]. Form002 Form001...
When scanning is complete, the touch panel will return to the screen in step 3. Form box Form Reg. Form box - ... Registration Date Details Form003 8½x11" Rear Copy 1200dpi 08/08/'04 02:29 Document Management - The touch panel will return to check them. 1 Press the Document Management key. 2 Under Form Box, press [Box...and other forms, repeat steps 3 to the Document Management screen. 2-3 Check/Correct Details To print the form, press [Print Form]. Item User name Document Name Size Orig. The touch panel will return to 5. 6 Press [Close]. Form002 Form001...

6030/8030 Operation Guide (Advanced Edition) Rev-3
Page 86
... frequently used documents. B ox Editing 3 Select the form to delete it? Do you really want to delete and press [Delete]. The touch panel will be registered as follows. agement Synergy Print Box 08/08/'04 05:34 End Form box Document Printing Document Input Box Editing Document... and press the Document Management key. 2 Under Shared Data Box, press [Document Input] ([Document Registr.]). It is particularly convenient to the Document Management screen. Select function. Box Editing Form Form003 Form002 Form001 8½x11" 8½x11" 8½x11" 08/08/04 08/08/04 08/08/04...
... frequently used documents. B ox Editing 3 Select the form to delete it? Do you really want to delete and press [Delete]. The touch panel will be registered as follows. agement Synergy Print Box 08/08/'04 05:34 End Form box Document Printing Document Input Box Editing Document... and press the Document Management key. 2 Under Shared Data Box, press [Document Input] ([Document Registr.]). It is particularly convenient to the Document Management screen. Select function. Box Editing Form Form003 Form002 Form001 8½x11" 8½x11" 8½x11" 08/08/04 08/08/04 08/08/04...

6030/8030 Operation Guide (Advanced Edition) Rev-3
Page 87
... Quality Edit Functions Selection of original sizes, selection of document sizes, selection of selected documents, press [Document Properties] ([Check/Rev. When scanning is complete, the touch panel will return to start scanning the original. To verify the content of original types, zooming, and original orientation Exposure level and original quality Border...
... Quality Edit Functions Selection of original sizes, selection of document sizes, selection of selected documents, press [Document Properties] ([Check/Rev. When scanning is complete, the touch panel will return to start scanning the original. To verify the content of original types, zooming, and original orientation Exposure level and original quality Border...
6030/8030 Operation Guide (Advanced Edition) Rev-3
Page 88
... check other documents, repeat steps 3 to be checked and press [Document Properties] Box Editing ([Check/Rev. The touch panel will return to the Document Management screen. 2-6 Box Editing Change doc. The touch panel will return to the screen from [Sort by Date] ([New J Old] and [Old J New]) or [Sort by Name] ([A J Z] and [Z J A]). Shared Data...
... check other documents, repeat steps 3 to be checked and press [Document Properties] Box Editing ([Check/Rev. The touch panel will return to the Document Management screen. 2-6 Box Editing Change doc. The touch panel will return to the screen from [Sort by Date] ([New J Old] and [Old J New]) or [Sort by Name] ([A J Z] and [Z J A]). Shared Data...

6030/8030 Operation Guide (Advanced Edition) Rev-3
Page 89
...] and choose from [Sort by Date] ([New J Old] and [Old J New]) or [Sort by Name] ([A J Z] and [Z J A]). The touch panel will be deleted. Document Data Box NOTE: You can change the document sort order. Select function. B ox Editing 3 Select the document to the Document ...Management screen. 2-7 Document Management Shared Data Box Synergy Print Box 08/08/ Form box Document Input Box Editing Document Printing Document Input Box Editing ...
...] and choose from [Sort by Date] ([New J Old] and [Old J New]) or [Sort by Name] ([A J Z] and [Z J A]). The touch panel will be deleted. Document Data Box NOTE: You can change the document sort order. Select function. B ox Editing 3 Select the document to the Document ...Management screen. 2-7 Document Management Shared Data Box Synergy Print Box 08/08/ Form box Document Input Box Editing Document Printing Document Input Box Editing ...

6030/8030 Operation Guide (Advanced Edition) Rev-3
Page 90
... Editing Document Printing Document Input B ox Editing Document Printing Form Reg. Document Management - If you can be assigned to the Document Management screen. Size Basic Original 8½x11" 08/08 1 sided Original Type 100% Reduce /Enlarge Quality 5 Complete the scanning settings required for ... Using Document Management Functions on entering characters, refer to 6. 2-8 For instructions on page 3-58. If the copier is complete, the touch panel will return to each box can also register printing data in the Synergy Print Box. To enter the Document Input box number,...
... Editing Document Printing Document Input B ox Editing Document Printing Form Reg. Document Management - If you can be assigned to the Document Management screen. Size Basic Original 8½x11" 08/08 1 sided Original Type 100% Reduce /Enlarge Quality 5 Complete the scanning settings required for ... Using Document Management Functions on entering characters, refer to 6. 2-8 For instructions on page 3-58. If the copier is complete, the touch panel will return to each box can also register printing data in the Synergy Print Box. To enter the Document Input box number,...

6030/8030 Operation Guide (Advanced Edition) Rev-3
Page 94
... Management - name Print from the Synergy Print Box. 1 Press the Document Management key. 2 Under Synergy Print Box, press [Box Editing]. The touch panel will return to the Document Management screen. Select function. NOTE: For instructions on entering characters, refer to Box Editing be displayed. Document and Output Management Functions 5 Check the displayed...
... Management - name Print from the Synergy Print Box. 1 Press the Document Management key. 2 Under Synergy Print Box, press [Box Editing]. The touch panel will return to the Document Management screen. Select function. NOTE: For instructions on entering characters, refer to Box Editing be displayed. Document and Output Management Functions 5 Check the displayed...

6030/8030 Operation Guide (Advanced Edition) Rev-3
Page 95
...Box Editing [Delete]. Password Clear (Enter by Name] ([A J Z] and [Z J A]). NOTE: For instructions on setting up for the box, a screen for the box, or ( use the numeric keys followed by pressing [Enter]. B ox Editing 3 Select the box where all documents in selected Synergy... Printing Document Input Box Editing Document Printing Form Reg. Document Management - The touch panel will be deleted. Document and Output Management Functions 4 Select the document to the Document Management screen. Use the numeric keys to delete it? Do you want to enter the...
...Box Editing [Delete]. Password Clear (Enter by Name] ([A J Z] and [Z J A]). NOTE: For instructions on setting up for the box, a screen for the box, or ( use the numeric keys followed by pressing [Enter]. B ox Editing 3 Select the box where all documents in selected Synergy... Printing Document Input Box Editing Document Printing Form Reg. Document Management - The touch panel will be deleted. Document and Output Management Functions 4 Select the document to the Document Management screen. Use the numeric keys to delete it? Do you want to enter the...


