
KM-NET for Clients Operation Guide Rev-3.7
Page 5
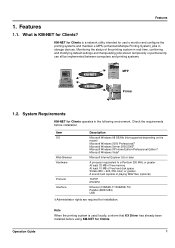
...MB of free memory At least 10 MB of free hard disk space SVGA (800 × 600, 256 color) or greater A sound card capable of the printing system in storage devices. Item OS Web Browser Hardware Protocol Interface Description Microsoft Windows 98 SE/Me (Not supported ...or permanently can all be implemented between computers and printing systems. KM-NET KM-NET MFP Printer 1.2. What is used locally, conform that KX Driver has already been installed before installation. Note When the printing system is KM-NET for Clients operates in the following environment. Check the requirements...
...MB of free memory At least 10 MB of free hard disk space SVGA (800 × 600, 256 color) or greater A sound card capable of the printing system in storage devices. Item OS Web Browser Hardware Protocol Interface Description Microsoft Windows 98 SE/Me (Not supported ...or permanently can all be implemented between computers and printing systems. KM-NET KM-NET MFP Printer 1.2. What is used locally, conform that KX Driver has already been installed before installation. Note When the printing system is KM-NET for Clients operates in the following environment. Check the requirements...
KX Driver User Guide Version 5.90
Page 10
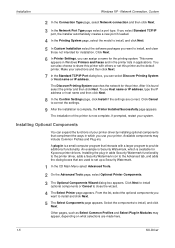
To use your system. 10 Installing Optional Components You can also choose to share this printer ...the dialog boxes that are used to install, and clear those not intended for Kyocera printer drivers. Installation Windows XP - This name appears in Windows Printers and Faxes and in the printer lists in which you can select Discover Printing...then click Next. 8 In the Confirm Settings page, click Install if the settings are made here. 1-5 KX Driver An example is Security Watermark, which is a small computer program that compliment the ways in applications. Click Next ...
To use your system. 10 Installing Optional Components You can also choose to share this printer ...the dialog boxes that are used to install, and clear those not intended for Kyocera printer drivers. Installation Windows XP - This name appears in Windows Printers and Faxes and in the printer lists in which you can select Discover Printing...then click Next. 8 In the Confirm Settings page, click Install if the settings are made here. 1-5 KX Driver An example is Security Watermark, which is a small computer program that compliment the ways in applications. Click Next ...

KX Driver User Guide Version 5.90
Page 26
..., enable the Collate check box for default tray select Use printer settings. 3-1 KX Driver See page 3-10 for further information. 4 If Ignore application collation is not applied. The Print dialog box appears. 2 Select the desired printing system from Microsoft Windows applications. • Basic Printing Tasks • Printing on Paper of copies box. Number...
..., enable the Collate check box for default tray select Use printer settings. 3-1 KX Driver See page 3-10 for further information. 4 If Ignore application collation is not applied. The Print dialog box appears. 2 Select the desired printing system from Microsoft Windows applications. • Basic Printing Tasks • Printing on Paper of copies box. Number...

KX Driver User Guide Version 5.90
Page 66
...this procedure to set the number of days to save jobs, and then press OK. 9 10 When you have completed the Custom box settings, press the Register key. 10 Set Up Custom Boxes in the Driver Use this box, press the Auto File Deletion Change key. Enter a name using the ...Custom box at the printing system's operation panel. 1 Click Start in the Windows task bar, and click Printers and Faxes to open the Printers and Faxes window. 1 2 Right-click the icon for your printing system in your printer driver (on your computer) that match the custom boxes registered at the printing system...
...this procedure to set the number of days to save jobs, and then press OK. 9 10 When you have completed the Custom box settings, press the Register key. 10 Set Up Custom Boxes in the Driver Use this box, press the Auto File Deletion Change key. Enter a name using the ...Custom box at the printing system's operation panel. 1 Click Start in the Windows task bar, and click Printers and Faxes to open the Printers and Faxes window. 1 2 Right-click the icon for your printing system in your printer driver (on your computer) that match the custom boxes registered at the printing system...
IB-40 User Guide
Page 1
...to +70 ˚C , +32 ˚F to +158 ˚F Humidity : 20% to 80%RH (Non-condensing) Temperature : -10 ˚C to +50 ˚C , 14 ˚F to +122 ˚F Humidity : 20% to 80%RH (Non-condensing) VCCI...the LAN network port on IPv6 networks. This device complies with IPv6: - Microsoft and Windows are properly and safely before using the product. [ Danger ] "Danger" indicates the ...protocol converter that may be used for the compatible protocols above - Mac PPD - Network FAX Driver - KM-NET VIEWER - EN55022 Class-B EN55024 About trademarks - This product is encouraged to try to...
...to +70 ˚C , +32 ˚F to +158 ˚F Humidity : 20% to 80%RH (Non-condensing) Temperature : -10 ˚C to +50 ˚C , 14 ˚F to +122 ˚F Humidity : 20% to 80%RH (Non-condensing) VCCI...the LAN network port on IPv6 networks. This device complies with IPv6: - Microsoft and Windows are properly and safely before using the product. [ Danger ] "Danger" indicates the ...protocol converter that may be used for the compatible protocols above - Mac PPD - Network FAX Driver - KM-NET VIEWER - EN55022 Class-B EN55024 About trademarks - This product is encouraged to try to...
IB-40 User Guide
Page 2
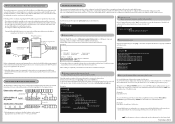
..." to "02". For the host name, any name that is not used for this product can be configured over write the hosts file and close Windows Notepad. 5. Example: When fifty IPv6 devices are using a different OS or Web browser, the configuration method may be set the stateless address here. ... this product 0 0 c 0 e e Change the first 2 digits from 192.168.0.1 to 192.168.0.254 : IPv4 address range on the network 192.168.0.1 192.168.0.10 51 addresses assigned as a work area for the OS or Web browser.) 1. Communication check At the Command Prompt, use the "ipv6" command to associate the...
..." to "02". For the host name, any name that is not used for this product can be configured over write the hosts file and close Windows Notepad. 5. Example: When fifty IPv6 devices are using a different OS or Web browser, the configuration method may be set the stateless address here. ... this product 0 0 c 0 e e Change the first 2 digits from 192.168.0.1 to 192.168.0.254 : IPv4 address range on the network 192.168.0.1 192.168.0.10 51 addresses assigned as a work area for the OS or Web browser.) 1. Communication check At the Command Prompt, use the "ipv6" command to associate the...

IC Link User's Manual ver. 2.8
Page 2
... Page 32 KX Print Driver Prologue / Epilogue Feature Creating the PRESCRIBE Macro Call Page 34 {PAGE } FSTS;EXIT Page 26 PRESCRIBE Samples Page 28 IC Link Image Converter Build Bitmap Image for PRESCRIBE Macro Page 31 Build JPEG Image for Windows Introduction Page 2 Setting ...Preferences Global Options Page 4 File Mappings Page 5 Project Menu Project Build & Project Settings Page 6 Resource Menu Add & Delete IC Link Project Resource Files Page 7 IC Link Project File Properties Page 8 Tools Menu Printer Tools Page 9 Custom Tools Page 10 Muti...
... Page 32 KX Print Driver Prologue / Epilogue Feature Creating the PRESCRIBE Macro Call Page 34 {PAGE } FSTS;EXIT Page 26 PRESCRIBE Samples Page 28 IC Link Image Converter Build Bitmap Image for PRESCRIBE Macro Page 31 Build JPEG Image for Windows Introduction Page 2 Setting ...Preferences Global Options Page 4 File Mappings Page 5 Project Menu Project Build & Project Settings Page 6 Resource Menu Add & Delete IC Link Project Resource Files Page 7 IC Link Project File Properties Page 8 Tools Menu Printer Tools Page 9 Custom Tools Page 10 Muti...
IC Link User's Manual ver. 2.8
Page 38
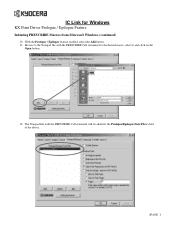
IC Link for the desired macro, select it and click on the Open button. 12. The Notepad file with the PRESCRIBE Call statement will be added to the Notepad file with the PRESCRIBE Call statement for Windows KX Print Driver Prologue / Epilogue Feature Initiating PRESCRIBE Macros from Microsoft Windows (continued) 10. Browse to the Prologue/Epilogue Data Files: field of the driver. {PAGE } With the Prologue / Epilogue feature enabled, select the Add button. 11.
IC Link for the desired macro, select it and click on the Open button. 12. The Notepad file with the PRESCRIBE Call statement will be added to the Notepad file with the PRESCRIBE Call statement for Windows KX Print Driver Prologue / Epilogue Feature Initiating PRESCRIBE Macros from Microsoft Windows (continued) 10. Browse to the Prologue/Epilogue Data Files: field of the driver. {PAGE } With the Prologue / Epilogue feature enabled, select the Add button. 11.

KX Driver Operation Guide Rev. 1.3.1
Page 21
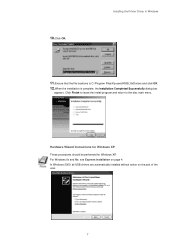
... 25. • Select No if you do not wish to install optional components and click Next. Verify the printer settings and click Install. The printer driver installation begins. 12 Once the installation is complete, the Printer Installed Successfully dialog box appears. • Select Yes (recommended) to install optional components and click... Next. 17 Select Yes or No to determine whether to apply the selected printer as the default printer for all Windows-based applications. 11 The Confirm Settings dialog box appears. Installation...
... 25. • Select No if you do not wish to install optional components and click Next. Verify the printer settings and click Install. The printer driver installation begins. 12 Once the installation is complete, the Printer Installed Successfully dialog box appears. • Select Yes (recommended) to install optional components and click... Next. 17 Select Yes or No to determine whether to apply the selected printer as the default printer for all Windows-based applications. 11 The Confirm Settings dialog box appears. Installation...
Kyocera Extended Driver 4.0 User Guide Rev-2.1
Page 25
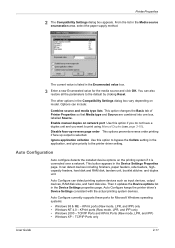
...order printing if face up output is listed in the application, and give priority to print using Manual Duplex (see page 3-10). Auto Configuration Auto configure detects the installed device options on the printing system if it updates the Device options list in ...Enumerated value box. 3 Enter a new Enumerated value for Microsoft Windows operating systems: • Windows 98 & ME - TCP/IP Ports and KPrint Ports (Raw mode, LPR, and IPP) • Windows XP - Auto Configure keeps the printer driver's Device Settings consistent with the actual printing system devices. This button...
...order printing if face up output is listed in the application, and give priority to print using Manual Duplex (see page 3-10). Auto Configuration Auto configure detects the installed device options on the printing system if it updates the Device options list in ...Enumerated value box. 3 Enter a new Enumerated value for Microsoft Windows operating systems: • Windows 98 & ME - TCP/IP Ports and KPrint Ports (Raw mode, LPR, and IPP) • Windows XP - Auto Configure keeps the printer driver's Device Settings consistent with the actual printing system devices. This button...
Kyocera Extended Driver 3.x User Guide Rev-1.4
Page 13
Hardware Wizard Instructions for Windows XP These procedures should be performed for Windows XP. Installing the Printer Driver in Windows 11.Ensure that the file locations is C:\Program Files\Kyocera\KMSL\9xDrviers and click OK. 12.When the installation is complete, the Installation Completed Successfully dialog box appears. For Windows 9x and Me, see Express Installation on the part of the user. 7 In Windows 2000, all USB drivers are automatically installed without action on page 4. Click Finish to leave the install program and return to the disc main menu. 10.Click OK.
Hardware Wizard Instructions for Windows XP These procedures should be performed for Windows XP. Installing the Printer Driver in Windows 11.Ensure that the file locations is C:\Program Files\Kyocera\KMSL\9xDrviers and click OK. 12.When the installation is complete, the Installation Completed Successfully dialog box appears. For Windows 9x and Me, see Express Installation on the part of the user. 7 In Windows 2000, all USB drivers are automatically installed without action on page 4. Click Finish to leave the install program and return to the disc main menu. 10.Click OK.


