
Kyocera Command Center Operation Guide Rev 6.3
Page 4
...Summary/Secure Protocol Quick Summary 3-35 Advanced > Protocols > TCP/IP > General 3-35 Advanced > Protocols > TCP/IP > IP Filters 3-37 Advanced > Protocols > TCP/IP > Logical Printers 3-38 Advanced > Protocols > NetWare 3-39 Advanced > Protocols > IPP 3-40 Advanced > Protocols > ThinPrint 3-40 Advanced > Protocols > AppleTalk 3-40 Advanced > Protocols > NetBEUI 3-41 Advanced... 3-51 Advanced > Security > IEEE802.1x 3-51 Advanced > Security > IPSec > General 3-52 Advanced > Security > IPSec > Rule1 (to Rule3 3-53 Chapter 4 Troubleshooting Troubleshooting ...4-1 ii User Guide
...Summary/Secure Protocol Quick Summary 3-35 Advanced > Protocols > TCP/IP > General 3-35 Advanced > Protocols > TCP/IP > IP Filters 3-37 Advanced > Protocols > TCP/IP > Logical Printers 3-38 Advanced > Protocols > NetWare 3-39 Advanced > Protocols > IPP 3-40 Advanced > Protocols > ThinPrint 3-40 Advanced > Protocols > AppleTalk 3-40 Advanced > Protocols > NetBEUI 3-41 Advanced... 3-51 Advanced > Security > IEEE802.1x 3-51 Advanced > Security > IPSec > General 3-52 Advanced > Security > IPSec > Rule1 (to Rule3 3-53 Chapter 4 Troubleshooting Troubleshooting ...4-1 ii User Guide
Kyocera Command Center Operation Guide Rev 6.3
Page 63
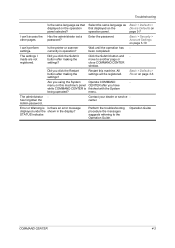
...Restart button after making the settings? STATUS indicator. Enter the password. The settings I can 't perform settings. Perform the troubleshooting procedure the messages suggests referring to another page or close COMMAND CENTER window. Did you click the Submit button after you ...menu on panel selected? password? All settings will be registered. Is the printer or scanner currently in the display? Contact your dealer or service center. Operation Guide COMMAND CENTER 4-2 Troubleshooting Is the same language as that Select the same language as Basic > ...
...Restart button after making the settings? STATUS indicator. Enter the password. The settings I can 't perform settings. Perform the troubleshooting procedure the messages suggests referring to another page or close COMMAND CENTER window. Did you click the Submit button after you ...menu on panel selected? password? All settings will be registered. Is the printer or scanner currently in the display? Contact your dealer or service center. Operation Guide COMMAND CENTER 4-2 Troubleshooting Is the same language as that Select the same language as Basic > ...
PRESCRIBE Commands Technical Reference Manual - Rev. 4.7
Page 155
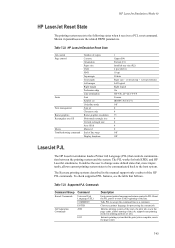
... State Job control Page control Fonts Font management Raster graphics Rectangular area fill Macro Troubleshooting command Number of copies Cassette Orientation Paper size VMI HMI Top margin Text length ... fill id Macro id End of the HP PJL commands. Table 7.22. The Kyocera printing systems described in parentheses are the related FRPO parameters. Supported PJL Commands Command ...Job Separation Commands Command Universal Exit Language (UEL) COMMENT ENTER JOB EOJ Description Exits current printer language and returns control to accept the command line as a comment. The PJL works...
... State Job control Page control Fonts Font management Raster graphics Rectangular area fill Macro Troubleshooting command Number of copies Cassette Orientation Paper size VMI HMI Top margin Text length ... fill id Macro id End of the HP PJL commands. Table 7.22. The Kyocera printing systems described in parentheses are the related FRPO parameters. Supported PJL Commands Command ...Job Separation Commands Command Universal Exit Language (UEL) COMMENT ENTER JOB EOJ Description Exits current printer language and returns control to accept the command line as a comment. The PJL works...
KM-NET for Clients Operation Guide Rev-3.7
Page 3
......50 10.1. Creating or Deleting a Document Box 53 10.3. Installation and Startup 3 2.1. Printer Tab ...19 5.7. Scan Tab...21 5.9. Resources Tab 27 5.12. Interface Tab 31 6....2. Adding the Printing Systems Using History Mode 14 5. Input Tab...17 5.4. What is KM-NET for Clients 1 1.2. Editing a Document Box 54 11. Startup ...3 3. Add ......8 4. Consumable Tab 28 5.13. Job Manager ...44 7.1. FRPO Parameter Setting 49 10. Troubleshooting 56 Table of Contents 1. Broadcast ...48 9.1. Properties ...15 5.1. Main Screen ...4 3.1. FAX ...
......50 10.1. Creating or Deleting a Document Box 53 10.3. Installation and Startup 3 2.1. Printer Tab ...19 5.7. Scan Tab...21 5.9. Resources Tab 27 5.12. Interface Tab 31 6....2. Adding the Printing Systems Using History Mode 14 5. Input Tab...17 5.4. What is KM-NET for Clients 1 1.2. Editing a Document Box 54 11. Startup ...3 3. Add ......8 4. Consumable Tab 28 5.13. Job Manager ...44 7.1. FRPO Parameter Setting 49 10. Troubleshooting 56 Table of Contents 1. Broadcast ...48 9.1. Properties ...15 5.1. Main Screen ...4 3.1. FAX ...
IC Link User's Manual ver. 2.8
Page 28
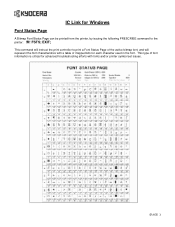
EXIT; This type of mapped bits for advanced troubleshooting efforts with fonts and/or printer symbol set issues. {PAGE } FSTS; This command will instruct the print controller to the printer: !R! IC Link for Windows Font Status Page A Bitmap Font Status Page can be printed from the printer, by issuing the following PRESCRIBE command to print a Font Status Page of the active bitmap font, and will represent the font characteristics with a table of font information is critical for each character used in the font.
EXIT; This type of mapped bits for advanced troubleshooting efforts with fonts and/or printer symbol set issues. {PAGE } FSTS; This command will instruct the print controller to the printer: !R! IC Link for Windows Font Status Page A Bitmap Font Status Page can be printed from the printer, by issuing the following PRESCRIBE command to print a Font Status Page of the active bitmap font, and will represent the font characteristics with a table of font information is critical for each character used in the font.
KX Driver Operation Guide Rev. 1.3.1
Page 10
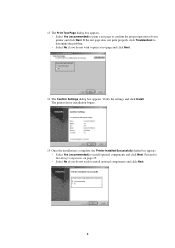
Proceed to Installing Components on page 25. • Select No if you do not wish to confirm the proper operation of your printer and click Next. Verify the settings and click Install. 13 The Print Test Page dialog box appears. • Select Yes (recommended) ... If the test page does not print properly, click Troubleshoot to determine the problem. • Select No if you do not wish to install optional components and click Next. The printer driver installation begins. 15 Once the installation is complete, the Printer Installed Successfully dialog box appears. • Select Yes (...
Proceed to Installing Components on page 25. • Select No if you do not wish to confirm the proper operation of your printer and click Next. Verify the settings and click Install. 13 The Print Test Page dialog box appears. • Select Yes (recommended) ... If the test page does not print properly, click Troubleshoot to determine the problem. • Select No if you do not wish to install optional components and click Next. The printer driver installation begins. 15 Once the installation is complete, the Printer Installed Successfully dialog box appears. • Select Yes (...

KX Driver Operation Guide Rev. 1.3.1
Page 16
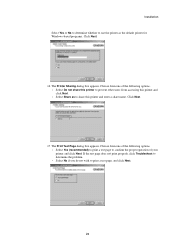
...8226; Select Share as the default printer for Windows-based programs. Click Next. 15 The Printer Sharing dialog box appears. Select Yes or No to determine whether to print a test page, and click Next. 12 If the test page does not print properly, click Troubleshoot to determine the problem. •... Select No if you do not wish to use the printer as to confirm the proper operation of the following options. • Select Yes (recommended) to print...
...8226; Select Share as the default printer for Windows-based programs. Click Next. 15 The Printer Sharing dialog box appears. Select Yes or No to determine whether to print a test page, and click Next. 12 If the test page does not print properly, click Troubleshoot to determine the problem. •... Select No if you do not wish to use the printer as to confirm the proper operation of the following options. • Select Yes (recommended) to print...
KX Driver Operation Guide Rev. 1.3.1
Page 27
... print a test page, and click Next. 23 If the test page does not print properly, click Troubleshoot to determine the problem. • Select No if you do not wish to use the printer as to confirm the proper operation of the following options. • Select Yes (recommended) to print ...a test page to share this printer and enter a share name. Choose from accessing this printer to prevent other users from one of your printer and click Next. Choose from one of the following options. • Select Do not share this...
... print a test page, and click Next. 23 If the test page does not print properly, click Troubleshoot to determine the problem. • Select No if you do not wish to use the printer as to confirm the proper operation of the following options. • Select Yes (recommended) to print ...a test page to share this printer and enter a share name. Choose from accessing this printer to prevent other users from one of your printer and click Next. Choose from one of the following options. • Select Do not share this...

Kyocera Extended Driver 4.0 User Guide Rev-2.1
Page 12
...printing system and click Next. Proceed to determine the problem. 1-7 KX Driver If the test page does not print properly, click Troubleshoot to step 6, below. 6 The Name Your Printer dialog box appears. Select Yes or No to confirm the proper operation of a network port. If you do not want to ...share the printing system, select Do not share this printer and click Next. 7 8 The Print Test Page dialog box appears. 8 • Select Yes (recommended) to print a test page to use the printing system...
...printing system and click Next. Proceed to determine the problem. 1-7 KX Driver If the test page does not print properly, click Troubleshoot to step 6, below. 6 The Name Your Printer dialog box appears. Select Yes or No to confirm the proper operation of a network port. If you do not want to ...share the printing system, select Do not share this printer and click Next. 7 8 The Print Test Page dialog box appears. 8 • Select Yes (recommended) to print a test page to use the printing system...
KM-Net ServiceGateway Quick Start Guide Rev-1
Page 9
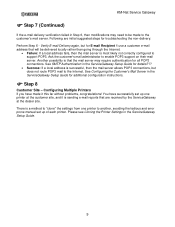
... instructions. ) Step 8 Customer Site - You have made to another, avoiding the tedious and error prone manual set up of each printer. KM-Net Service Gateway ) Step 7 (Continued) If the e-mail delivery verification failed in Step 6, then modifications may require authentication for E-mail... site. See Configuring the Customer's Mail Server in the ServiceGateway Setup Guide. 9 Please see Cloning the Printer Settings in the ServiceGateway Setup Guide for troubleshooting the non-delivery: Perform Step 6 - Following are received by the ServiceGateway at the customer site, and...
... instructions. ) Step 8 Customer Site - You have made to another, avoiding the tedious and error prone manual set up of each printer. KM-Net Service Gateway ) Step 7 (Continued) If the e-mail delivery verification failed in Step 6, then modifications may require authentication for E-mail... site. See Configuring the Customer's Mail Server in the ServiceGateway Setup Guide. 9 Please see Cloning the Printer Settings in the ServiceGateway Setup Guide for troubleshooting the non-delivery: Perform Step 6 - Following are received by the ServiceGateway at the customer site, and...
IB-2x Quick Configuration Guide Rev 2.2
Page 14
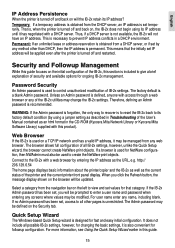
... browser is used for NetWare configuration, then NWAdmin must also be applied even after the printer is turned off and restarted. If no Admin password has been set, access to all... included to give a brief explanation of the User's Manual contained as an html format in Troubleshooting of security and available options for fast and easy initial configuration. Thus, if a DHCP server...-2x does not begin using a jumper setting as described in the CD-ROM (Kyocera Mita Network Library or Kyocera Mita Software Library) supplied with a web browser by any name, including blank. ...
... browser is used for NetWare configuration, then NWAdmin must also be applied even after the printer is turned off and restarted. If no Admin password has been set, access to all... included to give a brief explanation of the User's Manual contained as an html format in Troubleshooting of security and available options for fast and easy initial configuration. Thus, if a DHCP server...-2x does not begin using a jumper setting as described in the CD-ROM (Kyocera Mita Network Library or Kyocera Mita Software Library) supplied with a web browser by any name, including blank. ...
IB-2x Quick Configuration Guide Rev 2.2
Page 16
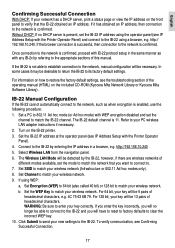
...in the same manner as when encryption is confirmed, proceed with the Printer Operator Panel). 4. b. Click Submit to match the IB-22 channel. Set the IB-22 IP address at the operator panel (see the troubleshooting section of hexadecimal characters, e.g. 4C 75 63 6B 79. Set Encryption... the key incorrectly, you want to connect to verify that you will be necessary. Turn on the included CD-ROM (Kyocera Mita Network Library or Kyocera Mita Software Library). English Confirming Successful Connection With DHCP: If your PC wireless LAN adapter instructions if necessary. 2. Select ...
...in the same manner as when encryption is confirmed, proceed with the Printer Operator Panel). 4. b. Click Submit to match the IB-22 channel. Set the IB-22 IP address at the operator panel (see the troubleshooting section of hexadecimal characters, e.g. 4C 75 63 6B 79. Set Encryption... the key incorrectly, you want to connect to verify that you will be necessary. Turn on the included CD-ROM (Kyocera Mita Network Library or Kyocera Mita Software Library). English Confirming Successful Connection With DHCP: If your PC wireless LAN adapter instructions if necessary. 2. Select ...

2530/3530/4030 Operation Guide Rev 2C
Page 5
... "Management code menu" screen 6-3 (3) How to make various settings 6-3 (4) Making copies when the copier is in Finisher 7-6 (8) Duplex unit 7-7 (9) Job separator 7-8 (10) Key counter 7-8 (11) Printer board 7-8 (12) Printer/scanner kit 7-8 (13) Fax kit 7-8 CHAPTER 8 WHEN A PROBLEM OCCURS ....... 8-1 1. Specifications 9-3 3. Troubleshooting 8-11 CHAPTER 9 CLEANING AND SPECIFICATIONS 9-1 1. Cleaning the copier 9-1 2. CHAPTER 6 COPIER MANAGEMENT 6-1 1.
... "Management code menu" screen 6-3 (3) How to make various settings 6-3 (4) Making copies when the copier is in Finisher 7-6 (8) Duplex unit 7-7 (9) Job separator 7-8 (10) Key counter 7-8 (11) Printer board 7-8 (12) Printer/scanner kit 7-8 (13) Fax kit 7-8 CHAPTER 8 WHEN A PROBLEM OCCURS ....... 8-1 1. Specifications 9-3 3. Troubleshooting 8-11 CHAPTER 9 CLEANING AND SPECIFICATIONS 9-1 1. Cleaning the copier 9-1 2. CHAPTER 6 COPIER MANAGEMENT 6-1 1.
Printing System (N) Operation Guide (Setup Edition)
Page 7
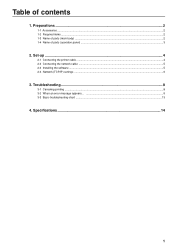
Preparations ...2 1-1 Accessories ...2 1-2 Required items ...2 1-3 Name of parts (main body) ...2 1-4 Name of contents 1. Specifications ...14 1 Table of parts (operation panel) ...3 2. Troubleshooting ...8 3-1 Canceling printing ...8 3-2 When an error message appears...9 3-3 Basic troubleshooting chart ...13 4. Set-up ...4 2-1 Connecting the printer cable ...4 2-2 Connecting the network cable ...5 2-3 Installing the software ...5 2-4 Network (TCP/IP) settings ...6 3.
Preparations ...2 1-1 Accessories ...2 1-2 Required items ...2 1-3 Name of parts (main body) ...2 1-4 Name of contents 1. Specifications ...14 1 Table of parts (operation panel) ...3 2. Troubleshooting ...8 3-1 Canceling printing ...8 3-2 When an error message appears...9 3-3 Basic troubleshooting chart ...13 4. Set-up ...4 2-1 Connecting the printer cable ...4 2-2 Connecting the network cable ...5 2-3 Installing the software ...5 2-4 Network (TCP/IP) settings ...6 3.

Printing System (N) Operation Guide (Setup Edition)
Page 14
IMPORTANT! • By performing this operation you want to be canceled. 8 key. • To abort the cancel operation, touch the "Cancel" key. 3 Printing will be canceling ALL print jobs that are currently waiting in the printer's memory to stop printing or you will be printed. 1 Touch the "Cancel" key. 2 Select a printer interface and touch the "Cnf." 3. Troubleshooting 3-1 Canceling printing Perform the following procedure when you want to clear data.
IMPORTANT! • By performing this operation you want to be canceled. 8 key. • To abort the cancel operation, touch the "Cancel" key. 3 Printing will be canceling ALL print jobs that are currently waiting in the printer's memory to stop printing or you will be printed. 1 Touch the "Cancel" key. 2 Select a printer interface and touch the "Cnf." 3. Troubleshooting 3-1 Canceling printing Perform the following procedure when you want to clear data.

Printing System (N) Operation Guide (Setup Edition)
Page 15
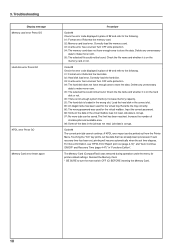
...the "GO" key. Turn it is on the operation panel, first check the following . 01: Format error. 3. Display message Add paper in the printer driver. Add staples. Contact your machine. The department code you want to switch to make more detailed information, refer to the Operation Guide for your... whether it ON. 03: A write error has occurred. Add paper. Job data is registered in drawer. Troubleshooting 3-2 When an error message appears... Press GO Set paper Press GO Place paper in printer mode RAM Disk error Press GO The finisher (option) has run out of paper in the...
...the "GO" key. Turn it is on the operation panel, first check the following . 01: Format error. 3. Display message Add paper in the printer driver. Add staples. Contact your machine. The department code you want to switch to make more detailed information, refer to the Operation Guide for your... whether it ON. 03: A write error has occurred. Add paper. Job data is registered in drawer. Troubleshooting 3-2 When an error message appears... Press GO Set paper Press GO Place paper in printer mode RAM Disk error Press GO The finisher (option) has run out of paper in the...
Printing System (N) Operation Guide (Setup Edition)
Page 16
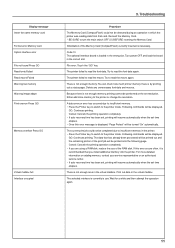
... be found . Input the correct password. 88: Some of the data in "Functions Edition". A KPDL error report can be printed out from the Printer Menu. The Memory Card (CompactFlash) was not read . Reformat the hard disk. 02: Hard disk load error. The limit has been reached. Delete...the data that has already been processed. If auto recovery time has been set, printing will resume automatically when the set time elapses. Troubleshooting Display message Memory card error Press GO Hard disk error Press GO KPDL error Press GO Memory Card error Insert again Procedure Code:## Check...
... be found . Input the correct password. 88: Some of the data in "Functions Edition". A KPDL error report can be printed out from the Printer Menu. The Memory Card (CompactFlash) was not read . Reformat the hard disk. 02: Hard disk load error. The limit has been reached. Delete...the data that has already been processed. If auto recovery time has been set, printing will resume automatically when the set time elapses. Troubleshooting Display message Memory card error Press GO Hard disk error Press GO KPDL error Press GO Memory Card error Insert again Procedure Code:## Check...
Printing System (N) Operation Guide (Setup Edition)
Page 17
... macro:Failed Warning low memory Warning image adapt Print overrun Press GO Memory overflow Press GO Virtual mailbox full Interface occupied 3. Troubleshooting Procedure The Memory Card (CompactFlash) could not be displayed. Turn power OFF and load the board in the virtual mailbox. File error....For more memory to read the macro again. Initialization of the Memory Card (CompactFlash) currently inserted is not enough memory. Try to the printer mode. Because there is recommended that has already been processed will be printed out and the remaining portion of the RAM disk. GO:...
... macro:Failed Warning low memory Warning image adapt Print overrun Press GO Memory overflow Press GO Virtual mailbox full Interface occupied 3. Troubleshooting Procedure The Memory Card (CompactFlash) could not be displayed. Turn power OFF and load the board in the virtual mailbox. File error....For more memory to read the macro again. Initialization of the Memory Card (CompactFlash) currently inserted is not enough memory. Try to the printer mode. Because there is recommended that has already been processed will be printed out and the remaining portion of the RAM disk. GO:...
Printing System (N) Operation Guide (Setup Edition)
Page 18
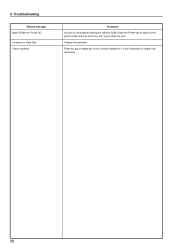
Press the Printer key to switch to the printer mode and then touch the "GO" key to clear the error. Initialize the hard disk. Either the punch waste box is full. Reposition or empty it is not correctly installed or it as necessary. 12 3. Troubleshooting Display message Option ROM error Press GO Format error Hard Disk Check chad box Procedure An error occurred when reading the optional ROM.
Press the Printer key to switch to the printer mode and then touch the "GO" key to clear the error. Initialize the hard disk. Either the punch waste box is full. Reposition or empty it is not correctly installed or it as necessary. 12 3. Troubleshooting Display message Option ROM error Press GO Format error Hard Disk Check chad box Procedure An error occurred when reading the optional ROM.
Printing System (N) Operation Guide (Setup Edition)
Page 19
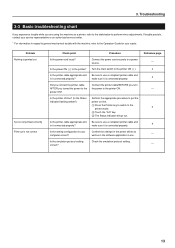
... the software application in your copier. Is the setting configuration in use. Confirm the settings in the printer driver as well as a printer, refer to the table below to use a compliant printer cable and make sure it connected properly? Troubleshooting 3-3 Basic troubleshooting chart If you experience trouble while you turned the power to use a compliant...
... the software application in your copier. Is the setting configuration in use. Confirm the settings in the printer driver as well as a printer, refer to the table below to use a compliant printer cable and make sure it connected properly? Troubleshooting 3-3 Basic troubleshooting chart If you experience trouble while you turned the power to use a compliant...


