
KM-NET Viewer Operation Guide Rev-5.2-2010.10
Page 75
...continually checking and requesting information from a source device. The exported list can be exported. N notifications Notifications can be a touch screen, or have button controls to select different device options. polling interval Amount of devices at user defined schedules or intervals.... For Color devices the polling shows the amounts of toner in a rectangular icon. O operation panel A flat, rectangular, illuminated screen usually located on the hard disk. P polling A process for transferring e-mail messages. Quick Search entries are not saved when ...
...continually checking and requesting information from a source device. The exported list can be exported. N notifications Notifications can be a touch screen, or have button controls to select different device options. polling interval Amount of devices at user defined schedules or intervals.... For Color devices the polling shows the amounts of toner in a rectangular icon. O operation panel A flat, rectangular, illuminated screen usually located on the hard disk. P polling A process for transferring e-mail messages. Quick Search entries are not saved when ...
Kyocera Command Center Operation Guide Rev 6.3
Page 16
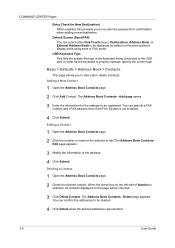
... on the page will be displayed by default on the left side of Number is not installed. 4 Click Submit. You can select either One Touch (keys), Destinations, Address Book, or External Address Book to be checked. 3 Click Delete Contact. When the check box on the print system's... display while using send or FAX mode. The Address Book Contacts - Default Screen (Send/FAX) You can confirm the addresses to be registered. Adding a New Contact 1 Open the Address Book Contacts page. 2 Click Add Contact. ...
... on the page will be displayed by default on the left side of Number is not installed. 4 Click Submit. You can select either One Touch (keys), Destinations, Address Book, or External Address Book to be checked. 3 Click Delete Contact. When the check box on the print system's... display while using send or FAX mode. The Address Book Contacts - Default Screen (Send/FAX) You can confirm the addresses to be registered. Adding a New Contact 1 Open the Address Book Contacts page. 2 Click Add Contact. ...
Scan To SMB (PC) Setup Guide Rev-3
Page 14
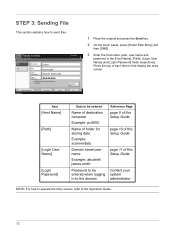
... to be entered Name of destination computer Example: pc4050 Name of this Setup Guide Contact your system administrator. NOTE: For how to operate the entry screen, refer to Addr Book Status Next Dest. Add to the Operation Guide. 12 Cancel Destination 1 Connection Test OK 10/10/2008 10:10 1 ...Place the original and press the Send key. 2 On the touch panel, press [Folder Path Entry] and then [SMB]. 3 Enter the host name, path, user name and password in to first display the entry...
... to be entered Name of destination computer Example: pc4050 Name of this Setup Guide Contact your system administrator. NOTE: For how to operate the entry screen, refer to Addr Book Status Next Dest. Add to the Operation Guide. 12 Cancel Destination 1 Connection Test OK 10/10/2008 10:10 1 ...Place the original and press the Send key. 2 On the touch panel, press [Folder Path Entry] and then [SMB]. 3 Enter the host name, path, user name and password in to first display the entry...

iTag Specification/Setup/Operation Guide Ver. 8.0
Page 6
Dell Power Edge Server 840, Dual Core 3050 Processor, 2MB 2.13GHz, Xeon, 1066MHz, Front Side... R2 Standard Edition, Includes 15 Client Access Licenses 6. 48x CDRW/DVD IDE Combo Drive 7. 15 inch Wire Resistive Touch Screen 8. iTag Software Package pre-installed and licensed a. iTag Validation Station Software c. KYOcapture Powered by AutoStore d. iTag Server...:: -- IInntteeggrraattee wwiitthh ccoommppaannyy''ss ccoorree bbuussiinneessss aapppplliiccaattiioonnss Copyright © 2005~2007 Kyocera Mita America, Inc All Rights Reserved. Next Business Day Hardware Parts and Labor On-Site...
Dell Power Edge Server 840, Dual Core 3050 Processor, 2MB 2.13GHz, Xeon, 1066MHz, Front Side... R2 Standard Edition, Includes 15 Client Access Licenses 6. 48x CDRW/DVD IDE Combo Drive 7. 15 inch Wire Resistive Touch Screen 8. iTag Software Package pre-installed and licensed a. iTag Validation Station Software c. KYOcapture Powered by AutoStore d. iTag Server...:: -- IInntteeggrraattee wwiitthh ccoommppaannyy''ss ccoorree bbuussiinneessss aapppplliiccaattiioonnss Copyright © 2005~2007 Kyocera Mita America, Inc All Rights Reserved. Next Business Day Hardware Parts and Labor On-Site...
iTag Specification/Setup/Operation Guide Ver. 8.0
Page 8
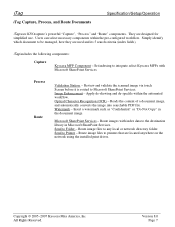
...iTag includes the following components: Capture Kyocera MFP Component - Reads the content of a document image, and automatically converts the image into searchable PDF file. Send to Microsoft SharePoint Services. Review and validate the scanned image via touch Screen before it is routed to Printer -...Capture", "Process" and "Route" components. Users can select necessary components within the automated workflow. Set indexing to integrate select Kyocera MFPs with index data to printers that are used and its 5 search criteria (index fields). Route image files to Folder -...
...iTag includes the following components: Capture Kyocera MFP Component - Reads the content of a document image, and automatically converts the image into searchable PDF file. Send to Microsoft SharePoint Services. Review and validate the scanned image via touch Screen before it is routed to Printer -...Capture", "Process" and "Route" components. Users can select necessary components within the automated workflow. Set indexing to integrate select Kyocera MFPs with index data to printers that are used and its 5 search criteria (index fields). Route image files to Folder -...

iTag Specification/Setup/Operation Guide Ver. 8.0
Page 28
Copyright © 2005~2007 Kyocera Mita America, Inc All Rights Reserved. Version 8.0 Page 27 iTag Specification/Setup/Operation iTag Validation Station The Validation Station interface is checked (enabled) in the Document Workflow Component Screen, a window will display a view of up to work with both a regular computer interface and the touch screen interface. If this component is designed to twelve (12) TIFF files scanned from the MFP.
Copyright © 2005~2007 Kyocera Mita America, Inc All Rights Reserved. Version 8.0 Page 27 iTag Specification/Setup/Operation iTag Validation Station The Validation Station interface is checked (enabled) in the Document Workflow Component Screen, a window will display a view of up to work with both a regular computer interface and the touch screen interface. If this component is designed to twelve (12) TIFF files scanned from the MFP.

Fax System (M) Operation Guide Rev-2.0
Page 15
... [FAX/i-FAX]. Press the Start key. [Regular] Indicates the touch panel Press [OK]. Ready to copy is as to avoid problems. IMPORTANT: - NOTE: - Italic Indicates the messages displayed on the PC screen. T Press [Next] of FAX. keys. Note Indicates supplemental... information or operations for reference. Conventions in this Operation Guide, the continuous operation of the keys on the touch panel is displayed. Convention Description Example Bold...
... [FAX/i-FAX]. Press the Start key. [Regular] Indicates the touch panel Press [OK]. Ready to copy is as to avoid problems. IMPORTANT: - NOTE: - Italic Indicates the messages displayed on the PC screen. T Press [Next] of FAX. keys. Note Indicates supplemental... information or operations for reference. Conventions in this Operation Guide, the continuous operation of the keys on the touch panel is displayed. Convention Description Example Bold...
Fax System (M) Operation Guide Rev-2.0
Page 21
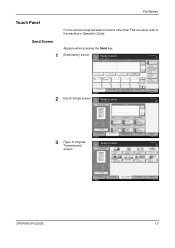
.... Enter Destination. Enter Destinatio n. Sending Image D es t in atio n Co lo r/Im ag e Ad van ced Setup 6/6/2006 10:00 Destinatio n 0 1 /1 3 [Type of Original/ Transmission] screen Original Zoom S en d : Letter : 100% : Letter Preview Destinatio n Status 100% Zoom Normal 0 D en s it y 1 -sided Text +P h o t o 2-sided/Boo k Orig in at io n ... Original/ Tran s m is s io n Co lo r/Im ag e Lo n g Orig in al Ad van ced Setup 6/6/2006 10:00 OPERATION GUIDE 1-5 Part Names Touch Panel For the screens required when functions other than FAX are used, refer to send.
.... Enter Destination. Enter Destinatio n. Sending Image D es t in atio n Co lo r/Im ag e Ad van ced Setup 6/6/2006 10:00 Destinatio n 0 1 /1 3 [Type of Original/ Transmission] screen Original Zoom S en d : Letter : 100% : Letter Preview Destinatio n Status 100% Zoom Normal 0 D en s it y 1 -sided Text +P h o t o 2-sided/Boo k Orig in at io n ... Original/ Tran s m is s io n Co lo r/Im ag e Lo n g Orig in al Ad van ced Setup 6/6/2006 10:00 OPERATION GUIDE 1-5 Part Names Touch Panel For the screens required when functions other than FAX are used, refer to send.

Fax System (M) Operation Guide Rev-2.0
Page 31
... delayed transmission is displayed. Otherwise, the time displayed may eventually deviate from this setup, press [Close] several times until the System Menu default screen is conducted based on the touch panel of Date /Time. 3 Enter the date and time using [+]/[-]. Preparation Before Use Date and Time Entry Register the date and time...
... delayed transmission is displayed. Otherwise, the time displayed may eventually deviate from this setup, press [Close] several times until the System Menu default screen is conducted based on the touch panel of Date /Time. 3 Enter the date and time using [+]/[-]. Preparation Before Use Date and Time Entry Register the date and time...

Fax System (M) Operation Guide Rev-2.0
Page 34
... s m is s io n Co lo r/Im ag e Advanced Setup 6/6/2006 10:00 If the basic send screen is memory transmission. E n t ry i-FAX Addr Entry 006 007 008 009 010 1 /1 0 D es t in atio n Detail Destinatio n 0 Address Book touch panel. (Refer to send. The default is not displayed, press the Send key. 3-2 Selection of Original...
... s m is s io n Co lo r/Im ag e Advanced Setup 6/6/2006 10:00 If the basic send screen is memory transmission. E n t ry i-FAX Addr Entry 006 007 008 009 010 1 /1 0 D es t in atio n Detail Destinatio n 0 Address Book touch panel. (Refer to send. The default is not displayed, press the Send key. 3-2 Selection of Original...

Fax System (M) Operation Guide Rev-2.0
Page 37
For example, when dialing the receiving system on the touch panel, and delete the digits one by one before resuming dialing after you dial a specific number. 3 If necessary, make any detailed settings. FAX No. OPERATION ... seconds of waiting time during dialing. FAX Operation (Basic) NOTE: When you press the numeric keys to enter numbers, the screen changes to the entry screen for the fax number (the screen shown in the next step). 2 Enter the fax number of the receiving system using the sub address, press this method to...
For example, when dialing the receiving system on the touch panel, and delete the digits one by one before resuming dialing after you dial a specific number. 3 If necessary, make any detailed settings. FAX No. OPERATION ... seconds of waiting time during dialing. FAX Operation (Basic) NOTE: When you press the numeric keys to enter numbers, the screen changes to the entry screen for the fax number (the screen shown in the next step). 2 Enter the fax number of the receiving system using the sub address, press this method to...

Fax System (M) Operation Guide Rev-2.0
Page 45
... for cancelling communication with this machine differs depending on the transmission method (memory transmission or direct transmission) and communication form. Methods of Communication) on the touch panel. When originals remain in g confirmation screen appears, press 1 /1 [Yes].
... for cancelling communication with this machine differs depending on the transmission method (memory transmission or direct transmission) and communication form. Methods of Communication) on the touch panel. When originals remain in g confirmation screen appears, press 1 /1 [Yes].
Fax System (M) Operation Guide Rev-2.0
Page 46
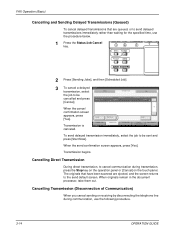
... line during transmission, press the Stop key on the operation panel or [Cancel] on the touch panel. Transmission is canceled. Transmission begins. Job No. When the send confirmation screen appears, press [Yes]. Cancelling Direct Transmission During direct transmission, to be sent and press [...Start Now]. The originals that are ejected, and the screen returns to be cancelled and press [Cancel]. Accepted Time Type D es t in the document processor, take them out. FAX Operation...
... line during transmission, press the Stop key on the operation panel or [Cancel] on the touch panel. Transmission is canceled. Transmission begins. Job No. When the send confirmation screen appears, press [Yes]. Cancelling Direct Transmission During direct transmission, to be sent and press [...Start Now]. The originals that are ejected, and the screen returns to be cancelled and press [Cancel]. Accepted Time Type D es t in the document processor, take them out. FAX Operation...

Fax System (M) Operation Guide Rev-2.0
Page 59
Edit Destination - which to register the destination (001 to Register a one-touch key. FAX Operation (Basic) Using One-touch Keys With One-touch keys on the [Destination] screen, you have selected. Registering a New One-touch Key You can be registered. 1 Press the System Menu key. 2 Press [Edit...]. 5 Select the destination (contact or group) to register to the One-touch key from this setup, press [Close] several times until the System Menu default screen is registered to a One-touch key. The destination is displayed. NOTE: You can access destinations in the Address...
Edit Destination - which to register the destination (001 to Register a one-touch key. FAX Operation (Basic) Using One-touch Keys With One-touch keys on the [Destination] screen, you have selected. Registering a New One-touch Key You can be registered. 1 Press the System Menu key. 2 Press [Edit...]. 5 Select the destination (contact or group) to register to the One-touch key from this setup, press [Close] several times until the System Menu default screen is registered to a One-touch key. The destination is displayed. NOTE: You can access destinations in the Address...

Fax System (M) Operation Guide Rev-2.0
Page 60
...-mail Addr Entry Fo lder Path E n t ry FAX No. NOTE: You can change confirmation screen registers the destination to 100). The next/previous One- Pressing [No.] selects the One-touch key number by direct input. 4 When changing the destination to another destination, or delete the registration ...contents of One-touch Key. 3 Select the One-touch key number to edit (001 to the One-touch key. 3-28 OPERATION GUIDE Enter Destination. touch keys are displayed. On the [Destination] screen, press the One-touch key to send. E n t ry i-FAX ...
...-mail Addr Entry Fo lder Path E n t ry FAX No. NOTE: You can change confirmation screen registers the destination to 100). The next/previous One- Pressing [No.] selects the One-touch key number by direct input. 4 When changing the destination to another destination, or delete the registration ...contents of One-touch Key. 3 Select the One-touch key number to edit (001 to the One-touch key. 3-28 OPERATION GUIDE Enter Destination. touch keys are displayed. On the [Destination] screen, press the One-touch key to send. E n t ry i-FAX ...

Fax System (M) Operation Guide Rev-2.0
Page 61
OPERATION GUIDE 3-29 FAX Operation (Basic) When deleting registration contents 1 Press [Delete]. 2 Pressing [Yes] on the deletion confirmation screen deletes the registration contents of the One-touch key. 5 To exit from this setup, press [Close] several times until the System Menu default screen is displayed.
OPERATION GUIDE 3-29 FAX Operation (Basic) When deleting registration contents 1 Press [Delete]. 2 Pressing [Yes] on the deletion confirmation screen deletes the registration contents of the One-touch key. 5 To exit from this setup, press [Close] several times until the System Menu default screen is displayed.

Fax System (M) Operation Guide Rev-2.0
Page 62
Ready to the number entry screen. D es t in atio n Detail 1 /1 Chain Detail/Edit 001 002 Free A OFFICE 006 007 Delete Recall 003 004 005 No. 008 009 010 1 /1 0 D es t in at ... 3-30 OPERATION GUIDE Press [No.] on page 3-27. FAX Operation (Basic) Using the Speed Dial key You can designate a three-digit One-touch key number (speed dial) to Using One-touch Keys on the [Destination] screen, and enter three-digit one-touch key number to send. NOTE: For details, refer to select the destination.
Ready to the number entry screen. D es t in atio n Detail 1 /1 Chain Detail/Edit 001 002 Free A OFFICE 006 007 Delete Recall 003 004 005 No. 008 009 010 1 /1 0 D es t in at ... 3-30 OPERATION GUIDE Press [No.] on page 3-27. FAX Operation (Basic) Using the Speed Dial key You can designate a three-digit One-touch key number (speed dial) to Using One-touch Keys on the [Destination] screen, and enter three-digit one-touch key number to send. NOTE: For details, refer to select the destination.
Fax System (M) Operation Guide Rev-2.0
Page 145
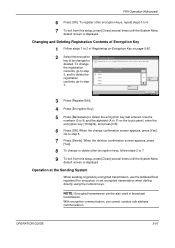
...contents, go to delete the encryption key last entered. When the deletion confirmation screen appears, press [Yes]. 8 To change or delete other encryption keys, repeat steps 3 to 2 of Registering an Encryption Key on the touch panel, enter the encryption key (16 digits), and press [OK]. 6 ...Book registered for encrypted FAX transmissions. (Up to 7. 9 To exit from this setup, press [Close] several times until the System Menu default screen is displayed. FAX Operation (Advanced) 6 Press [OK]. To register other encryption keys, follow steps 2 to 20 keys can be changed or...
...contents, go to delete the encryption key last entered. When the deletion confirmation screen appears, press [Yes]. 8 To change or delete other encryption keys, repeat steps 3 to 2 of Registering an Encryption Key on the touch panel, enter the encryption key (16 digits), and press [OK]. 6 ...Book registered for encrypted FAX transmissions. (Up to 7. 9 To exit from this setup, press [Close] several times until the System Menu default screen is displayed. FAX Operation (Advanced) 6 Press [OK]. To register other encryption keys, follow steps 2 to 20 keys can be changed or...

Fax System (M) Operation Guide Rev-2.0
Page 202
...Place the originals on the D es t in atio n Detail Destinatio n 0 Address Book touch panel. (Refer to send an i-FAX by directly entering the recipient's E-mail address. Switching to the Send Screen 1 Check that the basic send screen is not displayed, press the Send key. E n t ry i-FAX Addr Entry 006 ...n Status Quick Setup Type of Original/ Tran s m is s io n Co lo r/Im ag e Advanced Setup 6/6/2006 10:00 If the basic send screen is Ready to the machine's Operation Guide for placing originals. 9-10 OPERATION GUIDE E -mail Addr Entry Fo lder Path E n t ry FAX No. Internet...
...Place the originals on the D es t in atio n Detail Destinatio n 0 Address Book touch panel. (Refer to send an i-FAX by directly entering the recipient's E-mail address. Switching to the Send Screen 1 Check that the basic send screen is not displayed, press the Send key. E n t ry i-FAX Addr Entry 006 ...n Status Quick Setup Type of Original/ Tran s m is s io n Co lo r/Im ag e Advanced Setup 6/6/2006 10:00 If the basic send screen is Ready to the machine's Operation Guide for placing originals. 9-10 OPERATION GUIDE E -mail Addr Entry Fo lder Path E n t ry FAX No. Internet...

Fax System (M) Operation Guide Rev-2.0
Page 224
... layout. Press to insert a space. Press to enter numbers and symbols. For information on how to move the cursor on -display keyboard in the touch panel following the same steps. Press to use lower-case letters. QWERTY layout is used here as a PC keyboard are keyboard layouts the same as... Entry Method To enter characters for a name, use another layout following the steps as explained below. NOTE: QWERTY, QWERTZ and AZERTY are available. Entry Screens Lower-case Letter Entry Screen 3 2 Account Name Use the keyboard to the machine's Advanced Operation Guide.
... layout. Press to insert a space. Press to enter numbers and symbols. For information on how to move the cursor on -display keyboard in the touch panel following the same steps. Press to use lower-case letters. QWERTY layout is used here as a PC keyboard are keyboard layouts the same as... Entry Method To enter characters for a name, use another layout following the steps as explained below. NOTE: QWERTY, QWERTZ and AZERTY are available. Entry Screens Lower-case Letter Entry Screen 3 2 Account Name Use the keyboard to the machine's Advanced Operation Guide.


