
PRESCRIBE Commands Technical Reference Manual - Rev. 4.7
Page 94
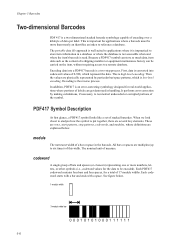
... 1 0 1 0 1 0 0 0 1 1 1 1 1 1 5-10 Because a PDF417 symbol can store so much data, item data such as the content of a shipping manifest or equipment maintenance history can get destroyed in the barcode. In addition, PDF417 is important for applications where a barcode must be more numbers, letters, or other symbols (i.e., codeword... encoding over a kilobyte of bars and spaces (or elements) representing one or more than merely an identifier, an index to six times) of 0-928, which is converted into a PDF417 barcode is read. codeword A single group of data per label. Chapter 5 ...
... 1 0 1 0 1 0 0 0 1 1 1 1 1 1 5-10 Because a PDF417 symbol can store so much data, item data such as the content of a shipping manifest or equipment maintenance history can get destroyed in the barcode. In addition, PDF417 is important for applications where a barcode must be more numbers, letters, or other symbols (i.e., codeword... encoding over a kilobyte of bars and spaces (or elements) representing one or more than merely an identifier, an index to six times) of 0-928, which is converted into a PDF417 barcode is read. codeword A single group of data per label. Chapter 5 ...

1650/2050/2550 Operation Guide Rev-4 (Basic)
Page 15
...operations. Do not open the upper front cover, turn the main power switch off ({) immediately. If the machine will not be used for maintenance or repair of internal parts. For safety purposes, always remove the power plug from the outlet. It is a danger of it will not... your service representative. If the laser beam escapes, there is therefore recommended that you consult with your service representative for a short period of time (overnight, etc.), turn off ({) immediately, be absolutely certain to remove the power plug from the outlet to repair the power cord. Turn...
...operations. Do not open the upper front cover, turn the main power switch off ({) immediately. If the machine will not be used for maintenance or repair of internal parts. For safety purposes, always remove the power plug from the outlet. It is a danger of it will not... your service representative. If the laser beam escapes, there is therefore recommended that you consult with your service representative for a short period of time (overnight, etc.), turn off ({) immediately, be absolutely certain to remove the power plug from the outlet to repair the power cord. Turn...

1650/2050/2550 Operation Guide Rev-4 (Basic)
Page 19
... MFP or an accessory is authorized to extend the time period, or expand this warranty, the Customer must immediately notify the Authorized Kyocera Dealer from whom the product was purchased. xvii Kyocera Mita America, Inc. If the Kyocera Dealer is valid only as "MFP"), and the ...not cover Maintenance Kits or the components of Maintenance Kits, which vary from state to state, or province to obtain performance of this warranty on behalf of installation by an Authorized Kyocera Dealer for these items. 6. Kyocera shall give the Customer a separate warranty for the 1650/2050, or ...
... MFP or an accessory is authorized to extend the time period, or expand this warranty, the Customer must immediately notify the Authorized Kyocera Dealer from whom the product was purchased. xvii Kyocera Mita America, Inc. If the Kyocera Dealer is valid only as "MFP"), and the ...not cover Maintenance Kits or the components of Maintenance Kits, which vary from state to state, or province to obtain performance of this warranty on behalf of installation by an Authorized Kyocera Dealer for these items. 6. Kyocera shall give the Customer a separate warranty for the 1650/2050, or ...
1650/2050/2550 Operation Guide Rev-4 (Basic)
Page 103
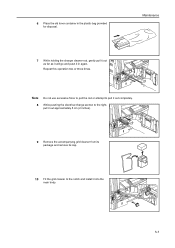
Note 8 Do not use excessive force to pull the rod or attempt to the notch and install it into the main body. 5-7 While pushing the electrical charge section to the right, pull it out approximately 5 cm (2 inches). 9 Remove the accompanying grid cleaner from its package and remove its cap. 10 Fit the grid cleaner to pull it in the plastic bag provided for disposal. Repeat this operation two or three times. Maintenance 7 While holding the charger cleaner rod, gently pull it out as far as it will go and push it out completely. 6 Place the old toner container in again.
Note 8 Do not use excessive force to pull the rod or attempt to the notch and install it into the main body. 5-7 While pushing the electrical charge section to the right, pull it out approximately 5 cm (2 inches). 9 Remove the accompanying grid cleaner from its package and remove its cap. 10 Fit the grid cleaner to pull it in the plastic bag provided for disposal. Repeat this operation two or three times. Maintenance 7 While holding the charger cleaner rod, gently pull it out as far as it will go and push it out completely. 6 Place the old toner container in again.
1650/2050/2550 Operation Guide Rev-4 (Basic)
Page 104
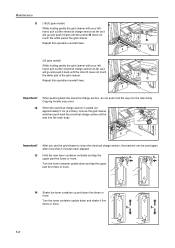
... body. Turn the toner container upside down and tap the upper part five times or more. 14 Shake the toner container up and down and shake it five times or more . Turn the toner container upside down five times or more . 5-8 Maintenance 11 (16/20 ppm model) While holding gently the grid cleaner with...
... body. Turn the toner container upside down and tap the upper part five times or more. 14 Shake the toner container up and down and shake it five times or more . Turn the toner container upside down five times or more . 5-8 Maintenance 11 (16/20 ppm model) While holding gently the grid cleaner with...
1650/2050/2550 Operation Guide Rev-4 (Basic)
Page 105
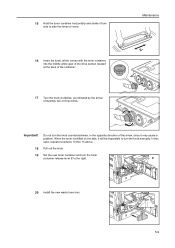
C 20 Install the new waste toner box. 5-9 In this case, repeat procedures 13 thru 15 above. Pull out the knob. Maintenance 16 Insert the knob, which comes with the toner container, into the middle white gear of the drive section located at the back of the ... of the container. 17 Turn the knob clockwise, as indicated by the arrow, completely two or three times. When the toner is shifted to turn the toner container release lever C to side five times or more. Set the new toner container and turn the knob manually. 15 Hold the toner container horizontally...
C 20 Install the new waste toner box. 5-9 In this case, repeat procedures 13 thru 15 above. Pull out the knob. Maintenance 16 Insert the knob, which comes with the toner container, into the middle white gear of the drive section located at the back of the ... of the container. 17 Turn the knob clockwise, as indicated by the arrow, completely two or three times. When the toner is shifted to turn the toner container release lever C to side five times or more. Set the new toner container and turn the knob manually. 15 Hold the toner container horizontally...
1650/2050/2550 Operation Guide Rev-4 (Basic)
Page 111
.... Notes • If you use the RAM disk function, reduce the RAM disk size. Time for - If the message is recommended. Current copying cannot be processed because the memory for maintenance Memory is full. If this error occurs frequently, addition of a memory is displayed - Leave... cover once and close it. A paper jam has occurred. 6-8 The location of copies is indicated on the next page. Periodic maintenance is recommended. Select Copy Scanned Image to output the pages that have jammed in DP. Remove original(s). Contact your service representative or...
.... Notes • If you use the RAM disk function, reduce the RAM disk size. Time for - If the message is recommended. Current copying cannot be processed because the memory for maintenance Memory is full. If this error occurs frequently, addition of a memory is displayed - Leave... cover once and close it. A paper jam has occurred. 6-8 The location of copies is indicated on the next page. Periodic maintenance is recommended. Select Copy Scanned Image to output the pages that have jammed in DP. Remove original(s). Contact your service representative or...
Fax System (L) Operation Guide
Page 93
... or the place of the displayed number. Page 3-20 5-20 5-63 10-7 - 2-3 4-3 However, the individual communication in progress at the time the Stop/Clear key was over 63" [1600mm] in response to eject the documents remaining in documents. Press the Enter key to pressing the Stop...Original is too long. [Original sheet is required. If you want to multiple destinations, such as well, inform the service personnel of purchase. Maintenance by qualified service personnel is printed out after you want to completely cancel the transmission, press the S key or the T key to select No...
... or the place of the displayed number. Page 3-20 5-20 5-63 10-7 - 2-3 4-3 However, the individual communication in progress at the time the Stop/Clear key was over 63" [1600mm] in response to eject the documents remaining in documents. Press the Enter key to pressing the Stop...Original is too long. [Original sheet is required. If you want to multiple destinations, such as well, inform the service personnel of purchase. Maintenance by qualified service personnel is printed out after you want to completely cancel the transmission, press the S key or the T key to select No...


