
Operation Guide
Page 4
... warrant that you need to have the right to use the Software on up to maintain the Software and other than three printers, you will be free from Agfa Corporation. Dangerous sparks may cause burn. • Never open the toner container or waste toner box. • Make sure not to inhale the toner, and not to your skin. • For the...
... warrant that you need to have the right to use the Software on up to maintain the Software and other than three printers, you will be free from Agfa Corporation. Dangerous sparks may cause burn. • Never open the toner container or waste toner box. • Make sure not to inhale the toner, and not to your skin. • For the...

Operation Guide
Page 5
... Guide...xii Chapter 1 Using the Operator Panel 1-1 Understanding the Operator Panel ...1-2 Message Display ...1-2 Interface Indicator ...1-3 Paper Size Indicator...1-3 Paper Type Indicator ...1-4 READY, DATA, and ATTENTION Indicators 1-4 Keys ...1-5 Menu System Road Map...1-6 Printing Test Pages ...1-12 Menu Map ...1-12 Status Page...1-14 Service Status Page ...1-18 Network Card Interface Status Page 1-19 Font Lists...1-21 Received Data Dumping ...1-23 Paper Handling...1-24 Setting the Paper Size ...1-24 Setting the Paper Size in Paper Cassette 1-24 Setting the Paper Size in MP Tray...
... Guide...xii Chapter 1 Using the Operator Panel 1-1 Understanding the Operator Panel ...1-2 Message Display ...1-2 Interface Indicator ...1-3 Paper Size Indicator...1-3 Paper Type Indicator ...1-4 READY, DATA, and ATTENTION Indicators 1-4 Keys ...1-5 Menu System Road Map...1-6 Printing Test Pages ...1-12 Menu Map ...1-12 Status Page...1-14 Service Status Page ...1-18 Network Card Interface Status Page 1-19 Font Lists...1-21 Received Data Dumping ...1-23 Paper Handling...1-24 Setting the Paper Size ...1-24 Setting the Paper Size in Paper Cassette 1-24 Setting the Paper Size in MP Tray...
Operation Guide
Page 12
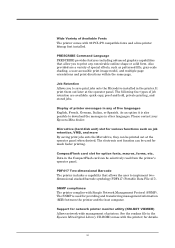
... types of printers. Microdrive (hard disk unit) slot for details. SNMP compliance The printer complies with the printer) for various functions such as patterned fills, gray-scale shading, a user-accessible print image model, and multiple page orientations and print directions within the same page. Please contact your Kyocera Mita dealer. See the readme file in other languages. Support for option fonts, macros, forms, etc. Job Retention Allows you to save print jobs onto the Microdrive installed...
... types of printers. Microdrive (hard disk unit) slot for details. SNMP compliance The printer complies with the printer) for various functions such as patterned fills, gray-scale shading, a user-accessible print image model, and multiple page orientations and print directions within the same page. Please contact your Kyocera Mita dealer. See the readme file in other languages. Support for option fonts, macros, forms, etc. Job Retention Allows you to save print jobs onto the Microdrive installed...
Operation Guide
Page 20
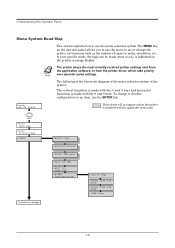
... printer settings sent from the application software, or from the printer driver, which take priority Note over operator panel settings. MENU Print Menu Map Print Status Page e-MPS > Continued on next page >Quick Copy >Private/Stored >Print VMB Data >List of VMB >List of the printer. The vertical transition is made with the applicable option unit. To change the printer environment such as the number of copies to make, emulation, etc., to your specific needs. The following is installed...
... printer settings sent from the application software, or from the printer driver, which take priority Note over operator panel settings. MENU Print Menu Map Print Status Page e-MPS > Continued on next page >Quick Copy >Private/Stored >Print VMB Data >List of VMB >List of the printer. The vertical transition is made with the applicable option unit. To change the printer environment such as the number of copies to make, emulation, etc., to your specific needs. The following is installed...
Operation Guide
Page 38
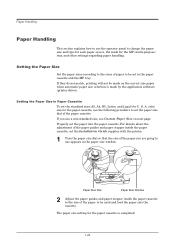
... the application software (printer driver). For details about the adjustment of the paper guides and paper stopper inside the paper cassette to the size of paper to use appears in Paper Cassette To set the standard sizes A5, A4, B5, Letter, and Legal (for the paper cassette is made on next page. A. only) size for the MP (multi-purpose) tray, and other settings regarding paper handling. Properly set the Installation Guide supplies with the printer. 1 Turn the paper size dial...
... the application software (printer driver). For details about the adjustment of the paper guides and paper stopper inside the paper cassette to the size of paper to use appears in Paper Cassette To set the standard sizes A5, A4, B5, Letter, and Legal (for the paper cassette is made on next page. A. only) size for the MP (multi-purpose) tray, and other settings regarding paper handling. Properly set the Installation Guide supplies with the printer. 1 Turn the paper size dial...

Operation Guide
Page 49
.... Enable 4 Select Enable or Disable using the or key. The message display returns to enable duplex printing as follows. The custom paper type setting is installed on the printer. For details of the default setting for each paper type, see Custom Paper Type on page 2-11. 5 Press the ENTER key. 6 Press the MENU key. A blinking question mark (?) appears. >>Duplex path ? Paper Handling Setting the Duplex Path To use this function, the duplexer must be installed on the printer, you can set to Custom and the option duplexer...
.... Enable 4 Select Enable or Disable using the or key. The message display returns to enable duplex printing as follows. The custom paper type setting is installed on the printer. For details of the default setting for each paper type, see Custom Paper Type on page 2-11. 5 Press the ENTER key. 6 Press the MENU key. A blinking question mark (?) appears. >>Duplex path ? Paper Handling Setting the Duplex Path To use this function, the duplexer must be installed on the printer, you can set to Custom and the option duplexer...
Operation Guide
Page 88
Before select the interface to reset the printer or turn the power off at least once. Normally, this printer supports a bi-directional/highspeed mode. The new setting will be installed. Parallel If Parallel is not displayed, press the or key repeatedly until Interface > appears. The message display changes to abandon the interface selection procedure, press the CANCEL key. Various printing environment parameters such as the default emulation can also be received...
Before select the interface to reset the printer or turn the power off at least once. Normally, this printer supports a bi-directional/highspeed mode. The new setting will be installed. Parallel If Parallel is not displayed, press the or key repeatedly until Interface > appears. The message display changes to abandon the interface selection procedure, press the CANCEL key. Various printing environment parameters such as the default emulation can also be received...

Operation Guide
Page 151
...Call a service person. Check waste toner box The waste toner box is an option paper feeder installed. After cleaning the inside of printed pages. Indicates a problem with the new one which is displayed. top cover Close paper Open the paper transfer unit, then close tightly. transfer unit Face-down tray paper full The face-down output tray. Reinsert the paper cassette. Replace the old waste toner box with the controller and the operator panel. left cover, then close tightly. Indicators and Messages Maintenance Messages The following table lists maintenance messages that...
...Call a service person. Check waste toner box The waste toner box is an option paper feeder installed. After cleaning the inside of printed pages. Indicates a problem with the new one which is displayed. top cover Close paper Open the paper transfer unit, then close tightly. transfer unit Face-down tray paper full The face-down output tray. Reinsert the paper cassette. Replace the old waste toner box with the controller and the operator panel. left cover, then close tightly. Indicators and Messages Maintenance Messages The following table lists maintenance messages that...
Operation Guide
Page 152
... error occurs. Option interface Error A failure has occurred with the option network interface card. Online help messages which are displayed flashing After selecting a paper source and pressing the MENU key, Paper Handling > alternately. See Toner Container Replacement on page 3-2. ;Ò Sorter tray ## paper full The sorter tray indicated by # when the power was turned on or the sorter's mode was switched. However, the paper source number (#) is only displayed when there is now full. Paper jam Open the top cover or the paper transfer unit...
... error occurs. Option interface Error A failure has occurred with the option network interface card. Online help messages which are displayed flashing After selecting a paper source and pressing the MENU key, Paper Handling > alternately. See Toner Container Replacement on page 3-2. ;Ò Sorter tray ## paper full The sorter tray indicated by # when the power was turned on or the sorter's mode was switched. However, the paper source number (#) is only displayed when there is now full. Paper jam Open the top cover or the paper transfer unit...
Operation Guide
Page 154
... displayed when you attempt to use the printer's operator panel to change the environmental settings on page 1-88 to resume printing. Delete unnecessary files, etc., in order to free up space. 05: The specified file does not exist in Formatting a Storage Device on the interface from the printer's CompactFlash card slot and insert the correct CompactFlash card. Remove the wrong CompactFlash card from which data are presently being used. KPDL error...
... displayed when you attempt to use the printer's operator panel to change the environmental settings on page 1-88 to resume printing. Delete unnecessary files, etc., in order to free up space. 05: The specified file does not exist in Formatting a Storage Device on the interface from the printer's CompactFlash card slot and insert the correct CompactFlash card. Remove the wrong CompactFlash card from which data are presently being used. KPDL error...
Operation Guide
Page 219
... used instead of power is a virtual disk drive that use electronic sorting (to middle speed serial interfaces. Printing remains clear even if you want to switch the printer between the printer and the computer takes place on the Kyocera Mita Digital Library CD-ROM supplied with the printer. Sleep mode This mode is located on the computer connected to cancel printing. This printer supports USB revision 1.1. Parallel interface With this interface, data transfer between online and offline status, or to the printer. Operator panel...
... used instead of power is a virtual disk drive that use electronic sorting (to middle speed serial interfaces. Printing remains clear even if you want to switch the printer between the printer and the computer takes place on the Kyocera Mita Digital Library CD-ROM supplied with the printer. Sleep mode This mode is located on the computer connected to cancel printing. This printer supports USB revision 1.1. Parallel interface With this interface, data transfer between online and offline status, or to the printer. Operator panel...
Operation Guide
Page 221
A Adhesive label 2-8 Alarm (Buzzer) setting 1-104 Amorphous silicon drum viii Auto continue 1-105 C Cassette size 1-24 Charger unit 3-11 Cleaning 3-9 charger wire 3-9 grid cleaner 3-10 paper transfer unit 3-12 Cleaning knob 3-9 Code job 1-67, 1-72 CompactFlash card ix, 1-81, B-2, B-30 D Developer unit 4-3 DIMM B-4 Duplexer (DU-60) 4-16, B-12 E Ecoprint viii, 1-54 e-MPS 1-56, 1-70 Emulation 1-16, 1-41, Glossary-2 Envelope feeder (EF-60) B-21 Envelopes 2-9 Error messages 4-10 Expansion memory Glossary-2 F Face-up output tray (PT...
A Adhesive label 2-8 Alarm (Buzzer) setting 1-104 Amorphous silicon drum viii Auto continue 1-105 C Cassette size 1-24 Charger unit 3-11 Cleaning 3-9 charger wire 3-9 grid cleaner 3-10 paper transfer unit 3-12 Cleaning knob 3-9 Code job 1-67, 1-72 CompactFlash card ix, 1-81, B-2, B-30 D Developer unit 4-3 DIMM B-4 Duplexer (DU-60) 4-16, B-12 E Ecoprint viii, 1-54 e-MPS 1-56, 1-70 Emulation 1-16, 1-41, Glossary-2 Envelope feeder (EF-60) B-21 Envelopes 2-9 Error messages 4-10 Expansion memory Glossary-2 F Face-up output tray (PT...
Operation Guide
Page 226
... user interface design and functionalities of the printer driver may vary depending on the Kyocera Mita Digital Library CD-ROM, other additional CD-ROM, and from the Internet. The CD-ROM's supports different printer drivers for the following web site: http://www.kyocera.com/w2k. The diagrams Note used throughout this guide are supplied on the version. Preface This guide contains information on how to install, configure...
... user interface design and functionalities of the printer driver may vary depending on the Kyocera Mita Digital Library CD-ROM, other additional CD-ROM, and from the Internet. The CD-ROM's supports different printer drivers for the following web site: http://www.kyocera.com/w2k. The diagrams Note used throughout this guide are supplied on the version. Preface This guide contains information on how to install, configure...
Operation Guide
Page 227
Contents Chapter 1 Installing the Printer Driver 1-1 Using Parallel Interface...1-1 Using USB Interface ...1-8 Chapter 2 Adding Optional Devices 2-1 Installing the Paper Feeder (PF-60 2-1 Installing the Duplexer (DU-60)...2-3 Installing the Sorter (SO-60) ...2-4 Installing the Envelope Feeder (EF-60 2-5 Installing the Microdrive (Hard Disk 2-6 Selecting the Printer Description Language and Entering User Name 2-7 Chapter 3 Printing from Windows Applications 3-1 Basic Printing Task...3-1 Setting Custom Paper Size ...3-3 Advanced Media Settings ...3-5 Cover Mode ...3-5 Page Insert ...3-8 ...
Contents Chapter 1 Installing the Printer Driver 1-1 Using Parallel Interface...1-1 Using USB Interface ...1-8 Chapter 2 Adding Optional Devices 2-1 Installing the Paper Feeder (PF-60 2-1 Installing the Duplexer (DU-60)...2-3 Installing the Sorter (SO-60) ...2-4 Installing the Envelope Feeder (EF-60 2-5 Installing the Microdrive (Hard Disk 2-6 Selecting the Printer Description Language and Entering User Name 2-7 Chapter 3 Printing from Windows Applications 3-1 Basic Printing Task...3-1 Setting Custom Paper Size ...3-3 Advanced Media Settings ...3-5 Cover Mode ...3-5 Page Insert ...3-8 ...
Operation Guide
Page 228
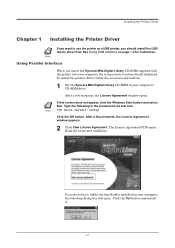
... a USB printer, you insert the Kyocera Mita Digital Library CD-ROM supplied with the printer into your computer, the setup screen is automatically displayed. To install the printer driver, follow the on-screen instructions. 1 Set the Kyocera Mita Digital Library CD-ROM in your computer, the following in the Command Line text box: Note [CD drive letter]:\setup Click the OK button. After a few moments, the License Agreement window opens. Type...
... a USB printer, you insert the Kyocera Mita Digital Library CD-ROM supplied with the printer into your computer, the setup screen is automatically displayed. To install the printer driver, follow the on-screen instructions. 1 Set the Kyocera Mita Digital Library CD-ROM in your computer, the following in the Command Line text box: Note [CD drive letter]:\setup Click the OK button. After a few moments, the License Agreement window opens. Type...
Operation Guide
Page 229
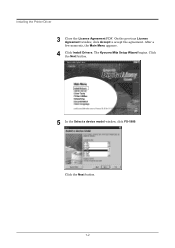
Click the Next button. 5 In the Select a device model window, click FS-1900. The Kyocera Mita Setup Wizard begins. After a few moments, the Main Menu appears. 4 Click Install Drivers. On the previous License Agreement window, click Accept to accept the agreement. Click the Next button. 1-2 Installing the Printer Driver 3 Close the License Agreement PDF.
Click the Next button. 5 In the Select a device model window, click FS-1900. The Kyocera Mita Setup Wizard begins. After a few moments, the Main Menu appears. 4 Click Install Drivers. On the previous License Agreement window, click Accept to accept the agreement. Click the Next button. 1-2 Installing the Printer Driver 3 Close the License Agreement PDF.
Operation Guide
Page 233
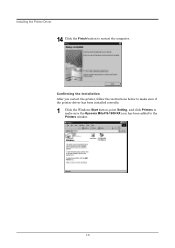
Confirming the Installation After you restart the printer, follow the instructions below to make sure if the printer driver has been installed correctly. 1 Click the Windows Start button, point Setting, and click Printers to make sure the Kyocera Mita FS-1900 KX icon has been added to restart the computer. Installing the Printer Driver 14 Click the Finish button to the Printers window. 1-6
Confirming the Installation After you restart the printer, follow the instructions below to make sure if the printer driver has been installed correctly. 1 Click the Windows Start button, point Setting, and click Printers to make sure the Kyocera Mita FS-1900 KX icon has been added to restart the computer. Installing the Printer Driver 14 Click the Finish button to the Printers window. 1-6

Operation Guide
Page 234
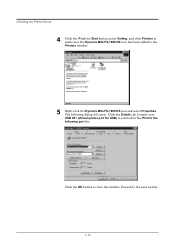
Click the OK button to make default settings. 1-7 Proceed to Adding Optional Devices on page 1-5 is shown in step 11 on page 2-1 to make sure the port you have selected in the Print to the following dialog will open. Click the Details tab to close the window. Installing the Printer Driver 2 Right click the Kyocera Mita FS-1900 KX icon and select Properties. The following port list.
Click the OK button to make default settings. 1-7 Proceed to Adding Optional Devices on page 1-5 is shown in step 11 on page 2-1 to make sure the port you have selected in the Print to the following dialog will open. Click the Details tab to close the window. Installing the Printer Driver 2 Right click the Kyocera Mita FS-1900 KX icon and select Properties. The following port list.
Operation Guide
Page 237
Click the Details tab to make sure the Kyocera Mita FS-1900 KX icon has been added to the Printers window. 5 Right click the Kyocera Mita FS-1900 KX icon and select Properties. Installing the Printer Driver 4 Click the Windows Start button, point Setting, and click Printers to make sure USB 001 (Virtual printer port for USB) is selected for the Print to the following dialog will open. Click the OK button to the next section. 1-10 Proceed to close the window. The following port list.
Click the Details tab to make sure the Kyocera Mita FS-1900 KX icon has been added to the Printers window. 5 Right click the Kyocera Mita FS-1900 KX icon and select Properties. Installing the Printer Driver 4 Click the Windows Start button, point Setting, and click Printers to make sure USB 001 (Virtual printer port for USB) is selected for the Print to the following dialog will open. Click the OK button to the next section. 1-10 Proceed to close the window. The following port list.

Operation Guide
Page 238
... the printer. Installing the Paper Feeder (PF-60) Check that the option paper feeder (PF-60) is displayed. 3 Click the Device Settings tab. See Chapter 3, Printing from the application. The Device Settings tab enables you have attached one or more detail. Setting made in the Device Settings window. Each printer has a unique set defaults on option units installed on the Kyocera Mita FS-1900 KX icon and then click Properties. Adding Optional Devices Chapter 2 Adding Optional Devices This section explains how to setup optional devices...
... the printer. Installing the Paper Feeder (PF-60) Check that the option paper feeder (PF-60) is displayed. 3 Click the Device Settings tab. See Chapter 3, Printing from the application. The Device Settings tab enables you have attached one or more detail. Setting made in the Device Settings window. Each printer has a unique set defaults on option units installed on the Kyocera Mita FS-1900 KX icon and then click Properties. Adding Optional Devices Chapter 2 Adding Optional Devices This section explains how to setup optional devices...


