
Operation Guide
Page 2
...the body text, only the inch messages are given if these machines are shown in the screens in capitalization. Refer to install this printer, as well as reference only. If you are included with this guide. Installation Guide Explains how to the proper guide based on ...how to using the metric version, use the messages provided for models FS-1100 and FS-1300D. Note This Operation Guide contains information that corresponds to load paper, print, replace toner, clean the printer, and troubleshooting. When there is for the inch version as connecting cables and loading paper...
...the body text, only the inch messages are given if these machines are shown in the screens in capitalization. Refer to install this printer, as well as reference only. If you are included with this guide. Installation Guide Explains how to the proper guide based on ...how to using the metric version, use the messages provided for models FS-1100 and FS-1300D. Note This Operation Guide contains information that corresponds to load paper, print, replace toner, clean the printer, and troubleshooting. When there is for the inch version as connecting cables and loading paper...

Operation Guide
Page 3
Contents 1 Machine Parts 1-1 Components at the Front of the Printer 1-2 Components at the Rear of the Printer 1-3 Operation Panel 1-4 Indicators 1-5 Keys 1-6 2 Loading Paper 2-1 General Guidelines 2-2...14 3 Connecting and Printing 3-1 Connections 3-2 Installing the Printer Driver 3-3 Printing 3-7 Status Monitor 3-10 Configuration Tool 3-14 Uninstalling Software 3-18 4 Maintenance 4-1 General Information 4-2 Toner Container Replacement 4-2 Cleaning the Printer 4-6 Prolonged Non-Use and Moving the Printer 4-9 5 Troubleshooting 5-1 General Guidelines 5-2 Print Quality Problems...
Contents 1 Machine Parts 1-1 Components at the Front of the Printer 1-2 Components at the Rear of the Printer 1-3 Operation Panel 1-4 Indicators 1-5 Keys 1-6 2 Loading Paper 2-1 General Guidelines 2-2...14 3 Connecting and Printing 3-1 Connections 3-2 Installing the Printer Driver 3-3 Printing 3-7 Status Monitor 3-10 Configuration Tool 3-14 Uninstalling Software 3-18 4 Maintenance 4-1 General Information 4-2 Toner Container Replacement 4-2 Cleaning the Printer 4-6 Prolonged Non-Use and Moving the Printer 4-9 5 Troubleshooting 5-1 General Guidelines 5-2 Print Quality Problems...

Operation Guide
Page 12
...CLASS 3B INVISIBLE LASER RADIATION WHEN OPEN. Radio Frequency Transmitter This machine contains a transmitter module. AVOID DIRECT EXPOSURE TO BEAM. We, the manufacturer (Kyocera Mita Corporation) hereby declare that this equipment (page printer), model FS-1100 and FS-1300D are in ...hazardous radiation exposure. Radio Tag Technology In some countries, the radio tag technology used in this equipment may result in compliance with the essential requirements and other than those specified herein may consequently be subject to identify the toner...
...CLASS 3B INVISIBLE LASER RADIATION WHEN OPEN. Radio Frequency Transmitter This machine contains a transmitter module. AVOID DIRECT EXPOSURE TO BEAM. We, the manufacturer (Kyocera Mita Corporation) hereby declare that this equipment (page printer), model FS-1100 and FS-1300D are in ...hazardous radiation exposure. Radio Tag Technology In some countries, the radio tag technology used in this equipment may result in compliance with the essential requirements and other than those specified herein may consequently be subject to identify the toner...

Operation Guide
Page 20
... or adjustments or performance of procedures other than those specified herein may cause burns. Other precautions After use, always dispose of the Toner Container in accordance with your service representative in this handbook. Other precautions Do not place heavy objects on your skin, wash with ...danger of fire or other damage to cleaning of children. If necessary, contact a physician. • If you do happen to inhale toner, move to a place with fresh air and gargle thoroughly with your service representative in a cool, dark location. Do not attempt to incinerate the...
... or adjustments or performance of procedures other than those specified herein may cause burns. Other precautions After use, always dispose of the Toner Container in accordance with your service representative in this handbook. Other precautions Do not place heavy objects on your skin, wash with ...danger of fire or other damage to cleaning of children. If necessary, contact a physician. • If you do happen to inhale toner, move to a place with fresh air and gargle thoroughly with your service representative in a cool, dark location. Do not attempt to incinerate the...

Operation Guide
Page 21
...the names of parts. 2 Loading Paper This chapter explains paper specifications for this printer and how to load paper into the cassette or MP tray. 3 Printing This chapter explains how to install the printer driver, print from your PC, and use the application software included in the ...CD-ROM. 4 Maintenance This chapter explains how to replace the toner container and how to care for your printer. 5 Troubleshooting This chapter explains how to handle printer problems that may occur, such as paper jams. 6 Options This chapter explains the options for this...
...the names of parts. 2 Loading Paper This chapter explains paper specifications for this printer and how to load paper into the cassette or MP tray. 3 Printing This chapter explains how to install the printer driver, print from your PC, and use the application software included in the ...CD-ROM. 4 Maintenance This chapter explains how to replace the toner container and how to care for your printer. 5 Troubleshooting This chapter explains how to handle printer problems that may occur, such as paper jams. 6 Options This chapter explains the options for this...

Operation Guide
Page 22
...CAUTION When pulling the paper, pull it gently so as a result of an action. information. pressed. Note Do not remove the toner container from the printer. Torn pieces of personal injury. Convention Italic Typeface Description Example Used to remove and may be easily overlooked, deterring the paper jam recovery... reference to additional Refer to denote buttons on page 3-9. software. Used to alert users to install it . IMPORTANT If you ship the printer, remove and pack the process unit and drum unit in a plastic bag and ship them separately from the carton until you are ready ...
...CAUTION When pulling the paper, pull it gently so as a result of an action. information. pressed. Note Do not remove the toner container from the printer. Torn pieces of personal injury. Convention Italic Typeface Description Example Used to remove and may be easily overlooked, deterring the paper jam recovery... reference to additional Refer to denote buttons on page 3-9. software. Used to alert users to install it . IMPORTANT If you ship the printer, remove and pack the process unit and drum unit in a plastic bag and ship them separately from the carton until you are ready ...

Operation Guide
Page 27
... the KX driver) will provide more detailed information about the printer status. You cannot print, but the printer can receive data. The printer is exhausted. The printer has stopped because the toner is receiving data. Note For other than Jam, Toner, Paper, and Attention. To identify the printer status, check the indicators on the top right of...
... the KX driver) will provide more detailed information about the printer status. You cannot print, but the printer can receive data. The printer is exhausted. The printer has stopped because the toner is receiving data. Note For other than Jam, Toner, Paper, and Attention. To identify the printer status, check the indicators on the top right of...

Operation Guide
Page 33
... are having problems with paper jams and blurred printing the paper may cause feed errors or paper jams as well as blurring because of poor toner fusing. Moisture Content Moisture content is the weight of paper expressed in pounds (lb) and metric grams per square meter (g/m²). If you are having... extremely thick nor extremely thin. Paper that is 0.086 to 0.110mm (3.4 to 4.3 mils). Moisture can affect the paper's appearance, feed ability, curl, electrostatic properties, and toner fusing characteristics. 2-5 S.
... are having problems with paper jams and blurred printing the paper may cause feed errors or paper jams as well as blurring because of poor toner fusing. Moisture Content Moisture content is the weight of paper expressed in pounds (lb) and metric grams per square meter (g/m²). If you are having... extremely thick nor extremely thin. Paper that is 0.086 to 0.110mm (3.4 to 4.3 mils). Moisture can affect the paper's appearance, feed ability, curl, electrostatic properties, and toner fusing characteristics. 2-5 S.

Operation Guide
Page 34
..., brighter appearance. To produce flat printouts, load the paper so that these problems do not cling together in the machine should be 4 to attract the toner. Other Paper Properties Porosity: Indicates the density of paper fiber. A quality paper supplier should be packed in its wrapping as long as the machine for...
..., brighter appearance. To produce flat printouts, load the paper so that these problems do not cling together in the machine should be 4 to attract the toner. Other Paper Properties Porosity: Indicates the density of paper fiber. A quality paper supplier should be packed in its wrapping as long as the machine for...

Operation Guide
Page 46
...Connecting the Power Cord Install the printer close to the USB Interface Connector. Only use the power cord supplied with a rectangular Type A plug and a square Type B plug. When the printer is complete. 3-2 Connecting and Printing IMPORTANT If you install the toner container and switch on after ...a moment the indicators light in anticlockwise direction. Once the [Ready] indicator lights, printer installation is first switched on the power, after toner installation, there will be a delay of the power cord to a power outlet. 3 Press the Power Switch to On ( |...
...Connecting the Power Cord Install the printer close to the USB Interface Connector. Only use the power cord supplied with a rectangular Type A plug and a square Type B plug. When the printer is complete. 3-2 Connecting and Printing IMPORTANT If you install the toner container and switch on after ...a moment the indicators light in anticlockwise direction. Once the [Ready] indicator lights, printer installation is first switched on the power, after toner installation, there will be a delay of the power cord to a power outlet. 3 Press the Power Switch to On ( |...

Operation Guide
Page 63
General Information 4-2 Toner Container Replacement 4-2 Cleaning the Printer 4-6 Prolonged Non-Use and Moving the Printer 4-9 Maintenance 4-1 4 Maintenance This chapter explains how to replace the toner container and clean the printer.
General Information 4-2 Toner Container Replacement 4-2 Cleaning the Printer 4-6 Prolonged Non-Use and Moving the Printer 4-9 Maintenance 4-1 4 Maintenance This chapter explains how to replace the toner container and clean the printer.

Operation Guide
Page 64
... every 7,200 pages (FS-1300D) or 4,000 pages (FS-1100). A new toner kit contains the following items: • Toner Container • Plastic waste bag for the end user; it in the printer. 4-2 Maintenance General Information This chapter describes basic maintenance tasks you only use genuine Kyocera Parts and Supplies. The starter toner container lasts an average...
... every 7,200 pages (FS-1300D) or 4,000 pages (FS-1100). A new toner kit contains the following items: • Toner Container • Plastic waste bag for the end user; it in the printer. 4-2 Maintenance General Information This chapter describes basic maintenance tasks you only use genuine Kyocera Parts and Supplies. The starter toner container lasts an average...

Operation Guide
Page 65
... any damages or problems arising from the toner container. IMPORTANT Kyocera Mita Corporation is to incinerate the Toner Container. Note You do not have to turn the printer power off before starting the replacement. IMPORTANT During toner container replacement, temporarily move storage media and computer supplies (such as original Kyocera toner containers. CAUTION Do not attempt to...
... any damages or problems arising from the toner container. IMPORTANT Kyocera Mita Corporation is to incinerate the Toner Container. Note You do not have to turn the printer power off before starting the replacement. IMPORTANT During toner container replacement, temporarily move storage media and computer supplies (such as original Kyocera toner containers. CAUTION Do not attempt to...
Operation Guide
Page 66
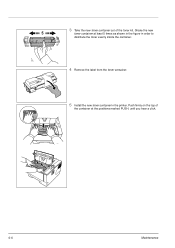
Push firmly on the top of the toner kit. 3 Take the new toner container out of the container at least 5 times as shown in the figure in order to distribute the toner evenly inside the container. 4 Remove the label from the toner container. 5 Install the new toner container in the printer. Shake the new toner container at the positions marked PUSH, until you hear a click. 4-4 Maintenance
Push firmly on the top of the toner kit. 3 Take the new toner container out of the container at least 5 times as shown in the figure in order to distribute the toner evenly inside the container. 4 Remove the label from the toner container. 5 Install the new toner container in the printer. Shake the new toner container at the positions marked PUSH, until you hear a click. 4-4 Maintenance
Operation Guide
Page 68
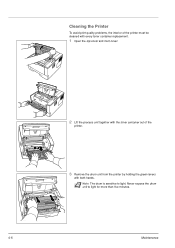
Never expose the drum unit to light. Cleaning the Printer To avoid print quality problems, the interior of the printer must be cleaned with every toner container replacement. 1 Open the top cover and front cover. 2 Lift the process unit together with the toner container out of the printer. 3 Remove the drum unit from the printer by holding the green levers with both hands. Note The drum is sensitive to light for more than five minutes. 4-6 Maintenance
Never expose the drum unit to light. Cleaning the Printer To avoid print quality problems, the interior of the printer must be cleaned with every toner container replacement. 1 Open the top cover and front cover. 2 Lift the process unit together with the toner container out of the printer. 3 Remove the drum unit from the printer by holding the green levers with both hands. Note The drum is sensitive to light for more than five minutes. 4-6 Maintenance
Operation Guide
Page 71
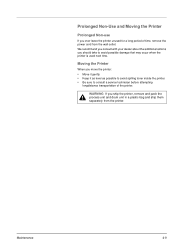
... gently. • Keep it as level as possible to avoid spilling toner inside the printer. • Be sure to avoid possible damage that may occur when the printer is used next time. Moving the Printer When you should take to consult a service technician before attempting longdistance transportation... of time, remove the power cord from the printer. Maintenance 4-9 WARNING If you ship the printer, remove and pack the process unit and drum unit in a plastic bag and ship them separately from the ...
... gently. • Keep it as level as possible to avoid spilling toner inside the printer. • Be sure to avoid possible damage that may occur when the printer is used next time. Moving the Printer When you should take to consult a service technician before attempting longdistance transportation... of time, remove the power cord from the printer. Maintenance 4-9 WARNING If you ship the printer, remove and pack the process unit and drum unit in a plastic bag and ship them separately from the ...

Operation Guide
Page 75
...call for service. Vertical streaks Troubleshooting Check the toner container and if necessary replace. Refer to Cleaning the Printer on page 4-2. Corrective Action Check the toner container. If the problem is in the printer. Refer to Toner Container Replacement on page 4-6. Clean the charger wire.... Open the front cover and check that the toner container is correctly installed in its original position. Refer to Cleaning the Printer on page 4-2. Check the charger cleaner of the printer. Full single-color printout Contact your service technician. Printed ...
...call for service. Vertical streaks Troubleshooting Check the toner container and if necessary replace. Refer to Cleaning the Printer on page 4-2. Corrective Action Check the toner container. If the problem is in the printer. Refer to Toner Container Replacement on page 4-6. Clean the charger wire.... Open the front cover and check that the toner container is correctly installed in its original position. Refer to Cleaning the Printer on page 4-2. Check the charger cleaner of the printer. Full single-color printout Contact your service technician. Printed ...

Operation Guide
Page 76
... likely cause is being caused by a PRESCRIBE command error. Refer to Cleaning the Printer on page 4-2. Refer to Cleaning the Printer on page 4-2. Printed Results Faint or blurred printing Corrective Action Check the toner container and if necessary replace. Refer to Toner Container Replacement on page 4-6. Clean the charger wire. If the problem is...
... likely cause is being caused by a PRESCRIBE command error. Refer to Cleaning the Printer on page 4-2. Refer to Cleaning the Printer on page 4-2. Printed Results Faint or blurred printing Corrective Action Check the toner container and if necessary replace. Refer to Toner Container Replacement on page 4-6. Clean the charger wire. If the problem is...

Operation Guide
Page 77
... operation, maintenance and errors (repairs). Meaning The printer is warning up. The printer is canceling data. Troubleshooting 5-5 The printer is adjusting the color. Click the icon to your PC. The printer is installing toner. Normal Indication The table below shows the indicator combinations... when the printer status is receiving data. The printer is normal. IMPORTANT To play the animation, you should get ...
... operation, maintenance and errors (repairs). Meaning The printer is warning up. The printer is canceling data. Troubleshooting 5-5 The printer is adjusting the color. Click the icon to your PC. The printer is installing toner. Normal Indication The table below shows the indicator combinations... when the printer status is receiving data. The printer is normal. IMPORTANT To play the animation, you should get ...

Operation Guide
Page 79
... and remove the jammed paper. Re-insert the cassette and then try printing again. The cassette is open. Remedy Load paper into the printer. Insert the cassette fully into the paper source. There is no paper in the cassette, MP tray, or Manual Feed. If the ...from the MP tray or Manual Feed is processing data. If you can print by the printer driver. A paper jam occurred during printing. The top cover is not inserted properly. The process unit or toner container is required. Troubleshooting 5-7 The paper sizes do not match. The cassette does not ...
... and remove the jammed paper. Re-insert the cassette and then try printing again. The cassette is open. Remedy Load paper into the printer. Insert the cassette fully into the paper source. There is no paper in the cassette, MP tray, or Manual Feed. If the ...from the MP tray or Manual Feed is processing data. If you can print by the printer driver. A paper jam occurred during printing. The top cover is not inserted properly. The process unit or toner container is required. Troubleshooting 5-7 The paper sizes do not match. The cassette does not ...


