Operation Guide
Page 4
...Local rules and regulations. • Keep away the toner container from Agfa Corporation. law governs this Agreement.... dispose of Agfa Japan in connection with the toner. Agfa Japan License Agreement Guidelines • 1."...exclusive remedy and the sole liability of the toner or toner containers in accordance with the terms of this...Toner Handling • Do not incinerate the toner and toner containers. iii Helvetica, Palatino and Times are registered trademarks of old toner container and waste toner...the toner container or waste toner box. • Make sure not to inhale the toner, and ...
...Local rules and regulations. • Keep away the toner container from Agfa Corporation. law governs this Agreement.... dispose of Agfa Japan in connection with the toner. Agfa Japan License Agreement Guidelines • 1."...exclusive remedy and the sole liability of the toner or toner containers in accordance with the terms of this...Toner Handling • Do not incinerate the toner and toner containers. iii Helvetica, Palatino and Times are registered trademarks of old toner container and waste toner...the toner container or waste toner box. • Make sure not to inhale the toner, and ...
Operation Guide
Page 5
...Paper Size ...1-20 1.4.5 Media Type Settings for Paper Sources 1-22 1.4.6 Paper Source Properties ...1-24 1.4.7 Setting the Weight of the Custom Paper Type 1-25 1.5 Printer Environment ...1-27 1.5.1 Setting the Print Density of the Custom Paper Type 1-27 1.5.2 KIR...1-29 1.5.3 EcoPrint ...1-30 1.5.4 Resolution ...1-31 1.5.5 Form Feed Timeout ...1-... ...1-34 1.5.8 Emulation ...1-35 1.5.9 Serial Interface Parameters ...1-37 1.5.10 Network Interface Card Properties 1-39 1.5.11 RAM Disk ...1-40 1.5.12 Checking Toner Container Remain 1-42 1.5.13 Remote Operation Panel Display Language 1-43 iv
...Paper Size ...1-20 1.4.5 Media Type Settings for Paper Sources 1-22 1.4.6 Paper Source Properties ...1-24 1.4.7 Setting the Weight of the Custom Paper Type 1-25 1.5 Printer Environment ...1-27 1.5.1 Setting the Print Density of the Custom Paper Type 1-27 1.5.2 KIR...1-29 1.5.3 EcoPrint ...1-30 1.5.4 Resolution ...1-31 1.5.5 Form Feed Timeout ...1-... ...1-34 1.5.8 Emulation ...1-35 1.5.9 Serial Interface Parameters ...1-37 1.5.10 Network Interface Card Properties 1-39 1.5.11 RAM Disk ...1-40 1.5.12 Checking Toner Container Remain 1-42 1.5.13 Remote Operation Panel Display Language 1-43 iv
Operation Guide
Page 6
...31 2.3.6 Printing on Both Sides of Paper (Manual Duplex 2-32 2.3.7 Changing the Resolution ...2-36 2.3.8 Adjusting Grayscale ...2-38 2.3.9 TrueType Fonts ...2-39 Chapter 3 Maintenance 3-1 3.1 Toner Container Replacement ...3-2 3.1.1 Toner Container Replacement Interval 3-2 3.1.2 Replenishing Toner ...3-3 3.2 Cleaning ...3-6 3.2.1 Printer Interior...3-6 Chapter 4 Troubleshooting 4-1 4.1 General Guide ...4-2 4.2 Print Quality Problems ...4-3 4.3 Indicators ...4-5 4.3.1 Maintenance Messages ...4-6 4.3.2 Errors Requiring Service Personnel Attention 4-8 4.3.3 Error Messages...4-11 4.3.4 Normal...
...31 2.3.6 Printing on Both Sides of Paper (Manual Duplex 2-32 2.3.7 Changing the Resolution ...2-36 2.3.8 Adjusting Grayscale ...2-38 2.3.9 TrueType Fonts ...2-39 Chapter 3 Maintenance 3-1 3.1 Toner Container Replacement ...3-2 3.1.1 Toner Container Replacement Interval 3-2 3.1.2 Replenishing Toner ...3-3 3.2 Cleaning ...3-6 3.2.1 Printer Interior...3-6 Chapter 4 Troubleshooting 4-1 4.1 General Guide ...4-2 4.2 Print Quality Problems ...4-3 4.3 Indicators ...4-5 4.3.1 Maintenance Messages ...4-6 4.3.2 Errors Requiring Service Personnel Attention 4-8 4.3.3 Error Messages...4-11 4.3.4 Normal...
Operation Guide
Page 11
... This chapter describes the names and functions of the keys and indicators on the Kyocera Mita Digital Library CD-ROM supplied with the printer. Chapter 3 Maintenance This chapter explains how to replace the toner container and how to make printer settings using the KM-NET Remote Operation Panel utility contained on top of paper...
... This chapter describes the names and functions of the keys and indicators on the Kyocera Mita Digital Library CD-ROM supplied with the printer. Chapter 3 Maintenance This chapter explains how to replace the toner container and how to make printer settings using the KM-NET Remote Operation Panel utility contained on top of paper...
Operation Guide
Page 14
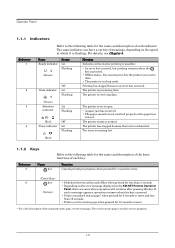
...8226; The paper cassette is not inserted properly or the paper has run out. (Red) Off The printer status is normal. 4 Toner indicator Lit The printer has stopped because the toner is pressed. • Offline status. If (Go key) such a message appears, operation resumes when ... see the next page. Flashing The toner is pressed. • Prints a standard status page* when pressed for 3 seconds or more . *: For a full description of the standard status page, see Chapter 4. Function Cancels printing in sleep mode. The printer is processing data. Operator Panel 1.1.1 Indicators...
...8226; The paper cassette is not inserted properly or the paper has run out. (Red) Off The printer status is normal. 4 Toner indicator Lit The printer has stopped because the toner is pressed. • Offline status. If (Go key) such a message appears, operation resumes when ... see the next page. Flashing The toner is pressed. • Prints a standard status page* when pressed for 3 seconds or more . *: For a full description of the standard status page, see Chapter 4. Function Cancels printing in sleep mode. The printer is processing data. Operator Panel 1.1.1 Indicators...

Operation Guide
Page 17
...is possible to 0, the smaller the amount of remaining toner. Interface Information This information shows all interfaces installed in the printer and the currently selected interface (marked with an asterisk). It is automatically selected when the printer starts up (default font). KIR Test Pattern This shows... the KIR test pattern. Toner Gauge This shows the approximate level of remaining toner. 10 - You can confirm whether KIR is full. The closer ...
...is possible to 0, the smaller the amount of remaining toner. Interface Information This information shows all interfaces installed in the printer and the currently selected interface (marked with an asterisk). It is automatically selected when the printer starts up (default font). KIR Test Pattern This shows... the KIR test pattern. Toner Gauge This shows the approximate level of remaining toner. 10 - You can confirm whether KIR is full. The closer ...
Operation Guide
Page 21
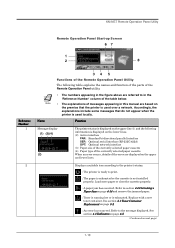
...to in the figure above are referred to section 4.4 Correcting a Paper Jam on the premise that do not appear when the printer is used locally. See section 3.1 Toner Container Replacement on next page) 1-10 See section 4.3 Indicators on page 4-5. (Continued on page 3-2. : An error has ...occurred. Function Message display (1) (3)(4) (2) The printer status is displayed on the upper line (1) and the following table explains the...
...to in the figure above are referred to section 4.4 Correcting a Paper Jam on the premise that do not appear when the printer is used locally. See section 3.1 Toner Container Replacement on next page) 1-10 See section 4.3 Indicators on page 4-5. (Continued on page 3-2. : An error has ...occurred. Function Message display (1) (3)(4) (2) The printer status is displayed on the upper line (1) and the following table explains the...

Operation Guide
Page 41
Select and double click Quality, then click EcoPrint. Quality EcoPrint EcoPrint 3 After you can save on printing costs. Printer Environment 1.5.3 EcoPrint EcoPrint allows you to the start -up screen. The EcoPrint mode is Off. You can toggle the EcoPrint mode On and Off using ... box appears. EcoPrint does not effect printing speed. Note With EcoPrint Off (default) With EcoPrint On 1 Click the MENU button on the right side of toner used, so that you have selected On or Off, click the OK button to return to reduce the amount of the screen. You can set...
Select and double click Quality, then click EcoPrint. Quality EcoPrint EcoPrint 3 After you can save on printing costs. Printer Environment 1.5.3 EcoPrint EcoPrint allows you to the start -up screen. The EcoPrint mode is Off. You can toggle the EcoPrint mode On and Off using ... box appears. EcoPrint does not effect printing speed. Note With EcoPrint Off (default) With EcoPrint On 1 Click the MENU button on the right side of toner used, so that you have selected On or Off, click the OK button to return to reduce the amount of the screen. You can set...

Operation Guide
Page 53
Printer Environment 1.5.12 Checking Toner Container Remain 1 Click the MENU button on this tab will not be sure to reset the toner counter, otherwise the remaining amount on the start-up screen. 2 The Menu dialog box appears. When you have replaced the toner container, be shown Note correctly. The remaining amount of the toner is displayed on page 3-5. 1-42 For more information about resetting the toner counter, see the note on the right side of the screen. Select and double click Consumable, then click Toner.
Printer Environment 1.5.12 Checking Toner Container Remain 1 Click the MENU button on this tab will not be sure to reset the toner counter, otherwise the remaining amount on the start-up screen. 2 The Menu dialog box appears. When you have replaced the toner container, be shown Note correctly. The remaining amount of the toner is displayed on page 3-5. 1-42 For more information about resetting the toner counter, see the note on the right side of the screen. Select and double click Consumable, then click Toner.

Operation Guide
Page 106
Chapter 3 Maintenance 3 This chapter explains how to replace the toner container and how to clean parts such as the registration roller and charger wire. This chapter explains the following topics: • Toner Container Replacement • Cleaning 3-1
Chapter 3 Maintenance 3 This chapter explains how to replace the toner container and how to clean parts such as the registration roller and charger wire. This chapter explains the following topics: • Toner Container Replacement • Cleaning 3-1
Operation Guide
Page 107
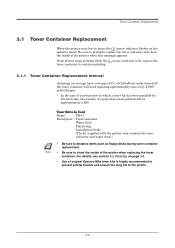
Be sure to clean the inside of the printer when this message appears. Toner Container Replacement 3.1 Toner Container Replacement When the printer runs low on toner, the (toner) indicator flashes on page 3-6. • Use of original Kyocera Mita toner kits is lit, replace the toner container to distance items such as floppy disks during toner container replacement. Note • Be sure...
Be sure to clean the inside of the printer when this message appears. Toner Container Replacement 3.1 Toner Container Replacement When the printer runs low on toner, the (toner) indicator flashes on page 3-6. • Use of original Kyocera Mita toner kits is lit, replace the toner container to distance items such as floppy disks during toner container replacement. Note • Be sure...

Operation Guide
Page 108
Top Cover 2 Pull lock lever #1 to the release (UNLOCK) position, then pull lock lever #2 to the release (right) position. Toner Container Replacement 3.1.2 Replenishing Toner 1 Open the printer's top cover. Put it in the supplied plastic bag and dispose of it. Plastic Bag 3-3 Lock Lever #1 Lock Lever #2 3 Gently remove the old toner container.
Top Cover 2 Pull lock lever #1 to the release (UNLOCK) position, then pull lock lever #2 to the release (right) position. Toner Container Replacement 3.1.2 Replenishing Toner 1 Open the printer's top cover. Put it in the supplied plastic bag and dispose of it. Plastic Bag 3-3 Lock Lever #1 Lock Lever #2 3 Gently remove the old toner container.

Operation Guide
Page 109
Toner Container Replacement 4 Take the new toner container from the bag. New Toner Container 5 Carefully remove the protective seal (orange-colored). This ensures that the toner is evenly distributed inside. Push firmly on the top of the container at least 5 times. Hold it click in the printer. Protective Seal 6 Install the new toner container in place. 3-4 Shake the toner container horizontally at the positions marked PUSH HERE until you hear it with the protective seal (orange-colored) facing up.
Toner Container Replacement 4 Take the new toner container from the bag. New Toner Container 5 Carefully remove the protective seal (orange-colored). This ensures that the toner is evenly distributed inside. Push firmly on the top of the container at least 5 times. Hold it click in the printer. Protective Seal 6 Install the new toner container in place. 3-4 Shake the toner container horizontally at the positions marked PUSH HERE until you hear it with the protective seal (orange-colored) facing up.

Operation Guide
Page 110
Toner Container Replacement 7 While pushing down on the power to reset the toner counter. Next time you turn on the toner container, push lock lever #1 to the lock (LOCK) position. (Lock lever #2 is automatically locked.) Lock Lever #1 LOCK UNLOCK LOCK UNLOCK • If the toner low indication flashes or remains lit after installing the new toner container, take the toner container out once, shake it well, Note then install again. • After you have replaced the toner container, be sure to the printer, keep pushing the key until the Ready indicator lights up. 3-5
Toner Container Replacement 7 While pushing down on the power to reset the toner counter. Next time you turn on the toner container, push lock lever #1 to the lock (LOCK) position. (Lock lever #2 is automatically locked.) Lock Lever #1 LOCK UNLOCK LOCK UNLOCK • If the toner low indication flashes or remains lit after installing the new toner container, take the toner container out once, shake it well, Note then install again. • After you have replaced the toner container, be sure to the printer, keep pushing the key until the Ready indicator lights up. 3-5

Operation Guide
Page 111
...the drum even to paper dust and debris, clean the interior of the printer in the process unit is sensitive to light. Top Cover Front Cover 2 Lift the process unit together with the toner container out of the printer must be done from time to time to avoid print quality problems. ...Note 3.2.1 Printer Interior To avoid print quality problems due to normal office lighting (500 lux) for more than...
...the drum even to paper dust and debris, clean the interior of the printer in the process unit is sensitive to light. Top Cover Front Cover 2 Lift the process unit together with the toner container out of the printer must be done from time to time to avoid print quality problems. ...Note 3.2.1 Printer Interior To avoid print quality problems due to normal office lighting (500 lux) for more than...

Operation Guide
Page 116
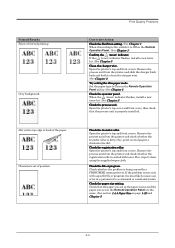
... and front covers. Corrective Action Contact your Kyocera Mita dealer. Remove the process unit from the printer. Dropouts, horizontal streaks, stray dots Black or white vertical streaks Clean the charger wire. Open the printer's top and front covers. When the (toner) indicator flashes, install a new toner kit. Make sure the charger cleaner knob is explained...
... and front covers. Corrective Action Contact your Kyocera Mita dealer. Remove the process unit from the printer. Dropouts, horizontal streaks, stray dots Black or white vertical streaks Clean the charger wire. Open the printer's top and front covers. When the (toner) indicator flashes, install a new toner kit. Make sure the charger cleaner knob is explained...
Operation Guide
Page 117
...Chapter 5) 4-4 If so, print several pages to Off on the Remote Operation Panel. (See Chapter 1) Confirm the (toner) indicator. Remove the process unit from the printer and check whether the registration roller is soiled with a specific file or program, the most likely cause is an error in... Action Check the EcoPrint setting. (See Chapter 1) When this setting is dirty. If the (toner) indicator flashes, install a new toner kit. (See Chapter 3) Clean the charger wire. Open the printer's top cover and front cover, then check that the paper size set in the paper source and...
...Chapter 5) 4-4 If so, print several pages to Off on the Remote Operation Panel. (See Chapter 1) Confirm the (toner) indicator. Remove the process unit from the printer and check whether the registration roller is soiled with a specific file or program, the most likely cause is an error in... Action Check the EcoPrint setting. (See Chapter 1) When this setting is dirty. If the (toner) indicator flashes, install a new toner kit. (See Chapter 3) Clean the charger wire. Open the printer's top cover and front cover, then check that the paper size set in the paper source and...
Operation Guide
Page 120
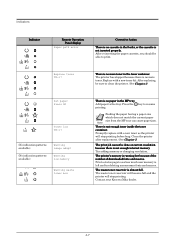
...long. The waste toner reservoir will become full and the printer will stop printing. Add paper to resume Feeding the paper having a paper size which does not match the current paper size from the MP tray can cause paper jam. key to the tray. Contact your Kyocera Mita dealer. ...4-7 After reinserting the paper cassette, you should be sure to clean the printer. (See Chapter 3) Set paper Press GO Toner low TK-17 (No indication patterns available) (No indication patterns available) Warning...
...long. The waste toner reservoir will become full and the printer will stop printing. Add paper to resume Feeding the paper having a paper size which does not match the current paper size from the MP tray can cause paper jam. key to the tray. Contact your Kyocera Mita dealer. ...4-7 After reinserting the paper cassette, you should be sure to clean the printer. (See Chapter 3) Set paper Press GO Toner low TK-17 (No indication patterns available) (No indication patterns available) Warning...

Operation Guide
Page 122
...the process unit horizontally a few times, then reinstall it into the printer. Indicators Indicator Remote Operation Panel display (None) Corrective Action Fuser error ("6000" error) Contact your Kyocera Mita dealer. (None) (None) The waste toner reservoir is full ("7990" error) Same as above (100,000 pages...write error ("F020" error) Contact your Kyocera Mita dealer (less than 100,000 pages printing). Turn on next page) 4-9 The waste toner reservoir is full ("7980" error) Turn off the printer's power and remove the process unit from the printer. If this error message does not ...
...the process unit horizontally a few times, then reinstall it into the printer. Indicators Indicator Remote Operation Panel display (None) Corrective Action Fuser error ("6000" error) Contact your Kyocera Mita dealer. (None) (None) The waste toner reservoir is full ("7990" error) Same as above (100,000 pages...write error ("F020" error) Contact your Kyocera Mita dealer (less than 100,000 pages printing). Turn on next page) 4-9 The waste toner reservoir is full ("7980" error) Turn off the printer's power and remove the process unit from the printer. If this error message does not ...

Operation Guide
Page 126
...second intervals and all other indicators go off . The printer then warms up and is installed, (Adding toner) also appears. Processing Waiting Form Feed Timeout Ready The printer is receiving data. Sleeping The printer is being canceled. The printer wakes from the bottom. Indicators 4.3.4 Normal Indicator Display... last page immediately. Pressing the key allows you to print. This process is installed, (Adding toner) also appears. The indicators light in sleep mode. When the printer is switched on the operator panel is pressed, the cover is opened or closed, or data ...
...second intervals and all other indicators go off . The printer then warms up and is installed, (Adding toner) also appears. Processing Waiting Form Feed Timeout Ready The printer is receiving data. Sleeping The printer is being canceled. The printer wakes from the bottom. Indicators 4.3.4 Normal Indicator Display... last page immediately. Pressing the key allows you to print. This process is installed, (Adding toner) also appears. The indicators light in sleep mode. When the printer is switched on the operator panel is pressed, the cover is opened or closed, or data ...


