User Guide
Page 2
... 2-1 System requirements 2-1 Registering your scanner 2-1 Making connections 2-2 Installing the IEEE-1394 card in the host computer 2-2 Installing the Kodak Driver software 2-2 Installing the FireWire cable 2-2 Attaching the power cord 2-3 Powering up the host computer 2-3 Scanner components 2-3 3 ...the Scanner 3-1 Turning the scanner on and off 3-1 Starting and stopping scanning 3-1 Manually pausing and resuming the scanner 3-2 Automatically pausing and resuming the scanner 3-2 Manually ending scanning 3-2 Document preparation 3-3 Adjusting the side guides and end stop 3-4 ...
... 2-1 System requirements 2-1 Registering your scanner 2-1 Making connections 2-2 Installing the IEEE-1394 card in the host computer 2-2 Installing the Kodak Driver software 2-2 Installing the FireWire cable 2-2 Attaching the power cord 2-3 Powering up the host computer 2-3 Scanner components 2-3 3 ...the Scanner 3-1 Turning the scanner on and off 3-1 Starting and stopping scanning 3-1 Manually pausing and resuming the scanner 3-2 Automatically pausing and resuming the scanner 3-2 Manually ending scanning 3-2 Document preparation 3-3 Adjusting the side guides and end stop 3-4 ...
User Guide
Page 6
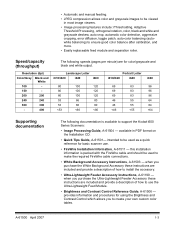
... Black and White 100 - 150 - 200 200 240 240 300 300 - 400 Landscape Letter i610/i620 i640 i660 80 100 120 80 100 120 80 100 120 53 66 80 53 66 80 • Automatic and manual feeding. • JPEG compression allows color and grayscale images to be viewed in most image...
... Black and White 100 - 150 - 200 200 240 240 300 300 - 400 Landscape Letter i610/i620 i640 i660 80 100 120 80 100 120 80 100 120 53 66 80 53 66 80 • Automatic and manual feeding. • JPEG compression allows color and grayscale images to be viewed in most image...

User Guide
Page 8
... user may be required to take corrective action. EMC statements United States Japan This equipment has been tested and found to comply with the instruction manual, may cause harmful interference to radio communications. This is a Class A product based on the standard of this equipment is used in which case the user...
... user may be required to take corrective action. EMC statements United States Japan This equipment has been tested and found to comply with the instruction manual, may cause harmful interference to radio communications. This is a Class A product based on the standard of this equipment is used in which case the user...
User Guide
Page 11
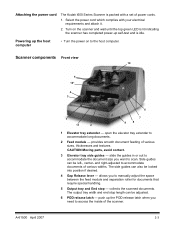
... to accommodate documents of various sizes, thicknesses and textures. and right-adjusted to access the inside of power cords. 1. open the elevator tray extender to manually adjust the space between the feed module and separation roller for documents that require special handling. 5 Output tray and End stop length can be left... 5 12* 4 3 6 1 11 2 7 9 8 1 Elevator tray extender - Select the power cord which complies with a set of the scanner. Turn on to scan. Attaching the power cord The Kodak i600 Series Scanner is idle.
... to accommodate documents of various sizes, thicknesses and textures. and right-adjusted to access the inside of power cords. 1. open the elevator tray extender to manually adjust the space between the feed module and separation roller for documents that require special handling. 5 Output tray and End stop length can be left... 5 12* 4 3 6 1 11 2 7 9 8 1 Elevator tray extender - Select the power cord which complies with a set of the scanner. Turn on to scan. Attaching the power cord The Kodak i600 Series Scanner is idle.

User Guide
Page 15
... resuming the scanner • Document preparation • Adjusting the side guides and output tray • Scanning documents • Feeding long documents • Automatic, continuous and manual feeding • Calibration Turning the scanner on and off • Press the button on the scanner's lower right-side (I) to power it up or restarting...
... resuming the scanner • Document preparation • Adjusting the side guides and output tray • Scanning documents • Feeding long documents • Automatic, continuous and manual feeding • Calibration Turning the scanner on and off • Press the button on the scanner's lower right-side (I) to power it up or restarting...

User Guide
Page 16
Manually pausing and resuming the scanner While scanning documents: • Press the Stop/Pause button on the scanner twice. In order to prevent overwriting images before ... by pressing the Stop/Pause button on the scanner once to in Chapter 2. Stop/Pause button Start/Resume button Automatically pausing and resuming the scanner Manually ending scanning During scanning the scanner monitors its own internal image buffer memory. To avoid this situation be scanned, you cannot continue scanning without restarting...
Manually pausing and resuming the scanner While scanning documents: • Press the Stop/Pause button on the scanner twice. In order to prevent overwriting images before ... by pressing the Stop/Pause button on the scanner once to in Chapter 2. Stop/Pause button Start/Resume button Automatically pausing and resuming the scanner Manually ending scanning During scanning the scanner monitors its own internal image buffer memory. To avoid this situation be scanned, you cannot continue scanning without restarting...

User Guide
Page 17
... thickness requirements in this allows the feeder to introduce documents into the scanner must be transported successfully through the scanner. business cards) can be manually fed, one at a time. Document preparation Before you begin scanning documents, make certain the documents can be fed through the scanner easily. ..., in doubt about whether a specific damaged document can handle paper weights from 45 to 200 g/m2 (12 to 110 lb.). The Kodak Feeder Kit for Ultra Lightweight Paper can be arranged so the leading edges of all staples and paper clips before scanning. • Documents...
... thickness requirements in this allows the feeder to introduce documents into the scanner must be transported successfully through the scanner. business cards) can be manually fed, one at a time. Document preparation Before you begin scanning documents, make certain the documents can be fed through the scanner easily. ..., in doubt about whether a specific damaged document can handle paper weights from 45 to 200 g/m2 (12 to 110 lb.). The Kodak Feeder Kit for Ultra Lightweight Paper can be arranged so the leading edges of all staples and paper clips before scanning. • Documents...

User Guide
Page 24
...gap release lever. Using the scanner in doubt about whether a damaged document can be scanned, feed them one document is to manually adjust the space between the feed module and separation roller for documents that the paper present sensor is recommended when handling special documents.... 1. A-61500 April 2007 Press and hold the gap release lever - Manual feeding To manually feed documents: 1. Feeding documents that require special handling The gap release lever allows you to be transported through the scanner, ...
...gap release lever. Using the scanner in doubt about whether a damaged document can be scanned, feed them one document is to manually adjust the space between the feed module and separation roller for documents that the paper present sensor is recommended when handling special documents.... 1. A-61500 April 2007 Press and hold the gap release lever - Manual feeding To manually feed documents: 1. Feeding documents that require special handling The gap release lever allows you to be transported through the scanner, ...

User Guide
Page 30
... Font size Ink cartridge Print side Minimum printing distance from document lead edge Static fields available Dynamic fields available Languages supported Description 1 40 12 front manually set, Set by capture software application 0, 90, 180 or 270 degrees 2 selectable, Bold or Normal NOTE: Not all languages can support a Bold font based on...
... Font size Ink cartridge Print side Minimum printing distance from document lead edge Static fields available Dynamic fields available Languages supported Description 1 40 12 front manually set, Set by capture software application 0, 90, 180 or 270 degrees 2 selectable, Bold or Normal NOTE: Not all languages can support a Bold font based on...

User Guide
Page 31
There are visible by a small detent on the printer rail. Remove the output tray. 2. These positions are 12 horizontal print positions. Changing print positions Changing the front horizontal print position The horizontal print position can be changed manually. 1. A-61500 April 2007 4-3 Open the print access cover.
There are visible by a small detent on the printer rail. Remove the output tray. 2. These positions are 12 horizontal print positions. Changing print positions Changing the front horizontal print position The horizontal print position can be changed manually. 1. A-61500 April 2007 4-3 Open the print access cover.

User Guide
Page 41
... and wipe the NFR and drive rollers with a roller cleaning pad. Manually rotate and wipe the separation roller tires with a roller cleaning pad. If the tires show signs of wear or damage, replace the separation roller. See "...
... and wipe the NFR and drive rollers with a roller cleaning pad. Manually rotate and wipe the separation roller tires with a roller cleaning pad. If the tires show signs of wear or damage, replace the separation roller. See "...

User Guide
Page 42
Push the release lever down (located underneath the printer access cover) to the ribs in this chapter. 5-6 A-61500 April 2007 Inspect the tires. If the tires show signs of wear or damage, replace the feed module tires. Manually rotate and wipe the feed module tires with a roller cleaning pad. See "Replacement procedures" later in order to remove any residue between the ribs. 14. Lift up the printer access cover. 12. Cleaning the feed module tires 11. For best results wipe parallel to release and remove the feed module. 13.
Push the release lever down (located underneath the printer access cover) to the ribs in this chapter. 5-6 A-61500 April 2007 Inspect the tires. If the tires show signs of wear or damage, replace the feed module tires. Manually rotate and wipe the feed module tires with a roller cleaning pad. See "Replacement procedures" later in order to remove any residue between the ribs. 14. Lift up the printer access cover. 12. Cleaning the feed module tires 11. For best results wipe parallel to release and remove the feed module. 13.
