User Guide
Page 2
... statements 1-5 United States 1-5 Japan 1-5 Taiwan 1-5 Peoples Republic of China 1-5 Acoustic emission 1-5 Power system connection 1-5 2 Getting Started 2-1 Site specifications 2-1 System requirements 2-1 Registering your scanner 2-1 Making connections 2-2 Installing the IEEE-1394 card in the host computer 2-2 Installing the Kodak Driver software 2-2 Installing the FireWire cable 2-2 Attaching the power cord 2-3 Powering up the host computer...
... statements 1-5 United States 1-5 Japan 1-5 Taiwan 1-5 Peoples Republic of China 1-5 Acoustic emission 1-5 Power system connection 1-5 2 Getting Started 2-1 Site specifications 2-1 System requirements 2-1 Registering your scanner 2-1 Making connections 2-2 Installing the IEEE-1394 card in the host computer 2-2 Installing the Kodak Driver software 2-2 Installing the FireWire cable 2-2 Attaching the power cord 2-3 Powering up the host computer...

User Guide
Page 3
Calibrating the scanner 3-11 Image calibration 3-11 Ultrasonics calibration 3-14 4 The Enhanced Printer 4-1 Overview 4-1 Printer specifications 4-2 Changing print positions 4-3 Changing the front horizontal print positions 4-3 Installing an ink ...
Calibrating the scanner 3-11 Image calibration 3-11 Ultrasonics calibration 3-14 4 The Enhanced Printer 4-1 Overview 4-1 Printer specifications 4-2 Changing print positions 4-3 Changing the front horizontal print positions 4-3 Installing an ink ...
User Guide
Page 4
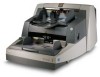
... for use with the accessory. includes information on how to scan documents. provides maintenance procedures for the i600 Series Scanners, including replacement procedures for the Kodak i600 Series Scanners. provides a listing of the i600 Series Scanners unless otherwise noted. Chapter 5, Maintenance - provides a description of error messages. 1 Introduction This User's Guide provides information and procedures...
... for use with the accessory. includes information on how to scan documents. provides maintenance procedures for the i600 Series Scanners, including replacement procedures for the Kodak i600 Series Scanners. provides a listing of the i600 Series Scanners unless otherwise noted. Chapter 5, Maintenance - provides a description of error messages. 1 Introduction This User's Guide provides information and procedures...

User Guide
Page 5
... at 80 pages per minute which includes an enhanced printer. • Kodak i620 Scanner is a desktop duplex color scanner with an automatic document feeder that runs at 80 pages per minute which includes an enhanced printer. • Kodak i640 Scanner is a desktop duplex color scanner with an automatic document feeder that runs at 120 pages per minute...
... at 80 pages per minute which includes an enhanced printer. • Kodak i620 Scanner is a desktop duplex color scanner with an automatic document feeder that runs at 80 pages per minute which includes an enhanced printer. • Kodak i640 Scanner is a desktop duplex color scanner with an automatic document feeder that runs at 120 pages per minute...
User Guide
Page 6
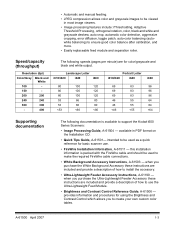
.../grayscale and black and white output. Resolution (dpi) Color/Gray Black and White 100 - 150 - 200 200 240 240 300 300 - 400 Landscape Letter i610/i620 i640 i660 80 100 120 80 100 120 80 100 120 53 66 80 53 66 80
.../grayscale and black and white output. Resolution (dpi) Color/Gray Black and White 100 - 150 - 200 200 240 240 300 300 - 400 Landscape Letter i610/i620 i640 i660 80 100 120 80 100 120 80 100 120 53 66 80 53 66 80
User Guide
Page 7
... to environmental considerations. If the gas springs exhibit a sign of the job description for . Do not attempt to repair. • The Kodak i600 Series Scanners contain lead in the USA, visit the Electronics Industry Alliance website: www.eiae.org. • The product packaging is recyclable. •...the Material Safety Data Sheet for operation of any mechanical device. Disposal of this material may be required to the operation of the scanner or any machinery. For disposal or recycling information, please contact your local authorities or, in the circuit board solder. When accessing ...
... to environmental considerations. If the gas springs exhibit a sign of the job description for . Do not attempt to repair. • The Kodak i600 Series Scanners contain lead in the USA, visit the Electronics Industry Alliance website: www.eiae.org. • The product packaging is recyclable. •...the Material Safety Data Sheet for operation of any mechanical device. Disposal of this material may be required to the operation of the scanner or any machinery. For disposal or recycling information, please contact your local authorities or, in the circuit board solder. When accessing ...
User Guide
Page 9
..., level work surface, • within 1.52 metres (5 feet) of scanning parameters, and the host computer configuration. If the scanner is the minimum recommended system configuration to Appendix B, Specifications. You can register your scanner so Kodak can be registered before any service support can provide you with temperature and relative humidity typical of an...
..., level work surface, • within 1.52 metres (5 feet) of scanning parameters, and the host computer configuration. If the scanner is the minimum recommended system configuration to Appendix B, Specifications. You can register your scanner so Kodak can be registered before any service support can provide you with temperature and relative humidity typical of an...

User Guide
Page 10
...host computer. Connect the other end of the cable into the scanner. 2. The installation program starts automatically. 2. Plug the end of the scanner for installing the IEEE-1394 (FireWire) card and the Kodak driver software before you install the IEEE-1394 card in the... and properly seated. Install the IEEE-1394 (FireWire) card according to the scanner. 2-2 A-61500 April 2007 Making connections Installing the IEEE-1394 card in the host computer Installing the Kodak Driver software Installing the FireWire cable Follow the instructions for IEEE-1394 connectivity. ...
...host computer. Connect the other end of the cable into the scanner. 2. The installation program starts automatically. 2. Plug the end of the scanner for installing the IEEE-1394 (FireWire) card and the Kodak driver software before you install the IEEE-1394 card in the... and properly seated. Install the IEEE-1394 (FireWire) card according to the scanner. 2-2 A-61500 April 2007 Making connections Installing the IEEE-1394 card in the host computer Installing the Kodak Driver software Installing the FireWire cable Follow the instructions for IEEE-1394 connectivity. ...
User Guide
Page 11
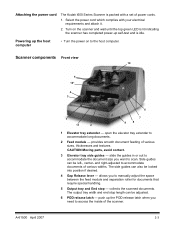
... your electrical requirements and attach it. 2. A-61500 April 2007 2-3 Attaching the power cord The Kodak i600 Series Scanner is idle. Turn on to scan. Scanner components Front view 10 5 12* 4 3 6 1 11 2 7 9 8 1 Elevator tray extender - provides smooth document feeding of the scanner. and right-adjusted to accommodate long documents. 2 Feed module - open the elevator tray...
... your electrical requirements and attach it. 2. A-61500 April 2007 2-3 Attaching the power cord The Kodak i600 Series Scanner is idle. Turn on to scan. Scanner components Front view 10 5 12* 4 3 6 1 11 2 7 9 8 1 Elevator tray extender - provides smooth document feeding of the scanner. and right-adjusted to accommodate long documents. 2 Feed module - open the elevator tray...
User Guide
Page 12
... idle. press the power switch on and the scanner is in document stacking. 11 Paper Present Sensor - aids in "sleep" or lamp saver mode. Start/Resume (green) button: to call Service. Illuminates when a usercorrectable ... to Chapter 6, Troubleshooting, for complete descriptions of job). detects the presence of the output tray. 2-4 A-61500 April 2007 illuminates when the scanner is enabled and/or scanning, and flashes when the scanner is turned on (I) or off (O) as required. 10 Exit deflector (optional) - illuminate or flash from top to raise the front...
... idle. press the power switch on and the scanner is in document stacking. 11 Paper Present Sensor - aids in "sleep" or lamp saver mode. Start/Resume (green) button: to call Service. Illuminates when a usercorrectable ... to Chapter 6, Troubleshooting, for complete descriptions of job). detects the presence of the output tray. 2-4 A-61500 April 2007 illuminates when the scanner is enabled and/or scanning, and flashes when the scanner is turned on (I) or off (O) as required. 10 Exit deflector (optional) - illuminate or flash from top to raise the front...
User Guide
Page 13
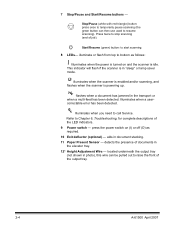
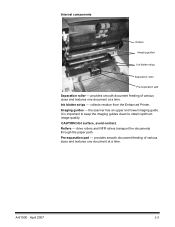
.... Pre-separation pad - A-61500 April 2007 2-5 Internal components Rollers Imaging guides Ink blotter strips Separation roller Pre-separation pad Separation roller - Ink blotter strips - the scanner has an upper and lower imaging guide. It is important to keep the imaging guides clean to obtain optimum image quality. drive rollers and NFR...
.... Pre-separation pad - A-61500 April 2007 2-5 Internal components Rollers Imaging guides Ink blotter strips Separation roller Pre-separation pad Separation roller - Ink blotter strips - the scanner has an upper and lower imaging guide. It is important to keep the imaging guides clean to obtain optimum image quality. drive rollers and NFR...

User Guide
Page 14
before connecting the FireWire cable, be sure that power to the scanner is packed with the scanner for your location and connect it accordingly. the scanner has 3 (ultrasonic) multi-feed detection sensors, 1 (optical) paper path sensor and 1 (optical) paper present sensor. Choose the power ...Present sensor Power cord connection IEEE-1394 connection Retainer clip Power Cord Connection - Connect the power cord first to the scanner, then to the scanner. The scanner is off. Sensors - provides power to the wall outlet. These sensors detect the presence of documents in the ...
before connecting the FireWire cable, be sure that power to the scanner is packed with the scanner for your location and connect it accordingly. the scanner has 3 (ultrasonic) multi-feed detection sensors, 1 (optical) paper path sensor and 1 (optical) paper present sensor. Choose the power ...Present sensor Power cord connection IEEE-1394 connection Retainer clip Power Cord Connection - Connect the power cord first to the scanner, then to the scanner. The scanner is off. Sensors - provides power to the wall outlet. These sensors detect the presence of documents in the ...

User Guide
Page 15
... which is controlled by the top green indicator light being on and constant. IMPORTANT: Always power up the scanner to its ready state before powering up the scanner, wait until for it down. If this does not occur, refer to Chapter 6, "Indicator lights" for...indicator light will remain on and constant. A-61500 April 2007 3-1 3 Using the Scanner This chapter provides the following operational procedures: • Turning on/off the scanner • Starting, stopping, pausing and resuming the scanner • Document preparation • Adjusting the side guides and output tray •...
... which is controlled by the top green indicator light being on and constant. IMPORTANT: Always power up the scanner to its ready state before powering up the scanner, wait until for it down. If this does not occur, refer to Chapter 6, "Indicator lights" for...indicator light will remain on and constant. A-61500 April 2007 3-1 3 Using the Scanner This chapter provides the following operational procedures: • Turning on/off the scanner • Starting, stopping, pausing and resuming the scanner • Document preparation • Adjusting the side guides and output tray •...

User Guide
Page 16
...without restarting the job from the host application. • Press the Start/Resume button on the scanner to in Chapter 2. The scanner automatically resumes scanning by pressing the Stop/Pause button on the scanner once to be sure your host application. After feeding the last document to pause scanning. NOTE:... Your application may configure the scanner with a transport timeout function which signals an End of job message will automatically pause the feeder while waiting for the host ...
...without restarting the job from the host application. • Press the Start/Resume button on the scanner to in Chapter 2. The scanner automatically resumes scanning by pressing the Stop/Pause button on the scanner once to be sure your host application. After feeding the last document to pause scanning. NOTE:... Your application may configure the scanner with a transport timeout function which signals an End of job message will automatically pause the feeder while waiting for the host ...

User Guide
Page 17
...using the gap release lever. Minimum Document Size: 6.4 x 6.4 cm (2.5 x 2.5 in .) (i.e. The Kodak Feeder Kit for Ultra Lightweight Paper can be transported successfully through the scanner, place the document in a clear protective sleeve with the lead edge of the document aligned with the folded... edge of the sleeve. Remove all documents are aligned and centered under the feed module; Kodak scanners have been tested with missing corners, perforated edges, hole punches in portrait orientation one at a time. Scanning documents outside ...
...using the gap release lever. Minimum Document Size: 6.4 x 6.4 cm (2.5 x 2.5 in .) (i.e. The Kodak Feeder Kit for Ultra Lightweight Paper can be transported successfully through the scanner, place the document in a clear protective sleeve with the lead edge of the document aligned with the folded... edge of the sleeve. Remove all documents are aligned and centered under the feed module; Kodak scanners have been tested with missing corners, perforated edges, hole punches in portrait orientation one at a time. Scanning documents outside ...

User Guide
Page 23
... is raised to scan small batches of the stacked documents. 2. If the document partially covers a sensor, false multi-feeds may damage the scanner. Automatic feeding To scan a batch of documents follow Steps 1 through 5 above. Align the leading edges of documents (less than 25). Continuous feeding... into the elevator tray in this position to allow more documents to be loaded. IMPORTANT: Staples and paper clips on how your scanner is configured, the transport will remain in landscape orientation (longer side as the leading edge). Adjust the output tray end stop when...
... is raised to scan small batches of the stacked documents. 2. If the document partially covers a sensor, false multi-feeds may damage the scanner. Automatic feeding To scan a batch of documents follow Steps 1 through 5 above. Align the leading edges of documents (less than 25). Continuous feeding... into the elevator tray in this position to allow more documents to be loaded. IMPORTANT: Staples and paper clips on how your scanner is configured, the transport will remain in landscape orientation (longer side as the leading edge). Adjust the output tray end stop when...

User Guide
Page 24
A-61500 April 2007 Using the scanner in doubt about whether a damaged document can be scanned, feed them one at a time. 3. If more than one document is to manually adjust the space ...between the feed module and separation roller for documents that require special handling The gap release lever allows you to be transported through the scanner, use the gap release lever and manually feed the document. Feeding documents that require special handling; documents that the paper present sensor is recommended when...
A-61500 April 2007 Using the scanner in doubt about whether a damaged document can be scanned, feed them one at a time. 3. If more than one document is to manually adjust the space ...between the feed module and separation roller for documents that require special handling The gap release lever allows you to be transported through the scanner, use the gap release lever and manually feed the document. Feeding documents that require special handling; documents that the paper present sensor is recommended when...

User Guide
Page 25
...on, allow the lamps to use a good, clean calibration target. Frequent calibration is properly adjusted for best performance. Select Kodak Scanner: i600. Frequent calibration is installed, it must be rebooted prior to achieve the best overall quality of calibration that detects ...the calibration target in order to calibration. • Ultrasonics calibration: ensures that the ultrasonics system that can be performed on your scanner. IMPORTANT: If the White Background Accessory is not needed or recommended. See Chapter 5, "Supplies and accessories" for 90 seconds. ...
...on, allow the lamps to use a good, clean calibration target. Frequent calibration is properly adjusted for best performance. Select Kodak Scanner: i600. Frequent calibration is installed, it must be rebooted prior to achieve the best overall quality of calibration that detects ...the calibration target in order to calibration. • Ultrasonics calibration: ensures that the ultrasonics system that can be performed on your scanner. IMPORTANT: If the White Background Accessory is not needed or recommended. See Chapter 5, "Supplies and accessories" for 90 seconds. ...

User Guide
Page 26
Click Device. Click Settings. The main Kodak Scanner window will be displayed. 7. The following screen will be displayed. 3-12 9. A-61500 April 2007 Click the Setup icon to access the main Kodak Scanner window. 8.
Click Device. Click Settings. The main Kodak Scanner window will be displayed. 7. The following screen will be displayed. 3-12 9. A-61500 April 2007 Click the Setup icon to access the main Kodak Scanner window. 8.

User Guide
Page 29
... information (i.e., information that may change for each page scanned, such as the document sequential counter). The printer operates at full scanner speed. The printer is attempted. A-61500 April 2007 4-1 The Kodak i600 Series Scanners include a factory-installed, preconfigured front printer. All printer controls and functions are smaller than 10 cm (4 in.). • The...
... information (i.e., information that may change for each page scanned, such as the document sequential counter). The printer operates at full scanner speed. The printer is attempted. A-61500 April 2007 4-1 The Kodak i600 Series Scanners include a factory-installed, preconfigured front printer. All printer controls and functions are smaller than 10 cm (4 in.). • The...


