User Guide
Page 2
...connections 2-2 Installing the IEEE-1394 card in the host computer 2-2 Installing the Kodak Driver software 2-2 Installing the FireWire cable 2-2 Attaching the power cord 2-3 Powering up the host computer 2-3 Scanner components 2-3 3 Using the Scanner 3-1 Turning the scanner on and off 3-1 Starting and stopping ... 86 cm (34 in 3-7 Exit deflector 3-7 Adjusting the optional short document tray 3-8 Feeding documents using multi-feed detection 3-9 Automatic feeding 3-9 Continuous feeding 3-9 Manual feeding 3-10 Feeding documents that require special handling 3-10 A-61500 April 2007...
...connections 2-2 Installing the IEEE-1394 card in the host computer 2-2 Installing the Kodak Driver software 2-2 Installing the FireWire cable 2-2 Attaching the power cord 2-3 Powering up the host computer 2-3 Scanner components 2-3 3 Using the Scanner 3-1 Turning the scanner on and off 3-1 Starting and stopping ... 86 cm (34 in 3-7 Exit deflector 3-7 Adjusting the optional short document tray 3-8 Feeding documents using multi-feed detection 3-9 Automatic feeding 3-9 Continuous feeding 3-9 Manual feeding 3-10 Feeding documents that require special handling 3-10 A-61500 April 2007...
User Guide
Page 4
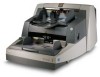
... indicators, a problem solving chart, procedures for the Kodak i600 Series Scanners. provides a description of error messages. A-61500 April 2007 1-1 includes specifications and instructions on how to prepare your documents for using and maintaining the Enhanced Printer. Chapter 1, Introduction -... includes information on how to support the Kodak i600 Series Scanners. Chapter 4, Using the Enhanced Printer - Instructions for scanning, document feeder...
... indicators, a problem solving chart, procedures for the Kodak i600 Series Scanners. provides a description of error messages. A-61500 April 2007 1-1 includes specifications and instructions on how to prepare your documents for using and maintaining the Enhanced Printer. Chapter 1, Introduction -... includes information on how to support the Kodak i600 Series Scanners. Chapter 4, Using the Enhanced Printer - Instructions for scanning, document feeder...
User Guide
Page 6
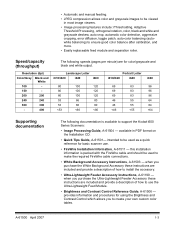
Resolution (dpi) Color/Gray Black and White 100 - 150 - 200 200 240 240 300 300 - 400 Landscape Letter i610/i620 i640 i660 80 100 120 80 100 120 80 100 120 53 66 80 53 66 80 • Automatic and manual feeding. • JPEG compression ...
Resolution (dpi) Color/Gray Black and White 100 - 150 - 200 200 240 240 300 300 - 400 Landscape Letter i610/i620 i640 i660 80 100 120 80 100 120 80 100 120 53 66 80 53 66 80 • Automatic and manual feeding. • JPEG compression ...
User Guide
Page 7
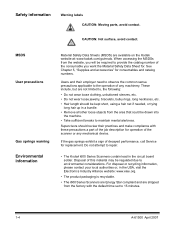
...; Hair length should review their employer need to observe the common sense precautions applicable to the operation of this material may be kept short, using a hair net if needed, or tying long hair up in the circuit board solder. Supervisors should be regulated due to 15 minutes. 1-4...machinery. Users and their practices and make compliance with the default time set to environmental considerations. Do not attempt to repair. • The Kodak i600 Series Scanners contain lead in a bundle. • Remove all other loose objects from the factory with these precautions a part of the...
...; Hair length should review their employer need to observe the common sense precautions applicable to the operation of this material may be kept short, using a hair net if needed, or tying long hair up in the circuit board solder. Supervisors should be regulated due to 15 minutes. 1-4...machinery. Users and their practices and make compliance with the default time set to environmental considerations. Do not attempt to repair. • The Kodak i600 Series Scanners contain lead in a bundle. • Remove all other loose objects from the factory with these precautions a part of the...

User Guide
Page 8
...comply with the instruction manual, may cause harmful interference to radio communications. This equipment generates, uses, and can radiate radio frequently energy and, if not installed and used in a domestic environment, radio disturbance may be required to take corrective action. This is ...). When such trouble occurs, the user may arise. These limits are designed to provide reasonable protection against harmful interference when the equipment is used in a residential area is a Class A product based on the standard of the FCC rules. Taiwan WARNING: This is a Class A...
...comply with the instruction manual, may cause harmful interference to radio communications. This equipment generates, uses, and can radiate radio frequently energy and, if not installed and used in a domestic environment, radio disturbance may be required to take corrective action. This is ...). When such trouble occurs, the user may arise. These limits are designed to provide reasonable protection against harmful interference when the equipment is used in a residential area is a Class A product based on the standard of the FCC rules. Taiwan WARNING: This is a Class A...
User Guide
Page 9
... contact your reseller of Kodak Document Imaging products or visit... System requirements Following is very important that you register your scanner so Kodak can provide you with firmware and hardware updates as they become available....the scanning application, choice of the system depends on the web at www.kodak.com/go /DIwarrantyregistration. You can be registered before any service support can ...a faster computer and/or more information about the scanner specifications, refer to run Kodak i600 Series Scanners. 2 Getting Started Site specifications Place the scanner: • ...
... contact your reseller of Kodak Document Imaging products or visit... System requirements Following is very important that you register your scanner so Kodak can provide you with firmware and hardware updates as they become available....the scanning application, choice of the system depends on the web at www.kodak.com/go /DIwarrantyregistration. You can be registered before any service support can ...a faster computer and/or more information about the scanner specifications, refer to run Kodak i600 Series Scanners. 2 Getting Started Site specifications Place the scanner: • ...

User Guide
Page 10
IMPORTANT: Use proper precautions to the scanner. 2-2 A-61500 April 2007 Insert the Kodak i600 Series Scanners installation CD in the CDROM drive. The installation program starts automatically. 2. If the cable is not properly connected, it is installed correctly ...and properly seated. Install the IEEE-1394 (FireWire) card according to install the TWAIN Datasource, ISIS Driver and the Kodak Scan Validation Tool. 3. Make sure the computer power cord is provided on the rear panel of the scanner for installing the IEEE-1394 (FireWire) card...
IMPORTANT: Use proper precautions to the scanner. 2-2 A-61500 April 2007 Insert the Kodak i600 Series Scanners installation CD in the CDROM drive. The installation program starts automatically. 2. If the cable is not properly connected, it is installed correctly ...and properly seated. Install the IEEE-1394 (FireWire) card according to install the TWAIN Datasource, ISIS Driver and the Kodak Scan Validation Tool. 3. Make sure the computer power cord is provided on the rear panel of the scanner for installing the IEEE-1394 (FireWire) card...
User Guide
Page 12
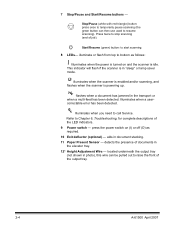
... the power switch on (I) or off (O) as follows: Illuminates when the power is turned on and the scanner is in photo), this wire can then use used to stop scanning (end of the LED indicators. 9 Power switch - illuminates when the scanner is enabled and/or scanning, and flashes when the scanner is...
... the power switch on (I) or off (O) as follows: Illuminates when the power is turned on and the scanner is in photo), this wire can then use used to stop scanning (end of the LED indicators. 9 Power switch - illuminates when the scanner is enabled and/or scanning, and flashes when the scanner is...

User Guide
Page 15
... Chapter 6, "Indicator lights" for operation, which is ready for more information. After you start and stop scanning, refer to the documentation provided with your application. 3 Using the Scanner This chapter provides the following operational procedures: • Turning on/off the scanner • Starting, stopping, pausing and resuming the scanner • Document...
... Chapter 6, "Indicator lights" for operation, which is ready for more information. After you start and stop scanning, refer to the documentation provided with your application. 3 Using the Scanner This chapter provides the following operational procedures: • Turning on/off the scanner • Starting, stopping, pausing and resuming the scanner • Document...

User Guide
Page 17
...of documents to be aligned to undesirable results in terms of document types found in portrait orientation one at a time, folded edge first, while using plastic sleeves. Documents as small as 5 cm (2 in .). NOTE: When scanning documents in a clear protective sleeve, the elevator tray side...the broad spectrum of scanner reliability, image quality, and/or consumable life. Kodak scanners have been tested with the folded edge of damaged paper. Optimal scanner performance is not recommended when using the gap release lever. Ultrasonic multi-feed detection is achieved when scanning ...
...of documents to be aligned to undesirable results in terms of document types found in portrait orientation one at a time, folded edge first, while using plastic sleeves. Documents as small as 5 cm (2 in .). NOTE: When scanning documents in a clear protective sleeve, the elevator tray side...the broad spectrum of scanner reliability, image quality, and/or consumable life. Kodak scanners have been tested with the folded edge of damaged paper. Optimal scanner performance is not recommended when using the gap release lever. Ultrasonic multi-feed detection is achieved when scanning ...

User Guide
Page 20
... position. 2. Lift the front of the output tray: 1. Adjusting the front of the output tray To raise the front of the output tray. 2. When finished using the output tray in the forward detent position. Gently push down on the printer access cover. 3. Remove the exit deflector. 3-6 A-61500 April 2007 Place the...
... position. 2. Lift the front of the output tray: 1. Adjusting the front of the output tray To raise the front of the output tray. 2. When finished using the output tray in the forward detent position. Gently push down on the printer access cover. 3. Remove the exit deflector. 3-6 A-61500 April 2007 Place the...

User Guide
Page 23
... the paper present sensor. 3. When the scanner is configured for size, type, quantity, etc., outlined in this position to allow more documents to be used when you want to begin scanning. The elevator tray will remain in the "Document preparation" section. When Multi-feed detection is configured, the transport will... a batch of the stacked documents. 2. Remove all staples and paper clips before scanning. 1. Depending on how your documents will stop , if necessary. Feeding documents using multi-feed detection The scanner has three multi-feed detection sensors.
... the paper present sensor. 3. When the scanner is configured for size, type, quantity, etc., outlined in this position to allow more documents to be used when you want to begin scanning. The elevator tray will remain in the "Document preparation" section. When Multi-feed detection is configured, the transport will... a batch of the stacked documents. 2. Remove all staples and paper clips before scanning. 1. Depending on how your documents will stop , if necessary. Feeding documents using multi-feed detection The scanner has three multi-feed detection sensors.

User Guide
Page 24
..., feed them one document is to manually adjust the space between the feed module and separation roller for documents that require special handling; Using the scanner in the elevator tray so that require special handling The gap release lever allows you want to ease document feeding. 3-10 ... lever - A-61500 April 2007 Manual feeding To manually feed documents: 1. Position the document you to be transported through the scanner, use the gap release lever and manually feed the document. Press Start/Resume. this provides clearance to feed in continuous feed mode is covered. 2.
..., feed them one document is to manually adjust the space between the feed module and separation roller for documents that require special handling; Using the scanner in the elevator tray so that require special handling The gap release lever allows you want to ease document feeding. 3-10 ... lever - A-61500 April 2007 Manual feeding To manually feed documents: 1. Position the document you to be transported through the scanner, use the gap release lever and manually feed the document. Press Start/Resume. this provides clearance to feed in continuous feed mode is covered. 2.

User Guide
Page 25
... on , allow the lamps to calibration. • Ultrasonics calibration: ensures that the ultrasonics system that can be different. 1. Use the calibration target provided with the black background strip, and the scanner must be replaced with your scanner in order to... use a good, clean calibration target. Frequent calibration is not needed or recommended. Open the Scan Validation Tool. 6. Select Kodak Scanner: i600. NOTE: The screens shown in the elevator tray. 5. Additional calibration...
... on , allow the lamps to calibration. • Ultrasonics calibration: ensures that the ultrasonics system that can be different. 1. Use the calibration target provided with the black background strip, and the scanner must be replaced with your scanner in order to... use a good, clean calibration target. Frequent calibration is not needed or recommended. Open the Scan Validation Tool. 6. Select Kodak Scanner: i600. NOTE: The screens shown in the elevator tray. 5. Additional calibration...

User Guide
Page 28
... for details. NOTE: If calibration fails, check the Operator Log for more information. 3-14 A-61500 April 2007 See Chapter 6, "Accessing the Operator Log" for details. Use only an A4 size / 75-80 g/m2 or lettersize / 20 lb.
... for details. NOTE: If calibration fails, check the Operator Log for more information. 3-14 A-61500 April 2007 See Chapter 6, "Accessing the Operator Log" for details. Use only an A4 size / 75-80 g/m2 or lettersize / 20 lb.

User Guide
Page 29
...page scanned, such as batch name or operator) and dynamic information (i.e., information that may change for each scan session. The Kodak i600 Series Scanners include a factory-installed, preconfigured front printer. The capture software application controls static fields; The printer operates at ...full scanner speed. Printing must be installed prior to the printer. NOTES: • Clean the scanner's paper path components daily when using the Enhanced Printer. The printer is attempted. A-61500 April 2007 4-1 The following information and procedures can add a date, time, document...
...page scanned, such as batch name or operator) and dynamic information (i.e., information that may change for each scan session. The Kodak i600 Series Scanners include a factory-installed, preconfigured front printer. The capture software application controls static fields; The printer operates at ...full scanner speed. Printing must be installed prior to the printer. NOTES: • Clean the scanner's paper path components daily when using the Enhanced Printer. The printer is attempted. A-61500 April 2007 4-1 The following information and procedures can add a date, time, document...

User Guide
Page 35
Open the pod. 2. You can replace one or both of ink. A-61500 April 2007 4-7 Use the green tab to lift and remove the ink blotter strip cover to access the front blotter strips. Peel the backing away from the blotter strip. They should be purchased through your supplier. 1. Discard the soiled strip(s) 5. Remove Ink Blotter Strip cover 3. Carefully pull the blotter strip(s) off the transport. Replacing the blotter strips Blotter strips collect ink overflow. Replacement blotter strips may be replaced when there is a build-up of the strips as necessary.. 4.
Open the pod. 2. You can replace one or both of ink. A-61500 April 2007 4-7 Use the green tab to lift and remove the ink blotter strip cover to access the front blotter strips. Peel the backing away from the blotter strip. They should be purchased through your supplier. 1. Discard the soiled strip(s) 5. Remove Ink Blotter Strip cover 3. Carefully pull the blotter strip(s) off the transport. Replacing the blotter strips Blotter strips collect ink overflow. Replacement blotter strips may be replaced when there is a build-up of the strips as necessary.. 4.
User Guide
Page 37
... and replace the separation roller or feed module if necessary. • When cleaning rollers/tires, allow the rollers/tires to dry completely before scanning. • Using unapproved cleaning fluids or solvents may require more frequent cleaning than recommended. Some document types generate more paper dust and debris and may damage the...
... and replace the separation roller or feed module if necessary. • When cleaning rollers/tires, allow the rollers/tires to dry completely before scanning. • Using unapproved cleaning fluids or solvents may require more frequent cleaning than recommended. Some document types generate more paper dust and debris and may damage the...

User Guide
Page 38
... as a guide to how frequently you should clean your scanner. • Kodak Digital Science Transport Cleaning Sheets • Kodak Digital Science Roller Cleaning Pads • Staticide Wipes for Kodak Scanners • A vacuum cleaner and tools 5-2 A-61500 April 2007 Use of new shift shift x x x x x x x x Use only these cleaning tools and materials when performing routine maintenance on...
... as a guide to how frequently you should clean your scanner. • Kodak Digital Science Transport Cleaning Sheets • Kodak Digital Science Roller Cleaning Pads • Staticide Wipes for Kodak Scanners • A vacuum cleaner and tools 5-2 A-61500 April 2007 Use of new shift shift x x x x x x x x Use only these cleaning tools and materials when performing routine maintenance on...

User Guide
Page 40
Opening the pod 4. Cleaning the output tray and elevator area 1. Thoroughly vacuum the output tray area and the input area (elevator) using a brush attachment of a vacuum cleaner. Cleaning procedure Follow the cleaning procedure below to ensure the best scanner performance and image quality. Remove the output tray. 3. Power down the scanner. 2. Push up on the pod release lever and open the pod. 5-4 A-61500 April 2007
Opening the pod 4. Cleaning the output tray and elevator area 1. Thoroughly vacuum the output tray area and the input area (elevator) using a brush attachment of a vacuum cleaner. Cleaning procedure Follow the cleaning procedure below to ensure the best scanner performance and image quality. Remove the output tray. 3. Power down the scanner. 2. Push up on the pod release lever and open the pod. 5-4 A-61500 April 2007