User Guide
Page 2
...connections 2-2 Installing the IEEE-1394 card in the host computer 2-2 Installing the Kodak Driver software 2-2 Installing the FireWire cable 2-2 Attaching the power cord 2-3 Powering up the host computer 2-3 Scanner components 2-3 3 Using the Scanner 3-1 Turning the scanner on and off 3-1 Starting and stopping ... 86 cm (34 in 3-7 Exit deflector 3-7 Adjusting the optional short document tray 3-8 Feeding documents using multi-feed detection 3-9 Automatic feeding 3-9 Continuous feeding 3-9 Manual feeding 3-10 Feeding documents that require special handling 3-10 A-61500 April 2007...
...connections 2-2 Installing the IEEE-1394 card in the host computer 2-2 Installing the Kodak Driver software 2-2 Installing the FireWire cable 2-2 Attaching the power cord 2-3 Powering up the host computer 2-3 Scanner components 2-3 3 Using the Scanner 3-1 Turning the scanner on and off 3-1 Starting and stopping ... 86 cm (34 in 3-7 Exit deflector 3-7 Adjusting the optional short document tray 3-8 Feeding documents using multi-feed detection 3-9 Automatic feeding 3-9 Continuous feeding 3-9 Manual feeding 3-10 Feeding documents that require special handling 3-10 A-61500 April 2007...
User Guide
Page 4
... Scanners including a product description, scanner features, safety information and user precautions. includes information on how to support the Kodak i600 Series Scanners. Chapter 4, Using the Enhanced Printer - provides a description of error messages. Appendix B, Specifications - Chapter 3, Using the Scanner - Chapter 6, Troubleshooting - provides a description of internal and external scanner components. Chapter 2, Getting Started - A-61500 April...
... Scanners including a product description, scanner features, safety information and user precautions. includes information on how to support the Kodak i600 Series Scanners. Chapter 4, Using the Enhanced Printer - provides a description of error messages. Appendix B, Specifications - Chapter 3, Using the Scanner - Chapter 6, Troubleshooting - provides a description of internal and external scanner components. Chapter 2, Getting Started - A-61500 April...
User Guide
Page 6
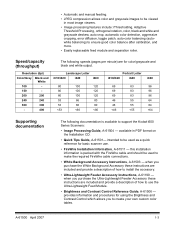
Resolution (dpi) Color/Gray Black and White 100 - 150 - 200 200 240 240 300 300 - 400 Landscape Letter i610/i620 i640 i660 80 100 120 80 100 120 80 100 120 53 66 80 53 66 80 Speed/capacity (throughput) The following speeds (pages per ...
Resolution (dpi) Color/Gray Black and White 100 - 150 - 200 200 240 240 300 300 - 400 Landscape Letter i610/i620 i640 i660 80 100 120 80 100 120 80 100 120 53 66 80 53 66 80 Speed/capacity (throughput) The following speeds (pages per ...
User Guide
Page 7
... at: www.kodak.com/go/msds. Safety information Warning labels CAUTION: Moving parts, avoid contact. Do not attempt to 15 minutes. 1-4 A-61500 April 2007 When accessing the MSDSs from the area that could be kept short, using a hair net if needed, or tying long hair up in the circuit board solder.... Users and their practices and make compliance with the default time set to repair. • The Kodak i600 Series Scanners contain lead in a bundle. • ...
... at: www.kodak.com/go/msds. Safety information Warning labels CAUTION: Moving parts, avoid contact. Do not attempt to 15 minutes. 1-4 A-61500 April 2007 When accessing the MSDSs from the area that could be kept short, using a hair net if needed, or tying long hair up in the circuit board solder.... Users and their practices and make compliance with the default time set to repair. • The Kodak i600 Series Scanners contain lead in a bundle. • ...

User Guide
Page 8
... can radiate radio frequently energy and, if not installed and used in a domestic environment, radio disturbance may cause radio interference in a commercial environment. When such trouble occurs, the user may be required to take adequate measures...domestic environment this equipment in a residential area is operated in which case the user will be required to take corrective action. Taiwan WARNING: This is used in accordance with the limits for interference by information Technology Equipment (VCCI). EMC statements United States Japan This equipment has been tested and found to...
... can radiate radio frequently energy and, if not installed and used in a domestic environment, radio disturbance may cause radio interference in a commercial environment. When such trouble occurs, the user may be required to take adequate measures...domestic environment this equipment in a residential area is operated in which case the user will be required to take corrective action. Taiwan WARNING: This is used in accordance with the limits for interference by information Technology Equipment (VCCI). EMC statements United States Japan This equipment has been tested and found to...
User Guide
Page 9
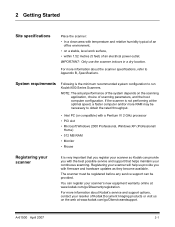
IMPORTANT: Only use the scanner indoors in a dry location. If the ...configuration. A-61500 April 2007 2-1 NOTE: The actual performance of the system depends on the web at www.kodak.com/go /DIserviceandsupport. The scanner must be registered before any service support can be necessary to obtain the rated... • Monitor • Mouse Registering your scanner's new equipment warranty online at www.kodak.com/go /DIwarrantyregistration. For more information about Kodak's service and support options, contact your continuous scanning. System requirements Following is very important...
IMPORTANT: Only use the scanner indoors in a dry location. If the ...configuration. A-61500 April 2007 2-1 NOTE: The actual performance of the system depends on the web at www.kodak.com/go /DIserviceandsupport. The scanner must be registered before any service support can be necessary to obtain the rated... • Monitor • Mouse Registering your scanner's new equipment warranty online at www.kodak.com/go /DIwarrantyregistration. For more information about Kodak's service and support options, contact your continuous scanning. System requirements Following is very important...

User Guide
Page 10
... Install the IEEE-1394 (FireWire) card according to avoid static when you connect the scanner. Insert the Kodak i600 Series Scanners installation CD in the CDROM drive. IMPORTANT: Use proper precautions to the directions supplied with the right angle into the IEEE-1394 card outlet in the host... computer. Making connections Installing the IEEE-1394 card in the host computer Installing the Kodak Driver software Installing the FireWire cable...
... Install the IEEE-1394 (FireWire) card according to avoid static when you connect the scanner. Insert the Kodak i600 Series Scanners installation CD in the CDROM drive. IMPORTANT: Use proper precautions to the directions supplied with the right angle into the IEEE-1394 card outlet in the host... computer. Making connections Installing the IEEE-1394 card in the host computer Installing the Kodak Driver software Installing the FireWire cable...
User Guide
Page 12
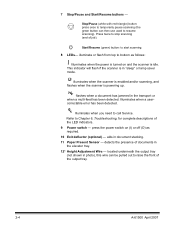
... Chapter 6, Troubleshooting, for complete descriptions of the output tray. 2-4 A-61500 April 2007 Refer to stop scanning (end of documents in photo), this wire can then use used to raise the front of the LED indicators. 9 Power switch -
... Chapter 6, Troubleshooting, for complete descriptions of the output tray. 2-4 A-61500 April 2007 Refer to stop scanning (end of documents in photo), this wire can then use used to raise the front of the LED indicators. 9 Power switch -

User Guide
Page 15
... on and constant. NOTE: Before you power up . • Press the button on the scanner's lower right-side (O) to power it to complete self-test. 3 Using the Scanner This chapter provides the following operational procedures: • Turning on/off the scanner • Starting, stopping, pausing and resuming the scanner • Document...
... on and constant. NOTE: Before you power up . • Press the button on the scanner's lower right-side (O) to power it to complete self-test. 3 Using the Scanner This chapter provides the following operational procedures: • Turning on/off the scanner • Starting, stopping, pausing and resuming the scanner • Document...

User Guide
Page 17
...requirements in this allows the feeder to introduce documents into the scanner must be aligned to accommodate the width of the sleeve. The Kodak Feeder Kit for Ultra Lightweight Paper can handle paper weights from 45 to 200 g/m2 (12 to 110 lb.). A-61500 April ...found in the most common business applications. business cards) can be center-fed, in .) (i.e. Optimal scanner performance is not recommended when using the gap release lever. Ultrasonic multi-feed detection is achieved when scanning documents within the recommended document specifications listed below. Documents as small ...
...requirements in this allows the feeder to introduce documents into the scanner must be aligned to accommodate the width of the sleeve. The Kodak Feeder Kit for Ultra Lightweight Paper can handle paper weights from 45 to 200 g/m2 (12 to 110 lb.). A-61500 April ...found in the most common business applications. business cards) can be center-fed, in .) (i.e. Optimal scanner performance is not recommended when using the gap release lever. Ultrasonic multi-feed detection is achieved when scanning documents within the recommended document specifications listed below. Documents as small ...

User Guide
Page 20
... the output tray and insert it out of the output tray until in this position, tuck the height adjustment wire back into place. 4. When finished using the output tray in snaps into position and lower the output tray. Adjusting the front of the output tray To raise the front of the...
... the output tray and insert it out of the output tray until in this position, tuck the height adjustment wire back into place. 4. When finished using the output tray in snaps into position and lower the output tray. Adjusting the front of the output tray To raise the front of the...

User Guide
Page 23
... documents to scan small batches of the stack. Adjust the elevator tray side guides. 4. Continuous feeding A-61500 April 2007 Continuous feeding can be used when you may need to press the Start/ Resume button to begin scanning. When the scanner is configured, the transport will stop , if ... the documents fully cover at least one sensor. When Multi-feed detection is set up in the "Document preparation" section. Feeding documents using multi-feed detection The scanner has three multi-feed detection sensors. The elevator tray will automatically start scanning, or you want to the...
... documents to scan small batches of the stack. Adjust the elevator tray side guides. 4. Continuous feeding A-61500 April 2007 Continuous feeding can be used when you may need to press the Start/ Resume button to begin scanning. When the scanner is configured, the transport will stop , if ... the documents fully cover at least one sensor. When Multi-feed detection is set up in the "Document preparation" section. Feeding documents using multi-feed detection The scanner has three multi-feed detection sensors. The elevator tray will automatically start scanning, or you want to the...

User Guide
Page 24
... gap release lever - Push the document into the elevator tray. If more than one at a time. 3. Manual feeding To manually feed documents: 1. i.e. A-61500 April 2007 Using the scanner in doubt about whether a damaged document can be scanned, feed them one document is recommended when handling special documents. 1. After the document(s) has...
... gap release lever - Push the document into the elevator tray. If more than one at a time. 3. Manual feeding To manually feed documents: 1. i.e. A-61500 April 2007 Using the scanner in doubt about whether a damaged document can be scanned, feed them one document is recommended when handling special documents. 1. After the document(s) has...

User Guide
Page 25
... 5. 2. NOTE: The screens shown in order to warm up for 90 seconds. 3. The screens displayed on your scanner. Refer to use a good, clean calibration target. Use the calibration target provided with the black background strip, and the scanner must be replaced with your system may be different. 1. If the... ensures that the ultrasonics system that can be performed on , allow the lamps to achieve the best overall quality of scanned images. Select Kodak Scanner: i600. IMPORTANT: If the White Background Accessory is not needed or recommended. A-61500 April 2007 3-11
... 5. 2. NOTE: The screens shown in order to warm up for 90 seconds. 3. The screens displayed on your scanner. Refer to use a good, clean calibration target. Use the calibration target provided with the black background strip, and the scanner must be replaced with your system may be different. 1. If the... ensures that the ultrasonics system that can be performed on , allow the lamps to achieve the best overall quality of scanned images. Select Kodak Scanner: i600. IMPORTANT: If the White Background Accessory is not needed or recommended. A-61500 April 2007 3-11

User Guide
Page 28
Use only an A4 size / 75-80 g/m2 or lettersize / 20 lb. Place the paper in the elevator tray in the elevator tray and output tray. 2. ...
Use only an A4 size / 75-80 g/m2 or lettersize / 20 lb. Place the paper in the elevator tray in the elevator tray and output tray. 2. ...

User Guide
Page 29
The Kodak i600 Series Scanners include a factory-installed, preconfigured front printer. All printer...be found in the Image Processing Guide, A-61504. 4 The Enhanced Printer Overview This chapter provides instructions for using the printer. • You cannot print on documents that may change for each scan session. The printer ... scanner speed. A-61500 April 2007 4-1 NOTES: • Clean the scanner's paper path components daily when using the Enhanced Printer. The printer is unique in errors when printing is attempted. The following information and procedures ...
The Kodak i600 Series Scanners include a factory-installed, preconfigured front printer. All printer...be found in the Image Processing Guide, A-61504. 4 The Enhanced Printer Overview This chapter provides instructions for using the printer. • You cannot print on documents that may change for each scan session. The printer ... scanner speed. A-61500 April 2007 4-1 NOTES: • Clean the scanner's paper path components daily when using the Enhanced Printer. The printer is unique in errors when printing is attempted. The following information and procedures ...

User Guide
Page 35
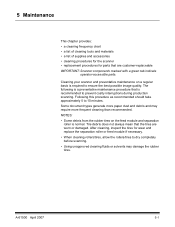
Replacing the blotter strips Blotter strips collect ink overflow. Open the pod. 2. You can replace one or both of ink. They should be purchased through your supplier. 1. A-61500 April 2007 4-7 Remove Ink Blotter Strip cover 3. Discard the soiled strip(s) 5. Use the green tab to lift and remove the ink blotter strip cover to access the front blotter strips. Carefully pull the blotter strip(s) off the transport. Peel the backing away from the blotter strip. Replacement blotter strips may be replaced when there is a build-up of the strips as necessary.. 4.
Replacing the blotter strips Blotter strips collect ink overflow. Open the pod. 2. You can replace one or both of ink. They should be purchased through your supplier. 1. A-61500 April 2007 4-7 Remove Ink Blotter Strip cover 3. Discard the soiled strip(s) 5. Use the green tab to lift and remove the ink blotter strip cover to access the front blotter strips. Carefully pull the blotter strip(s) off the transport. Peel the backing away from the blotter strip. Replacement blotter strips may be replaced when there is a build-up of the strips as necessary.. 4.
User Guide
Page 37
Some document types generate more frequent cleaning than recommended. Following this procedure as recommended should take approximately 5 to dry completely before scanning. • Using unapproved cleaning fluids or solvents may require more paper dust and debris and may damage the rubber tires. After cleaning, inspect the tires for parts ...
Some document types generate more frequent cleaning than recommended. Following this procedure as recommended should take approximately 5 to dry completely before scanning. • Using unapproved cleaning fluids or solvents may require more paper dust and debris and may damage the rubber tires. After cleaning, inspect the tires for parts ...

User Guide
Page 38
... cleaning tools and materials when performing routine maintenance on your scanner. Use the chart below as a guide to how frequently you should clean your scanner. • Kodak Digital Science Transport Cleaning Sheets • Kodak Digital Science Roller Cleaning Pads • Staticide Wipes for Kodak Scanners • A vacuum cleaner and tools 5-2 A-61500 April 2007 Procedure...
... cleaning tools and materials when performing routine maintenance on your scanner. Use the chart below as a guide to how frequently you should clean your scanner. • Kodak Digital Science Transport Cleaning Sheets • Kodak Digital Science Roller Cleaning Pads • Staticide Wipes for Kodak Scanners • A vacuum cleaner and tools 5-2 A-61500 April 2007 Procedure...

User Guide
Page 40
Thoroughly vacuum the output tray area and the input area (elevator) using a brush attachment of a vacuum cleaner. Opening the pod 4. Cleaning the output tray and elevator area 1. Remove the output tray. 3. Push up on the pod release lever and open the pod. 5-4 A-61500 April 2007 Cleaning procedure Follow the cleaning procedure below to ensure the best scanner performance and image quality. Power down the scanner. 2.
Thoroughly vacuum the output tray area and the input area (elevator) using a brush attachment of a vacuum cleaner. Opening the pod 4. Cleaning the output tray and elevator area 1. Remove the output tray. 3. Push up on the pod release lever and open the pod. 5-4 A-61500 April 2007 Cleaning procedure Follow the cleaning procedure below to ensure the best scanner performance and image quality. Power down the scanner. 2.