
User Manual
Page 1
Kodak EasyShare ZD710 zoom digital camera User's guide www.kodak.com For interactive tutorials, www.kodak.com/go/howto For help with your camera, www.kodak.com/go/zd710support
Kodak EasyShare ZD710 zoom digital camera User's guide www.kodak.com For interactive tutorials, www.kodak.com/go/howto For help with your camera, www.kodak.com/go/zd710support

User Manual
Page 5
... the lens cap and strap 1 Loading the battery 2 Turning on the camera 3 Setting the language and date/time 3 Storing pictures on an SD card 4 2 Taking pictures/videos 5 Taking a picture 5 Using optical zoom 8 Using the Flash button 9 Using ... with pictures/videos 15 Reviewing pictures and videos 15 Deleting pictures and videos 16 Using the Menu button in Review 17 Cropping pictures 18 Using Kodak Perfect Touch technology 18 Adding sound tags 19 Editing videos 20 Running a slide show 22 Viewing pictures/videos in different ways 24 Selecting multiple pictures...
... the lens cap and strap 1 Loading the battery 2 Turning on the camera 3 Setting the language and date/time 3 Storing pictures on an SD card 4 2 Taking pictures/videos 5 Taking a picture 5 Using optical zoom 8 Using the Flash button 9 Using ... with pictures/videos 15 Reviewing pictures and videos 15 Deleting pictures and videos 16 Using the Menu button in Review 17 Cropping pictures 18 Using Kodak Perfect Touch technology 18 Adding sound tags 19 Editing videos 20 Running a slide show 22 Viewing pictures/videos in different ways 24 Selecting multiple pictures...

User Manual
Page 6
...45 5 Transferring and printing pictures 46 Installing the software 46 Transferring pictures 47 Printing pictures 48 Accessories for your camera 50 6 Troubleshooting 51 Camera problems 51 Computer/connectivity problems 53 Picture quality problems 54 Direct printing (PictBridge) problems 55 7 Getting help ...56 Helpful links 56 8 Appendix 58 Camera specifications 58 Care and maintenance 60 Storage capacities 61 Important safety instructions 61 Limited warranty 63 Upgrading your software and firmware 64 Regulatory compliance 65 iv www.kodak.com/go/support
...45 5 Transferring and printing pictures 46 Installing the software 46 Transferring pictures 47 Printing pictures 48 Accessories for your camera 50 6 Troubleshooting 51 Camera problems 51 Computer/connectivity problems 53 Picture quality problems 54 Direct printing (PictBridge) problems 55 7 Getting help ...56 Helpful links 56 8 Appendix 58 Camera specifications 58 Care and maintenance 60 Storage capacities 61 Important safety instructions 61 Limited warranty 63 Upgrading your software and firmware 64 Regulatory compliance 65 iv www.kodak.com/go/support

User Manual
Page 7
1 Setting up your camera Attaching the lens cap and strap 1 2 3 www.kodak.com/go/support 1
1 Setting up your camera Attaching the lens cap and strap 1 2 3 www.kodak.com/go/support 1

User Manual
Page 8
Setting up your camera Loading the battery 1 2 Kodak lithium digital camera Kodak Ni-MH rechargeable AA batteries (rechargeable battery CRV3 (non-rechargeable) digital camera battery (KAA2HR) or non-rechargeable) To replace batteries and extend battery life, see page 62. 2 www.kodak.com/go/support
Setting up your camera Loading the battery 1 2 Kodak lithium digital camera Kodak Ni-MH rechargeable AA batteries (rechargeable battery CRV3 (non-rechargeable) digital camera battery (KAA2HR) or non-rechargeable) To replace batteries and extend battery life, see page 62. 2 www.kodak.com/go/support

User Manual
Page 9
www.kodak.com/go/support 3 for previous/next field. NOTE: To change . Turning on the camera Setting up your camera Setting the language and date/time Language: 1 to change. 2 OK to change the date/time and language in the future, use the Setup menu (see page 33). Date/Time: 1 At the prompt, press OK. 2 to accept. OK OK to accept.
www.kodak.com/go/support 3 for previous/next field. NOTE: To change . Turning on the camera Setting up your camera Setting the language and date/time Language: 1 to change. 2 OK to change the date/time and language in the future, use the Setup menu (see page 33). Date/Time: 1 At the prompt, press OK. 2 to accept. OK OK to accept.
User Manual
Page 10
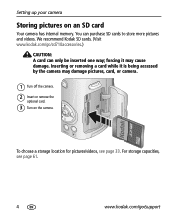
...can purchase SD cards to store more pictures and videos. forcing it is being accessed by the camera may cause damage. You can only be inserted one way; We recommend Kodak SD cards. (Visit www.kodak.com/go /support For storage capacities, see page 33. Inserting or removing a card while ...it may damage pictures, card, or camera. 1 Turn off the camera. 2 Insert or remove the optional card. 3 Turn on an...
...can purchase SD cards to store more pictures and videos. forcing it is being accessed by the camera may cause damage. You can only be inserted one way; We recommend Kodak SD cards. (Visit www.kodak.com/go /support For storage capacities, see page 33. Inserting or removing a card while ...it may damage pictures, card, or camera. 1 Turn off the camera. 2 Insert or remove the optional card. 3 Turn on an...
User Manual
Page 12
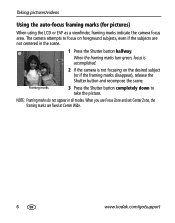
...centered in all modes. When the framing marks turn green, focus is accomplished. 2 If the camera is not focusing on foreground subjects, even if the subjects are fixed at Center Wide. 6 www.kodak.com/go/support NOTE: Framing marks do not appear in the scene. 1 Press the Shutter button... halfway. Taking pictures/videos Using the auto-focus framing marks (for pictures) When using the LCD or EVF as a viewfinder, framing marks indicate the camera focus area.
...centered in all modes. When the framing marks turn green, focus is accomplished. 2 If the camera is not focusing on foreground subjects, even if the subjects are fixed at Center Wide. 6 www.kodak.com/go/support NOTE: Framing marks do not appear in the scene. 1 Press the Shutter button... halfway. Taking pictures/videos Using the auto-focus framing marks (for pictures) When using the LCD or EVF as a viewfinder, framing marks indicate the camera focus area.
User Manual
Page 15
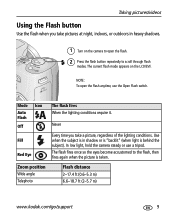
Never Fill Red Eye Every time you take a picture, regardless of the lighting conditions. In low light, hold the camera steady or use the Open Flash switch. Mode Icon Auto Flash Off The flash fires When the lighting conditions require it. Zoom ...position Wide angle Telephoto Flash distance 2-17.4 ft (0.6-5.3 m) 6.6-18.7 ft (2-5.7 m) www.kodak.com/go/support 9 NOTE: To open the flash. 2 Press the flash button repeatedly to scroll through flash modes. Taking pictures/videos Using the Flash button...
Never Fill Red Eye Every time you take a picture, regardless of the lighting conditions. In low light, hold the camera steady or use the Open Flash switch. Mode Icon Auto Flash Off The flash fires When the lighting conditions require it. Zoom ...position Wide angle Telephoto Flash distance 2-17.4 ft (0.6-5.3 m) 6.6-18.7 ft (2-5.7 m) www.kodak.com/go/support 9 NOTE: To open the flash. 2 Press the flash button repeatedly to scroll through flash modes. Taking pictures/videos Using the Flash button...

User Manual
Page 16
... 1 Turn the Mode dial to have more control over camera focusing. Normal (none) Auto focus The camera focuses when the Shutter button is pressed halfway down. 10 www.kodak.com/go/support NOTE: After you take the picture, the camera stays in Landscape. Auto-focus framing of flash if possible.... Close-up /Macro or Landscape setting. To gain sharpness Camera automatically sets the focus distance and detail in...
... 1 Turn the Mode dial to have more control over camera focusing. Normal (none) Auto focus The camera focuses when the Shutter button is pressed halfway down. 10 www.kodak.com/go/support NOTE: After you take the picture, the camera stays in Landscape. Auto-focus framing of flash if possible.... Close-up /Macro or Landscape setting. To gain sharpness Camera automatically sets the focus distance and detail in...
User Manual
Page 17
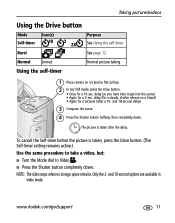
... Self-timer Icon(s) 10 2 2X Purpose See Using the self-timer Burst See page 12 Normal (none) Normal picture taking Using the self-timer 1 Place camera on a tripod) • Again for a 10-sec. delay (for a steady, shutter release on a tripod or flat surface. 2 In any Still mode, press the Drive button... Self-timer before the picture is taken after a 10- and 18-second delay) 3 Compose the scene. 4 Press the Shutter button halfway, then completely down . www.kodak.com/go/support 11
... Self-timer Icon(s) 10 2 2X Purpose See Using the self-timer Burst See page 12 Normal (none) Normal picture taking Using the self-timer 1 Place camera on a tripod) • Again for a 10-sec. delay (for a steady, shutter release on a tripod or flat surface. 2 In any Still mode, press the Drive button... Self-timer before the picture is taken after a 10- and 18-second delay) 3 Compose the scene. 4 Press the Shutter button halfway, then completely down . www.kodak.com/go/support 11

User Manual
Page 18
... pressed. uncertain. NOTE: During quickview, you release the Shutter button, when the pictures are longer than 0.5 seconds. 12 www.kodak.com/go/support Mode Icon First Burst Last Burst Description Purpose Capture an expected Camera takes up to 2 pictures while the Shutter event. button is released, only the last 2 pictures are saved...
... pressed. uncertain. NOTE: During quickview, you release the Shutter button, when the pictures are longer than 0.5 seconds. 12 www.kodak.com/go/support Mode Icon First Burst Last Burst Description Purpose Capture an expected Camera takes up to 2 pictures while the Shutter event. button is released, only the last 2 pictures are saved...

User Manual
Page 23
... Sound Tags See page 19 Make Picture See page 20 Trim Videos Action Print See page 20 See page 21 Bookmark See page 22 www.kodak.com/go/support 17 Working with pictures/videos Using the Menu button in Review 1 Press the Review button, then the Menu button. 2 Press to choose... a tab: ■ Review to view pictures/videos (see page 24) ■ Edit to edit pictures/videos (see page 18) ■ 3 Press Setup for other camera settings (see page 33) to highlight a setting, then press the OK button. 4 Highlight an option, then press the OK button.
... Sound Tags See page 19 Make Picture See page 20 Trim Videos Action Print See page 20 See page 21 Bookmark See page 22 www.kodak.com/go/support 17 Working with pictures/videos Using the Menu button in Review 1 Press the Review button, then the Menu button. 2 Press to choose... a tab: ■ Review to view pictures/videos (see page 24) ■ Edit to edit pictures/videos (see page 18) ■ 3 Press Setup for other camera settings (see page 33) to highlight a setting, then press the OK button. 4 Highlight an option, then press the OK button.
User Manual
Page 24
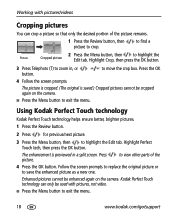
...to crop. to find a 2 Press the Menu button, then to zoom in a split screen. Enhanced pictures cannot be enhanced again on the camera. ■ Press the Menu button to exit the menu. Working with pictures/videos Cropping pictures You can only be used with pictures, not video... can crop a picture so that only the desired portion of the 4 Press the OK button. to highlight the Edit tab. Using Kodak Perfect Touch technology Kodak Perfect Touch technology helps ensure better, brighter pictures. 1 Press the Review button. 2 Press for previous/next picture. 3 Press the Menu...
...to crop. to find a 2 Press the Menu button, then to zoom in a split screen. Enhanced pictures cannot be enhanced again on the camera. ■ Press the Menu button to exit the menu. Working with pictures/videos Cropping pictures You can only be used with pictures, not video... can crop a picture so that only the desired portion of the 4 Press the OK button. to highlight the Edit tab. Using Kodak Perfect Touch technology Kodak Perfect Touch technology helps ensure better, brighter pictures. 1 Press the Review button. 2 Press for previous/next picture. 3 Press the Menu...
User Manual
Page 27
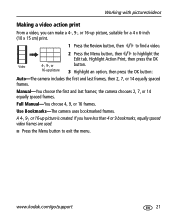
... bookmarked frames. A 4-, 9-, or 16-up picture 3 Highlight an option, then press the OK button: Auto-The camera includes the first and last frames, then 2, 7, or 14 equally spaced frames. If you can make a 4-, 9-, or 16-up picture, suitable for a 4 x 6-inch (10 x 15 .... 2 Press the Menu button, then to exit the menu. Manual-You choose the first and last frames; Full Manual-You choose 4, 9, or 16 frames. www.kodak.com/go/support 21 Working with pictures/videos Making a video action print From a video, you have less than 4 or 9 bookmarks, equally spaced video frames are...
... bookmarked frames. A 4-, 9-, or 16-up picture 3 Highlight an option, then press the OK button: Auto-The camera includes the first and last frames, then 2, 7, or 14 equally spaced frames. If you can make a 4-, 9-, or 16-up picture, suitable for a 4 x 6-inch (10 x 15 .... 2 Press the Menu button, then to exit the menu. Manual-You choose the first and last frames; Full Manual-You choose 4, 9, or 16 frames. www.kodak.com/go/support 21 Working with pictures/videos Making a video action print From a video, you have less than 4 or 9 bookmarks, equally spaced video frames are...
User Manual
Page 28
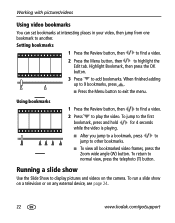
Running a slide show on a television or on the camera. Working with pictures/videos Using video bookmarks You can set bookmarks at interesting places in your video, then jump from one bookmark to display pictures and videos on any external device, see page 24. 22 www.kodak.com/go/support Highlight Bookmark, then press...
Running a slide show on a television or on the camera. Working with pictures/videos Using video bookmarks You can set bookmarks at interesting places in your video, then jump from one bookmark to display pictures and videos on any external device, see page 24. 22 www.kodak.com/go/support Highlight Bookmark, then press...

User Manual
Page 30
...-up thumbnails. 3 Press Telephoto (T) to return to single-picture view. ■ To select multiple pictures/videos, see page 35). To connect the camera to exit Review. 24 www.kodak.com/go /zd710accessories). The slide show stops if you connect or disconnect the cable while the slide show is correct (see page 25...
...-up thumbnails. 3 Press Telephoto (T) to return to single-picture view. ■ To select multiple pictures/videos, see page 35). To connect the camera to exit Review. 24 www.kodak.com/go /zd710accessories). The slide show stops if you connect or disconnect the cable while the slide show is correct (see page 25...
User Manual
Page 32
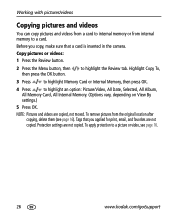
...can copy pictures and videos from a card to internal memory or from the original location after copying, delete them (see page 16. 26 www.kodak.com/go/support Before you copy, make sure that you applied for print, email, and favorites are not copied. To remove pictures from internal... memory to a card. Tags that a card is inserted in the camera. Copy pictures or videos: 1 Press the Review button. 2 Press the Menu button, then then press the OK button. to highlight an option: Picture/Video...
...can copy pictures and videos from a card to internal memory or from the original location after copying, delete them (see page 16. 26 www.kodak.com/go/support Before you copy, make sure that you applied for print, email, and favorites are not copied. To remove pictures from internal... memory to a card. Tags that a card is inserted in the camera. Copy pictures or videos: 1 Press the Review button. 2 Press the Menu button, then then press the OK button. to highlight an option: Picture/Video...
User Manual
Page 34
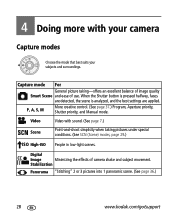
.... (See page 37.) Program, Aperture priority, Shutter priority, and Manual mode. Digital Image Minimizing the effects of use. When the Shutter button is pressed halfway, faces...SCN (Scene) modes, page 29.) ISO High-ISO People in low-light scenes. Video Video with your camera Capture modes Choose the mode that best suits your subjects and surroundings. 4 Doing more with sound. (See... -offers an excellent balance of image quality Smart Scene and ease of camera shake and subject movement. Stabilization Panorama "Stitching" 2 or 3 pictures into 1 panoramic scene. (See page 36...
.... (See page 37.) Program, Aperture priority, Shutter priority, and Manual mode. Digital Image Minimizing the effects of use. When the Shutter button is pressed halfway, faces...SCN (Scene) modes, page 29.) ISO High-ISO People in low-light scenes. Video Video with your camera Capture modes Choose the mode that best suits your subjects and surroundings. 4 Doing more with sound. (See... -offers an excellent balance of image quality Smart Scene and ease of camera shake and subject movement. Stabilization Panorama "Stitching" 2 or 3 pictures into 1 panoramic scene. (See page 36...
User Manual
Page 35
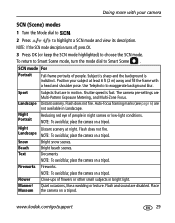
...in bright light. Reducing red eye of flowers or other small subjects in night scenes or low-light conditions. Flash does not fire. Fireworks. www.kodak.com/go/support 29 Flash does not fire. Quiet occasions, like a wedding or lecture. NOTE: If the SCN mode description turns off, press... OK. 3 Press OK (or keep the SCN mode highlighted) to exaggerate background blur. NOTE: To avoid blur, place the camera on a tripod. Use Telephoto to choose the SCN mode. Bright snow scenes. Subject is sharp and the background is fast. Bright beach scenes. SCN...
...in bright light. Reducing red eye of flowers or other small subjects in night scenes or low-light conditions. Flash does not fire. Fireworks. www.kodak.com/go/support 29 Flash does not fire. Quiet occasions, like a wedding or lecture. NOTE: If the SCN mode description turns off, press... OK. 3 Press OK (or keep the SCN mode highlighted) to exaggerate background blur. NOTE: To avoid blur, place the camera on a tripod. Use Telephoto to choose the SCN mode. Bright snow scenes. Subject is sharp and the background is fast. Bright beach scenes. SCN...


