User guide
Page 26
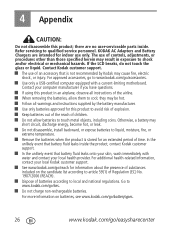
... a battery may cause fire, electric shock, or injury. For additional health-related information, contact your local Kodak customer support. ■ See www.kodak.com/go /easysharecenter Contact Kodak customer support. ■ The use of time. In the unlikely event that battery fluid leaks inside . there are...2006 (REACH). ■ Dispose of children. ■ Do not allow them to cool; KODAK AC Adapters and Battery Chargers are no user-serviceable parts inside the product, contact Kodak customer support. ■ In the unlikely event that is stored for this product to avoid risk of...
... a battery may cause fire, electric shock, or injury. For additional health-related information, contact your local Kodak customer support. ■ See www.kodak.com/go /easysharecenter Contact Kodak customer support. ■ The use of time. In the unlikely event that battery fluid leaks inside . there are...2006 (REACH). ■ Dispose of children. ■ Do not allow them to cool; KODAK AC Adapters and Battery Chargers are no user-serviceable parts inside the product, contact Kodak customer support. ■ In the unlikely event that is stored for this product to avoid risk of...

Extended user guide
Page 3
Back, bottom view EVF/LCD EVF (Electronic viewfinder) LCD Delete, Menu, Info, Review EVF/LCD Product features Power light Mode dial Power Vertical Shutter on/off Shutter button Flash, Focus Mode, Drive Jog dial Strap post Zoom (Telephoto, Wide Angle) Share 5V DC-In, A/V Out, USB Vertical Shutter button OK, Tripod socket www.kodak.com/go/support SD/SDHC Card slot, battery compartment i
Back, bottom view EVF/LCD EVF (Electronic viewfinder) LCD Delete, Menu, Info, Review EVF/LCD Product features Power light Mode dial Power Vertical Shutter on/off Shutter button Flash, Focus Mode, Drive Jog dial Strap post Zoom (Telephoto, Wide Angle) Share 5V DC-In, A/V Out, USB Vertical Shutter button OK, Tripod socket www.kodak.com/go/support SD/SDHC Card slot, battery compartment i
Extended user guide
Page 5
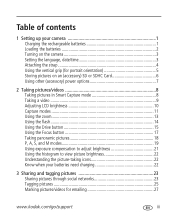
... the rechargeable batteries 1 Loading the batteries 2 Turning on the camera 3 Setting the language, date/time 3 Attaching the strap 4 Using the vertical grip (for portrait orientation 5 Storing pictures on an (accessory) SD or SDHC Card 6 Using ... batteries need charging 22 3 Sharing and tagging pictures 23 Sharing pictures through social networks 23 Tagging pictures 25 Marking pictures/videos for emailing 27 www.kodak.com/go/support iii
... the rechargeable batteries 1 Loading the batteries 2 Turning on the camera 3 Setting the language, date/time 3 Attaching the strap 4 Using the vertical grip (for portrait orientation 5 Storing pictures on an (accessory) SD or SDHC Card 6 Using ... batteries need charging 22 3 Sharing and tagging pictures 23 Sharing pictures through social networks 23 Tagging pictures 25 Marking pictures/videos for emailing 27 www.kodak.com/go/support iii
Extended user guide
Page 6
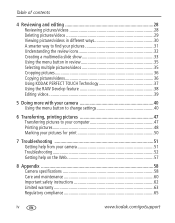
... pictures/videos 36 Using KODAK PERFECT TOUCH Technology 37 Using the RAW Develop feature 38 Editing videos 39 5 Doing more with your camera 40 Using the menu button... to change settings 40 6 Transferring, printing pictures 47 Transferring pictures to your computer 47 Printing pictures 48 Marking your pictures for print 50 7 Troubleshooting 51 Getting help from your camera... 51 Troubleshooting 52 Getting help on the Web 57 8 Appendix 58 Camera specifications 58 Care and maintenance 60 Important ...
... pictures/videos 36 Using KODAK PERFECT TOUCH Technology 37 Using the RAW Develop feature 38 Editing videos 39 5 Doing more with your camera 40 Using the menu button... to change settings 40 6 Transferring, printing pictures 47 Transferring pictures to your computer 47 Printing pictures 48 Marking your pictures for print 50 7 Troubleshooting 51 Getting help from your camera... 51 Troubleshooting 52 Getting help on the Web 57 8 Appendix 58 Camera specifications 58 Care and maintenance 60 Important ...
Extended user guide
Page 7
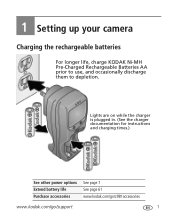
Lights are on while the charger is plugged in. (See the charger documentation for instructions and charging times.) See other power options Extend battery life Purchase accessories See page 7 See page 61 www.kodak.com/go/z981accessories www.kodak.com/go/support 1 1 Setting up your camera Charging the rechargeable batteries For longer life, charge KODAK Ni-MH Pre-Charged Rechargeable Batteries AA prior to use, and occasionally discharge them to depletion.
Lights are on while the charger is plugged in. (See the charger documentation for instructions and charging times.) See other power options Extend battery life Purchase accessories See page 7 See page 61 www.kodak.com/go/z981accessories www.kodak.com/go/support 1 1 Setting up your camera Charging the rechargeable batteries For longer life, charge KODAK Ni-MH Pre-Charged Rechargeable Batteries AA prior to use, and occasionally discharge them to depletion.

Extended user guide
Page 8
Setting up your camera Loading the batteries 1 2 See other power options Extend battery life Purchase accessories See page 7 See page 61 www.kodak.com/go/z981accessories 2 www.kodak.com/go/support
Setting up your camera Loading the batteries 1 2 See other power options Extend battery life Purchase accessories See page 7 See page 61 www.kodak.com/go/z981accessories 2 www.kodak.com/go/support

Extended user guide
Page 9
www.kodak.com/go/support 3 to change. NOTE: To change current field. for previous/next field. OK to accept. Date/Time: At the prompt, press OK. OK to accept. Turning on the camera Setting up your camera Setting the language, date/time Language: to change language or date/time in the future, use the Setup menu (see page 43).
www.kodak.com/go/support 3 to change. NOTE: To change current field. for previous/next field. OK to accept. Date/Time: At the prompt, press OK. OK to accept. Turning on the camera Setting up your camera Setting the language, date/time Language: to change language or date/time in the future, use the Setup menu (see page 43).

Extended user guide
Page 11
Use to take pictures in the portrait orientation. Slide the Vertical Shutter switch. 3 Take pictures in the vertical, portrait orientation. 1 Attach and tighten the grip. 2 Turn on the camera. www.kodak.com/go/support 5 Use the Vertical Shutter button to zoom. Setting up your camera Using the vertical grip (for portrait orientation) The vertical grip makes it easier to take pictures.
Use to take pictures in the portrait orientation. Slide the Vertical Shutter switch. 3 Take pictures in the vertical, portrait orientation. 1 Attach and tighten the grip. 2 Turn on the camera. www.kodak.com/go/support 5 Use the Vertical Shutter button to zoom. Setting up your camera Using the vertical grip (for portrait orientation) The vertical grip makes it easier to take pictures.

Extended user guide
Page 12
You can purchase an SD or SDHC Card to store more pictures and videos. (Maximum supported card size is on an (accessory) SD or SDHC Card Your camera has internal memory. forcing it may damage the pictures, the card, or the camera. 1 Turn off the camera. 2 3 Purchase accessories www.kodak.com/go/z981accessories 6 www.kodak.com/go/support Setting up your camera Storing pictures on may cause damage. Inserting or removing a card when the camera is 32 GB.) CAUTION: A card can only be inserted one way;
You can purchase an SD or SDHC Card to store more pictures and videos. (Maximum supported card size is on an (accessory) SD or SDHC Card Your camera has internal memory. forcing it may damage the pictures, the card, or the camera. 1 Turn off the camera. 2 3 Purchase accessories www.kodak.com/go/z981accessories 6 www.kodak.com/go/support Setting up your camera Storing pictures on may cause damage. Inserting or removing a card when the camera is 32 GB.) CAUTION: A card can only be inserted one way;

Extended user guide
Page 13
NOTE: The AC adapter does not charge the batteries. Purchase accessories www.kodak.com/go/z981accessories www.kodak.com/go/support 7 Setting up your camera Using other (accessory) power options Use the KODAK 5-Volt AC Adapter to save battery power.
NOTE: The AC adapter does not charge the batteries. Purchase accessories www.kodak.com/go/z981accessories www.kodak.com/go/support 7 Setting up your camera Using other (accessory) power options Use the KODAK 5-Volt AC Adapter to save battery power.

Extended user guide
Page 14
EVF/LCD To save battery power, press the EVF/LCD button and use the electronic viewfinder. Framing marks do not appear in Smart Capture mode 1 Turn the Mode dial to Smart Capture . 2 Press the Shutter button halfway to lock the focus. 2 Taking pictures/videos Taking pictures in some SCN (scene) and Video modes. 8 www.kodak.com/go/support NOTE: For more information on Smart Capture and other modes, see page 11. When the framing marks turn green, press the Shutter button completely down.
EVF/LCD To save battery power, press the EVF/LCD button and use the electronic viewfinder. Framing marks do not appear in Smart Capture mode 1 Turn the Mode dial to Smart Capture . 2 Press the Shutter button halfway to lock the focus. 2 Taking pictures/videos Taking pictures in some SCN (scene) and Video modes. 8 www.kodak.com/go/support NOTE: For more information on Smart Capture and other modes, see page 11. When the framing marks turn green, press the Shutter button completely down.

Extended user guide
Page 15
... faces are detected. If the camera is not focusing on the desired subject, release the Shutter button and recompose the scene. 2 Press the Shutter button completely down to Video . 2 Press the Shutter button completely down and release. (To stop recording, press and release again.) www.kodak.com/go/support 9 Taking a video 1 Turn the...
... faces are detected. If the camera is not focusing on the desired subject, release the Shutter button and recompose the scene. 2 Press the Shutter button completely down to Video . 2 Press the Shutter button completely down and release. (To stop recording, press and release again.) www.kodak.com/go/support 9 Taking a video 1 Turn the...
Extended user guide
Page 16
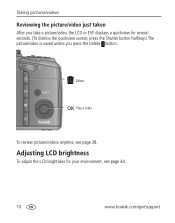
Adjusting LCD brightness To adjust the LCD brightness for several seconds. (To dismiss the quickview sooner, press the Shutter button halfway.) The picture/video is saved unless you take a picture/video, the LCD or EVF displays a quickview for your environment, see page 28. Taking pictures/videos Reviewing the picture/video just taken After you press the Delete button. Delete OK Play a video To review pictures/videos anytime, see page 44. 10 www.kodak.com/go/support
Adjusting LCD brightness To adjust the LCD brightness for several seconds. (To dismiss the quickview sooner, press the Shutter button halfway.) The picture/video is saved unless you take a picture/video, the LCD or EVF displays a quickview for your environment, see page 28. Taking pictures/videos Reviewing the picture/video just taken After you press the Delete button. Delete OK Play a video To review pictures/videos anytime, see page 44. 10 www.kodak.com/go/support

Extended user guide
Page 17
... special conditions. (See page 12.) P Program More creative control. (See page 19.) A Aperture Priority S Shutter Priority M Manual Video Video with sound. (See page 9.) www.kodak.com/go/support 11 Shutter speed is applied, for your subjects and surroundings. Taking pictures/videos Capture modes Choose the mode that are detected. ■ The scene...
... special conditions. (See page 12.) P Program More creative control. (See page 19.) A Aperture Priority S Shutter Priority M Manual Video Video with sound. (See page 9.) www.kodak.com/go/support 11 Shutter speed is applied, for your subjects and surroundings. Taking pictures/videos Capture modes Choose the mode that are detected. ■ The scene...
Extended user guide
Page 18
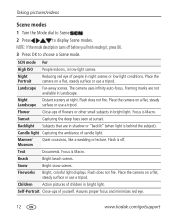
..." (when light is off before you finish reading it, press OK. 3 Press OK to display Scene modes. Focus is Macro. Place the camera on a flat, steady surface or use a tripod. Night Distant scenery at sunset. Flash does not fire. Sunset Capturing the deep hues seen ... Bright, colorful light displays. Children Action pictures of candle light. Place the camera on a flat, steady surface or use a tripod. Snow Bright snow scenes. Assures proper focus and minimizes red eye. 12 www.kodak.com/go/support Taking pictures/videos Scene modes 1 Turn the Mode dial to Scene . ...
..." (when light is off before you finish reading it, press OK. 3 Press OK to display Scene modes. Focus is Macro. Place the camera on a flat, steady surface or use a tripod. Night Distant scenery at sunset. Flash does not fire. Sunset Capturing the deep hues seen ... Bright, colorful light displays. Children Action pictures of candle light. Place the camera on a flat, steady surface or use a tripod. Snow Bright snow scenes. Assures proper focus and minimizes red eye. 12 www.kodak.com/go/support Taking pictures/videos Scene modes 1 Turn the Mode dial to Scene . ...
Extended user guide
Page 19
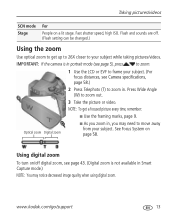
Taking pictures/videos SCN mode Stage For People on page 58. IMPORTANT: If the camera is not available in . www.kodak.com/go/support 13 Press Wide Angle (W) to your subject while taking pictures/videos. Optical zoom Digital zoom ■ As you zoom in, you may need to zoom in Smart Capture mode.) NOTE: You...
Taking pictures/videos SCN mode Stage For People on page 58. IMPORTANT: If the camera is not available in . www.kodak.com/go/support 13 Press Wide Angle (W) to your subject while taking pictures/videos. Optical zoom Digital zoom ■ As you zoom in, you may need to zoom in Smart Capture mode.) NOTE: You...
Extended user guide
Page 20
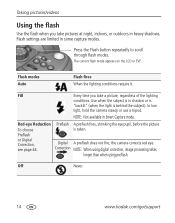
... shrinking the eye pupil, before the picture is behind the subject). Off Never. 14 www.kodak.com/go/support Flash modes Auto Flash fires When the lighting conditions require it. Digital A preflash does not fire; Flash settings are limited in heavy shadows. NOTE: Not available ...repeatedly to scroll through flash modes. In low light, hold the camera steady or use a tripod. Fill Every time you take a picture, regardless of the lighting conditions. Correction NOTE: When using digital correction, image processing takes longer than when using preflash. The current...
... shrinking the eye pupil, before the picture is behind the subject). Off Never. 14 www.kodak.com/go/support Flash modes Auto Flash fires When the lighting conditions require it. Digital A preflash does not fire; Flash settings are limited in heavy shadows. NOTE: Not available ...repeatedly to scroll through flash modes. In low light, hold the camera steady or use a tripod. Fill Every time you take a picture, regardless of the lighting conditions. Correction NOTE: When using digital correction, image processing takes longer than when using preflash. The current...

Extended user guide
Page 21
taken 8 2sexconTdhse first picture later. The camera takes the picture(s) after a 10-second delay. Use the same procedure to ensure a steady Shutter button press. or...repeatedly to take a 2- A second picture 2 Press the Shutter button halfway to focus and set exposure, then completely down . Place the camera on a tripod or flat surface. 1 In any picture-taking mode, press the Drive button until the desired self-timer icon is displayed ... taken after a 10-second delay (so you want to be included in a picture, or to take the pictures. www.kodak.com/go/support 15
taken 8 2sexconTdhse first picture later. The camera takes the picture(s) after a 10-second delay. Use the same procedure to ensure a steady Shutter button press. or...repeatedly to take a 2- A second picture 2 Press the Shutter button halfway to focus and set exposure, then completely down . Place the camera on a tripod or flat surface. 1 In any picture-taking mode, press the Drive button until the desired self-timer icon is displayed ... taken after a 10-second delay (so you want to be included in a picture, or to take the pictures. www.kodak.com/go/support 15

Extended user guide
Page 22
... in Review (see page 29). The current flash mode appears on the LCD. The camera stops taking pictures in the RAW format. 16 www.kodak.com/go/support speed 8/s second, up to take the pictures. Mode Icon Description Example Burst Camera takes 0.9 picture per A person swinging a golf club. Burst is pressed. A child blowing out...
... in Review (see page 29). The current flash mode appears on the LCD. The camera stops taking pictures in the RAW format. 16 www.kodak.com/go/support speed 8/s second, up to take the pictures. Mode Icon Description Example Burst Camera takes 0.9 picture per A person swinging a golf club. Burst is pressed. A child blowing out...

Extended user guide
Page 23
... magnification, press to adjust focal length. 2 Press the Shutter button halfway to focus and set exposure, then completely down to scroll through a window. www.kodak.com/go/support 17 Using the Focus button Taking pictures/videos Press the Focus button repeatedly to take the picture. IMPORTANT: Focus mode availability varies by picture...
... magnification, press to adjust focal length. 2 Press the Shutter button halfway to focus and set exposure, then completely down to scroll through a window. www.kodak.com/go/support 17 Using the Focus button Taking pictures/videos Press the Focus button repeatedly to take the picture. IMPORTANT: Focus mode availability varies by picture...


