User Manual
Page 5
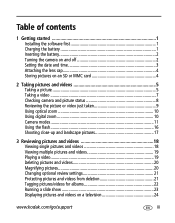
...software first 1 Charging the battery 1 Inserting the battery 2 Turning the camera on and off 2 Setting the date and time 3 Attaching the lens cap 4 Storing pictures on an SD or MMC card 4 2 Taking pictures and videos 5 Taking a picture 5 Taking a video 7 Checking camera... and picture status 8 Reviewing the picture or video just taken 9 Using optical zoom 10 Using digital zoom 10 Camera modes 11 Using the flash 16 Shooting close-up and landscape ... pictures and videos on a television 24 www.kodak.com/go/support iii
...software first 1 Charging the battery 1 Inserting the battery 2 Turning the camera on and off 2 Setting the date and time 3 Attaching the lens cap 4 Storing pictures on an SD or MMC card 4 2 Taking pictures and videos 5 Taking a picture 5 Taking a video 7 Checking camera... and picture status 8 Reviewing the picture or video just taken 9 Using optical zoom 10 Using digital zoom 10 Camera modes 11 Using the flash 16 Shooting close-up and landscape ... pictures and videos on a television 24 www.kodak.com/go/support iii

User Manual
Page 6
... and videos 24 Viewing picture/video information 25 4 Installing the software 26 Install the software 26 5 Doing more with your camera 27 Changing picture-taking settings 27 Using setup to customize your camera 32 Using burst 34 Using exposure bracketing 35 Pre-tagging for album...43 Transferring pictures/videos with the USB cable 43 Printing pictures 44 Dock compatibility for your camera 47 7 Troubleshooting 48 Camera problems 48 Computer/connectivity problems 49 Picture quality problems 50 Camera ready light status 51 Helpful links 52 Telephone customer support 53 iv www...
... and videos 24 Viewing picture/video information 25 4 Installing the software 26 Install the software 26 5 Doing more with your camera 27 Changing picture-taking settings 27 Using setup to customize your camera 32 Using burst 34 Using exposure bracketing 35 Pre-tagging for album...43 Transferring pictures/videos with the USB cable 43 Printing pictures 44 Dock compatibility for your camera 47 7 Troubleshooting 48 Camera problems 48 Computer/connectivity problems 49 Picture quality problems 50 Camera ready light status 51 Helpful links 52 Telephone customer support 53 iv www...

User Manual
Page 7
Table of contents 8 Appendix 54 Camera specifications 54 Tips, safety, maintenance 57 Important battery information 57 Storage capacities 59 Power-saving features 60 Flash settings in each mode 61 Upgrading your software and firmware 62 Warranty...63 Regulatory compliance 65 www.kodak.com/go/support v
Table of contents 8 Appendix 54 Camera specifications 54 Tips, safety, maintenance 57 Important battery information 57 Storage capacities 59 Power-saving features 60 Flash settings in each mode 61 Upgrading your software and firmware 62 Warranty...63 Regulatory compliance 65 www.kodak.com/go/support v
User Manual
Page 8
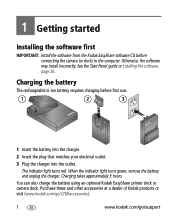
... Here! The indicator light turns red. You can also charge the battery using an optional Kodak EasyShare printer dock or camera dock. Charging the battery The rechargeable Li-Ion battery requires charging before connecting the camera (or dock) to the computer. Otherwise, the software may install incorrectly. Purchase these and other accessories at a dealer of...
... Here! The indicator light turns red. You can also charge the battery using an optional Kodak EasyShare printer dock or camera dock. Charging the battery The rechargeable Li-Ion battery requires charging before connecting the camera (or dock) to the computer. Otherwise, the software may install incorrectly. Purchase these and other accessories at a dealer of...
User Manual
Page 10
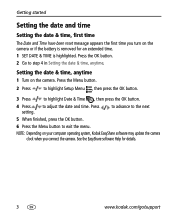
... the OK button. 2 Go to exit the menu. NOTE: Depending on the camera. Setting the date & time, anytime 1 Turn on your computer operating system, Kodak EasyShare software may update the camera clock when you turn on the camera or if the battery is highlighted. Press setting. to advance to the next 5... Time , then press the OK button. 4 Press to adjust the date and time. See the EasyShare software Help for an extended time. 1 SET DATE & TIME is removed for details. 3 www.kodak.com/go/support Getting started Setting the date and time Setting the date & time, first time The...
... the OK button. 2 Go to exit the menu. NOTE: Depending on the camera. Setting the date & time, anytime 1 Turn on your computer operating system, Kodak EasyShare software may update the camera clock when you turn on the camera or if the battery is highlighted. Press setting. to advance to the next 5... Time , then press the OK button. 4 Press to adjust the date and time. See the EasyShare software Help for an extended time. 1 SET DATE & TIME is removed for details. 3 www.kodak.com/go/support Getting started Setting the date and time Setting the date & time, first time The...
User Manual
Page 28
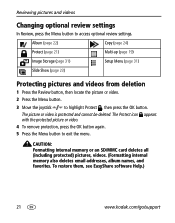
To restore them, see EasyShare software Help.) 21 www.kodak.com/go/support The picture or video is protected and cannot be deleted. Reviewing pictures and videos Changing optional review settings In Review, press the ...
To restore them, see EasyShare software Help.) 21 www.kodak.com/go/support The picture or video is protected and cannot be deleted. Reviewing pictures and videos Changing optional review settings In Review, press the ...

User Manual
Page 29
Second-on your computer. To add other pictures to the same album, move the joystick to the camera's internal memory. www.kodak.com/go/support 22 See Kodak EasyShare software Help for details. The album name appears with album names. To remove a selection, highlight an album name ... remove all album selections, select Clear All. Third-transfer to your Computer When you want, press the OK button. See Kodak EasyShare software Help for details. Reviewing pictures and videos Tagging pictures/videos for albums Use the Album feature in Review to tag the pictures...
Second-on your computer. To add other pictures to the same album, move the joystick to the camera's internal memory. www.kodak.com/go/support 22 See Kodak EasyShare software Help for details. The album name appears with album names. To remove a selection, highlight an album name ... remove all album selections, select Clear All. Third-transfer to your Computer When you want, press the OK button. See Kodak EasyShare software Help for details. Reviewing pictures and videos Tagging pictures/videos for albums Use the Album feature in Review to tag the pictures...
User Manual
Page 33
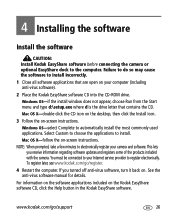
.../go /register. 4 Restart the computer. Windows OS-select Complete to the computer. To register later, see www.kodak.com/go /support 26 4 Installing the software Install the software CAUTION: Install Kodak EasyShare software before connecting the camera or optional EasyShare dock to automatically install the most commonly used applications. Mac OS X-double-click the CD icon on the...
.../go /register. 4 Restart the computer. Windows OS-select Complete to the computer. To register later, see www.kodak.com/go /support 26 4 Installing the software Install the software CAUTION: Install Kodak EasyShare software before connecting the camera or optional EasyShare dock to automatically install the most commonly used applications. Mac OS X-double-click the CD icon on the...
User Manual
Page 37
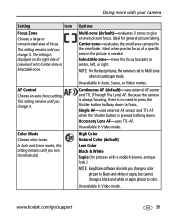
... AF (default)-uses external AF sensor and TTL (Through The Lens) AF. Unavailable in the viewfinder. www.kodak.com/go/support 30 Ideal for pictures with your camera Setting Icon Focus Zone Choose a large or concentrated area of Liveview if set to Multi-zone when in the...Doing more with a reddish-brown, antique look.) NOTE: EasyShare software also lets you change a black-and-white or sepia picture to color. Ideal when precise focus of a specific area in Landscape mode. NOTE: For the best pictures, the camera is set to Center-zone or Selectable-zone. This setting...
... AF (default)-uses external AF sensor and TTL (Through The Lens) AF. Unavailable in the viewfinder. www.kodak.com/go/support 30 Ideal for pictures with your camera Setting Icon Focus Zone Choose a large or concentrated area of Liveview if set to Multi-zone when in the...Doing more with a reddish-brown, antique look.) NOTE: EasyShare software also lets you change a black-and-white or sepia picture to color. Ideal when precise focus of a specific area in Landscape mode. NOTE: For the best pictures, the camera is set to Center-zone or Selectable-zone. This setting...
User Manual
Page 43
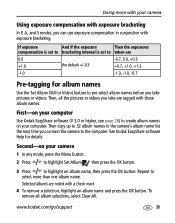
... the exposures compensation is set to bracketing interval is set to select more with your computer Use Kodak EasyShare software (V 3.0 or higher, see page 26) to the computer. Then copy up to 32 album names to the camera's album name list the next time you can use exposure compensation in conjunction with exposure bracketing...
... the exposures compensation is set to bracketing interval is set to select more with your computer Use Kodak EasyShare software (V 3.0 or higher, see page 26) to the computer. Then copy up to 32 album names to the camera's album name list the next time you can use exposure compensation in conjunction with exposure bracketing...
User Manual
Page 44
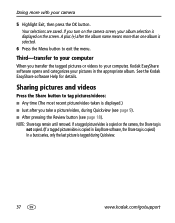
...album selection is displayed on the camera, the Share tag is not copied. (If a tagged picture/video is copied in the appropriate album. Sharing pictures and videos Press the Share button to exit the menu. NOTE: Share tags remain until removed. See the Kodak EasyShare software Help for details. Doing more ... After pressing the Review button (see page 18). Third-transfer to your computer When you transfer the tagged pictures or videos to your computer, Kodak EasyShare software opens and categorizes your camera 5 Highlight Exit, then press the OK button. Your selections are saved.
...album selection is displayed on the camera, the Share tag is not copied. (If a tagged picture/video is copied in the appropriate album. Sharing pictures and videos Press the Share button to exit the menu. NOTE: Share tags remain until removed. See the Kodak EasyShare software Help for details. Doing more ... After pressing the Review button (see page 18). Third-transfer to your computer When you transfer the tagged pictures or videos to your computer, Kodak EasyShare software opens and categorizes your camera 5 Highlight Exit, then press the OK button. Your selections are saved.
User Manual
Page 45
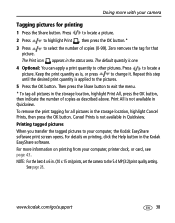
... of copies (0-99). See page 28. Cancel Prints is applied to change it. NOTE: For the best 4 x 6 in. (10 x 15 cm) prints, set the camera to select the number of copies as is, or press to the pictures. 5 Press the OK button. The default quantity is not available in Quickview... For details on printing from your computer, printer dock, or card, see page 43. Doing more information on printing, click the Help button in the Kodak EasyShare software. Press to your computer, the Kodak EasyShare software print screen opens. The Print icon appears in the status area.
... of copies (0-99). See page 28. Cancel Prints is applied to change it. NOTE: For the best 4 x 6 in. (10 x 15 cm) prints, set the camera to select the number of copies as is, or press to the pictures. 5 Press the OK button. The default quantity is not available in Quickview... For details on printing from your computer, printer dock, or card, see page 43. Doing more information on printing, click the Help button in the Kodak EasyShare software. Press to your computer, the Kodak EasyShare software print screen opens. The Print icon appears in the status area.
User Manual
Page 46
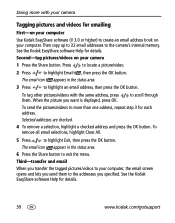
When the picture you transfer the tagged pictures/videos to your camera 1 Press the Share button. Doing more than one address, repeat step 3 for emailing First-on your computer Use Kodak EasyShare software (V 3.0 or higher) to create an email address book on your computer, the email ...an email address, then press the OK button. To remove all email selections, highlight Clear All. 5 Press to the camera's internal memory. See the Kodak EasyShare software Help for details. The email icon appears in the status area. 3 Press to the addresses you specified. The email...
When the picture you transfer the tagged pictures/videos to your camera 1 Press the Share button. Doing more than one address, repeat step 3 for emailing First-on your computer Use Kodak EasyShare software (V 3.0 or higher) to create an email address book on your computer, the email ...an email address, then press the OK button. To remove all email selections, highlight Clear All. 5 Press to the camera's internal memory. See the Kodak EasyShare software Help for details. The email icon appears in the status area. 3 Press to the addresses you specified. The email...
User Manual
Page 47
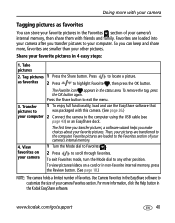
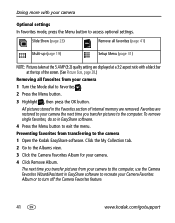
... press the OK button. The first time you transfer pictures, a software wizard helps you make choices about your favorite pictures in the Kodak EasyShare software. www.kodak.com/go/support 40 Share your favorite pictures. To view pictures/videos on your computer 2 Connect the camera to scroll through favorites. For more , favorites are transferred to any...
... press the OK button. The first time you transfer pictures, a software wizard helps you make choices about your favorite pictures in the Kodak EasyShare software. www.kodak.com/go/support 40 Share your favorite pictures. To view pictures/videos on your computer 2 Connect the camera to scroll through favorites. For more , favorites are transferred to any...
User Manual
Page 48
.... 2 Go to exit the menu. Slide Show (page 23) Remove all favorites from your camera to the computer, use the Camera Favorites Wizard/Assistant in EasyShare software to recreate your Camera Favorites Album or to the camera 1 Open the Kodak EasyShare software. Favorites are removed. All pictures stored in EasyShare software. 4 Press the Menu button to the Albums view. 3 Click the...
.... 2 Go to exit the menu. Slide Show (page 23) Remove all favorites from your camera to the computer, use the Camera Favorites Wizard/Assistant in EasyShare software to recreate your Camera Favorites Album or to the camera 1 Open the Kodak EasyShare software. Favorites are removed. All pictures stored in EasyShare software. 4 Press the Menu button to the Albums view. 3 Click the...
User Manual
Page 50
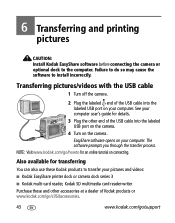
... your pictures and videos: ■ Kodak EasyShare printer dock or camera dock series 3 ■ Kodak multi-card reader, Kodak SD multimedia card reader-writer Purchase these Kodak products to install incorrectly. Failure to do so may cause the software to transfer your computer. 6 Transferring and printing pictures CAUTION: Install Kodak EasyShare software before connecting the camera or optional dock to the...
... your pictures and videos: ■ Kodak EasyShare printer dock or camera dock series 3 ■ Kodak multi-card reader, Kodak SD multimedia card reader-writer Purchase these Kodak products to install incorrectly. Failure to do so may cause the software to transfer your computer. 6 Transferring and printing pictures CAUTION: Install Kodak EasyShare software before connecting the camera or optional dock to the...
User Manual
Page 52
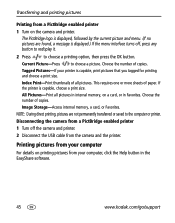
... enabled printer 1 Turn on the camera and printer. Disconnecting the camera from a PictBridge enabled printer 1 Turn off , press any button to redisplay it. 2 Press to choose a picture. Choose the number of copies. Printing pictures from your computer For details on a card, or in the EasyShare software. 45 www.kodak.com/go/support Choose the number...
... enabled printer 1 Turn on the camera and printer. Disconnecting the camera from a PictBridge enabled printer 1 Turn off , press any button to redisplay it. 2 Press to choose a picture. Choose the number of copies. Printing pictures from your computer For details on a card, or in the EasyShare software. 45 www.kodak.com/go/support Choose the number...

User Manual
Page 53
..., and share them with an SD/MMC slot. Transferring and printing pictures Ordering prints online Kodak EasyShare gallery (www.kodakgallery.com) is one of the many online print services offered in Kodak EasyShare software. See www.kodak.com/go /support 46 www.kodak.com/go /picturemaker.) ■ Take the card to your card into a printer with family...
..., and share them with an SD/MMC slot. Transferring and printing pictures Ordering prints online Kodak EasyShare gallery (www.kodakgallery.com) is one of the many online print services offered in Kodak EasyShare software. See www.kodak.com/go /support 46 www.kodak.com/go /picturemaker.) ■ Take the card to your card into a printer with family...
User Manual
Page 56
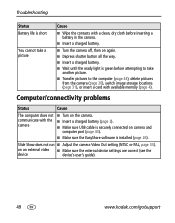
...(see the device device's user's guide). 49 www.kodak.com/go/support on camera and computer port (page 43). ■ Make sure the EasyShare software is installed (page 26). Slide Show does not run ■ Adjust the camera Video Out setting (NTSC or PAL, page 33). ... Insert a charged battery. ■ Wait until the ready light is green before inserting a battery in the camera. ■ Insert a charged battery. ■ Turn the camera off, then on the camera. Troubleshooting Status Battery life is short You cannot take a picture Cause ■ Wipe the contacts with a...
...(see the device device's user's guide). 49 www.kodak.com/go/support on camera and computer port (page 43). ■ Make sure the EasyShare software is installed (page 26). Slide Show does not run ■ Adjust the camera Video Out setting (NTSC or PAL, page 33). ... Insert a charged battery. ■ Wait until the ready light is green before inserting a battery in the camera. ■ Insert a charged battery. ■ Turn the camera off, then on the camera. Troubleshooting Status Battery life is short You cannot take a picture Cause ■ Wipe the contacts with a...

User Manual
Page 59
... camera www.kodak.com/go/howto Software Get information on EasyShare software Get help with the Windows operating system and working with digital pictures www.kodak.com/go/easysharesw (or click the Help button in the EasyShare software) www.kodak.com/go/pcbasics Other Get support for other cameras, software, accessories, more www.kodak.com/go/support Get information on Kodak EasyShare printer docks www.kodak...
... camera www.kodak.com/go/howto Software Get information on EasyShare software Get help with the Windows operating system and working with digital pictures www.kodak.com/go/easysharesw (or click the Help button in the EasyShare software) www.kodak.com/go/pcbasics Other Get support for other cameras, software, accessories, more www.kodak.com/go/support Get information on Kodak EasyShare printer docks www.kodak...


