User Manual
Page 5
... 1 Installing the software first 1 Charging the battery 1 Inserting the battery 2 Turning the camera on and off 2 Setting the date and time 3 Attaching the lens cap 4 Storing pictures on an SD or MMC card 4 2 Taking pictures and videos 5 Taking a picture 5 Taking a video 7 Checking camera and picture status 8 Reviewing the picture or video just taken 9 Using optical zoom 10 Using digital zoom 10 Camera modes 11 Using the flash 16 Shooting close-up and landscape pictures 17 3 Reviewing pictures and videos 18 Viewing single pictures and videos 18 Viewing multiple pictures and...
... 1 Installing the software first 1 Charging the battery 1 Inserting the battery 2 Turning the camera on and off 2 Setting the date and time 3 Attaching the lens cap 4 Storing pictures on an SD or MMC card 4 2 Taking pictures and videos 5 Taking a picture 5 Taking a video 7 Checking camera and picture status 8 Reviewing the picture or video just taken 9 Using optical zoom 10 Using digital zoom 10 Camera modes 11 Using the flash 16 Shooting close-up and landscape pictures 17 3 Reviewing pictures and videos 18 Viewing single pictures and videos 18 Viewing multiple pictures and...
User Manual
Page 10
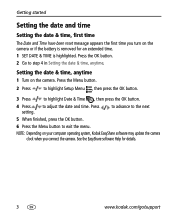
... battery is removed for details. 3 www.kodak.com/go/support NOTE: Depending on the camera. Press the Menu button. 2 Press to highlight Setup Menu , then press the OK button. 3 Press to highlight Date & Time , then press the OK button. 4 Press to exit the menu. to advance to the next 5 When finished, press the OK button. 6 Press the Menu button to adjust the date and time. See the EasyShare software Help for an extended time. 1 SET DATE & TIME...
... battery is removed for details. 3 www.kodak.com/go/support NOTE: Depending on the camera. Press the Menu button. 2 Press to highlight Setup Menu , then press the OK button. 3 Press to highlight Date & Time , then press the OK button. 4 Press to exit the menu. to advance to the next 5 When finished, press the OK button. 6 Press the Menu button to adjust the date and time. See the EasyShare software Help for an extended time. 1 SET DATE & TIME...

User Manual
Page 17
The camera screen displays the zoomed image and the zoom indicator. 3 Press the Shutter button halfway and hold to set the exposure and focus, then press the rest of the way down to take the picture. (When taking videos, press and release the Shutter button.) Using digital zoom Use digital zoom in any still mode to get up to 3X closer to your subject. If the camera screen is no closer than 23.6 in. (60 cm) from 3.6X...
The camera screen displays the zoomed image and the zoom indicator. 3 Press the Shutter button halfway and hold to set the exposure and focus, then press the rest of the way down to take the picture. (When taking videos, press and release the Shutter button.) Using digital zoom Use digital zoom in any still mode to get up to 3X closer to your subject. If the camera screen is no closer than 23.6 in. (60 cm) from 3.6X...
User Manual
Page 18
...the Menu button to change other settings. Taking pictures and videos IMPORTANT: You may be affected when using digital zoom. For an acceptable 4 x 6 in printed image quality when using optical zoom. Shutter Priority Controlling the shutter speed, ISO speed, and exposure compensation. Shutter priority mode is primarily used to prevent blur when your subject is primarily used to all menu options. The camera automatically sets the aperture for slow shutter speeds. The blue slider on the scene lighting. Aperture Controlling aperture, exposure compensation, flash compensation...
...the Menu button to change other settings. Taking pictures and videos IMPORTANT: You may be affected when using digital zoom. For an acceptable 4 x 6 in printed image quality when using optical zoom. Shutter Priority Controlling the shutter speed, ISO speed, and exposure compensation. Shutter priority mode is primarily used to prevent blur when your subject is primarily used to all menu options. The camera automatically sets the aperture for slow shutter speeds. The blue slider on the scene lighting. Aperture Controlling aperture, exposure compensation, flash compensation...
User Manual
Page 19
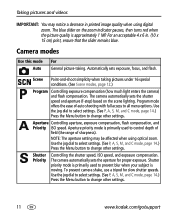
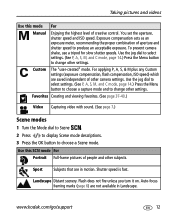
.... Use this mode For Manual Enjoying the highest level of creative control. Auto-focus framing marks (page 6) are saved independent of other camera settings. Use the jog dial to select settings. (See P, A, S, M, and C mode, page 14.) Press the Menu button to choose a capture mode and to choose a Scene mode. Exposure compensation acts as an exposure meter, recommending the proper combination of aperture and shutter speed to change other settings. Taking pictures and videos Use this SCN mode For...
.... Use this mode For Manual Enjoying the highest level of creative control. Auto-focus framing marks (page 6) are saved independent of other camera settings. Use the jog dial to select settings. (See P, A, S, M, and C mode, page 14.) Press the Menu button to choose a capture mode and to choose a Scene mode. Exposure compensation acts as an exposure meter, recommending the proper combination of aperture and shutter speed to change other settings. Taking pictures and videos Use this SCN mode For...
User Manual
Page 21
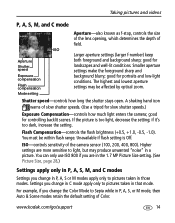
... 1.7 MP Picture Size setting. (See Picture Size, page 28.) Settings apply only in P, A, S, M, and C modes Settings you change the Color Mode to pictures taken in those modes. www.kodak.com/go/support 14 good for landscapes and well-lit conditions. Taking pictures and videos P, A, S, M, and C mode ISO Aperture Shutter speed Exposure compensation Flash compensation Mode setting Aperture-also known as f-stop, controls the size of the lens opening, which determines the depth of the camera sensor (100, 200, 400, 800). Larger aperture settings (larger f-number) keep...
... 1.7 MP Picture Size setting. (See Picture Size, page 28.) Settings apply only in P, A, S, M, and C modes Settings you change the Color Mode to pictures taken in those modes. www.kodak.com/go/support 14 good for landscapes and well-lit conditions. Taking pictures and videos P, A, S, M, and C mode ISO Aperture Shutter speed Exposure compensation Flash compensation Mode setting Aperture-also known as f-stop, controls the size of the lens opening, which determines the depth of the camera sensor (100, 200, 400, 800). Larger aperture settings (larger f-number) keep...
User Manual
Page 31
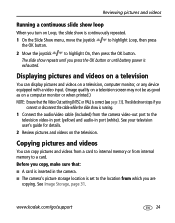
... repeats until battery power is running. 1 Connect the audio/video cable (included) from internal memory to highlight On, then press the OK button. See your television user's guide for details. 2 Review pictures and videos on a computer monitor or when printed.) NOTE: Ensure that : ■ A card is inserted in port (white). www.kodak.com/go/support 24 Displaying pictures and videos on a television You can copy pictures and videos from a card to internal memory or from the camera video-out...
... repeats until battery power is running. 1 Connect the audio/video cable (included) from internal memory to highlight On, then press the OK button. See your television user's guide for details. 2 Review pictures and videos on a computer monitor or when printed.) NOTE: Ensure that : ■ A card is inserted in port (white). www.kodak.com/go/support 24 Displaying pictures and videos on a television You can copy pictures and videos from a card to internal memory or from the camera video-out...
User Manual
Page 33
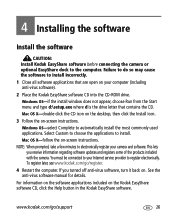
... on -screen instructions. Mac OS X-double-click the CD icon on the desktop, then click the Install icon. 3 Follow the on . www.kodak.com/go /register. 4 Restart the computer. Windows OS-if the install window does not appear, choose Run from the Start menu and type d:\setup.exe where d is the drive letter that are open on your camera and software. If you receive information regarding software updates and...
... on -screen instructions. Mac OS X-double-click the CD icon on the desktop, then click the Install icon. 3 Follow the on . www.kodak.com/go /register. 4 Restart the computer. Windows OS-if the install window does not appear, choose Run from the Start menu and type d:\setup.exe where d is the drive letter that are open on your camera and software. If you receive information regarding software updates and...
User Manual
Page 35
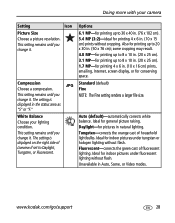
... (default) Fine NOTE: The Fine setting renders a larger file size. Ideal for printing 4 x 6 in . (76 x 102 cm). 5.4 MP (3:2)-ideal for indoor pictures under tungsten or halogen lighting without flash. Compression JPG Choose a compression. Options 6.1 MP-for printing up to 30 x 40 in . (10 x 15 cm) prints without cropping. White Balance Choose your camera Setting Icon Picture Size Choose a picture resolution. Tungsten-corrects the orange cast of fluorescent lighting. www.kodak...
... (default) Fine NOTE: The Fine setting renders a larger file size. Ideal for printing 4 x 6 in . (76 x 102 cm). 5.4 MP (3:2)-ideal for indoor pictures under tungsten or halogen lighting without flash. Compression JPG Choose a compression. Options 6.1 MP-for printing up to 30 x 40 in . (10 x 15 cm) prints without cropping. White Balance Choose your camera Setting Icon Picture Size Choose a picture resolution. Tungsten-corrects the orange cast of fluorescent lighting. www.kodak...
User Manual
Page 37
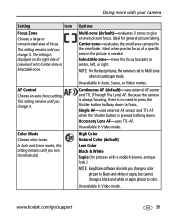
... focus of focus. Unavailable in the viewfinder. Selectable-zone-move the focus brackets to give an even picture focus. Unavailable in Video mode. Unavailable in Auto, Scene, or Video modes. High Color Natural Color (default) Low Color Black & White Sepia (for general picture taking. Doing more with a reddish-brown, antique look.) NOTE: EasyShare software also lets you turn the Mode dial. In Auto and Scene modes, this setting remains until you change a black-and-white or sepia picture to focus...
... focus of focus. Unavailable in the viewfinder. Selectable-zone-move the focus brackets to give an even picture focus. Unavailable in Video mode. Unavailable in Auto, Scene, or Video modes. High Color Natural Color (default) Low Color Black & White Sepia (for general picture taking. Doing more with a reddish-brown, antique look.) NOTE: EasyShare software also lets you turn the Mode dial. In Auto and Scene modes, this setting remains until you change a black-and-white or sepia picture to focus...
User Manual
Page 38
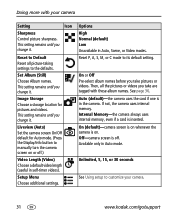
... .) Video Length (Video) Choose a default video length (useful in the camera. If not, the camera uses internal memory. Available only in Auto, Scene, or Video modes. Set Album (Still) Choose Album names. Reset to Default Reset all the pictures or videos you take are tagged with your camera. 31 www.kodak.com/go/support This setting remains until you change it . Image Storage Choose a storage location for Auto mode. (Press the Display/Info button to customize your camera Setting Icon Sharpness Control picture sharpness. This setting...
... .) Video Length (Video) Choose a default video length (useful in the camera. If not, the camera uses internal memory. Available only in Auto, Scene, or Video modes. Set Album (Still) Choose Album names. Reset to Default Reset all the pictures or videos you take are tagged with your camera. 31 www.kodak.com/go/support This setting remains until you change it . Image Storage Choose a storage location for Auto mode. (Press the Display/Info button to customize your camera Setting Icon Sharpness Control picture sharpness. This setting...
User Manual
Page 41
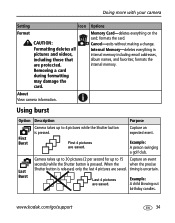
... saved. About View camera information. Options Memory Card-deletes everything in internal memory including email addresses, album names, and favorites; Last Burst Camera takes up to 30 pictures (2 per second for up to 15 Capture an event seconds) while the Shutter button is pressed. Removing a card during formatting may damage the card. When the when the precise Shutter button is uncertain. formats the internal memory. Doing more with your camera Setting Icon Format CAUTION: Formatting deletes all pictures and videos...
... saved. About View camera information. Options Memory Card-deletes everything in internal memory including email addresses, album names, and favorites; Last Burst Camera takes up to 30 pictures (2 per second for up to 15 Capture an event seconds) while the Shutter button is pressed. Removing a card during formatting may damage the card. When the when the precise Shutter button is uncertain. formats the internal memory. Doing more with your camera Setting Icon Format CAUTION: Formatting deletes all pictures and videos...
User Manual
Page 48
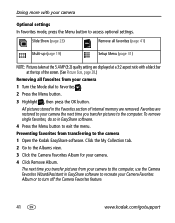
... transferring to exit the menu. All pictures stored in EasyShare software to recreate your camera the next time you transfer pictures from your camera to the computer, use the Camera Favorites Wizard/Assistant in the Favorites section of the screen. (See Picture Size, page 28.) Removing all favorites (page 41) Multi-up (page 19) Setup Menu (page 31) NOTE: Pictures taken at the 5.4 MP (3:2) quality setting are displayed at the top of internal memory...
... transferring to exit the menu. All pictures stored in EasyShare software to recreate your camera the next time you transfer pictures from your camera to the computer, use the Camera Favorites Wizard/Assistant in the Favorites section of the screen. (See Picture Size, page 28.) Removing all favorites (page 41) Multi-up (page 19) Setup Menu (page 31) NOTE: Pictures taken at the 5.4 MP (3:2) quality setting are displayed at the top of internal memory...
User Manual
Page 55
... ■ Place the camera on a Kodak EasyShare camera or printer dock turn on picture size and content.) Picture orientation is operating normally. (The camera estimates the number of a picture See page 43. controls do not function See page 57 for more battery information. black screen is taken, based on ■ Insert a charged battery. www.kodak.com/go/support 48 The pictures remaining number does not decrease after each picture is displayed ■ Transfer all pictures to the computer.
... ■ Place the camera on a Kodak EasyShare camera or printer dock turn on picture size and content.) Picture orientation is operating normally. (The camera estimates the number of a picture See page 43. controls do not function See page 57 for more battery information. black screen is taken, based on ■ Insert a charged battery. www.kodak.com/go/support 48 The pictures remaining number does not decrease after each picture is displayed ■ Transfer all pictures to the computer.
User Manual
Page 56
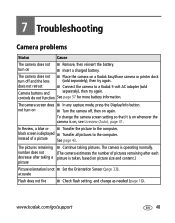
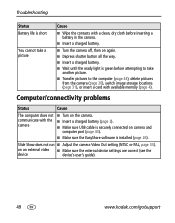
... ■ Insert a charged battery (page 2). camera ■ Make sure USB cable is securely connected on the camera. Computer/connectivity problems Status Cause The computer does not ■ Turn on camera and computer port (page 43). ■ Make sure the EasyShare software is installed (page 26). on again. ■ Depress shutter button all the way. ■ Insert a charged battery. ■ Wait until the ready light is green before attempting to take a picture Cause ■ Wipe...
... ■ Insert a charged battery (page 2). camera ■ Make sure USB cable is securely connected on the camera. Computer/connectivity problems Status Cause The computer does not ■ Turn on camera and computer port (page 43). ■ Make sure the EasyShare software is installed (page 26). on again. ■ Depress shutter button all the way. ■ Insert a charged battery. ■ Wait until the ready light is green before attempting to take a picture Cause ■ Wipe...

User Manual
Page 57
... green, press the Shutter button the rest of the way down to take the picture. ■ Increase the shutter speed or decrease the ISO speed (page 14). When the ready light glows green, press the Shutter button the rest of the way down to take the picture. ■ Decrease the shutter speed or increase the ISO speed (page 14). Troubleshooting Picture quality problems Status Cause The picture is too dark or ■ Use Fill flash...
... green, press the Shutter button the rest of the way down to take the picture. ■ Increase the shutter speed or decrease the ISO speed (page 14). When the ready light glows green, press the Shutter button the rest of the way down to take the picture. ■ Decrease the shutter speed or increase the ISO speed (page 14). Troubleshooting Picture quality problems Status Cause The picture is too dark or ■ Use Fill flash...
User Manual
Page 58
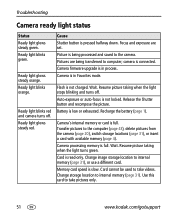
...pictures to internal memory (page 31), or use a different card. Change storage location to take videos. Resume picture taking when the light stops blinking and turns off . Ready light glows steady orange. Flash is read-only. Card is not charged. Recharge the battery (page 1). Ready light glows steady red. Cause Shutter button is connected. Use this card to internal memory (page 31). Ready light blinks red and camera turns off . camera is pressed halfway down. Resume picture taking when the light turns green. Battery is in process. Wait. Troubleshooting Camera...
...pictures to internal memory (page 31), or use a different card. Change storage location to take videos. Resume picture taking when the light stops blinking and turns off . Ready light glows steady orange. Flash is read-only. Card is not charged. Recharge the battery (page 1). Ready light glows steady red. Cause Shutter button is connected. Use this card to internal memory (page 31). Ready light blinks red and camera turns off . camera is pressed halfway down. Resume picture taking when the light turns green. Battery is in process. Wait. Troubleshooting Camera...

User Manual
Page 59
... repairs, etc.) Purchase camera accessories (camera docks, printer www.kodak.com/go/z760accessories docks, lenses, cards, etc.) Download the latest camera firmware and software www.kodak.com/go/z760downloads See online demonstrations of your camera www.kodak.com/go/howto Software Get information on EasyShare software Get help with the Windows operating system and working with digital pictures www.kodak.com/go/easysharesw (or click the Help button in the EasyShare software) www.kodak.com/go/pcbasics Other Get support...
... repairs, etc.) Purchase camera accessories (camera docks, printer www.kodak.com/go/z760accessories docks, lenses, cards, etc.) Download the latest camera firmware and software www.kodak.com/go/z760downloads See online demonstrations of your camera www.kodak.com/go/howto Software Get information on EasyShare software Get help with the Windows operating system and working with digital pictures www.kodak.com/go/easysharesw (or click the Help button in the EasyShare software) www.kodak.com/go/pcbasics Other Get support...
User Manual
Page 70
... User's Guides. Retain the original dated sales receipt. Such repair service will not be honored only within the geographical location that Kodak digital cameras and accessories were purchased. This warranty does not cover circumstances beyond Kodak's control, nor problems caused by failure to any necessary adjustments and/or replacement parts. Limited warranty coverage This limited warranty will REPAIR or REPLACE Kodak EasyShare digital cameras and accessories if they fail to function...
... User's Guides. Retain the original dated sales receipt. Such repair service will not be honored only within the geographical location that Kodak digital cameras and accessories were purchased. This warranty does not cover circumstances beyond Kodak's control, nor problems caused by failure to any necessary adjustments and/or replacement parts. Limited warranty coverage This limited warranty will REPAIR or REPLACE Kodak EasyShare digital cameras and accessories if they fail to function...
User Manual
Page 78
Index color mode, 30 compression, 28 date and time, 3 date stamp, 33 digital zoom, 32 exposure metering, 29 flash, 16 focus zone, 30 image storage, 31 language, 33 liveview, 31 orientation sensor, 33 picture size, 28 picture taking mode, 11 quickview, 32 self timer, 27 sharpness, 31 sound themes, 33 sound volume, 33 video date display, 33 video length, 31 video out, 33 white balance, 28 share button, ii, 27 sharpness, 31 shutoff, auto, 60 shutter priority, 11 shutter speed, PASM mode, 14 shutter, problems, 49 sleep mode, 60 slide...
Index color mode, 30 compression, 28 date and time, 3 date stamp, 33 digital zoom, 32 exposure metering, 29 flash, 16 focus zone, 30 image storage, 31 language, 33 liveview, 31 orientation sensor, 33 picture size, 28 picture taking mode, 11 quickview, 32 self timer, 27 sharpness, 31 sound themes, 33 sound volume, 33 video date display, 33 video length, 31 video out, 33 white balance, 28 share button, ii, 27 sharpness, 31 shutoff, auto, 60 shutter priority, 11 shutter speed, PASM mode, 14 shutter, problems, 49 sleep mode, 60 slide...


