

User Manual
Page 5
... 14 Using camera Help 15 Understanding the picture-taking icons 15 3 Working with pictures/videos 16 Reviewing pictures/videos 16 Deleting pictures/videos 17 Using the menu button in review 20 Editing pictures 20 Editing videos 22 Running a slide show 25 Viewing pictures/videos in different ways 28 Selecting picture/videos 29 Copying pictures/videos 30 www.kodak.com...
... 14 Using camera Help 15 Understanding the picture-taking icons 15 3 Working with pictures/videos 16 Reviewing pictures/videos 16 Deleting pictures/videos 17 Using the menu button in review 20 Editing pictures 20 Editing videos 22 Running a slide show 25 Viewing pictures/videos in different ways 28 Selecting picture/videos 29 Copying pictures/videos 30 www.kodak.com...

User Manual
Page 6
Table of contents 4 Doing more with your camera 31 Using the menu button to change settings 31 Using the Setup menu 36 Taking panoramic pictures 39 Using exposure compensation to adjust picture brightness ... the framing grid to compose a picture 41 5 Transferring, printing, tagging 42 Installing the software 42 Transferring pictures/videos 43 Printing pictures 43 Tagging your pictures 46 6 Troubleshooting 50 7 Getting help 54 8 Appendix 56 Camera specifications 56 Upgrading your software and firmware 59 Care and maintenance 59 Storage capacities 60 Important safety instructions...
Table of contents 4 Doing more with your camera 31 Using the menu button to change settings 31 Using the Setup menu 36 Taking panoramic pictures 39 Using exposure compensation to adjust picture brightness ... the framing grid to compose a picture 41 5 Transferring, printing, tagging 42 Installing the software 42 Transferring pictures/videos 43 Printing pictures 43 Tagging your pictures 46 6 Troubleshooting 50 7 Getting help 54 8 Appendix 56 Camera specifications 56 Upgrading your software and firmware 59 Care and maintenance 59 Storage capacities 60 Important safety instructions...

User Manual
Page 11
Reviewing pictures, videos... www.kodak.com/go/support Tag a picture, video as a favorite 5 Using the touch screen Setting up your camera When you are Tap the screen to Taking pictures, videos... Change capture modes Change a setting Open/close thumbnails For more about reviewing pictures, see page 9. Delete a picture, video Tag a picture, video View previous picture, video View previous thumbnails Open/close the Settings panel For more about : ■ Taking pictures, see page 7. ■ Capture modes, see page 9. ■ Settings, see page 16.
Reviewing pictures, videos... www.kodak.com/go/support Tag a picture, video as a favorite 5 Using the touch screen Setting up your camera When you are Tap the screen to Taking pictures, videos... Change capture modes Change a setting Open/close thumbnails For more about reviewing pictures, see page 9. Delete a picture, video Tag a picture, video View previous picture, video View previous thumbnails Open/close the Settings panel For more about : ■ Taking pictures, see page 7. ■ Capture modes, see page 9. ■ Settings, see page 16.

User Manual
Page 12
...www.kodak.com/go/support Inserting or removing a card while the camera is on an SD or SDHC card Your camera has internal memory. forcing it may damage the pictures, the card, or the camera. CAUTION: A card can purchase an SD or SDHC card to conveniently store more pictures/videos.... Formatting internal memory or an SD/SDHC card deletes all (including protected) pictures/videos. 1 Turn off the camera. 2 Insert or remove the optional card. 3 Turn on -screen prompts. optional card IMPORTANT: For ...
...www.kodak.com/go/support Inserting or removing a card while the camera is on an SD or SDHC card Your camera has internal memory. forcing it may damage the pictures, the card, or the camera. CAUTION: A card can purchase an SD or SDHC card to conveniently store more pictures/videos.... Formatting internal memory or an SD/SDHC card deletes all (including protected) pictures/videos. 1 Turn off the camera. 2 Insert or remove the optional card. 3 Turn on -screen prompts. optional card IMPORTANT: For ...

User Manual
Page 13
... down , the framing marks remain locked on /off controls and status icons. www.kodak.com/go/support 7 Reviewing the picture/video just taken After you move the camera. During playback, tap anywhere to play a video. The camera turns on the camera. To review pictures/videos anytime, see page 24. For more about bookmarks, see page 16. 2 Taking...
... down , the framing marks remain locked on /off controls and status icons. www.kodak.com/go/support 7 Reviewing the picture/video just taken After you move the camera. During playback, tap anywhere to play a video. The camera turns on the camera. To review pictures/videos anytime, see page 24. For more about bookmarks, see page 16. 2 Taking...

User Manual
Page 14
...-taking mode to get up to 5X magnification beyond optical zoom. Taking pictures/videos Using the framing marks to take the picture. When the framing marks turn green, focus is accomplished. 2 If the camera is at the top of the optical zoom range. NOTE: You may appear...: For focus distances, see Specifications starting on faces. (and in Smart Capture or video mode. 8 www.kodak.com/go/support Using digital zoom Use digital zoom in . (10 x 15 cm) print. You cannot use digital zoom in Framing marks 1 Press the Shutter button halfway. Press Telephoto (T) until the slider is ...
...-taking mode to get up to 5X magnification beyond optical zoom. Taking pictures/videos Using the framing marks to take the picture. When the framing marks turn green, focus is accomplished. 2 If the camera is at the top of the optical zoom range. NOTE: You may appear...: For focus distances, see Specifications starting on faces. (and in Smart Capture or video mode. 8 www.kodak.com/go/support Using digital zoom Use digital zoom in . (10 x 15 cm) print. You cannot use digital zoom in Framing marks 1 Press the Shutter button halfway. Press Telephoto (T) until the slider is ...

User Manual
Page 15
Video Capturing video with sound. (See page 11.) www.kodak.com/go/support 9 Smart ■ Kodak Perfect Touch technology is analyzed for other content and for lighting. Enjoy access to all picture-taking -it offers excellent image quality and ease of...when taking pictures in practically any situation. (See page 10.) Program The most creative control over your pictures. Using different modes Tap Mode. Taking pictures/videos Use this mode For General picture taking settings. Capture You can choose the best picture size and aspect ratio for better pictures. Then tap a mode....
Video Capturing video with sound. (See page 11.) www.kodak.com/go/support 9 Smart ■ Kodak Perfect Touch technology is analyzed for other content and for lighting. Enjoy access to all picture-taking -it offers excellent image quality and ease of...when taking pictures in practically any situation. (See page 10.) Program The most creative control over your pictures. Using different modes Tap Mode. Taking pictures/videos Use this mode For General picture taking settings. Capture You can choose the best picture size and aspect ratio for better pictures. Then tap a mode....
User Manual
Page 16
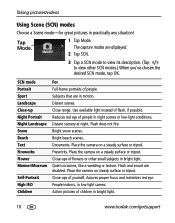
Taking pictures/videos Using Scene (SCN) modes Choose a Scene mode-for great pictures in low-light scenes. Use available light instead of yourself. Quiet occasions, like a wedding or ... a steady surface or tripod. People indoors, in practically any situation! Action pictures of people in bright light. 10 www.kodak.com/go/support Bright beach scenes. Place the camera on steady surface or tripod. Bright snow scenes. Tap Mode. 1 Tap Mode. SCN mode Portrait Sport Landscape Close-up Night Portrait Night Landscape...
Taking pictures/videos Using Scene (SCN) modes Choose a Scene mode-for great pictures in low-light scenes. Use available light instead of yourself. Quiet occasions, like a wedding or ... a steady surface or tripod. People indoors, in practically any situation! Action pictures of people in bright light. 10 www.kodak.com/go/support Bright beach scenes. Place the camera on steady surface or tripod. Bright snow scenes. Tap Mode. 1 Tap Mode. SCN mode Portrait Sport Landscape Close-up Night Portrait Night Landscape...
User Manual
Page 17
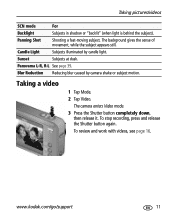
...by candle light. www.kodak.com/go/support 11 Panorama L-R, R-L See page 39. The camera enters Video mode. 3 Press the Shutter button completely down, then release it. To stop recording, press and release the Shutter button again. To review and work with videos, see page 16. Panning...The background gives the sense of movement, while the subject appears still. Candle Light Subjects illuminated by camera shake or subject motion. Sunset Subjects at dusk. Taking pictures/videos SCN mode For Backlight Subjects in shadow or "backlit" (when light is behind the subject). ...
...by candle light. www.kodak.com/go/support 11 Panorama L-R, R-L See page 39. The camera enters Video mode. 3 Press the Shutter button completely down, then release it. To stop recording, press and release the Shutter button again. To review and work with videos, see page 16. Panning...The background gives the sense of movement, while the subject appears still. Candle Light Subjects illuminated by camera shake or subject motion. Sunset Subjects at dusk. Taking pictures/videos SCN mode For Backlight Subjects in shadow or "backlit" (when light is behind the subject). ...

User Manual
Page 18
..., regardless of the lighting conditions. Every time you turn off (see page 38. 12 www.kodak.com/go/support Use when the subject is in Smart Capture mode. In low light, hold the camera steady or use a tripod. Flash modes Flash fires Auto When the lighting conditions require it.... Taking pictures/videos Using the flash Open the Settings panel Tap the Flash setting 1 In any Still mode...
..., regardless of the lighting conditions. Every time you turn off (see page 38. 12 www.kodak.com/go/support Use when the subject is in Smart Capture mode. In low light, hold the camera steady or use a tripod. Flash modes Flash fires Auto When the lighting conditions require it.... Taking pictures/videos Using the flash Open the Settings panel Tap the Flash setting 1 In any Still mode...

User Manual
Page 19
...set exposure. 4 Press the Shutter button completely down and hold it to take a 2- Use the same procedure to 3 pictures in quick succession. Place the camera on a tripod). 2 shot-The first picture is taken after a 10-second delay. Self-timer/Burst 1 In any Still mode, tap Settings to open...-A picture is taken after the delay. NOTE: In Panoramic modes (page 39), only the 2- www.kodak.com/go/support 13 Using burst Use burst to take up to take pictures. Taking pictures/videos Using the self-timer Use the self-timer when you have time to ensure a steady Shutter button...
...set exposure. 4 Press the Shutter button completely down and hold it to take a 2- Use the same procedure to 3 pictures in quick succession. Place the camera on a tripod). 2 shot-The first picture is taken after a 10-second delay. Self-timer/Burst 1 In any Still mode, tap Settings to open...-A picture is taken after the delay. NOTE: In Panoramic modes (page 39), only the 2- www.kodak.com/go/support 13 Using burst Use burst to take up to take pictures. Taking pictures/videos Using the self-timer Use the self-timer when you have time to ensure a steady Shutter button...

User Manual
Page 20
... infinity auto-focus. Macro Close range. For Focus System/Distances, see page 58. 14 www.kodak.com/go/support Taking pictures/videos Using focus modes For more flexibility, you can adjust the camera's focus distance. Open the Settings panel 1 Tap Settings to open the Settings panel. Focus 2 Tap Focus repeatedly, until the desired... mode because focus distance is automatically selected. Auto-focus framing marks are not available in Landscape. Press the Shutter button halfway, then completely down. The camera automatically sets the focus distance depending on the zoom position.
... infinity auto-focus. Macro Close range. For Focus System/Distances, see page 58. 14 www.kodak.com/go/support Taking pictures/videos Using focus modes For more flexibility, you can adjust the camera's focus distance. Open the Settings panel 1 Tap Settings to open the Settings panel. Focus 2 Tap Focus repeatedly, until the desired... mode because focus distance is automatically selected. Auto-focus framing marks are not available in Landscape. Press the Shutter button halfway, then completely down. The camera automatically sets the focus distance depending on the zoom position.

User Manual
Page 21
Taking pictures/videos Using camera Help To better understand each menu option, use camera Help. Turn on Help Scroll up/down Exit Exit Help Understanding the picture-taking icons Settings panel (open/close) Flash Self-timer/Burst Focus Mode Exposure compensation Zoom: digital telephoto wide Tag name Picture size Flash Macro/Landscape Self timer Date stamp AF mode Long time exposure ISO White Balance AF Zone Exposure metering www.kodak.com/go/support 15 Highlight a menu choice, then press the Info button.
Taking pictures/videos Using camera Help To better understand each menu option, use camera Help. Turn on Help Scroll up/down Exit Exit Help Understanding the picture-taking icons Settings panel (open/close) Flash Self-timer/Burst Focus Mode Exposure compensation Zoom: digital telephoto wide Tag name Picture size Flash Macro/Landscape Self timer Date stamp AF mode Long time exposure ISO White Balance AF Zone Exposure metering www.kodak.com/go/support 15 Highlight a menu choice, then press the Info button.

User Manual
Page 22
3 Working with pictures/videos Reviewing pictures/videos Delete a picture, video View previous picture, video View previous thumbnails Open/close thumbnails Tag a picture, video Tag a picture, video as a favorite Press the Review button to enter/exit Review. 16 www.kodak.com/go/support
3 Working with pictures/videos Reviewing pictures/videos Delete a picture, video View previous picture, video View previous thumbnails Open/close thumbnails Tag a picture, video Tag a picture, video as a favorite Press the Review button to enter/exit Review. 16 www.kodak.com/go/support

User Manual
Page 23
... hold for previous/next. 3 Tap Delete, then follow the screen prompts. NOTE: To delete protected pictures/videos, remove protection before deleting. (See Protecting pictures/videos from deletion.) www.kodak.com/go/support 17 Magnifying a picture Working with pictures/videos ■ Press Telephoto (T) to magnify a picture 2X-8X. ■ Tap to view other parts of...
... hold for previous/next. 3 Tap Delete, then follow the screen prompts. NOTE: To delete protected pictures/videos, remove protection before deleting. (See Protecting pictures/videos from deletion.) www.kodak.com/go/support 17 Magnifying a picture Working with pictures/videos ■ Press Telephoto (T) to magnify a picture 2X-8X. ■ Tap to view other parts of...

User Manual
Page 24
... EasyShare software Help.) 18 www.kodak.com/go/support Favorites automatically receive a Protect tag. ■ Tap Exit to retrieve it. Protecting pictures/videos from deletion 1 Press the Review button. 2 Tap for previous/next. 3 Press the Menu button. 4 Tap Protect. The picture/video ...or SDHC card deletes all (including protected) pictures/videos. (Formatting internal memory also deletes email addresses, tag names, and favorites. Working with the protected picture/video. The Protect icon appears with pictures/videos Using the undo delete feature If you accidentally delete...
... EasyShare software Help.) 18 www.kodak.com/go/support Favorites automatically receive a Protect tag. ■ Tap Exit to retrieve it. Protecting pictures/videos from deletion 1 Press the Review button. 2 Tap for previous/next. 3 Press the Menu button. 4 Tap Protect. The picture/video ...or SDHC card deletes all (including protected) pictures/videos. (Formatting internal memory also deletes email addresses, tag names, and favorites. Working with the protected picture/video. The Protect icon appears with pictures/videos Using the undo delete feature If you accidentally delete...

User Manual
Page 25
Working with pictures/videos Understanding the review icons Pictures Delete picture Tag picture Tag picture as a favorite View previous picture View previous thumbnails Videos Delete video Open/close thumbnails Tag video Tag video as a favorite Play video View previous picture, video Open/close thumbnails www.kodak.com/go/support 19
Working with pictures/videos Understanding the review icons Pictures Delete picture Tag picture Tag picture as a favorite View previous picture View previous thumbnails Videos Delete video Open/close thumbnails Tag video Tag video as a favorite Play video View previous picture, video Open/close thumbnails www.kodak.com/go/support 19
User Manual
Page 26
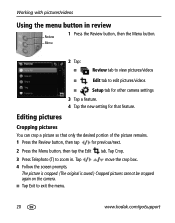
... review Review Menu 1 Press the Review button, then the Menu button. 2 Tap: ■ Review tab to view pictures/videos ■ Edit tab to exit the menu. 20 www.kodak.com/go/support The picture is cropped. (The original is saved.) Cropped pictures cannot be cropped again on the... camera. ■ Tap Exit to edit pictures/videos ■ Setup tab for other camera settings 3 Tap a feature. 4 Tap the new setting for ...
... review Review Menu 1 Press the Review button, then the Menu button. 2 Tap: ■ Review tab to view pictures/videos ■ Edit tab to exit the menu. 20 www.kodak.com/go/support The picture is cropped. (The original is saved.) Cropped pictures cannot be cropped again on the... camera. ■ Tap Exit to edit pictures/videos ■ Setup tab for other camera settings 3 Tap a feature. 4 Tap the new setting for ...

User Manual
Page 27
www.kodak.com/go/support 21 NOTE: Only one sound tag can add a recorded voice or sound tag (up to 1 minute long) to a picture. The sound tag ... tap for previous/next. 2 Press the Menu button, then tap the Edit tab. 3 Tap Sound Tag. 4 Tap Record. 5 Follow the screen prompts. Working with pictures/videos Adding sound tags You can be added to each picture (not to...
www.kodak.com/go/support 21 NOTE: Only one sound tag can add a recorded voice or sound tag (up to 1 minute long) to a picture. The sound tag ... tap for previous/next. 2 Press the Menu button, then tap the Edit tab. 3 Tap Sound Tag. 4 Tap Record. 5 Follow the screen prompts. Working with pictures/videos Adding sound tags You can be added to each picture (not to...

User Manual
Page 28
...picture or to save the enhanced picture as a new one. ■ Tap Exit to pictures taken in Smart Capture mode. (You cannot enhance videos, panoramic pictures, pictures that are already enhanced, or pictures taken in a split screen. Touch picture. The enhancement is previewed in Smart Capture mode... Review button. 2 Tap for previous/next. 2 Press the Menu button, then tap the Edit tab. Perfect Touch is saved.) 22 www.kodak.com/go/support Working with pictures/videos Using Kodak Perfect Touch technology Kodak Perfect Touch technology helps ensure better, brighter pictures.
...picture or to save the enhanced picture as a new one. ■ Tap Exit to pictures taken in Smart Capture mode. (You cannot enhance videos, panoramic pictures, pictures that are already enhanced, or pictures taken in a split screen. Touch picture. The enhancement is previewed in Smart Capture mode... Review button. 2 Tap for previous/next. 2 Press the Menu button, then tap the Edit tab. Perfect Touch is saved.) 22 www.kodak.com/go/support Working with pictures/videos Using Kodak Perfect Touch technology Kodak Perfect Touch technology helps ensure better, brighter pictures.


