
User Manual
Page 3
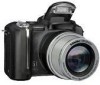
Front View 7 8 6 9 10 5 4 3 2 1 1 Lens 2 Grip 3 Self-timer/Video light 4 LED indicator 5 Shutter button 6 Mode /Power switch 7 Exposure metering button 8 Program button 9 Drive button 10 Mode dial www.kodak.com/go/support Product features 11 12 13 14 15 16 17 18 19 11 Hot shoe 12 Flash 13 Flash button 14 Focus button 15 Strap post 16 Speaker 17 Microphone 18 USB, A/V Out 19 DC-In (5V) i
Front View 7 8 6 9 10 5 4 3 2 1 1 Lens 2 Grip 3 Self-timer/Video light 4 LED indicator 5 Shutter button 6 Mode /Power switch 7 Exposure metering button 8 Program button 9 Drive button 10 Mode dial www.kodak.com/go/support Product features 11 12 13 14 15 16 17 18 19 11 Hot shoe 12 Flash 13 Flash button 14 Focus button 15 Strap post 16 Speaker 17 Microphone 18 USB, A/V Out 19 DC-In (5V) i

User Manual
Page 4
Product features Back View 5 4 3 2 6 1 7 8 9 10 11 12 13 14 17 18 15 16 1 Delete button 10 Set button 2 Tripod socket 11 AE/AF lock button 3 Dock connector 12 Status button 4 LCD screen 13 Review button 5 EVF/LCD toggle button 14 Joystick ( ); OK button (press in) 6 Diopter dial 15 Slot for optional SD or MMC card 7 EVF (Electronic Viewfinder) 16 Share button 8 Zoom lever 17 Menu button 9 Command dial 18 Battery compartment ii www.kodak.com/go/support
Product features Back View 5 4 3 2 6 1 7 8 9 10 11 12 13 14 17 18 15 16 1 Delete button 10 Set button 2 Tripod socket 11 AE/AF lock button 3 Dock connector 12 Status button 4 LCD screen 13 Review button 5 EVF/LCD toggle button 14 Joystick ( ); OK button (press in) 6 Diopter dial 15 Slot for optional SD or MMC card 7 EVF (Electronic Viewfinder) 16 Share button 8 Zoom lever 17 Menu button 9 Command dial 18 Battery compartment ii www.kodak.com/go/support

User Manual
Page 5
... the lens cap and strap 1 Charging the battery 2 Loading the battery 2 Turning on the camera 3 Setting the language and date/time, first time 3 Setting the language and date/time, other times 4 Storing pictures on an SD or MMC card 4 2 ...pictures and videos 11 Protecting pictures and videos from deletion 16 3 Transferring and printing pictures 18 Installing the software 18 Transferring pictures 19 Printing from a Kodak EasyShare printer dock or your computer 20 Printing from an optional SD or MMC card 20 Ordering prints online 21 Direct printing with a PictBridge enabled printer...
... the lens cap and strap 1 Charging the battery 2 Loading the battery 2 Turning on the camera 3 Setting the language and date/time, first time 3 Setting the language and date/time, other times 4 Storing pictures on an SD or MMC card 4 2 ...pictures and videos 11 Protecting pictures and videos from deletion 16 3 Transferring and printing pictures 18 Installing the software 18 Transferring pictures 19 Printing from a Kodak EasyShare printer dock or your computer 20 Printing from an optional SD or MMC card 20 Ordering prints online 21 Direct printing with a PictBridge enabled printer...

User Manual
Page 6
Table of contents 4 Doing more with your camera 24 Picture-taking modes 24 Using the focus button 29 Using the drive mode for self-timer, burst, exposure bracketing 30 Using the AE/AF ... picture/video information 56 Copying pictures and videos 57 Running a slide show 58 Pre-tagging for album names 59 Sharing your pictures 62 5 Troubleshooting 68 Camera problems 68 Computer/connectivity problems 70 Picture quality problems 71 Direct printing (PictBridge) problems 73 6 Getting help 74 Helpful links 74 Telephone customer...
Table of contents 4 Doing more with your camera 24 Picture-taking modes 24 Using the focus button 29 Using the drive mode for self-timer, burst, exposure bracketing 30 Using the AE/AF ... picture/video information 56 Copying pictures and videos 57 Running a slide show 58 Pre-tagging for album names 59 Sharing your pictures 62 5 Troubleshooting 68 Camera problems 68 Computer/connectivity problems 70 Picture quality problems 71 Direct printing (PictBridge) problems 73 6 Getting help 74 Helpful links 74 Telephone customer...
User Manual
Page 7
Table of contents 7 Appendix 76 Camera specifications 76 Storage capacities 80 Power-saving features 82 Accessories 83 Important safety instructions 84 Battery information 86 Upgrading your software and firmware 87 Additional care and maintenance 87 Warranty...88 Regulatory compliance 90 www.kodak.com/go/support v
Table of contents 7 Appendix 76 Camera specifications 76 Storage capacities 80 Power-saving features 82 Accessories 83 Important safety instructions 84 Battery information 86 Upgrading your software and firmware 87 Additional care and maintenance 87 Warranty...88 Regulatory compliance 90 www.kodak.com/go/support v

User Manual
Page 8
1 Setting up your camera Attaching the lens cap and strap 1 www.kodak.com/go/support
1 Setting up your camera Attaching the lens cap and strap 1 www.kodak.com/go/support

User Manual
Page 9
Purchase these and other accessories at a dealer of Kodak products or visit www.kodak.com/go /support 2 Loading the battery CAUTION: We recommend that you use . Red-charging Green-complete Approximately 3 hours for full charge You can also charge the battery using a Kodak EasyShare printer dock or camera dock. Setting up your camera Charging the battery Charge the Li-Ion rechargeable battery before first use a Kodak Li-Ion rechargeable battery (KLIC-5001). www.kodak.com/go /p850accessories. For information on replacing the battery and extending battery life, see page 86.
Purchase these and other accessories at a dealer of Kodak products or visit www.kodak.com/go /support 2 Loading the battery CAUTION: We recommend that you use . Red-charging Green-complete Approximately 3 hours for full charge You can also charge the battery using a Kodak EasyShare printer dock or camera dock. Setting up your camera Charging the battery Charge the Li-Ion rechargeable battery before first use a Kodak Li-Ion rechargeable battery (KLIC-5001). www.kodak.com/go /p850accessories. For information on replacing the battery and extending battery life, see page 86.

User Manual
Page 10
Setting up your camera Turning on the camera ■ Capture: For taking pictures and videos. ■ Favorites: View your Favorites, see page 65. Setting the language and date/time, first time Language: 1 Move to accept. 3 www.kodak.com/go/support for previous/next field. 2 Press OK to choose a Language, then press OK. Date & Time: 1 Press OK. to change.
Setting up your camera Turning on the camera ■ Capture: For taking pictures and videos. ■ Favorites: View your Favorites, see page 65. Setting the language and date/time, first time Language: 1 Move to accept. 3 www.kodak.com/go/support for previous/next field. 2 Press OK to choose a Language, then press OK. Date & Time: 1 Press OK. to change.

User Manual
Page 11
... SD or MMC card Your camera has 32 MB of Kodak products or www.kodak.com/go /support 4 forcing it in this camera before taking pictures (see page 49). 2 Notched corner 1 Turn off the camera SD or MMC card (optional) CAUTION: A card can purchase a Kodak SD or MMC card to ...Purchase SD or MMC cards at a dealer of internal memory. You can only be inserted one way; For best results, purchase a Kodak card. for storage capacities. Setting up your camera Setting the language and date/time, other times 1 Press Menu. (Press again to exit.) 2 Move to highlightSetup . 3 to...
... SD or MMC card Your camera has 32 MB of Kodak products or www.kodak.com/go /support 4 forcing it in this camera before taking pictures (see page 49). 2 Notched corner 1 Turn off the camera SD or MMC card (optional) CAUTION: A card can purchase a Kodak SD or MMC card to ...Purchase SD or MMC cards at a dealer of internal memory. You can only be inserted one way; For best results, purchase a Kodak card. for storage capacities. Setting up your camera Setting the language and date/time, other times 1 Press Menu. (Press again to exit.) 2 Move to highlightSetup . 3 to...

User Manual
Page 12
2 Taking pictures and videos Taking a picture 1 2 EVF 3 Auto LCD or Use the Diopter to set the AE/AF. To stop recording, press and release the Shutter button again. 5 www.kodak.com/go/support AF/AE indicator: green-successful red-failed failed focus failed exposure 4 Press the Shutter button completely down . When the AE/AF indicator turns green, press the Shutter button completely down and release. Taking a video 1 2 EVF 3 LCD or 4 Press Shutter button halfway to adjust the sharpness of the Viewfinder.
2 Taking pictures and videos Taking a picture 1 2 EVF 3 Auto LCD or Use the Diopter to set the AE/AF. To stop recording, press and release the Shutter button again. 5 www.kodak.com/go/support AF/AE indicator: green-successful red-failed failed focus failed exposure 4 Press the Shutter button completely down . When the AE/AF indicator turns green, press the Shutter button completely down and release. Taking a video 1 2 EVF 3 LCD or 4 Press Shutter button halfway to adjust the sharpness of the Viewfinder.

User Manual
Page 13
Taking pictures and videos Reviewing a quickview of the picture or video just taken After you press no buttons, the picture/video is saved. Tag a picture/video for email or as a favorite, or tag a picture for approximately 5 seconds. www.kodak.com/go/support 6 While the picture or video is displayed, you can: If you take a picture or video, the EVF/LCD screen displays a Quickview for print. Move the Joystick to play/pause video. Delete Press OK to adjust the volume. To rewind or fast forward. To view pictures and videos anytime, see page 11.
Taking pictures and videos Reviewing a quickview of the picture or video just taken After you press no buttons, the picture/video is saved. Tag a picture/video for email or as a favorite, or tag a picture for approximately 5 seconds. www.kodak.com/go/support 6 While the picture or video is displayed, you can: If you take a picture or video, the EVF/LCD screen displays a Quickview for print. Move the Joystick to play/pause video. Delete Press OK to adjust the volume. To rewind or fast forward. To view pictures and videos anytime, see page 11.

User Manual
Page 14
...centered in Landscape, Night Landscape, Fireworks, or Video mode. When the framing marks turn green, focus is focusing. Framing marks 2 If the camera is not focusing on the desired subject (or if the framing marks disappear), release the Shutter button and recompose the scene. 3 Press the Shutter... button completely down to focus on foreground subjects, even if the subjects are fixed at Center Wide. 7 www.kodak.com/go/support Taking pictures and videos Using the auto-focus framing marks (pictures) When using the EVF/LCD screen as a viewfinder, framing marks indicate ...
...centered in Landscape, Night Landscape, Fireworks, or Video mode. When the framing marks turn green, focus is focusing. Framing marks 2 If the camera is not focusing on the desired subject (or if the framing marks disappear), release the Shutter button and recompose the scene. 3 Press the Shutter... button completely down to focus on foreground subjects, even if the subjects are fixed at Center Wide. 7 www.kodak.com/go/support Taking pictures and videos Using the auto-focus framing marks (pictures) When using the EVF/LCD screen as a viewfinder, framing marks indicate ...

User Manual
Page 15
Taking pictures and videos Capture modes in liveview Flash mode Focus mode Drive mode Date stamp Camera mode Album name Image stabilizer Accessory lens Framing marks Aperture Shutter speed Picture size Zoom indicator File size Pictures/time remaining Storage location Battery indicator (... halfway Framing marks Aperture Shutter speed Battery indicator Auto Focus/ Auto Exposure (AF/AE indicator) Slow shutter speed warning ISO Flash compensation Exposure compensation www.kodak.com/go/support 8
Taking pictures and videos Capture modes in liveview Flash mode Focus mode Drive mode Date stamp Camera mode Album name Image stabilizer Accessory lens Framing marks Aperture Shutter speed Picture size Zoom indicator File size Pictures/time remaining Storage location Battery indicator (... halfway Framing marks Aperture Shutter speed Battery indicator Auto Focus/ Auto Exposure (AF/AE indicator) Slow shutter speed warning ISO Flash compensation Exposure compensation www.kodak.com/go/support 8

User Manual
Page 16
...down to take the picture. (When taking videos, press and release the Shutter button.) Optical range Digital range Using digital zoom Use digital zoom in . (10 x 15 cm) print. 9 www.kodak.com/go/support Release the button, then press it again. The blue slider on the zoom indicator pauses and turns ...red when the picture quality reaches the limit for video recording. NOTE: You cannot use digital zoom for an acceptable 4 x 6 in any ...
...down to take the picture. (When taking videos, press and release the Shutter button.) Optical range Digital range Using digital zoom Use digital zoom in . (10 x 15 cm) print. 9 www.kodak.com/go/support Release the button, then press it again. The blue slider on the zoom indicator pauses and turns ...red when the picture quality reaches the limit for video recording. NOTE: You cannot use digital zoom for an acceptable 4 x 6 in any ...

User Manual
Page 17
Refer to close. www.kodak.com/go/support 10 To change the flash settings, see page 36. Press the cover to your external flash unit user's guide for fully ...Hot shoe. 3 Turn on the external flash unit. Flash When you want additional or specialized lighting (we recommend a Kodak external flash unit for details. You can use the camera's built-in heavy shadows. Make sure you take pictures at any shutter speed. The external flash unit is needed, ...outdoors in flash, as well, to provide extra fill flash. 1 Slide off the Hot-shoe cover. 2 Mount the flash unit to the camera.
Refer to close. www.kodak.com/go/support 10 To change the flash settings, see page 36. Press the cover to your external flash unit user's guide for fully ...Hot shoe. 3 Turn on the external flash unit. Flash When you want additional or specialized lighting (we recommend a Kodak external flash unit for details. You can use the camera's built-in heavy shadows. Make sure you take pictures at any shutter speed. The external flash unit is needed, ...outdoors in flash, as well, to provide extra fill flash. 1 Slide off the Hot-shoe cover. 2 Mount the flash unit to the camera.

User Manual
Page 18
Pictures 1 Press Review. (Press again to play . Adjust volume. To save battery power, use the optional Kodak EasyShare camera or printer dock, or Kodak 5-volt AC adapter. (See www.kodak.com/go/p850accessories.) 11 www.kodak.com/go/support Videos 1 Press OK to exit.) 2 View previous/next. Press again to view single pictures. End video play /pause. 2 During...
Pictures 1 Press Review. (Press again to play . Adjust volume. To save battery power, use the optional Kodak EasyShare camera or printer dock, or Kodak 5-volt AC adapter. (See www.kodak.com/go/p850accessories.) 11 www.kodak.com/go/support Videos 1 Press OK to exit.) 2 View previous/next. Press again to view single pictures. End video play /pause. 2 During...

User Manual
Page 19
To deselect the entire set , press Set again. To remove a picture from the set , press review or turn off the camera. To deselect a picture, press Set again and the blue box disappears. Multi-up 1 Press Review. (Press again to exit.) 10 of pictures to review and ... functions, for example Delete (page 17), Protect (page 16), and Copy (page 57). NOTE: Each time you press Set to the next picture. www.kodak.com/go/support 12 Taking pictures and videos Multi-selection of pictures during review Use the Set button to create a set of 20 selected pictures 2 Press Set...
To deselect the entire set , press Set again. To remove a picture from the set , press review or turn off the camera. To deselect a picture, press Set again and the blue box disappears. Multi-up 1 Press Review. (Press again to exit.) 10 of pictures to review and ... functions, for example Delete (page 17), Protect (page 16), and Copy (page 57). NOTE: Each time you press Set to the next picture. www.kodak.com/go/support 12 Taking pictures and videos Multi-selection of pictures during review Use the Set button to create a set of 20 selected pictures 2 Press Set...

User Manual
Page 20
Taking pictures and videos Magnifying a picture during review Use the Zoom lever to 1X. Magnify 1X-10X. 13 www.kodak.com/go/support OK Return to magnify your pictures. W/T View other parts of the picture.
Taking pictures and videos Magnifying a picture during review Use the Zoom lever to 1X. Magnify 1X-10X. 13 www.kodak.com/go/support OK Return to magnify your pictures. W/T View other parts of the picture.

User Manual
Page 21
Taking pictures and videos Identifying the review icons Picture Favorite tag Email tag Selected/ Total number Review mode Album name Print tag/number of prints Protect Picture number Image storage location Battery indicator Scroll arrows Video Favorite tag Email tag Selected/ Total number Review mode Album name Play/Pause Video length www.kodak.com/go/support Date stamp Protect Video number Image storage location Battery indicator Video date display 14
Taking pictures and videos Identifying the review icons Picture Favorite tag Email tag Selected/ Total number Review mode Album name Print tag/number of prints Protect Picture number Image storage location Battery indicator Scroll arrows Video Favorite tag Email tag Selected/ Total number Review mode Album name Play/Pause Video length www.kodak.com/go/support Date stamp Protect Video number Image storage location Battery indicator Video date display 14

User Manual
Page 23
To restore them, see EasyShare software Help.) www.kodak.com/go/support 16 ALL-protects all (including protected) pictures, videos. (Formatting internal memory also deletes email addresses, album names, and favorites. The Protect icon appears with the ...
To restore them, see EasyShare software Help.) www.kodak.com/go/support 16 ALL-protects all (including protected) pictures, videos. (Formatting internal memory also deletes email addresses, album names, and favorites. The Protect icon appears with the ...


