
User Manual
Page 5
... the lens cap and strap 1 Charging the battery 2 Loading the battery 2 Turning on the camera 3 Setting the language and date/time, first time 3 Setting the language and date/time, other times 4 Storing pictures on an SD or MMC card 4 2 ...pictures and videos 12 Protecting pictures and videos from deletion 16 3 Transferring and printing pictures 18 Installing the software 18 Transferring pictures 19 Printing from a Kodak EasyShare printer dock or your computer 20 Printing from an optional SD or MMC card 20 Ordering prints online 20 Direct printing with a PictBridge enabled printer...
... the lens cap and strap 1 Charging the battery 2 Loading the battery 2 Turning on the camera 3 Setting the language and date/time, first time 3 Setting the language and date/time, other times 4 Storing pictures on an SD or MMC card 4 2 ...pictures and videos 12 Protecting pictures and videos from deletion 16 3 Transferring and printing pictures 18 Installing the software 18 Transferring pictures 19 Printing from a Kodak EasyShare printer dock or your computer 20 Printing from an optional SD or MMC card 20 Ordering prints online 20 Direct printing with a PictBridge enabled printer...

User Manual
Page 10
Setting the language and date/time, first time Language: Move to accept. 3 www.kodak.com/go/support for previous/next field. 2 Press OK to choose a Language, then press OK. to change. Date & Time: 1 Press OK. Setting up your camera Turning on the camera I Favorites: View your Favorites, see page 66. I Capture: Take pictures and videos.
Setting the language and date/time, first time Language: Move to accept. 3 www.kodak.com/go/support for previous/next field. 2 Press OK to choose a Language, then press OK. to change. Date & Time: 1 Press OK. Setting up your camera Turning on the camera I Favorites: View your Favorites, see page 66. I Capture: Take pictures and videos.

User Manual
Page 11
... store more pictures and videos. forcing it in this camera before taking pictures (see page 49). 2 Notched corner 1 Turn off the camera SD or MMC card (optional) CAUTION: A card can purchase an SD or MMC card to change. www.kodak.com/go /p712accessories. Storing pictures on an SD or... MMC card Your camera has 32 MB of Kodak products or www.kodak.com/go /support 4 Setting ...
... store more pictures and videos. forcing it in this camera before taking pictures (see page 49). 2 Notched corner 1 Turn off the camera SD or MMC card (optional) CAUTION: A card can purchase an SD or MMC card to change. www.kodak.com/go /p712accessories. Storing pictures on an SD or... MMC card Your camera has 32 MB of Kodak products or www.kodak.com/go /support 4 Setting ...

User Manual
Page 12
Taking a video 1 2 EVF 3 LCD or 4 Press the Shutter button halfway to adjust the sharpness of the Viewfinder. AE/AF indicator: green-successful red-failed failed focus failed exposure 4 Press the Shutter button completely down . When the AE/AF indicator turns green, press the Shutter button completely down and release. To stop recording, press and release the Shutter button again. 5 www.kodak.com/go/support 2 Taking pictures and videos Taking a picture 1 2 EVF 3 Auto LCD or Use the Diopter to set the AE/AF.
Taking a video 1 2 EVF 3 LCD or 4 Press the Shutter button halfway to adjust the sharpness of the Viewfinder. AE/AF indicator: green-successful red-failed failed focus failed exposure 4 Press the Shutter button completely down . When the AE/AF indicator turns green, press the Shutter button completely down and release. To stop recording, press and release the Shutter button again. 5 www.kodak.com/go/support 2 Taking pictures and videos Taking a picture 1 2 EVF 3 Auto LCD or Use the Diopter to set the AE/AF.

User Manual
Page 14
NOTE: Framing marks do not appear in the scene. 1 Press the Shutter button halfway. For the best pictures, the camera attempts to focus on the desired subject (or if the framing marks disappear), release the Shutter button and recompose the scene. 3 Press the Shutter button ... not focusing on foreground subjects, even if the subjects are fixed at Center Wide. 7 www.kodak.com/go/support Framing marks 2 If the camera is focusing. When the framing marks turn green, focus is accomplished. When you use AF Zone (page 51) and set Center Zone, the framing marks are not centered in...
NOTE: Framing marks do not appear in the scene. 1 Press the Shutter button halfway. For the best pictures, the camera attempts to focus on the desired subject (or if the framing marks disappear), release the Shutter button and recompose the scene. 3 Press the Shutter button ... not focusing on foreground subjects, even if the subjects are fixed at Center Wide. 7 www.kodak.com/go/support Framing marks 2 If the camera is focusing. When the framing marks turn green, focus is accomplished. When you use AF Zone (page 51) and set Center Zone, the framing marks are not centered in...

User Manual
Page 17
... are from 12X to zoom out. The Zoom indicator shows zoom status. 2 Take the picture. You may notice decreased image quality when using digital zoom. Press Wide Angle (W) to 60X. The Zoom indicator shows zoom status. Release the button, then press it again. The blue slider on ...the zoom indicator pauses and turns red when the picture quality reaches the limit for video recording. www.kodak.com/go/support 10 NOTE: To enable Advanced digital zoom, select this option in the Setup menu (page 46). 1 Press Telephoto (T) ...
... are from 12X to zoom out. The Zoom indicator shows zoom status. 2 Take the picture. You may notice decreased image quality when using digital zoom. Press Wide Angle (W) to 60X. The Zoom indicator shows zoom status. Release the button, then press it again. The blue slider on ...the zoom indicator pauses and turns red when the picture quality reaches the limit for video recording. www.kodak.com/go/support 10 NOTE: To enable Advanced digital zoom, select this option in the Setup menu (page 46). 1 Press Telephoto (T) ...

User Manual
Page 18
... flash, as well, to provide extra fill flash. 1 Slide off the Hot-shoe cover. 2 Mount the flash unit to the camera. You can use the camera's built-in heavy shadows. The external flash unit is needed, the flash automatically opens. Flash When you press the Shutter button halfway...shoe. 3 Turn on the external flash unit. Refer to close. Press the cover to your external flash unit user's guide for fully automatic extended flash capabilities). To change the flash settings, see page 36. Make sure you want additional or specialized lighting (we recommend a Kodak external flash ...
... flash, as well, to provide extra fill flash. 1 Slide off the Hot-shoe cover. 2 Mount the flash unit to the camera. You can use the camera's built-in heavy shadows. The external flash unit is needed, the flash automatically opens. Flash When you press the Shutter button halfway...shoe. 3 Turn on the external flash unit. Refer to close. Press the cover to your external flash unit user's guide for fully automatic extended flash capabilities). To change the flash settings, see page 36. Make sure you want additional or specialized lighting (we recommend a Kodak external flash ...

User Manual
Page 20
...appears around your pictures. 4 Press Set to select a picture. To deselect a picture, press Set again and the blue box disappears. 13 www.kodak.com/go/support Multi-up 1 Press Review. (Press again to exit.) 10 of pictures to review and to the next picture. NOTE: Each time... you press Set to highlight a picture. To remove a picture from the set , press review or turn off the camera. Taking pictures and videos Multi-selection of pictures during review Use the Set button to create a set of 20 selected pictures 2 Press Set....
...appears around your pictures. 4 Press Set to select a picture. To deselect a picture, press Set again and the blue box disappears. 13 www.kodak.com/go/support Multi-up 1 Press Review. (Press again to exit.) 10 of pictures to review and to the next picture. NOTE: Each time... you press Set to highlight a picture. To remove a picture from the set , press review or turn off the camera. Taking pictures and videos Multi-selection of pictures during review Use the Set button to create a set of 20 selected pictures 2 Press Set....

User Manual
Page 25
...software. For information on the software applications included on . 3 Transferring and printing pictures Installing the software CAUTION: Install Kodak EasyShare software before connecting the camera or optional dock to automatically install the most commonly used applications. NOTE: When prompted, register your system up-to...d:\setup.exe where d is the drive letter that keeps your camera and software. If you turned off anti-virus software, turn it back on the Kodak EasyShare software CD, click the Help button in the Kodak EasyShare software. Failure to do so may cause the software to -...
...software. For information on the software applications included on . 3 Transferring and printing pictures Installing the software CAUTION: Install Kodak EasyShare software before connecting the camera or optional dock to automatically install the most commonly used applications. NOTE: When prompted, register your system up-to...d:\setup.exe where d is the drive letter that keeps your camera and software. If you turned off anti-virus software, turn it back on the Kodak EasyShare software CD, click the Help button in the Kodak EasyShare software. Failure to do so may cause the software to -...

User Manual
Page 26
.... For dock compatibility, see www.kodak.com/go /p712accessories. Kodak EasyShare software opens on the camera. To purchase accessories, see page 22.) 19 www.kodak.com/go /howto for details. 3 Plug the other accessories at a dealer of the USB cable into the labeled USB port on the camera. 4 Turn on your camera. 1 Turn off the camera. 2 Plug the labeled end...
.... For dock compatibility, see www.kodak.com/go /p712accessories. Kodak EasyShare software opens on the camera. To purchase accessories, see page 22.) 19 www.kodak.com/go /howto for details. 3 Plug the other accessories at a dealer of the USB cable into the labeled USB port on the camera. 4 Turn on your camera. 1 Turn off the camera. 2 Plug the labeled end...

User Manual
Page 28
... displayed, followed by the current picture and menu. (If no pictures are not directly printable (see page 55). 1 Turn the Mode switch to or . 2 Turn on the printer. Transferring and printing pictures Direct printing with I PictBridge enabled printer optional Kodak 5-volt AC adapter I Camera with fully charged batteries, or with a PictBridge enabled printer Your...
... displayed, followed by the current picture and menu. (If no pictures are not directly printable (see page 55). 1 Turn the Mode switch to or . 2 Turn on the printer. Transferring and printing pictures Direct printing with I PictBridge enabled printer optional Kodak 5-volt AC adapter I Camera with fully charged batteries, or with a PictBridge enabled printer Your...

User Manual
Page 29
... printing, pictures are compatible, visit www.kodak.com/go/dockcompatibility. Image Storage Access internal memory, a memory card, or Favorites. NOTE: If you tagged for your printer is capable, print pictures that you turned the Mode switch to choose a picture. Dock compatibility for printing (see which EasyShare camera and printer docks are not permanently transferred...
... printing, pictures are compatible, visit www.kodak.com/go/dockcompatibility. Image Storage Access internal memory, a memory card, or Favorites. NOTE: If you tagged for your printer is capable, print pictures that you turned the Mode switch to choose a picture. Dock compatibility for printing (see which EasyShare camera and printer docks are not permanently transferred...
User Manual
Page 33
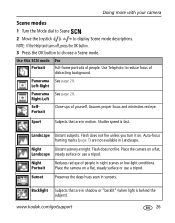
... yourself. Backlight Subjects that are in motion. Panorama See page 28. Flash does not fire unless you turn it on a flat, steady surface or use a tripod. Place the camera on . Right-Left SelfPortrait Close-ups of people in night scenes or low-light conditions. Left-Right... Panorama See page 28. www.kodak.com/go/support 26 Use Telephoto to reduce focus of people. Doing more with your camera Scene modes 1 Turn the Mode dial to Scene . 2 Move the Joystick to choose a Scene mode. ...
... yourself. Backlight Subjects that are in motion. Panorama See page 28. Flash does not fire unless you turn it on a flat, steady surface or use a tripod. Place the camera on . Right-Left SelfPortrait Close-ups of people in night scenes or low-light conditions. Left-Right... Panorama See page 28. www.kodak.com/go/support 26 Use Telephoto to reduce focus of people. Doing more with your camera Scene modes 1 Turn the Mode dial to Scene . 2 Move the Joystick to choose a Scene mode. ...

User Manual
Page 35
...more with the first picture. NOTE: For printing options, visit the Kodak EasyShare Gallery at www.kodakgallery.com. Get 1 panoramic picture. Exposure and white...for each panorama picture you took.) 5 If you take 3 pictures, the pictures are set to Off.) 1 Turn the Mode dial to SCN. 2 Move the Joystick to highlight Panorama Left-Right or Panorama Right-Left (depending ...results, use a tripod. Make the overlay from the first picture. 4 Compose the second picture. www.kodak.com/go/support 28 Individual pictures are taking only 2 pictures, press the OK button to 3 pictures ...
...more with the first picture. NOTE: For printing options, visit the Kodak EasyShare Gallery at www.kodakgallery.com. Get 1 panoramic picture. Exposure and white...for each panorama picture you took.) 5 If you take 3 pictures, the pictures are set to Off.) 1 Turn the Mode dial to SCN. 2 Move the Joystick to highlight Panorama Left-Right or Panorama Right-Left (depending ...results, use a tripod. Make the overlay from the first picture. 4 Compose the second picture. www.kodak.com/go/support 28 Individual pictures are taking only 2 pictures, press the OK button to 3 pictures ...

User Manual
Page 44
...speeds.) Exposure Compensation-lets you are in those modes. Shutter Speed-controls how long the shutter stays open. Use Reset Camera (see page 43). 37 www.kodak.com/go/support good for controlling backlit or non-standard scenes. If the picture is Off. Larger f-numbers, for PASM...the size of the lens opening, which determines the depth of field. Smaller f-numbers are more with your camera PASM and C1, C2, C3 modes Settings you change modes or turn off the camera. Aperture Shutter Speed Exposure Compensation Flash Compensation ISO Larger f-numbers keep the main subject sharp;
...speeds.) Exposure Compensation-lets you are in those modes. Shutter Speed-controls how long the shutter stays open. Use Reset Camera (see page 43). 37 www.kodak.com/go/support good for controlling backlit or non-standard scenes. If the picture is Off. Larger f-numbers, for PASM...the size of the lens opening, which determines the depth of field. Smaller f-numbers are more with your camera PASM and C1, C2, C3 modes Settings you change modes or turn off the camera. Aperture Shutter Speed Exposure Compensation Flash Compensation ISO Larger f-numbers keep the main subject sharp;
User Manual
Page 45
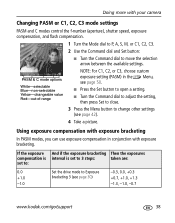
...with exposure bracketing In PASM modes, you can use exposure compensation in the Menu, see page 30) +0.7, +1.0, +1.3 -1.0 -1.3, -1.0, -0.7 www.kodak.com/go/support 38 I Turn the Command dial to adjust the setting, then press Set to close. 3 Press the Menu button to move the selection arrow between the available...value Red-out-of-range NOTE: For C1, C2, or C3, choose custom exposure setting (PASM) in conjunction with your camera Changing PASM or C1, C2, C3 mode settings PASM and C modes control the f-number (aperture), shutter speed, exposure compensation, and flash compensation...
...with exposure bracketing In PASM modes, you can use exposure compensation in the Menu, see page 30) +0.7, +1.0, +1.3 -1.0 -1.3, -1.0, -0.7 www.kodak.com/go/support 38 I Turn the Command dial to adjust the setting, then press Set to close. 3 Press the Menu button to move the selection arrow between the available...value Red-out-of-range NOTE: For C1, C2, or C3, choose custom exposure setting (PASM) in conjunction with your camera Changing PASM or C1, C2, C3 mode settings PASM and C modes control the f-number (aperture), shutter speed, exposure compensation, and flash compensation...

User Manual
Page 47
...: • Flash button (page 36) • Drive button (page 30) • Focus button (page 29) • Exposure metering button (page 39) www.kodak.com/go/support 40 To turn on the framing grid in Capture mode, see page 38. Command dial • Hold a function button and rotate the Command dial for rapid... dial to balance a picture between water, earth, and sky. Using the command dial for example, you want to adjust manual settings in combination with your camera Using the framing grid to close the menu.
...: • Flash button (page 36) • Drive button (page 30) • Focus button (page 29) • Exposure metering button (page 39) www.kodak.com/go/support 40 To turn on the framing grid in Capture mode, see page 38. Command dial • Hold a function button and rotate the Command dial for rapid... dial to balance a picture between water, earth, and sky. Using the command dial for example, you want to adjust manual settings in combination with your camera Using the framing grid to close the menu.

User Manual
Page 48
if it's to turn the histogram on /off . It's normal to underexposure and overexposure. Press the Status button to the left, the subject is in the middle of the histogram. Doing more with your camera Using the histogram In Capture or Review, the histogram ...shows the distribution of the scene show clipping, adjust the exposure in PASM modes by changing, for example, the aperture or shutter-speed setting. Press the Status button to the right of reflectance within a scene. Available only in yellow 41 www.kodak...
if it's to turn the histogram on /off . It's normal to underexposure and overexposure. Press the Status button to the left, the subject is in the middle of the histogram. Doing more with your camera Using the histogram In Capture or Review, the histogram ...shows the distribution of the scene show clipping, adjust the exposure in PASM modes by changing, for example, the aperture or shutter-speed setting. Press the Status button to the right of reflectance within a scene. Available only in yellow 41 www.kodak...

User Manual
Page 51
... compression. High Color Natural Color (default) Low Color Black & White Sepia NOTE: EasyShare software lets you change to Auto or SCN, the file type defaults to which white..., except with your camera Setting Icon File Type Compressed data, other than RAW or TIFF, to black & white or sepia. Choose a date option, or turn off the feature.... (Default is kept across Auto, SCN, PASM and independently in PASM, then change a color picture to reduce storage (memory) space or transmission times. Basic-JPEG, more with a RAW file. This setting is off.) www.kodak...
... compression. High Color Natural Color (default) Low Color Black & White Sepia NOTE: EasyShare software lets you change to Auto or SCN, the file type defaults to which white..., except with your camera Setting Icon File Type Compressed data, other than RAW or TIFF, to black & white or sepia. Choose a date option, or turn off the feature.... (Default is kept across Auto, SCN, PASM and independently in PASM, then change a color picture to reduce storage (memory) space or transmission times. Basic-JPEG, more with a RAW file. This setting is off.) www.kodak...

User Manual
Page 52
...and TTL-AF when the Shutter button is no need to focus. This setting remains until you turn off the camera. Setting Icon Video Size Choose a video resolution. Doing more with your camera Video menu options Video Some settings are unavailable in Liveview 640 x 480-higher resolution and file ...size. AF Control Choose an auto-focus setting. Because the camera is always focusing, there is pressed halfway down to press the Shutter button halfway down . 45 www.kodak.com/go/support This setting remains until you change it . Video plays in a 320 x...
...and TTL-AF when the Shutter button is no need to focus. This setting remains until you turn off the camera. Setting Icon Video Size Choose a video resolution. Doing more with your camera Video menu options Video Some settings are unavailable in Liveview 640 x 480-higher resolution and file ...size. AF Control Choose an auto-focus setting. Because the camera is always focusing, there is pressed halfway down to press the Shutter button halfway down . 45 www.kodak.com/go/support This setting remains until you change it . Video plays in a 320 x...


