
User guide
Page 13
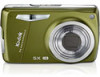
... functions in , press Telephoto (T). The shortcuts appear. Shortcuts www.kodak.com/go/m575support Press to choose a setting. Use shortcuts Your camera has a clean, uncluttered interface. Do more with your camera Use the optical zoom 1 Use the LCD to the most popular capture and review functions: 1 Press the Info button. For quick access to frame...
... functions in , press Telephoto (T). The shortcuts appear. Shortcuts www.kodak.com/go/m575support Press to choose a setting. Use shortcuts Your camera has a clean, uncluttered interface. Do more with your camera Use the optical zoom 1 Use the LCD to the most popular capture and review functions: 1 Press the Info button. For quick access to frame...
User guide
Page 14
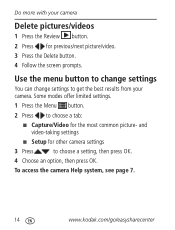
...kodak.com/go/easysharecenter Some modes offer limited settings. 1 Press the Menu button. 2 Press to choose a setting, then press OK. 4 Choose an option, then press OK. Use the menu button to change settings You can change settings to get the best results from your camera Delete pictures/videos 1 Press the Review... button. 2 Press for the most common picture- and video-taking settings ■ Setup for other camera settings 3 Press to choose a tab: ■ Capture/Video...
...kodak.com/go/easysharecenter Some modes offer limited settings. 1 Press the Menu button. 2 Press to choose a setting, then press OK. 4 Choose an option, then press OK. Use the menu button to change settings You can change settings to get the best results from your camera Delete pictures/videos 1 Press the Review... button. 2 Press for the most common picture- and video-taking settings ■ Setup for other camera settings 3 Press to choose a tab: ■ Capture/Video...

User guide
Page 15
Do more with your camera Understand the picture-taking icons Focus mode Self timer/Burst Exposure compensation Flash mode Capture mode Pictures/time remaining Zoom slider Keyword tag Understand the review icons Video duration Select picture/video Add text tag View thumbnails Play video Upload Favorite Text tag Battery level Print/number of prints Protected Email Picture/Video number Battery level www.kodak.com/go/m575support 15
Do more with your camera Understand the picture-taking icons Focus mode Self timer/Burst Exposure compensation Flash mode Capture mode Pictures/time remaining Zoom slider Keyword tag Understand the review icons Video duration Select picture/video Add text tag View thumbnails Play video Upload Favorite Text tag Battery level Print/number of prints Protected Email Picture/Video number Battery level www.kodak.com/go/m575support 15
User guide
Page 16
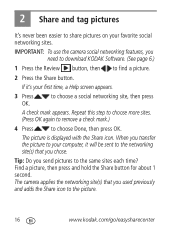
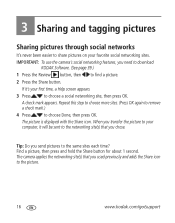
When you need to download KODAK Software. (See page 6.) 1 Press the Review button, then to choose a social networking site, then press A check mark appears. IMPORTANT: To use the camera social networking features, you transfer the picture to your favorite social networking sites. to find a picture. 2 Press the ...Press OK. Tip: Do you chose. If it will be sent to the picture. 16 www.kodak.com/go/easysharecenter The picture is displayed with the Share icon. The camera applies the networking site(s) that you used previously and adds the Share icon to the networking site...
When you need to download KODAK Software. (See page 6.) 1 Press the Review button, then to choose a social networking site, then press A check mark appears. IMPORTANT: To use the camera social networking features, you transfer the picture to your favorite social networking sites. to find a picture. 2 Press the ...Press OK. Tip: Do you chose. If it will be sent to the picture. 16 www.kodak.com/go/easysharecenter The picture is displayed with the Share icon. The camera applies the networking site(s) that you used previously and adds the Share icon to the networking site...

User guide
Page 17
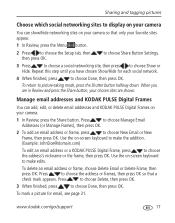
... press the Share button, your favorite sites appear. 1 In Review, press the Menu button. 2 Press to choose the Setup tab, then Share Button Settings, then press OK. To access the camera Help system, see page 7. to choose 3 Press to choose a social networking site, then press to choose ...Show/Hide. Share and tag pictures Choose networking sites to show You can show/hide social networking sites on your camera so that only your chosen sites appear. www.kodak.com...
... press the Share button, your favorite sites appear. 1 In Review, press the Menu button. 2 Press to choose the Setup tab, then Share Button Settings, then press OK. To access the camera Help system, see page 7. to choose 3 Press to choose a social networking site, then press to choose ...Show/Hide. Share and tag pictures Choose networking sites to show You can show/hide social networking sites on your camera so that only your chosen sites appear. www.kodak.com...
User guide
Page 18
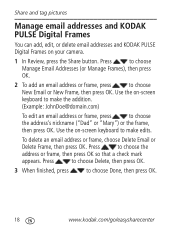
... or frame, then press OK so that a check mark appears. Use the on -screen keyboard to choose Done, then press OK. 18 www.kodak.com/go/easysharecenter Press to choose New Email or New Frame, then press OK. Press to choose Delete, then press OK. 3 When finished, ...press to make edits. Share and tag pictures Manage email addresses and KODAK PULSE Digital Frames You can add, edit, or delete email addresses and KODAK PULSE Digital Frames on your camera. 1 In Review, press the Share button. To delete an email address or frame, choose Delete Email or Delete ...
... or frame, then press OK so that a check mark appears. Use the on -screen keyboard to choose Done, then press OK. 18 www.kodak.com/go/easysharecenter Press to choose New Email or New Frame, then press OK. Press to choose Delete, then press OK. 3 When finished, ...press to make edits. Share and tag pictures Manage email addresses and KODAK PULSE Digital Frames You can add, edit, or delete email addresses and KODAK PULSE Digital Frames on your camera. 1 In Review, press the Share button. To delete an email address or frame, choose Delete Email or Delete ...
User guide
Page 20
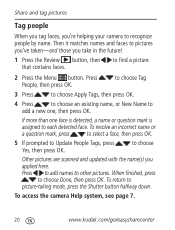
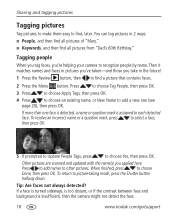
... People Tags, press Yes, then press OK. Share and tag pictures Tag people When you tag faces, you take in the future! 1 Press the Review button, then that contains faces. Press People, then press OK. To resolve an incorrect name or a question mark, press to select a face, then... picture 2 Press the Menu button. When finished, press to picture-taking mode, press the Shutter button halfway down. To access the camera Help system, see page 7. 20 www.kodak.com/go/easysharecenter to choose Tag 3 Press to choose Apply Tags, then press OK. 4 Press to choose an existing name, or ...
... People Tags, press Yes, then press OK. Share and tag pictures Tag people When you tag faces, you take in the future! 1 Press the Review button, then that contains faces. Press People, then press OK. To resolve an incorrect name or a question mark, press to select a face, then... picture 2 Press the Menu button. When finished, press to picture-taking mode, press the Shutter button halfway down. To access the camera Help system, see page 7. 20 www.kodak.com/go/easysharecenter to choose Tag 3 Press to choose Apply Tags, then press OK. 4 Press to choose an existing name, or ...
User guide
Page 21
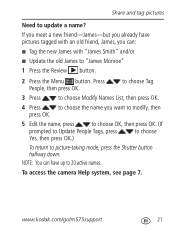
If you meet a new friend-James-but you already have up to "James Monroe" 1 Press the Review button. 2 Press the Menu button. Press People, then press OK. NOTE: You can have pictures tagged with an old friend, James, you want to modify, ... the name you can: ■ Tag the new James with "James Smith" and/or ■ Update the old James to 20 active names. www.kodak.com/go/m575support 21 To access the camera Help system, see page 7. Share and tag pictures Need to picture-taking mode, press the Shutter button halfway down.
If you meet a new friend-James-but you already have up to "James Monroe" 1 Press the Review button. 2 Press the Menu button. Press People, then press OK. NOTE: You can have pictures tagged with an old friend, James, you want to modify, ... the name you can: ■ Tag the new James with "James Smith" and/or ■ Update the old James to 20 active names. www.kodak.com/go/m575support 21 To access the camera Help system, see page 7. Share and tag pictures Need to picture-taking mode, press the Shutter button halfway down.
User guide
Page 22
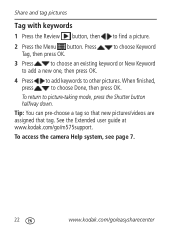
...to add a new one, then press OK. 4 Press to add keywords to choose Done, then press OK. See the Extended user guide at www.kodak.com/go /easysharecenter Press Tag, then press OK. Tip: You can pre-choose a tag so that new pictures/videos are assigned that tag. When... finished, press to other pictures. To return to find a picture. 2 Press the Menu button. Share and tag pictures Tag with keywords 1 Press the Review button, then to picture-taking mode, press the Shutter button halfway down. To access the camera Help system, see page 7. 22 www.kodak.com/go /m575support.
...to add a new one, then press OK. 4 Press to add keywords to choose Done, then press OK. See the Extended user guide at www.kodak.com/go /easysharecenter Press Tag, then press OK. Tip: You can pre-choose a tag so that new pictures/videos are assigned that tag. When... finished, press to other pictures. To return to find a picture. 2 Press the Menu button. Share and tag pictures Tag with keywords 1 Press the Review button, then to picture-taking mode, press the Shutter button halfway down. To access the camera Help system, see page 7. 22 www.kodak.com/go /m575support.
User guide
Page 23
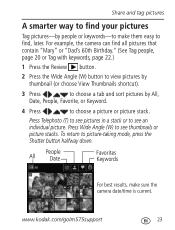
To return to see thumbnails or picture stacks. www.kodak.com/go/m575support 23 Press Wide Angle (W) to picture-taking...4 Press to choose a picture or picture stack. Press Telephoto (T) to see an individual picture. For example, the camera can find , later. People All Date Favorites Keywords For best results, make them easy to see pictures in a stack... or "Dad's 60th Birthday." (See Tag people, page 20 or Tag with keywords, page 22.) 1 Press the Review button. 2 Press the Wide Angle (W) button to view pictures by thumbnail (or choose View Thumbnails shortcut). 3 Press ...
To return to see thumbnails or picture stacks. www.kodak.com/go/m575support 23 Press Wide Angle (W) to picture-taking...4 Press to choose a picture or picture stack. Press Telephoto (T) to see an individual picture. For example, the camera can find , later. People All Date Favorites Keywords For best results, make them easy to see pictures in a stack... or "Dad's 60th Birthday." (See Tag people, page 20 or Tag with keywords, page 22.) 1 Press the Review button. 2 Press the Wide Angle (W) button to view pictures by thumbnail (or choose View Thumbnails shortcut). 3 Press ...
User guide
Page 24
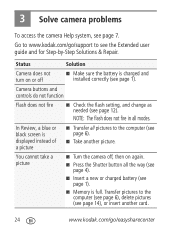
... not fire ■ Check the flash setting, and change as needed (see page 6). ■ Take another card. 24 www.kodak.com/go /support to see page 1). Status Solution Camera does not turn on or off , then on again. ■ Press the Shutter button all the way (see page 4). &#...see page 12). In Review, a blue or black screen is charged and installed correctly (see the Extended user guide and for Step-by-Step Solutions & Repair. Transfer pictures to the computer (see page 6), delete pictures (see page 7. You cannot take a picture ■ Turn the camera off ■ Make ...
... not fire ■ Check the flash setting, and change as needed (see page 6). ■ Take another card. 24 www.kodak.com/go /support to see page 1). Status Solution Camera does not turn on or off , then on again. ■ Press the Shutter button all the way (see page 4). &#...see page 12). In Review, a blue or black screen is charged and installed correctly (see the Extended user guide and for Step-by-Step Solutions & Repair. Transfer pictures to the computer (see page 6), delete pictures (see page 7. You cannot take a picture ■ Turn the camera off ■ Make ...
Extended user guide
Page 4
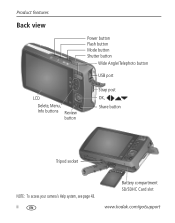
Product features Back view Power button Flash button Mode button Shutter button Wide Angle/Telephoto button USB port LCD Delete, Menu, Info buttons Review button Strap post OK, Share button Tripod socket NOTE: To access your camera's Help system, see page 43. ii Battery compartment SD/SDHC Card slot www.kodak.com/go/support
Product features Back view Power button Flash button Mode button Shutter button Wide Angle/Telephoto button USB port LCD Delete, Menu, Info buttons Review button Strap post OK, Share button Tripod socket NOTE: To access your camera's Help system, see page 43. ii Battery compartment SD/SDHC Card slot www.kodak.com/go/support
Extended user guide
Page 5
... the strap 1 Loading the KLIC-7006 battery 1 Charging the battery 2 Turning on the camera 4 Setting the language and date/time 4 Storing pictures on an optional SD or SDHC Card 5 2 Taking pictures/videos 6 Taking pictures 6 Taking a video 7 Adjusting LCD ... 3 Sharing and tagging pictures 16 Sharing pictures through social networks 16 Tagging pictures 18 Marking pictures as favorites and for email 20 4 Reviewing and editing 22 Reviewing pictures/videos 22 Deleting pictures/videos 23 Viewing pictures/videos in different ways 24 A smarter way to find and enjoy your pictures 25...
... the strap 1 Loading the KLIC-7006 battery 1 Charging the battery 2 Turning on the camera 4 Setting the language and date/time 4 Storing pictures on an optional SD or SDHC Card 5 2 Taking pictures/videos 6 Taking pictures 6 Taking a video 7 Adjusting LCD ... 3 Sharing and tagging pictures 16 Sharing pictures through social networks 16 Tagging pictures 18 Marking pictures as favorites and for email 20 4 Reviewing and editing 22 Reviewing pictures/videos 22 Deleting pictures/videos 23 Viewing pictures/videos in different ways 24 A smarter way to find and enjoy your pictures 25...
Extended user guide
Page 6
...review icons 26 Using the menu button in review 27 Cropping pictures 27 Editing videos 28 Selecting multiple pictures/videos 29 Copying pictures/videos 29 Creating a multimedia slide show 30 5 Doing more with your camera... 32 Using the menu button to change settings 32 6 Transferring, printing pictures 39 Transferring pictures to your computer 39 Printing pictures 40 Marking your pictures for print 42 7 Troubleshooting 43 Getting help from your camera... 43 Troubleshooting 44 Getting help on the Web 48 8 Appendix 49 Camera specifications 49 Care ...
...review icons 26 Using the menu button in review 27 Cropping pictures 27 Editing videos 28 Selecting multiple pictures/videos 29 Copying pictures/videos 29 Creating a multimedia slide show 30 5 Doing more with your camera... 32 Using the menu button to change settings 32 6 Transferring, printing pictures 39 Transferring pictures to your computer 39 Printing pictures 40 Marking your pictures for print 42 7 Troubleshooting 43 Getting help from your camera... 43 Troubleshooting 44 Getting help on the Web 48 8 Appendix 49 Camera specifications 49 Care ...

Extended user guide
Page 19
...For Fireworks. Close-ups of people in different modes.) 3 Press to the most popular capture and review functions: 1 Press the Info button. Flash does not fire. Using shortcuts Your camera has a clean, uncluttered interface. To hide the shortcuts again, press . 2 Press to access functions...red eye of yourself. The shortcuts appear. Emphasizing horizontal motion, with a sharp subject and blurred background. www.kodak.com/go/support 13 Shortcuts Press to show/hide shortcuts. For best results, place the camera on a steady surface or tripod. Distant scenery at night.
...For Fireworks. Close-ups of people in different modes.) 3 Press to the most popular capture and review functions: 1 Press the Info button. Flash does not fire. Using shortcuts Your camera has a clean, uncluttered interface. To hide the shortcuts again, press . 2 Press to access functions...red eye of yourself. The shortcuts appear. Emphasizing horizontal motion, with a sharp subject and blurred background. www.kodak.com/go/support 13 Shortcuts Press to show/hide shortcuts. For best results, place the camera on a steady surface or tripod. Distant scenery at night.
Extended user guide
Page 22
...again to remove a check mark.) 4 Press to choose a social networking site, then press OK. A check mark appears. Tip: Do you chose. The camera applies the networking site(s) that you send pictures to find a picture. 2 Press the Share button. If it will be sent to the networking site(s) that... you need to download KODAK Software. (See page 39.) 1 Press the Review button, then to the same sites each time? IMPORTANT: To use the camera's social networking features, you used previously and adds the Share icon to share pictures...
...again to remove a check mark.) 4 Press to choose a social networking site, then press OK. A check mark appears. Tip: Do you chose. The camera applies the networking site(s) that you send pictures to find a picture. 2 Press the Share button. If it will be sent to the networking site(s) that... you need to download KODAK Software. (See page 39.) 1 Press the Review button, then to the same sites each time? IMPORTANT: To use the camera's social networking features, you used previously and adds the Share icon to share pictures...
Extended user guide
Page 23
...choose the Setup tab, then then press OK. Press to choose New Email or New Frame, then press OK. Use the on your camera. 1 In Review, press the Share button. Press to choose Delete, then press OK. 3 When finished, press to choose Show or Hide. Use the on ...or Delete Frame, then press OK. Sharing and tagging pictures Choose which social networking sites to display on your camera You can add, edit, or delete email addresses and KODAK PULSE Digital Frames on -screen keyboard to make the addition. (Example: [email protected]) To edit an email address or...
...choose the Setup tab, then then press OK. Press to choose New Email or New Frame, then press OK. Use the on your camera. 1 In Review, press the Share button. Press to choose Delete, then press OK. 3 When finished, press to choose Show or Hide. Use the on ...or Delete Frame, then press OK. Sharing and tagging pictures Choose which social networking sites to display on your camera You can add, edit, or delete email addresses and KODAK PULSE Digital Frames on -screen keyboard to make the addition. (Example: [email protected]) To edit an email address or...
Extended user guide
Page 24
.... Other pictures are scanned and updated with the name(s) you 're helping your camera to add a new one face is detected, a name or question mark is insufficient, then the camera might not detect the face. 18 www.kodak.com/go/support To return to choose Yes, then press OK. You can tag... pictures in the future! 1 Press the Review button, then to find all pictures from "Dad's 60th Birthday." To...
.... Other pictures are scanned and updated with the name(s) you 're helping your camera to add a new one face is detected, a name or question mark is insufficient, then the camera might not detect the face. 18 www.kodak.com/go/support To return to choose Yes, then press OK. You can tag... pictures in the future! 1 Press the Review button, then to find all pictures from "Dad's 60th Birthday." To...

Extended user guide
Page 26
..., then press OK. 2 When finished, press to choose OK, then press OK. 3 If you've added a new name, the camera prompts you can assign the favorite mark. 1 Press the Review button. 2 Press to find a picture to tag. 3 Press the Menu button. 4 Press to choose Favorite, then to choose Mark...pictures as favorites and for email Marking pictures/videos as favorites To make your camera's Help system, see page 43. 20 www.kodak.com/go/support Press to choose Tag People, then press OK. 3 Press to names: 1 Press the Review button. 2 Press the Menu button. Choose Yes, then press OK.
..., then press OK. 2 When finished, press to choose OK, then press OK. 3 If you've added a new name, the camera prompts you can assign the favorite mark. 1 Press the Review button. 2 Press to find a picture to tag. 3 Press the Menu button. 4 Press to choose Favorite, then to choose Mark...pictures as favorites and for email Marking pictures/videos as favorites To make your camera's Help system, see page 43. 20 www.kodak.com/go/support Press to choose Tag People, then press OK. 3 Press to names: 1 Press the Review button. 2 Press the Menu button. Choose Yes, then press OK.

Extended user guide
Page 27
...When you transfer the marked pictures/videos to send the pictures/videos. www.kodak.com/go/support 21 Press to find a picture. 2 Press the Share...an email address, then press OK. First, create a new email address. (See page 20.) 1 Press the Review button. To mark other pictures/videos with the same address, press , then press OK. To send the pictures/...videos to your computer. To access your computer, the software prompts you to your camera's Help system, see page 43. Sharing and tagging pictures Marking pictures/videos for emailing It's simple to...
...When you transfer the marked pictures/videos to send the pictures/videos. www.kodak.com/go/support 21 Press to find a picture. 2 Press the Share...an email address, then press OK. First, create a new email address. (See page 20.) 1 Press the Review button. To mark other pictures/videos with the same address, press , then press OK. To send the pictures/...videos to your computer. To access your computer, the software prompts you to your camera's Help system, see page 43. Sharing and tagging pictures Marking pictures/videos for emailing It's simple to...


