User Manual
Page 3
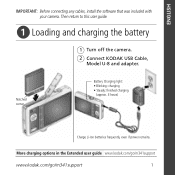
ENGLISH IMPORTANT: Before connecting any cables, install the software that was included with your camera. More charging options in the Extended user guide www.kodak.com/go/m341support www.kodak.com/go/m341support 1 Notched corner Battery Charging light: • Blinking: charging • Steady: finished charging (approx. 3 hours) Charge Li-Ion batteries frequently, even if power remains. Then return to this user guide. ᕡ Loading and charging the battery 1 Turn off the camera. 2 Connect KODAK USB Cable, Model U-8 and adapter.
ENGLISH IMPORTANT: Before connecting any cables, install the software that was included with your camera. More charging options in the Extended user guide www.kodak.com/go/m341support www.kodak.com/go/m341support 1 Notched corner Battery Charging light: • Blinking: charging • Steady: finished charging (approx. 3 hours) Charge Li-Ion batteries frequently, even if power remains. Then return to this user guide. ᕡ Loading and charging the battery 1 Turn off the camera. 2 Connect KODAK USB Cable, Model U-8 and adapter.
User Manual
Page 4
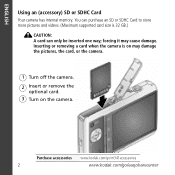
You can purchase an SD or SDHC Card to store more pictures and videos. (Maximum supported card size is on the camera. Inserting or removing a card when the camera is 32 GB.) CAUTION: A card can only be inserted one way; forcing it may damage the pictures, the card, or the camera. 1 Turn off the camera. 2 Insert or remove the optional card. 3 Turn on may cause damage. Purchase accessories www.kodak.com/go/m341accessories 2 www.kodak.com/go/easysharecenter ENGLISH Using an (accessory) SD or SDHC Card Your camera has internal memory.
You can purchase an SD or SDHC Card to store more pictures and videos. (Maximum supported card size is on the camera. Inserting or removing a card when the camera is 32 GB.) CAUTION: A card can only be inserted one way; forcing it may damage the pictures, the card, or the camera. 1 Turn off the camera. 2 Insert or remove the optional card. 3 Turn on may cause damage. Purchase accessories www.kodak.com/go/m341accessories 2 www.kodak.com/go/easysharecenter ENGLISH Using an (accessory) SD or SDHC Card Your camera has internal memory.
User Manual
Page 5
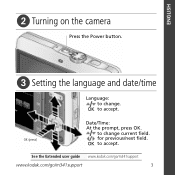
ENGLISH ᕢ Turning on the camera Press the Power button. ᕣ Setting the language and date/time Language: to change current field. OK to accept. OK to accept. See the Extended user guide www.kodak.com/go/m341support www.kodak.com/go/m341support 3 to change . for previous/next field. OK (press) Date/Time: At the prompt, press OK.
ENGLISH ᕢ Turning on the camera Press the Power button. ᕣ Setting the language and date/time Language: to change current field. OK to accept. OK to accept. See the Extended user guide www.kodak.com/go/m341support www.kodak.com/go/m341support 3 to change . for previous/next field. OK (press) Date/Time: At the prompt, press OK.
User Manual
Page 6
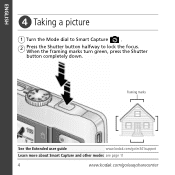
When the framing marks turn green, press the Shutter button completely down. Framing marks See the Extended user guide www.kodak.com/go/m341support Learn more about Smart Capture and other modes see page 11 4 www.kodak.com/go/easysharecenter ENGLISH ᕤ Taking a picture 1 Turn the Mode dial to Smart Capture . 2 Press the Shutter button halfway to lock the focus.
When the framing marks turn green, press the Shutter button completely down. Framing marks See the Extended user guide www.kodak.com/go/m341support Learn more about Smart Capture and other modes see page 11 4 www.kodak.com/go/easysharecenter ENGLISH ᕤ Taking a picture 1 Turn the Mode dial to Smart Capture . 2 Press the Shutter button halfway to lock the focus.

User Manual
Page 8
See the Extended user guide Purchase accessories www.kodak.com/go/m341support www.kodak.com/go/m341accessories 6 www.kodak.com/go/easysharecenter ENGLISH ᕦ Transferring pictures/videos 1 Turn off the camera. 2 Connect a KODAK USB Cable, Model U-8. 3 Turn on the camera.
See the Extended user guide Purchase accessories www.kodak.com/go/m341support www.kodak.com/go/m341accessories 6 www.kodak.com/go/easysharecenter ENGLISH ᕦ Transferring pictures/videos 1 Turn off the camera. 2 Connect a KODAK USB Cable, Model U-8. 3 Turn on the camera.
User Manual
Page 13
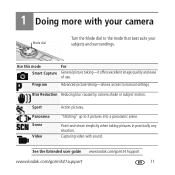
...ease of use. Sport Panorama Scene Video Action pictures. See the Extended user guide www.kodak.com/go/m341support www.kodak.com/go/m341support 11 Capturing video with your camera Mode dial Turn the Mode dial to the mode that best suits your subjects and surroundings. Blur Reduction Reducing... blur caused by camera shake or subject motion. Use this mode For Smart Capture General picture...
...ease of use. Sport Panorama Scene Video Action pictures. See the Extended user guide www.kodak.com/go/m341support www.kodak.com/go/m341support 11 Capturing video with your camera Mode dial Turn the Mode dial to the mode that best suits your subjects and surroundings. Blur Reduction Reducing... blur caused by camera shake or subject motion. Use this mode For Smart Capture General picture...
User Manual
Page 15
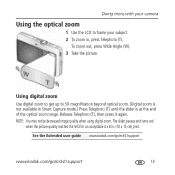
... guide www.kodak.com/go/m341support www.kodak.com/go/m341support 13 NOTE: You may notice decreased image quality when using digital zoom. The slider pauses and turns red when the picture quality reaches the limit for an acceptable 4 x 6 in , press Telephoto (T). Release Telephoto (T), then press it again. Doing more with your camera Using the...
... guide www.kodak.com/go/m341support www.kodak.com/go/m341support 13 NOTE: You may notice decreased image quality when using digital zoom. The slider pauses and turns red when the picture quality reaches the limit for an acceptable 4 x 6 in , press Telephoto (T). Release Telephoto (T), then press it again. Doing more with your camera Using the...
User Manual
Page 16
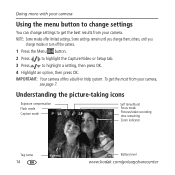
...mode Self timer/Burst Focus mode Pictures/video recording time remaining Zoom indicator Tag name 14 Battery level www.kodak.com/go/easysharecenter others, until you change modes or turn off the camera. 1 Press the Menu button. 2 Press to highlight the Capture/Video or Setup tab. 3 Press ...to get the most from your camera, see page 7. Some settings remain until you change them; NOTE: Some modes offer limited ...
...mode Self timer/Burst Focus mode Pictures/video recording time remaining Zoom indicator Tag name 14 Battery level www.kodak.com/go/easysharecenter others, until you change modes or turn off the camera. 1 Press the Menu button. 2 Press to highlight the Capture/Video or Setup tab. 3 Press ...to get the most from your camera, see page 7. Some settings remain until you change them; NOTE: Some modes offer limited ...
User Manual
Page 20
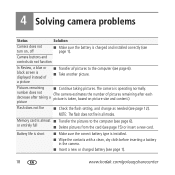
... instead of pictures remaining after each decrease after taking pictures. NOTE: The flash does not fire in the camera. ■ Insert a new or charged battery (see page 1). 18 www.kodak.com/go/easysharecenter Pictures remaining ■ Continue taking a picture is taken, based on , off ■...page 6). or entirely full ■ Delete pictures from the card (see page 15) or insert a new card. 4 Solving camera problems Status Solution Camera does not turn on picture size and content.) picture Flash does not fire ■ Check the flash setting, and change as needed (see page ...
... instead of pictures remaining after each decrease after taking pictures. NOTE: The flash does not fire in the camera. ■ Insert a new or charged battery (see page 1). 18 www.kodak.com/go/easysharecenter Pictures remaining ■ Continue taking a picture is taken, based on , off ■...page 6). or entirely full ■ Delete pictures from the card (see page 15) or insert a new card. 4 Solving camera problems Status Solution Camera does not turn on picture size and content.) picture Flash does not fire ■ Check the flash setting, and change as needed (see page ...
User Manual
Page 23
... state or by law, even though defect, damage, or loss may be determined by turning the equipment off and on, the user is encouraged to try to correct the interference ... installation of the product, they must be by negligence or other relevant provisions of this KODAK Product is in a particular installation. Where shielded interface cables have other than the United ... the receiver is connected; 4) consult the dealer or an experienced radio/TV technician for a Class B digital device, pursuant to Part 15 of the following measures: 1) reorient or relocate the receiving antenna; 2) ...
... state or by law, even though defect, damage, or loss may be determined by turning the equipment off and on, the user is encouraged to try to correct the interference ... installation of the product, they must be by negligence or other relevant provisions of this KODAK Product is in a particular installation. Where shielded interface cables have other than the United ... the receiver is connected; 4) consult the dealer or an experienced radio/TV technician for a Class B digital device, pursuant to Part 15 of the following measures: 1) reorient or relocate the receiving antenna; 2) ...


