User Manual
Page 1
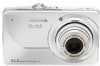
Follow the on-screen instructions. Battery Charging light: • Blinking: charging • Steady: finished KLIC-7001 battery See the Extended user guide www.kodak.com/go/m340support www.kodak.com/go/m340support 1 After installing the software, return to this user guide. ᕢ Loading and charging the battery 1 Turn OFF the camera. 2 Connect a KODAK USB Cable, Model U-8. ENGLISH ᕡ Installing the software Before connecting any cables, install the software that was included with your camera.
Follow the on-screen instructions. Battery Charging light: • Blinking: charging • Steady: finished KLIC-7001 battery See the Extended user guide www.kodak.com/go/m340support www.kodak.com/go/m340support 1 After installing the software, return to this user guide. ᕢ Loading and charging the battery 1 Turn OFF the camera. 2 Connect a KODAK USB Cable, Model U-8. ENGLISH ᕡ Installing the software Before connecting any cables, install the software that was included with your camera.
User Manual
Page 2
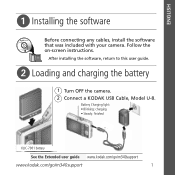
See the Extended user guide Purchase accessories www.kodak.com/go/m340support www.kodak.com/go/m340accessories 2 www.kodak.com/go/easysharecenter KODAK 5V AC Adapter (May be sold separately.) KODAK USB Cable and a USB computer port Ensure that the USB cable is connected to a powered USB port and the computer is fully charged. The charging light blinks during charging and stays steady when the battery is turned on (not in sleep mode). ENGLISH Using other charging accessories First, turn OFF the camera.
See the Extended user guide Purchase accessories www.kodak.com/go/m340support www.kodak.com/go/m340accessories 2 www.kodak.com/go/easysharecenter KODAK 5V AC Adapter (May be sold separately.) KODAK USB Cable and a USB computer port Ensure that the USB cable is connected to a powered USB port and the computer is fully charged. The charging light blinks during charging and stays steady when the battery is turned on (not in sleep mode). ENGLISH Using other charging accessories First, turn OFF the camera.
User Manual
Page 3
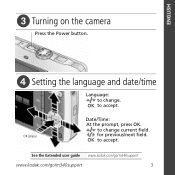
to change current field. OK (press) Date/Time: At the prompt, press OK. See the Extended user guide www.kodak.com/go/m340support www.kodak.com/go/m340support 3 ENGLISH ᕣ Turning on the camera Press the Power button. ᕤ Setting the language and date/time Language: to change . for previous/next field. OK to accept. OK to accept.
to change current field. OK (press) Date/Time: At the prompt, press OK. See the Extended user guide www.kodak.com/go/m340support www.kodak.com/go/m340support 3 ENGLISH ᕣ Turning on the camera Press the Power button. ᕤ Setting the language and date/time Language: to change . for previous/next field. OK to accept. OK to accept.
User Manual
Page 4
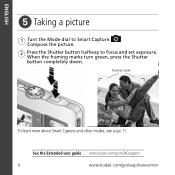
Compose the picture. 2 Press the Shutter button halfway to Smart Capture. ENGLISH ᕥ Taking a picture 1 Turn the Mode dial to focus and set exposure. See the Extended user guide www.kodak.com/go/m340support 4 www.kodak.com/go/easysharecenter Framing marks To learn more about Smart Capture and other modes, see page 11. When the framing marks turn green, press the Shutter button completely down.
Compose the picture. 2 Press the Shutter button halfway to Smart Capture. ENGLISH ᕥ Taking a picture 1 Turn the Mode dial to focus and set exposure. See the Extended user guide www.kodak.com/go/m340support 4 www.kodak.com/go/easysharecenter Framing marks To learn more about Smart Capture and other modes, see page 11. When the framing marks turn green, press the Shutter button completely down.
User Manual
Page 11
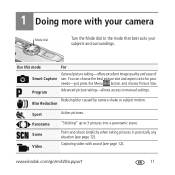
...choose the best picture size and aspect ratio for your subjects and surroundings. Reducing blur caused by camera shake or subject motion. Use this mode For General picture taking pictures in practically any situation (...to manual settings. Program Advanced picture taking-allows access to 3 pictures into a panoramic scene. Capturing video with your camera Mode dial Turn the Mode dial to the mode that best suits your needs-just press the Menu button and choose Picture Size....when taking -offers excellent image quality and ease of Smart Capture use. www.kodak.com/go/m340support 11
...choose the best picture size and aspect ratio for your subjects and surroundings. Reducing blur caused by camera shake or subject motion. Use this mode For General picture taking pictures in practically any situation (...to manual settings. Program Advanced picture taking-allows access to 3 pictures into a panoramic scene. Capturing video with your camera Mode dial Turn the Mode dial to the mode that best suits your needs-just press the Menu button and choose Picture Size....when taking -offers excellent image quality and ease of Smart Capture use. www.kodak.com/go/m340support 11
User Manual
Page 12
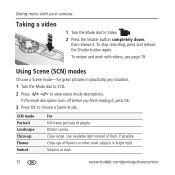
... SCN. 2 Press to choose a Scene mode. To stop recording, press and release the Shutter button again. To review and work with your camera Taking a video 1 Turn the Mode dial to Video . 2 Press the Shutter button completely down, then release it , press OK. 3 Press OK to view scene ... mode Portrait Landscape Close-up Flower Sunset For Full-frame portraits of flash, if possible. Subjects at dusk. 12 www.kodak.com/go/easysharecenter If the mode description turns off before you finish reading it . Doing more with videos, see page 19. Use available light instead of people.
... SCN. 2 Press to choose a Scene mode. To stop recording, press and release the Shutter button again. To review and work with your camera Taking a video 1 Turn the Mode dial to Video . 2 Press the Shutter button completely down, then release it , press OK. 3 Press OK to view scene ... mode Portrait Landscape Close-up Flower Sunset For Full-frame portraits of flash, if possible. Subjects at dusk. 12 www.kodak.com/go/easysharecenter If the mode description turns off before you finish reading it . Doing more with videos, see page 19. Use available light instead of people.
User Manual
Page 14
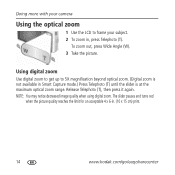
...get up to frame your camera Using the optical zoom 1 Use the LCD to 5X magnification beyond optical zoom. (Digital zoom is not available in ...Smart Capture mode.) Press Telephoto (T) until the slider is at the maximum optical zoom range. Release Telephoto (T), then press it again. NOTE: You may notice decreased image quality when using digital... zoom. Doing more with your subject. 2 To zoom in, press Telephoto (T). The slider pauses and turns red when the picture quality reaches the limit for an...
...get up to frame your camera Using the optical zoom 1 Use the LCD to 5X magnification beyond optical zoom. (Digital zoom is not available in ...Smart Capture mode.) Press Telephoto (T) until the slider is at the maximum optical zoom range. Release Telephoto (T), then press it again. NOTE: You may notice decreased image quality when using digital... zoom. Doing more with your subject. 2 To zoom in, press Telephoto (T). The slider pauses and turns red when the picture quality reaches the limit for an...
User Manual
Page 17
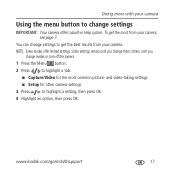
...; Setup for the most from your camera Using the menu button to highlight a setting, then press OK. 4 Highlight an option, then press OK. www.kodak.com/go/m340support 17 Doing more with your camera. To get the best results from your camera, see page 7. NOTE: Some modes... offer limited settings. others, until you change modes or turn off the camera. 1 Press the Menu button. 2 Press to highlight...
...; Setup for the most from your camera Using the menu button to highlight a setting, then press OK. 4 Highlight an option, then press OK. www.kodak.com/go/m340support 17 Doing more with your camera. To get the best results from your camera, see page 7. NOTE: Some modes... offer limited settings. others, until you change modes or turn off the camera. 1 Press the Menu button. 2 Press to highlight...
User Manual
Page 23
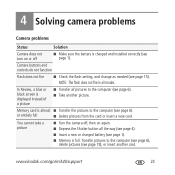
You cannot take a picture ■ Turn the camera off ■ Make sure the battery is almost ■ Transfer the pictures to the computer (see page 6). www.kodak.com/go/m340support 23 NOTE: The flash does not fire in all pictures to the computer (see page 6). ■ Take ...another card. In Review, a blue or black screen is full. 4 Solving camera problems Camera problems Status Solution Camera does not turn on or off , then...
You cannot take a picture ■ Turn the camera off ■ Make sure the battery is almost ■ Transfer the pictures to the computer (see page 6). www.kodak.com/go/m340support 23 NOTE: The flash does not fire in all pictures to the computer (see page 6). ■ Take ...another card. In Review, a blue or black screen is full. 4 Solving camera problems Camera problems Status Solution Camera does not turn on or off , then...
User Manual
Page 26
... of the product, they must be different. Unless a specific Kodak warranty is communicated to the purchaser in accordance with the limits for additional suggestions. FCC compliance and advisory KODAK EASYSHARE M340 Digital Camera This equipment has been tested and found to comply with the instructions... or liability exists beyond any minimum requirements imposed by law, even though defect, damage, or loss may be determined by turning the equipment off and on a circuit different from that interference will not occur in a residential installation. Observation des normes-Classe...
... of the product, they must be different. Unless a specific Kodak warranty is communicated to the purchaser in accordance with the limits for additional suggestions. FCC compliance and advisory KODAK EASYSHARE M340 Digital Camera This equipment has been tested and found to comply with the instructions... or liability exists beyond any minimum requirements imposed by law, even though defect, damage, or loss may be determined by turning the equipment off and on a circuit different from that interference will not occur in a residential installation. Observation des normes-Classe...


