User Guide
Page 2
... in the host computer 2-2 Installing the Kodak Driver software 2-2 Installing the FireWire cable 2-2 Attaching the power cord 2-3 Powering up the host computer 2-3 Scanner components 2-3 3 Using the Scanner 3-1 Turning the scanner on and off 3-1 Starting and stopping scanning 3-1 Manually pausing and resuming the scanner 3-2 Automatically pausing and resuming the scanner 3-2 Manually ending scanning 3-2 Document preparation 3-3 Adjusting the side guides...
... in the host computer 2-2 Installing the Kodak Driver software 2-2 Installing the FireWire cable 2-2 Attaching the power cord 2-3 Powering up the host computer 2-3 Scanner components 2-3 3 Using the Scanner 3-1 Turning the scanner on and off 3-1 Starting and stopping scanning 3-1 Manually pausing and resuming the scanner 3-2 Automatically pausing and resuming the scanner 3-2 Manually ending scanning 3-2 Document preparation 3-3 Adjusting the side guides...
User Guide
Page 12
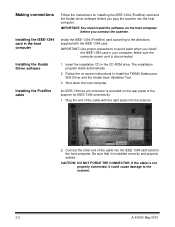
...you install the IEEE-1394 card in the host computer. Connect the other end of the scanner for installing the IEEE-1394 (FireWire) card and the Kodak driver software before you plug the scanner into the host computer. CAUTION: DO NOT FORCE THE CONNECTOR. IMPORTANT: You must install ...the software on the rear panel of the cable into the scanner. 2. Make sure the computer power cord is ...
...you install the IEEE-1394 card in the host computer. Connect the other end of the scanner for installing the IEEE-1394 (FireWire) card and the Kodak driver software before you plug the scanner into the host computer. CAUTION: DO NOT FORCE THE CONNECTOR. IMPORTANT: You must install ...the software on the rear panel of the cable into the scanner. 2. Make sure the computer power cord is ...
User Guide
Page 17
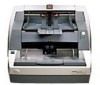
... for it to complete self-test. IMPORTANT: Always power up the scanner to Chapter 6, "Indicator lights" for your integration software. 3 Using the Scanner This chapter provides the following operational procedures: • Turning on/off the scanner • Starting, stopping, pausing and resuming the scanner • Document preparation • Adjusting the side guides and output tray •...
... for it to complete self-test. IMPORTANT: Always power up the scanner to Chapter 6, "Indicator lights" for your integration software. 3 Using the Scanner This chapter provides the following operational procedures: • Turning on/off the scanner • Starting, stopping, pausing and resuming the scanner • Document preparation • Adjusting the side guides and output tray •...
User Guide
Page 32
... to include both literal (static) information (i.e., information that stays the same for each document, such as the document sequential counter). The Kodak i600/i700 Series Scanners include a factory-installed, preconfigured front printer. The printer is attempted. any information that the software allows you to the printer. Printing must be enabled or disabled for using the...
... to include both literal (static) information (i.e., information that stays the same for each document, such as the document sequential counter). The Kodak i600/i700 Series Scanners include a factory-installed, preconfigured front printer. The printer is attempted. any information that the software allows you to the printer. Printing must be enabled or disabled for using the...
User Guide
Page 57
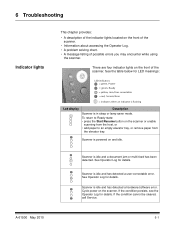
... return to Ready state: • press the Start/Resume button on the scanner. Scanner is idle and has detected a user-correctable error. Scanner is idle and a document jam or multi-feed has been detected. Cycle power on the scanner or enable scanning from the host, or • add paper to an empty ...the table below for details. See Operator Log for details. See Operator Log for details. There are four indicator lights on and idle. Scanner is idle and has detected a hardware/software error. Scanner is powered on the front of possible errors you may encounter while using the...
... return to Ready state: • press the Start/Resume button on the scanner. Scanner is idle and has detected a user-correctable error. Scanner is idle and a document jam or multi-feed has been detected. Cycle power on the scanner or enable scanning from the host, or • add paper to an empty ...the table below for details. See Operator Log for details. See Operator Log for details. There are four indicator lights on and idle. Scanner is idle and has detected a hardware/software error. Scanner is powered on the front of possible errors you may encounter while using the...
User Guide
Page 65
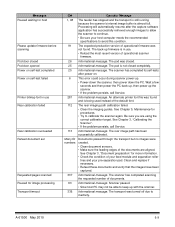
... 91 The expected production version of operational firmware was turned off due to calibrate the scanner again. The scanner has completed scanning the requested number of the documents are using the correct calibration target. A-61500 May 2010 6-9 Be sure you are...documents. 63 Informational message. The transport was not found and is in use . • Reload the most recent version of the default font. 112 The rear imaging path calibration failed. • Clean the imaging guides. The pod was found . The scanner has completed its self-tests after the capture software...
... 91 The expected production version of operational firmware was turned off due to calibrate the scanner again. The scanner has completed scanning the requested number of the documents are using the correct calibration target. A-61500 May 2010 6-9 Be sure you are...documents. 63 Informational message. The transport was not found and is in use . • Reload the most recent version of the default font. 112 The rear imaging path calibration failed. • Clean the imaging guides. The pod was found . The scanner has completed its self-tests after the capture software...
User Guide
Page 72
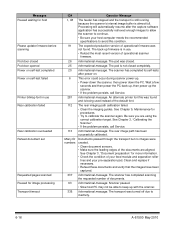
...5, Maintenance for procedures. • Try to keep up with the scanner. 336 Informational message. See Chapter 3, "Calibrating the Scanner". • If the problem persists, call Service. 281 Informational message. See Chapter 3, "Document preparation" for more information. • Check the condition of the .... 6 This error could occur during scanner power-up. • Power-down the scanner, then power down the PC. The scanner has completed its self-tests after the capture software application has successfully retrieved enough images to allow the scanner to continue. • Be sure ...
...5, Maintenance for procedures. • Try to keep up with the scanner. 336 Informational message. See Chapter 3, "Calibrating the Scanner". • If the problem persists, call Service. 281 Informational message. See Chapter 3, "Document preparation" for more information. • Check the condition of the .... 6 This error could occur during scanner power-up. • Power-down the scanner, then power down the PC. The scanner has completed its self-tests after the capture software application has successfully retrieved enough images to allow the scanner to continue. • Be sure ...
User Guide
Page 76
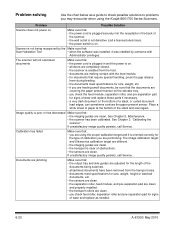
... are clean. • the transport is enabled from the transport area. • documents meet specifications for size, weight, etc. • if you are using the Kodak i600/i700 Series Scanners. Problem Possible Solution Scanner does not power on Make sure that : • the power cord is plugged in...into the receptacle in and the power is on. • all jammed documents have been removed from the host. • documents are feeding small documents, be sure that : Scan Validation Tool • when the software was installed, it is on the bottom of obstructions. • the ...
... are clean. • the transport is enabled from the transport area. • documents meet specifications for size, weight, etc. • if you are using the Kodak i600/i700 Series Scanners. Problem Possible Solution Scanner does not power on Make sure that : • the power cord is plugged in...into the receptacle in and the power is on. • all jammed documents have been removed from the host. • documents are feeding small documents, be sure that : Scan Validation Tool • when the software was installed, it is on the bottom of obstructions. • the ...
Installation Guide
Page 1
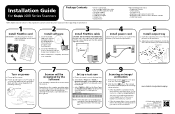
.... 2 Install software a. Follow the instructions, selecting the defaults, as the driver. Brightness and Contrast Control CD - b. Bottom position www.kodak.com/go/docimaging EASTMAN KODAK COMPANY 343 State Street Rochester, NY 14650 U.S.A. ©Eastman Kodak Company, 2003. Installation CD - Plug the end of the View buttons. Power up the scanner. Select Start > Programs > Kodak > Document Imaging > Scan...
.... 2 Install software a. Follow the instructions, selecting the defaults, as the driver. Brightness and Contrast Control CD - b. Bottom position www.kodak.com/go/docimaging EASTMAN KODAK COMPANY 343 State Street Rochester, NY 14650 U.S.A. ©Eastman Kodak Company, 2003. Installation CD - Plug the end of the View buttons. Power up the scanner. Select Start > Programs > Kodak > Document Imaging > Scan...


