User Guide
Page 2
... information 5 Acoustic emission 5 Power system 5 EMC statements 6 United States 6 Japan 6 Installing the scanner 7 Site specifications 7 System requirements 7 Minimum system configuration 7 Recommended system configuration 7 Unpacking the scanner 8 Registering your scanner 8 Removing the foam sheet 9 Scanner components 9 Front 9 Rear 10 Side 10 Internal 11 Making connections 12 Installing the IEEE-1394 (FireWire) card in the host computer 12 Installing the Kodak Driver Software 12 Installing the IEEE-1394 (FireWire) cable 12 Power setup 13 A-61514 September 2004 i
... information 5 Acoustic emission 5 Power system 5 EMC statements 6 United States 6 Japan 6 Installing the scanner 7 Site specifications 7 System requirements 7 Minimum system configuration 7 Recommended system configuration 7 Unpacking the scanner 8 Registering your scanner 8 Removing the foam sheet 9 Scanner components 9 Front 9 Rear 10 Side 10 Internal 11 Making connections 12 Installing the IEEE-1394 (FireWire) card in the host computer 12 Installing the Kodak Driver Software 12 Installing the IEEE-1394 (FireWire) cable 12 Power setup 13 A-61514 September 2004 i
User Guide
Page 3
... Closing the input and output trays 17 Using the Scanner 18 Starting and stopping scanning 18 Automatic feeding 18 Continuous feeding 18 Manual feeding 18 Damaged documents 19 Maintenance 21 Cleaning the scanner 21 Cleaning the separator module 22 Cleaning the feed module 23 Cleaning the drive rollers and transport area 24 Cleaning the imaging guides 25 Cleaning the paper path 26 Replacing parts 26 Calibrating the scanner 27 Troubleshooting 28 Indicator lights 28 Service indicator lights 28 Lamps 29 Clearing document jams 29 Adjusting the separator...
... Closing the input and output trays 17 Using the Scanner 18 Starting and stopping scanning 18 Automatic feeding 18 Continuous feeding 18 Manual feeding 18 Damaged documents 19 Maintenance 21 Cleaning the scanner 21 Cleaning the separator module 22 Cleaning the feed module 23 Cleaning the drive rollers and transport area 24 Cleaning the imaging guides 25 Cleaning the paper path 26 Replacing parts 26 Calibrating the scanner 27 Troubleshooting 28 Indicator lights 28 Service indicator lights 28 Lamps 29 Clearing document jams 29 Adjusting the separator...
User Guide
Page 4
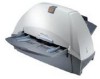
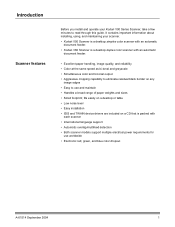
... installation • ISIS and TWAIN device drivers are included on a CD that is a desktop duplex color scanner with each scanner • International language support • Automatic overlap/multifeed detection • Both scanner models support multiple electrical power requirements for use and maintain • Handles a broad range of paper weights and sizes • Small footprint; Introduction Scanner features Before you install and operate your scanner. • Kodak i150 Scanner is a desktop simplex color scanner with an automatic document feeder. • Kodak i160 Scanner...
... installation • ISIS and TWAIN device drivers are included on a CD that is a desktop duplex color scanner with each scanner • International language support • Automatic overlap/multifeed detection • Both scanner models support multiple electrical power requirements for use and maintain • Handles a broad range of paper weights and sizes • Small footprint; Introduction Scanner features Before you install and operate your scanner. • Kodak i150 Scanner is a desktop simplex color scanner with an automatic document feeder. • Kodak i160 Scanner...
User Guide
Page 5
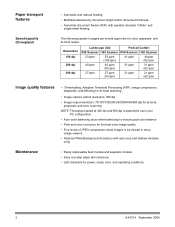
... image viewers • Optional White Background Accessory with operator-assisted "infinite" and single-sheet feeding The following speeds in pages per minute (ppm) are for power, ready, error, and operating conditions 2 A-61514 September 2004 Paper transport features Speed/capacity (throughput) • Automatic and manual feeding • Multifeed detection by document length and/or document thickness • Automatic document feeder (ADF) with auto-crop and deskew (simplex only) Maintenance • Easily replaceable feed...
... image viewers • Optional White Background Accessory with operator-assisted "infinite" and single-sheet feeding The following speeds in pages per minute (ppm) are for power, ready, error, and operating conditions 2 A-61514 September 2004 Paper transport features Speed/capacity (throughput) • Automatic and manual feeding • Multifeed detection by document length and/or document thickness • Automatic document feeder (ADF) with auto-crop and deskew (simplex only) Maintenance • Easily replaceable feed...
User Guide
Page 6
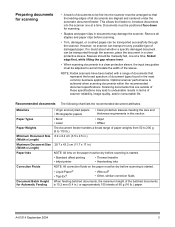
... fluids Document Batch Height When feeding batched documents, the maximum height of the batched documents for Automatic Feeding is achieved when scanning documents within the recommended document specifications. A-61514 September 2004 3 Sleeves should be manually fed, one at a time, folded edge first, while lifting the gap release lever. • When scanning documents in a clear protective sleeve, the input tray guides must be transported through the scanner. If...
... fluids Document Batch Height When feeding batched documents, the maximum height of the batched documents for Automatic Feeding is achieved when scanning documents within the recommended document specifications. A-61514 September 2004 3 Sleeves should be manually fed, one at a time, folded edge first, while lifting the gap release lever. • When scanning documents in a clear protective sleeve, the input tray guides must be transported through the scanner. If...
User Guide
Page 7
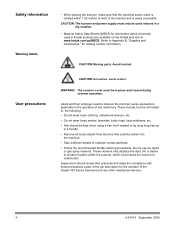
... the scanner, make the compliance with these precautions a part of any other mechanical devices. 4 A-61514 September 2004 CAUTION: The scanner and power supply must be kept short, using a hair net if needed or by tying long hair up in place and closed during scanner operation. Users and their practices and make sure that could cause the scanner to the operation of the job description for catalog number...
... the scanner, make the compliance with these precautions a part of any other mechanical devices. 4 A-61514 September 2004 CAUTION: The scanner and power supply must be kept short, using a hair net if needed or by tying long hair up in place and closed during scanner operation. Users and their practices and make sure that could cause the scanner to the operation of the job description for catalog number...
User Guide
Page 8
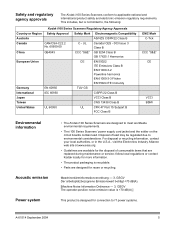
... or contact Kodak locally for more information. • The product packaging is not limited to meet worldwide environmental requirements. • The i100 Series Scanners' power supply cord jacket and ...Power system • The Kodak i100 Series Scanners are designed to , the following: Kodak i100 Series Scanners Regulatory Agency Approvals Country or Region Safety Approval Safety Mark Electromagnetic Compatibility Australia AS/NZS CISPR22 Class B Canada CAN/CSA-C22.2 No. 60950-00 C - This includes, but is recyclable. • Parts are replaced during maintenance or service...
... or contact Kodak locally for more information. • The product packaging is not limited to meet worldwide environmental requirements. • The i100 Series Scanners' power supply cord jacket and ...Power system • The Kodak i100 Series Scanners are designed to , the following: Kodak i100 Series Scanners Regulatory Agency Approvals Country or Region Safety Approval Safety Mark Electromagnetic Compatibility Australia AS/NZS CISPR22 Class B Canada CAN/CSA-C22.2 No. 60950-00 C - This includes, but is recyclable. • Parts are replaced during maintenance or service...
User Guide
Page 10
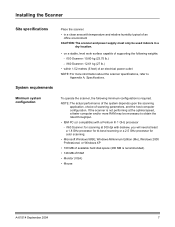
... 1 GHz processor - i160 Scanner: for color scanning. • Microsoft Windows 98SE, Windows Millennium Edition (Me), Windows 2000 Professional, or Windows XP • 100 MB of available hard disk space (200 MB is required. i150 Scanner: 10.80 kg (23.75 lb.) - Installing the Scanner Site specifications Place the scanner: • in a dry location. • on a stable, level work surface capable of supporting the following minimum configuration is recommended...
... 1 GHz processor - i160 Scanner: for color scanning. • Microsoft Windows 98SE, Windows Millennium Edition (Me), Windows 2000 Professional, or Windows XP • 100 MB of available hard disk space (200 MB is required. i150 Scanner: 10.80 kg (23.75 lb.) - Installing the Scanner Site specifications Place the scanner: • in a dry location. • on a stable, level work surface capable of supporting the following minimum configuration is recommended...
User Guide
Page 11
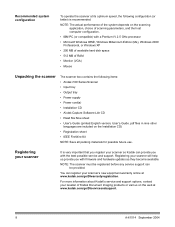
... of the system depends on the Installation CD) • Registration sheet • IEEE FireWire Kit NOTE: Save all packing materials for possible future use. Recommended system configuration To operate the scanner at its optimum speed, the following items: • Kodak i100 Series Scanner • Input tray • Output tray • Power supply • Power cord(s) • Installation CD • Kodak Capture Software Lite CD • Read Me Now sheet • User's Guide (printed English version;
... of the system depends on the Installation CD) • Registration sheet • IEEE FireWire Kit NOTE: Save all packing materials for possible future use. Recommended system configuration To operate the scanner at its optimum speed, the following items: • Kodak i100 Series Scanner • Input tray • Output tray • Power supply • Power cord(s) • Installation CD • Kodak Capture Software Lite CD • Read Me Now sheet • User's Guide (printed English version;
User Guide
Page 15
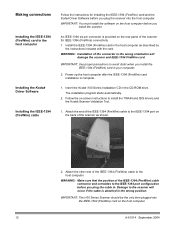
... ISIS drivers and the Kodak Scanner Validation Tool. 1. Power up the host computer after the IEEE-1394 (FireWire) card installation is provided on the back of the IEEE-1394 (FireWire) cable to avoid static when you install the IEEE-1394 (FireWire) card in your computer. 2. The installation program starts automatically. 2. Attach the end of the scanner as described by the instructions included with the card. IMPORTANT: The i100 Series Scanner...
... ISIS drivers and the Kodak Scanner Validation Tool. 1. Power up the host computer after the IEEE-1394 (FireWire) card installation is provided on the back of the IEEE-1394 (FireWire) cable to avoid static when you install the IEEE-1394 (FireWire) card in your computer. 2. The installation program starts automatically. 2. Attach the end of the scanner as described by the instructions included with the card. IMPORTANT: The i100 Series Scanner...

User Guide
Page 16
... 1394 cable 4. CAUTION: The scanner and power supply must only be supplied with the scanner. Press the side labeled "O" on the power switch to make sure that the power is on the power supply. 2. Power switch NOTE: The power switch is off. Beaded end of any unneeded power cords properly. After you power up the scanner. For best calibration and scanning results, allow the scanner lamps to power up the scanner, the red and green indicator lights will illuminate. Use...
... 1394 cable 4. CAUTION: The scanner and power supply must only be supplied with the scanner. Press the side labeled "O" on the power switch to make sure that the power is on the power supply. 2. Power switch NOTE: The power switch is off. Beaded end of any unneeded power cords properly. After you power up the scanner. For best calibration and scanning results, allow the scanner lamps to power up the scanner, the red and green indicator lights will illuminate. Use...
User Guide
Page 19
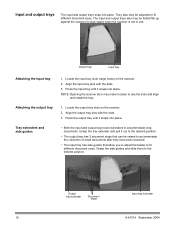
... document sizes. NOTE: Opening the scanner door may be folded flat up against the scanner to the desired position. Locate the input tray slots (large holes) on the scanner. 2. Locate the output tray slots on the scanner. 2. Grasp the tray extender and pull it snaps into place. Grasp the side guides and slide them to save space when the scanner is not in use. The input and output trays...
... document sizes. NOTE: Opening the scanner door may be folded flat up against the scanner to the desired position. Locate the input tray slots (large holes) on the scanner. 2. Locate the output tray slots on the scanner. 2. Grasp the tray extender and pull it snaps into place. Grasp the side guides and slide them to save space when the scanner is not in use. The input and output trays...
User Guide
Page 24
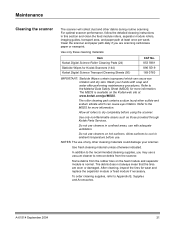
... rollers, imaging guides, transport area, and paper path at www.kodak.com/go/MSDS. NOTES: The use with soap and water after performing maintenance procedures. Some debris from the scanner. For optimal scanner performance, follow the detailed cleaning instructions in confined areas, use of any other debris during routine scanning. Refer to ambient temperature before using the scanner. To order cleaning supplies, refer to the Material Data Safety Sheet...
... rollers, imaging guides, transport area, and paper path at www.kodak.com/go/MSDS. NOTES: The use with soap and water after performing maintenance procedures. Some debris from the scanner. For optimal scanner performance, follow the detailed cleaning instructions in confined areas, use of any other debris during routine scanning. Refer to ambient temperature before using the scanner. To order cleaning supplies, refer to the Material Data Safety Sheet...
User Guide
Page 28
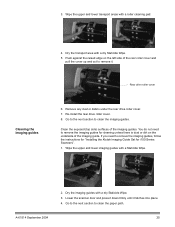
... imaging guides for i100 Series Scanners". 1. Go to the next section to clean the imaging guides. You do not need to remove it latches into place. 4. Wipe the upper and lower imaging guides with a dry Staticide Wipe. 5. Push against the raised edge on the underside of the rear roller cover and pull the cover up and out to remove the imaging guides, follow the instructions for "Installing the Kodak Imaging Guide Set for cleaning...
... imaging guides for i100 Series Scanners". 1. Go to the next section to clean the imaging guides. You do not need to remove it latches into place. 4. Wipe the upper and lower imaging guides with a dry Staticide Wipe. 5. Push against the raised edge on the underside of the rear roller cover and pull the cover up and out to remove the imaging guides, follow the instructions for "Installing the Kodak Imaging Guide Set for cleaning...
User Guide
Page 29
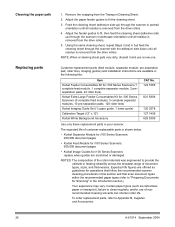
... roller life. NOTE: When a cleaning sheet gets very dirty, discard it and use of document types, sizes, and thicknesses. Customer-replacement parts (feed module, separator module, pre-separation pad, roller tires, imaging guides) and installation instructions are available in the following kits: Item Kodak Feeder Consumables Kit for i100 Series Scanners (1 complete feed module, 1 complete separator module, 2 preseparation pads, 24 roller tires) Kodak Extra-Large Feeder Consumables Kit for Scanning" in portrait orientation until all residue is removed...
... roller life. NOTE: When a cleaning sheet gets very dirty, discard it and use of document types, sizes, and thicknesses. Customer-replacement parts (feed module, separator module, pre-separation pad, roller tires, imaging guides) and installation instructions are available in the following kits: Item Kodak Feeder Consumables Kit for i100 Series Scanners (1 complete feed module, 1 complete separator module, 2 preseparation pads, 24 roller tires) Kodak Extra-Large Feeder Consumables Kit for Scanning" in portrait orientation until all residue is removed...

User Guide
Page 31
... for help with some common error conditions) Red and green on - the green indicator is busy Red on - Red indicator Green indicator Service indicator lights Green on , the scanner is doing. scanner is powering up After you power up the scanner both lights go out after about what the scanner is ready to scan Green flashing - scanner is ready to begin scanning. After you are downloading firmware or calibrating the scanner. The red...
... for help with some common error conditions) Red and green on - the green indicator is busy Red on - Red indicator Green indicator Service indicator lights Green on , the scanner is doing. scanner is powering up After you power up the scanner both lights go out after about what the scanner is ready to scan Green flashing - scanner is ready to begin scanning. After you are downloading firmware or calibrating the scanner. The red...
User Guide
Page 34
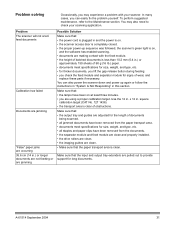
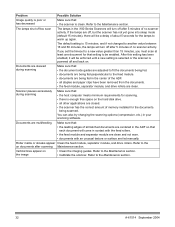
... and feed module are clean and properly installed. • the drive rollers are clean. • the imaging guides are making contact with your scanning application. You may experience a problem with the feed module. • the height of batched documents is less than 10.2 mm (0.4 in.) or approximately 150 sheets of 60 g (16 lb.) paper. • documents meet specifications for long documents. To perform suggested maintenance, refer to check your scanner.
... and feed module are clean and properly installed. • the drive rollers are clean. • the imaging guides are making contact with your scanning application. You may experience a problem with the feed module. • the height of batched documents is less than 10.2 mm (0.4 in.) or approximately 150 sheets of 60 g (16 lb.) paper. • documents meet specifications for long documents. To perform suggested maintenance, refer to check your scanner.
User Guide
Page 35
...; Calibrate the scanner. The lamps shut off too soon The lamps in your scanning software. Documents are skewed during scanning Make sure that : • the document side guides are adjusted to fit the documents being fed. • documents are being fed perpendicular to the Maintenance section. The default setting is enough free space on the hard disk drive. • all staples and paper clips have been removed from the documents. • the feed...
...; Calibrate the scanner. The lamps shut off too soon The lamps in your scanning software. Documents are skewed during scanning Make sure that : • the document side guides are adjusted to fit the documents being fed. • documents are being fed perpendicular to the Maintenance section. The default setting is enough free space on the hard disk drive. • all staples and paper clips have been removed from the documents. • the feed...
User Guide
Page 37
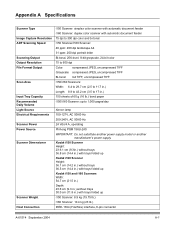
Appendix A Specifications Scanner Type Image Capture Resolution ADF Scanning Speed Scanning Output Output Resolution File Format Output Scan Area Input Tray Capacity Recommended Daily Volume Light Source Electrical Requirements Scanner Power Power Source Scanner Dimensionsr Scanner Weight Host Connection i150 Scanner: simplex color scanner with automatic document feeder i160 Scanner: duplex color scanner with trays folded up to 17 in .) Length: 8.9 to 43.2 cm (3.5 to 1,000 pages/day Xenon lamp 100-127V, AC 50/60 Hz 200-240V, AC 50/60 Hz...
Appendix A Specifications Scanner Type Image Capture Resolution ADF Scanning Speed Scanning Output Output Resolution File Format Output Scan Area Input Tray Capacity Recommended Daily Volume Light Source Electrical Requirements Scanner Power Power Source Scanner Dimensionsr Scanner Weight Host Connection i150 Scanner: simplex color scanner with automatic document feeder i160 Scanner: duplex color scanner with trays folded up to 17 in .) Length: 8.9 to 43.2 cm (3.5 to 1,000 pages/day Xenon lamp 100-127V, AC 50/60 Hz 200-240V, AC 50/60 Hz...

User Guide
Page 39
... Contact your scanner supplier to order supplies. Item Kodak Feeder Consumables Kit for i100 Series Scanners (1 complete feed module, 1 complete separator module, 2 pre-separation pads, 24 roller tires) Kodak Extra-Large Feeder Consumables Kit for i100 Series Scanners (5 complete feed modules, 5 complete separator modules, 10 pre-separation pads, 120 roller tires) Kodak Imaging Guide Set Kodak White Background Accessory / for i100 Series Scanners Kodak Digital Science Transport Cleaning Sheets (50) Kodak Digital Science Roller Cleaning Pads (24) Staticide Wipes for Kodak Scanners (144...
... Contact your scanner supplier to order supplies. Item Kodak Feeder Consumables Kit for i100 Series Scanners (1 complete feed module, 1 complete separator module, 2 pre-separation pads, 24 roller tires) Kodak Extra-Large Feeder Consumables Kit for i100 Series Scanners (5 complete feed modules, 5 complete separator modules, 10 pre-separation pads, 120 roller tires) Kodak Imaging Guide Set Kodak White Background Accessory / for i100 Series Scanners Kodak Digital Science Transport Cleaning Sheets (50) Kodak Digital Science Roller Cleaning Pads (24) Staticide Wipes for Kodak Scanners (144...


