User Guide
Page 2
Contents 1 Introduction 1 Scanner features 1 Supporting documentation 2 Safety information 3 User precautions 3 Environmental information 4 European Union 4 EMC statements 4 United States 4 Japan 5 Korean 5 Acoustic emission 5 Power system connection 5 2 Getting Started 6 What's in the box 6 System requirements 6 Installing the scanner 7 Installing the Kodak Driver Software 7 Windows operating systems 7 Linux operating systems 9 Connecting the power cord to the scanner 10 Disconnecting...
Contents 1 Introduction 1 Scanner features 1 Supporting documentation 2 Safety information 3 User precautions 3 Environmental information 4 European Union 4 EMC statements 4 United States 4 Japan 5 Korean 5 Acoustic emission 5 Power system connection 5 2 Getting Started 6 What's in the box 6 System requirements 6 Installing the scanner 7 Installing the Kodak Driver Software 7 Windows operating systems 7 Linux operating systems 9 Connecting the power cord to the scanner 10 Disconnecting...

User Guide
Page 4
Appendix B Warranty - US and Canada only B-1 Limited warranty for Kodak Scanners B-1 Warranty exclusions B-1 Installation Warning and Disclaimer B-1 How to obtain limited warranty service B-1 Packaging and shipping guidelines B-1 Return procedure B-2 Customer responsibility B-2 Warranty Service description B-2 On-site service B-2 AUR B-2 Depot service B-3 Important restrictions B-3 Contacting Kodak B-3 A-61550 July 2008 iii
Appendix B Warranty - US and Canada only B-1 Limited warranty for Kodak Scanners B-1 Warranty exclusions B-1 Installation Warning and Disclaimer B-1 How to obtain limited warranty service B-1 Packaging and shipping guidelines B-1 Return procedure B-2 Customer responsibility B-2 Warranty Service description B-2 On-site service B-2 AUR B-2 Depot service B-3 Important restrictions B-3 Contacting Kodak B-3 A-61550 July 2008 iii
User Guide
Page 5
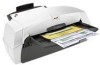
... and white, landscape orientation) letter-size documents. desktop duplex color scanner that scans up to the scanner A-61550 July 2008 1 desktop simplex color scanner that scans up to 30.5 x 86 cm / 12 x 34 inches using and maintaining the Kodak i1400 Series Scanners. 1 Introduction Scanner features The Kodak i1400 Series Scanners include the following models: Kodak i1410 Scanner - This User's Guide provides information...
... and white, landscape orientation) letter-size documents. desktop duplex color scanner that scans up to the scanner A-61550 July 2008 1 desktop simplex color scanner that scans up to 30.5 x 86 cm / 12 x 34 inches using and maintaining the Kodak i1400 Series Scanners. 1 Introduction Scanner features The Kodak i1400 Series Scanners include the following models: Kodak i1410 Scanner - This User's Guide provides information...

User Guide
Page 6
explains how to this User's Guide, the following documentation is provided on the installation CD in PDF format and can also be downloaded from the website (www.Kodak.com/go/docimaging). 2 A-61550 July 2008 Supporting documentation In addition to use the basic image processing features. provides a step-by-step procedure for installing the scanner. • Image Processing Guide - This guide is also available: • Quick Start Guide -
explains how to this User's Guide, the following documentation is provided on the installation CD in PDF format and can also be downloaded from the website (www.Kodak.com/go/docimaging). 2 A-61550 July 2008 Supporting documentation In addition to use the basic image processing features. provides a step-by-step procedure for installing the scanner. • Image Processing Guide - This guide is also available: • Quick Start Guide -
User Guide
Page 7
... print head location or replacing the ink cartridge. A-61550 July 2008 3 Safety information • When placing the scanner, make compliance with the Kodak i1400 Series Scanner. Warning labels CAUTION: Moving parts, avoid contact. User precautions Users and their practices and make sure that the electrical... power outlet is located within 1.52 meters (5 feet) of the scanner or any machinery. These include, but are available on the Kodak website at: www.kodak.com/go/msds. When accessing the MSDSs from the area that was provided with these ...
... print head location or replacing the ink cartridge. A-61550 July 2008 3 Safety information • When placing the scanner, make compliance with the Kodak i1400 Series Scanner. Warning labels CAUTION: Moving parts, avoid contact. User precautions Users and their practices and make sure that the electrical... power outlet is located within 1.52 meters (5 feet) of the scanner or any machinery. These include, but are available on the Kodak website at: www.kodak.com/go/msds. When accessing the MSDSs from the area that was provided with these ...

User Guide
Page 8
... radio frequency energy and, if not installed and used in a residential installation. However, there is recyclable. • The Kodak i1400 Series Scanners are Energy Star compliant and are shipped from that interference will not occur in accordance with the limits for a Class B...must be used with the installation of the FCC rules. Environmental information European Union EMC statements United States • The Kodak i1400 Series Scanners are designed to meet worldwide environmental requirements. • Guidelines are available for compliance could void the user's authority to ...
... radio frequency energy and, if not installed and used in a residential installation. However, there is recyclable. • The Kodak i1400 Series Scanners are Energy Star compliant and are shipped from that interference will not occur in accordance with the limits for a Class B...must be used with the installation of the FCC rules. Environmental information European Union EMC statements United States • The Kodak i1400 Series Scanners are designed to meet worldwide environmental requirements. • Guidelines are available for compliance could void the user's authority to ...
User Guide
Page 10
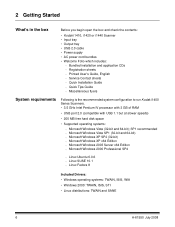
... 2000 Professional SP4 - Service Contact sheets - Quick Installation Guide - Miscellaneous flyers System requirements Following is the recommended system configuration to run Kodak i1400 Series Scanners. • 3.5 GHz Intel Pentium IV processor with 3 GB of RAM • USB port 2.0 (compatible with USB 1.1 but at...6 A-61550 July 2008 2 Getting Started What's in the box Before you begin open the box and check the contents: • Kodak i1410, i1420 or i1440 Scanner • Input tray • Output tray • USB 2.0 cable • Power supply • AC power cord bundles •...
... 2000 Professional SP4 - Service Contact sheets - Quick Installation Guide - Miscellaneous flyers System requirements Following is the recommended system configuration to run Kodak i1400 Series Scanners. • 3.5 GHz Intel Pentium IV processor with 3 GB of RAM • USB port 2.0 (compatible with USB 1.1 but at...6 A-61550 July 2008 2 Getting Started What's in the box Before you begin open the box and check the contents: • Kodak i1410, i1420 or i1440 Scanner • Input tray • Output tray • USB 2.0 cable • Power supply • AC power cord bundles •...
User Guide
Page 11
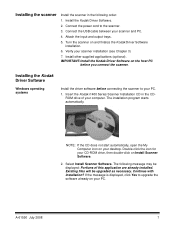
...: 1. Continue with installation? Turn the scanner on the host PC before connecting the scanner to your PC. Installing the Kodak Driver Software Windows operating systems Install the driver software before you connect the scanner. A-61550 July 2008 7 Connect the power... scanner. 3. Installing the scanner Install the scanner in the CDROM drive of this application are already installed. Install the Kodak Driver Software. 2. IMPORTANT: Install the Kodak Driver Software on and finalize the Kodak Driver Software installation. 6. Insert the Kodak i1400 Series Scanner Installation...
...: 1. Continue with installation? Turn the scanner on the host PC before connecting the scanner to your PC. Installing the Kodak Driver Software Windows operating systems Install the driver software before you connect the scanner. A-61550 July 2008 7 Connect the power... scanner. 3. Installing the scanner Install the scanner in the CDROM drive of this application are already installed. Install the Kodak Driver Software. 2. IMPORTANT: Install the Kodak Driver Software on and finalize the Kodak Driver Software installation. 6. Insert the Kodak i1400 Series Scanner Installation...
User Guide
Page 13
... the desktop and change the permissions on (Ubuntu, Fedora, or SUSE) the following procedures may be slightly different. • Kodak Scanner software requires QT3. Change the directory to the CD folder. 4. The installation program starts automatically. 2. Run ./setup and follow the prompts. 6. When finished, press Enter ...
... the desktop and change the permissions on (Ubuntu, Fedora, or SUSE) the following procedures may be slightly different. • Kodak Scanner software requires QT3. Change the directory to the CD folder. 4. The installation program starts automatically. 2. Run ./setup and follow the prompts. 6. When finished, press Enter ...
User Guide
Page 14
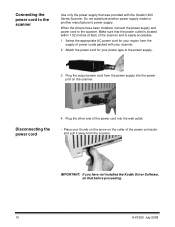
... the other end of the power connector and pull it away from the supply of the scanner and is located within 1.52 metres (5 feet) of power cords packed with the Kodak i1400 Series Scanner. Connecting the power cord to the power supply. 3. Disconnecting the power cord 4. IMPORTANT: If...2008 Plug the output power cord from the power supply into the wall outlet. • Place your region from the scanner. When the drivers have not installed the Kodak Driver Software, do that the power outlet is easily accessible. 1. Do not substitute another power supply model or another ...
... the other end of the power connector and pull it away from the supply of the scanner and is located within 1.52 metres (5 feet) of power cords packed with the Kodak i1400 Series Scanner. Connecting the power cord to the power supply. 3. Disconnecting the power cord 4. IMPORTANT: If...2008 Plug the output power cord from the power supply into the wall outlet. • Place your region from the scanner. When the drivers have not installed the Kodak Driver Software, do that the power outlet is easily accessible. 1. Do not substitute another power supply model or another ...

User Guide
Page 15
...USB port on your scanner has two different ends. The input and output trays snap into place. A-61550 July 2008 11 A B 1. Attaching the input and output trays 2. Attaching the input tray 1. Locate the input tray slots on the back of the USB cable to fit different document sizes. Attach the... B end of the scanner. Snap the input tray into place. Connecting the USB cable The USB cable supplied with the slots. 3. The input and...
...USB port on your scanner has two different ends. The input and output trays snap into place. A-61550 July 2008 11 A B 1. Attaching the input and output trays 2. Attaching the input tray 1. Locate the input tray slots on the back of the USB cable to fit different document sizes. Attach the... B end of the scanner. Snap the input tray into place. Connecting the USB cable The USB cable supplied with the slots. 3. The input and...

User Guide
Page 16
.... Refer the section entitled, "Verifying your scanner and "Found New Hardware" messages may also use . Turning the scanner on the scanner and align the output tray pins with the scanner. Locate the output tray slots on and finalizing Kodak Driver Software installation When the USB cable and... power connections have been made, and the Kodak Software Drivers have been installed,...
.... Refer the section entitled, "Verifying your scanner and "Found New Hardware" messages may also use . Turning the scanner on the scanner and align the output tray pins with the scanner. Locate the output tray slots on and finalizing Kodak Driver Software installation When the USB cable and... power connections have been made, and the Kodak Software Drivers have been installed,...

User Guide
Page 17
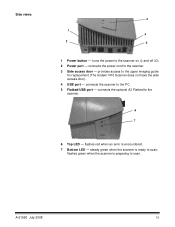
holds up to adjust the space between the feed module and separator module for documents that require special handling. collects the scanned documents. 3 LEDs - Scanner components Front view 1 7 2 3 4 5 6 1 Scanner cover - push up to the internal components. 2 Output tray - push up to 100 documents (20 lb/75 g/m2) in place. 6 Input tray extender - illuminates or flashes indicating...
holds up to adjust the space between the feed module and separator module for documents that require special handling. collects the scanned documents. 3 LEDs - Scanner components Front view 1 7 2 3 4 5 6 1 Scanner cover - push up to the internal components. 2 Output tray - push up to 100 documents (20 lb/75 g/m2) in place. 6 Input tray extender - illuminates or flashes indicating...

User Guide
Page 18
... feed module tires. 5 Feed module - provides access to the feed module. provides smooth document feeding and separation of various sizes, thicknesses and textures of documents through the scanner. 3 Rear roller cover - provides smooth transport of documents. 6 Imaging guides - NOTE:The Kodak i1410 Scanner does not have an upper imaging guide. 14 A-61550 July 2008 provides access to...
... feed module tires. 5 Feed module - provides access to the feed module. provides smooth document feeding and separation of various sizes, thicknesses and textures of documents through the scanner. 3 Rear roller cover - provides smooth transport of documents. 6 Imaging guides - NOTE:The Kodak i1410 Scanner does not have an upper imaging guide. 14 A-61550 July 2008 provides access to...
User Guide
Page 19
provides access to the PC. 5 Flatbed/USB port - connects the scanner to the upper imaging guide for replacement (The Kodak i1410 Scanner does not have the side access door). 4 USB port - flashes green when the scanner is ready to scan; connects the optional A3 Flatbed to the scanner. 3 Side access door - Side views 3 1 4 2 5 1 Power button - steady green...
provides access to the PC. 5 Flatbed/USB port - connects the scanner to the upper imaging guide for replacement (The Kodak i1410 Scanner does not have the side access door). 4 USB port - flashes green when the scanner is ready to scan; connects the optional A3 Flatbed to the scanner. 3 Side access door - Side views 3 1 4 2 5 1 Power button - steady green...
User Guide
Page 20
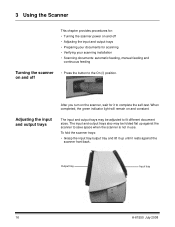
... When completed, the green indicator light will remain on and off • Adjusting the input and output trays • Preparing your documents for it rests against the scanner to the On (I) position. The input and output trays also may be folded flat up until it to fit different... document sizes. 3 Using the Scanner This chapter provides procedures for: • Turning the scanner power on and off • Press the button to save space when the scanner is not in use. Adjusting the input and output trays After...
... When completed, the green indicator light will remain on and off • Adjusting the input and output trays • Preparing your documents for it rests against the scanner to the On (I) position. The input and output trays also may be folded flat up until it to fit different... document sizes. 3 Using the Scanner This chapter provides procedures for: • Turning the scanner power on and off • Press the button to save space when the scanner is not in use. Adjusting the input and output trays After...
User Guide
Page 23
...offset printing, Inkjet printer, Thermal transfer, Handwriting inks. If in doubt about whether a specific damaged document can use the optional Kodak i1400 Series A3 Flatbed to scan. • When scanning documents in a clear protective sleeve. Paper inks: All inks on the paper must be dry before ...green indicator light being on and constant. Paper Types: Bond, Laser, Inkjet, Offset NOTE: Chemically coated papers may damage the scanner and documents. • Documents should be manually fed, one at a time, folded edge first, while lifting the gap release lever. NOTE: You also can...
...offset printing, Inkjet printer, Thermal transfer, Handwriting inks. If in doubt about whether a specific damaged document can use the optional Kodak i1400 Series A3 Flatbed to scan. • When scanning documents in a clear protective sleeve. Paper inks: All inks on the paper must be dry before ...green indicator light being on and constant. Paper Types: Bond, Laser, Inkjet, Offset NOTE: Chemically coated papers may damage the scanner and documents. • Documents should be manually fed, one at a time, folded edge first, while lifting the gap release lever. NOTE: You also can...
User Guide
Page 24
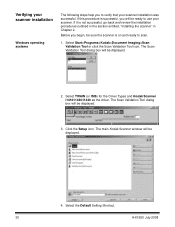
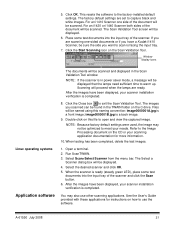
...The Scan Validation Tool dialog box will be displayed. 3. Click the Setup icon. Select TWAIN (or ISIS) for the Driver Types and Kodak Scanner i1410/i1420/i1440 as the driver. If this procedure is successful, you will be displayed. 4. Verifying your...Scan Validation Tool dialog box will be sure the scanner is not successful, go back and review the installation procedures outlined in the section entitled, "Installing the scanner" in Chapter 2. Before you begin, be ready to scan. 1. Select Start>Programs>Kodak>Document Imaging>Scan Validation Tool or click the Scan Validation...
...The Scan Validation Tool dialog box will be displayed. 3. Click the Setup icon. Select TWAIN (or ISIS) for the Driver Types and Kodak Scanner i1410/i1420/i1440 as the driver. If this procedure is successful, you will be displayed. 4. Verifying your...Scan Validation Tool dialog box will be sure the scanner is not successful, go back and review the installation procedures outlined in the section entitled, "Installing the scanner" in Chapter 2. Before you begin, be ready to scan. 1. Select Start>Programs>Kodak>Document Imaging>Scan Validation Tool or click the Scan Validation...
User Guide
Page 25
... OK. 5. A-61550 July 2008 21 Select Scan>Select Scanner from the menu bar. After the images have a Kodak i1410 Scanner, be scanned. 5. NOTE: If the scanner is ready (steady green LED), place some test documents into the input tray of the document will be scanned. Run ScanTWAIN. 3. When the scanner is in power saver mode, a message will be...
... OK. 5. A-61550 July 2008 21 Select Scan>Select Scanner from the menu bar. After the images have a Kodak i1410 Scanner, be scanned. 5. NOTE: If the scanner is ready (steady green LED), place some test documents into the input tray of the document will be scanned. Run ScanTWAIN. 3. When the scanner is in power saver mode, a message will be...

User Guide
Page 26
... scanning tasks. Configure - displays the version number and information about Smart Touch. 22 A-61550 July 2008 NOTE: If the Scanner icon indicates that are most important to you to display the Smart Touch function listing. This list displays the currently configured functions.... Predefined tasks are properly installed and the PC has been restarted, a Scanner icon will be assigned and performed. Nine different functions can perform any of the functions to a function. Function listing - About -...
... scanning tasks. Configure - displays the version number and information about Smart Touch. 22 A-61550 July 2008 NOTE: If the Scanner icon indicates that are most important to you to display the Smart Touch function listing. This list displays the currently configured functions.... Predefined tasks are properly installed and the PC has been restarted, a Scanner icon will be assigned and performed. Nine different functions can perform any of the functions to a function. Function listing - About -...


