User Guide
Page 2
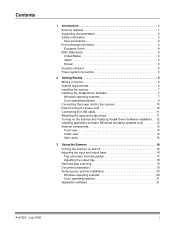
... power cord 10 Connecting the USB cable 11 Attaching the input and output trays 11 Turning on the scanner and finalizing Kodak Driver Software installation . . 12 Installing application software (Windows operating systems only 12 Scanner components 13 Front view 13 Inside view 14 Side views 15 3 Using the Scanner 16 Turning the scanner on and off 16 Adjusting the input and output trays 16 Tray extenders and side guides 17 Adjusting the output tray 18 Start and stop scanning 19 Document...
... power cord 10 Connecting the USB cable 11 Attaching the input and output trays 11 Turning on the scanner and finalizing Kodak Driver Software installation . . 12 Installing application software (Windows operating systems only 12 Scanner components 13 Front view 13 Inside view 14 Side views 15 3 Using the Scanner 16 Turning the scanner on and off 16 Adjusting the input and output trays 16 Tray extenders and side guides 17 Adjusting the output tray 18 Start and stop scanning 19 Document...
User Guide
Page 3
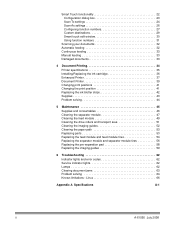
...box 23 Scan To settings 24 Scan As settings 26 Configuring function numbers 27 Custom destinations 29 Smart touch edit window 30 Using function numbers 31 Scanning your documents 32 Automatic feeding 32 Continuous feeding 33 Manual feeding 33 Damaged documents 33 4 Document Printing 34 Printer specifications 35 Installing/Replacing the ink cartridge 36 Enhanced Printer 37 Document Printer 39 Changing print positions 41 Changing the print position 41 Replacing the ink blotter strips 42 Supplies 43 Problem solving 44 5 Maintenance 45 Supplies and consumables 46 Cleaning...
...box 23 Scan To settings 24 Scan As settings 26 Configuring function numbers 27 Custom destinations 29 Smart touch edit window 30 Using function numbers 31 Scanning your documents 32 Automatic feeding 32 Continuous feeding 33 Manual feeding 33 Damaged documents 33 4 Document Printing 34 Printer specifications 35 Installing/Replacing the ink cartridge 36 Enhanced Printer 37 Document Printer 39 Changing print positions 41 Changing the print position 41 Replacing the ink blotter strips 42 Supplies 43 Problem solving 44 5 Maintenance 45 Supplies and consumables 46 Cleaning...
User Guide
Page 5
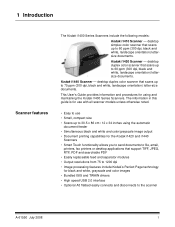
... Kodak's Perfect Page technology for use with all scanner models unless otherwise noted. • Easy to use • Small, compact size • Scans up to the scanner A-61550 July 2008 1 This User's Guide provides information and procedures for using the automatic document feeder • Simultaneous black and white and color/grayscale image output • Document printing capabilities for the Kodak i1420 and i1440 Scanners • Smart Touch functionality allows you to send documents to file, email, printers...
... Kodak's Perfect Page technology for use with all scanner models unless otherwise noted. • Easy to use • Small, compact size • Scans up to the scanner A-61550 July 2008 1 This User's Guide provides information and procedures for using the automatic document feeder • Simultaneous black and white and color/grayscale image output • Document printing capabilities for the Kodak i1420 and i1440 Scanners • Smart Touch functionality allows you to send documents to file, email, printers...
User Guide
Page 7
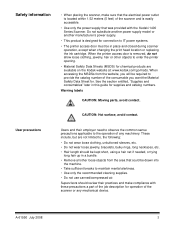
..., long necklaces, etc. • Hair length should review their employer need to observe the common sense precautions applicable to the operation of the job description for supplies and catalog numbers. Do not substitute another power supply model or another manufacturer's power supply. • This product is designed for connection to IT power systems. • The printer access door must be required to provide the...
..., long necklaces, etc. • Hair length should review their employer need to observe the common sense precautions applicable to the operation of the job description for supplies and catalog numbers. Do not substitute another power supply model or another manufacturer's power supply. • This product is designed for connection to IT power systems. • The printer access door must be required to provide the...

User Guide
Page 8
... is no guarantee that are replaced during maintenance or service; This equipment generates, uses, and can be determined by turning the equipment off and on, the user is connected. • Consult the dealer or an experienced radio/TV technician for additional suggestions. Environmental information European Union EMC statements United States • The Kodak i1400 Series Scanners are designed to 15 minutes...
... is no guarantee that are replaced during maintenance or service; This equipment generates, uses, and can be determined by turning the equipment off and on, the user is connected. • Consult the dealer or an experienced radio/TV technician for additional suggestions. Environmental information European Union EMC statements United States • The Kodak i1400 Series Scanners are designed to 15 minutes...
User Guide
Page 10
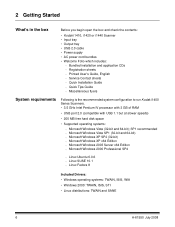
... 64-bit); Microsoft Windows XP x64 Edition - Linux Fedora 8 Included Drivers: • Windows operating systems: TWAIN, ISIS, WIA • Windows 2000: TWAIN, ISIS, STI • Linux distributions: TWAIN and SANE 6 A-61550 July 2008 2 Getting Started What's in the box Before you begin open the box and check the contents: • Kodak i1410, i1420 or i1440 Scanner • Input tray • Output tray • USB 2.0 cable • Power supply • AC power cord bundles • Welcome Folio which includes: - Quick Installation Guide -
... 64-bit); Microsoft Windows XP x64 Edition - Linux Fedora 8 Included Drivers: • Windows operating systems: TWAIN, ISIS, WIA • Windows 2000: TWAIN, ISIS, STI • Linux distributions: TWAIN and SANE 6 A-61550 July 2008 2 Getting Started What's in the box Before you begin open the box and check the contents: • Kodak i1410, i1420 or i1440 Scanner • Input tray • Output tray • USB 2.0 cable • Power supply • AC power cord bundles • Welcome Folio which includes: - Quick Installation Guide -
User Guide
Page 11
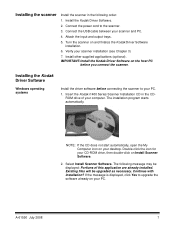
... 7 Install the Kodak Driver Software. 2. Connect the USB cable between your scanner installation (see Chapter 3) 7. Turn the scanner on the host PC before connecting the scanner to your PC. Installing the Kodak Driver Software Windows operating systems Install the driver software before you connect the scanner. NOTE: If the CD does not start automatically, open the My Computer icon on your CD-ROM drive, then double-click on your PC. 1. If the message is displayed, click Yes to the scanner. 3. Connect the power cord...
... 7 Install the Kodak Driver Software. 2. Connect the USB cable between your scanner installation (see Chapter 3) 7. Turn the scanner on the host PC before connecting the scanner to your PC. Installing the Kodak Driver Software Windows operating systems Install the driver software before you connect the scanner. NOTE: If the CD does not start automatically, open the My Computer icon on your CD-ROM drive, then double-click on your PC. 1. If the message is displayed, click Yes to the scanner. 3. Connect the power cord...
User Guide
Page 13
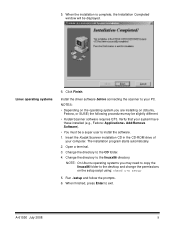
The installation program starts automatically. 2. Open a terminal. 3. Change the directory to exit. NOTE: On Ubuntu operating systems you are installing on (Ubuntu, Fedora, or SUSE) the following procedures may need to copy the linuxx86 folder to the linuxx86 directory. When the installation is complete, the Installation Completed window will be a super user to your computer. Click Finish. Insert the Kodak Scanner installation CD in the CD-ROM drive of your...
The installation program starts automatically. 2. Open a terminal. 3. Change the directory to exit. NOTE: On Ubuntu operating systems you are installing on (Ubuntu, Fedora, or SUSE) the following procedures may need to copy the linuxx86 folder to the linuxx86 directory. When the installation is complete, the Installation Completed window will be a super user to your computer. Click Finish. Insert the Kodak Scanner installation CD in the CD-ROM drive of your...
User Guide
Page 14
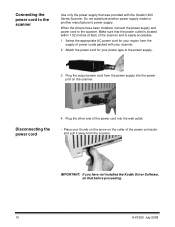
... on the scanner. Do not substitute another power supply model or another manufacturer's power supply. Plug the output power cord from the scanner. When the drivers have not installed the Kodak Driver Software, do that before proceeding. 10 A-61550 July 2008 IMPORTANT: If you have been installed, connect the power supply and power cord to the power supply. 3. Make sure that the power outlet is easily accessible. 1. Connecting the power cord to the scanner Use only the power supply that was...
... on the scanner. Do not substitute another power supply model or another manufacturer's power supply. Plug the output power cord from the scanner. When the drivers have not installed the Kodak Driver Software, do that before proceeding. 10 A-61550 July 2008 IMPORTANT: If you have been installed, connect the power supply and power cord to the power supply. 3. Make sure that the power outlet is easily accessible. 1. Connecting the power cord to the scanner Use only the power supply that was...
User Guide
Page 19
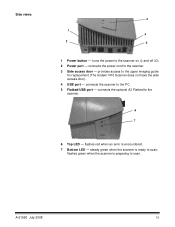
... - connects the power cord to the upper imaging guide for replacement (The Kodak i1410 Scanner does not have the side access door). 4 USB port - flashes red when an error is ready to scan; provides access to the scanner. 3 Side access door - connects the optional A3 Flatbed to the scanner on (|) and off (O). 2 Power port - turns the power to the scanner. 6 7 6 Top LED - connects the scanner to scan. Side views 3 1 4 2 5 1 Power button - flashes green when the scanner is preparing to the PC. 5 Flatbed/USB port...
... - connects the power cord to the upper imaging guide for replacement (The Kodak i1410 Scanner does not have the side access door). 4 USB port - flashes red when an error is ready to scan; provides access to the scanner. 3 Side access door - connects the optional A3 Flatbed to the scanner on (|) and off (O). 2 Power port - turns the power to the scanner. 6 7 6 Top LED - connects the scanner to scan. Side views 3 1 4 2 5 1 Power button - flashes green when the scanner is preparing to the PC. 5 Flatbed/USB port...
User Guide
Page 24
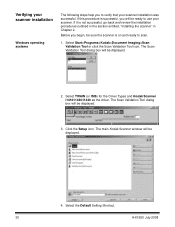
..., go back and review the installation procedures outlined in the section entitled, "Installing the scanner" in Chapter 2. Verifying your scanner installation Windows operating systems The following steps help you to use your scanner installation was successful. The Scan Validation Tool dialog box will be displayed. 4. Select the Default Setting Shortcut. 20 A-61550 July 2008 Select TWAIN (or ISIS) for the Driver Types and Kodak Scanner i1410/i1420/i1440 as the driver. Before you begin...
..., go back and review the installation procedures outlined in the section entitled, "Installing the scanner" in Chapter 2. Verifying your scanner installation Windows operating systems The following steps help you to use your scanner installation was successful. The Scan Validation Tool dialog box will be displayed. 4. Select the Default Setting Shortcut. 20 A-61550 July 2008 Select TWAIN (or ISIS) for the Driver Types and Kodak Scanner i1410/i1420/i1440 as the driver. Before you begin...
User Guide
Page 25
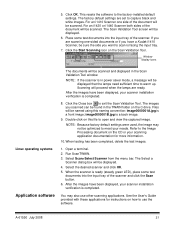
... i1440 Scanner both sides of the scanner and click the Scan button. 6. NOTE: If the scanner is a front image; The factory default settings are ready. Window display icons Linux operating systems Application software The documents will be scanned and displayed in power saver mode, a message will be scanned. A-61550 July 2008 21 Open a terminal. 2. Refer to capture black and white images. Click the Close box to the factory-installed default settings. When the scanner is a back image. 9. image0000001B...
... i1440 Scanner both sides of the scanner and click the Scan button. 6. NOTE: If the scanner is a front image; The factory default settings are ready. Window display icons Linux operating systems Application software The documents will be scanned and displayed in power saver mode, a message will be scanned. A-61550 July 2008 21 Open a terminal. 2. Refer to capture black and white images. Click the Close box to the factory-installed default settings. When the scanner is a back image. 9. image0000001B...

User Guide
Page 28
... select a different printer or different set the print options. These settings will be opened using Adobe Reader. • E-mail: creates an electronic file from the scanned documents and launches the application program for the saved file. Edit images prior to saving/emailing/printing: if selected, the scanned images will be saved and used to create it in the location specified in the Folder path. • Application: creates an electronic file from the scanned documents and launches...
... select a different printer or different set the print options. These settings will be opened using Adobe Reader. • E-mail: creates an electronic file from the scanned documents and launches the application program for the saved file. Edit images prior to saving/emailing/printing: if selected, the scanned images will be saved and used to create it in the location specified in the Folder path. • Application: creates an electronic file from the scanned documents and launches...

User Guide
Page 29
... the function is saved as PDF files, the software automatically assigns the date and sequence number for each file name. if you want to add a prefix to the beginning of the file and the location where it will be attached to the file name, it will be displayed after the document(s) are automatically assigned a unique file name. Settings button - The Save As dialog box will be displayed...
... the function is saved as PDF files, the software automatically assigns the date and sequence number for each file name. if you want to add a prefix to the beginning of the file and the location where it will be attached to the file name, it will be displayed after the document(s) are automatically assigned a unique file name. Settings button - The Save As dialog box will be displayed...
User Guide
Page 38
... counter, and custom messages. NOTES: • Clean the scanner's paper path components daily when using the Document Printer and the Enhanced Printer. NOTE: Refer to the Image Processing document on the CD or your scanning application documentation for more information about enabling printing and setting up print strings. The capture software application controls static fields; 4 Document Printing This chapter provides instructions for using the printer. • You cannot print on documents that are accessible through the ISIS Driver...
... counter, and custom messages. NOTES: • Clean the scanner's paper path components daily when using the Document Printer and the Enhanced Printer. NOTE: Refer to the Image Processing document on the CD or your scanning application documentation for more information about enabling printing and setting up print strings. The capture software application controls static fields; 4 Document Printing This chapter provides instructions for using the printer. • You cannot print on documents that are accessible through the ISIS Driver...

User Guide
Page 50
... through Kodak Parts Services. • Do not use cleaners in confined areas, use with soap and water after performing maintenance procedures. Supplies/Consumables Kodak Feeder Consumables Kit for i1400 Series Scanners Kodak Extra-Large Feeder Consumables Kit for i1400 Series Scanners Kodak Imaging Guide Set for i1400 Series Scanners (1 upper guide, 1 lower guide) Document Printer: Printer Ink Cartridges (10) Document Printer: Kodak Printer Ink Blotters (60) Document Printer: Kodak Printer Ink Cartridge Carrier Enhanced Printer: Black Ink Cartridges (HP C6602A) Enhanced Printer: Red Ink...
... through Kodak Parts Services. • Do not use cleaners in confined areas, use with soap and water after performing maintenance procedures. Supplies/Consumables Kodak Feeder Consumables Kit for i1400 Series Scanners Kodak Extra-Large Feeder Consumables Kit for i1400 Series Scanners Kodak Imaging Guide Set for i1400 Series Scanners (1 upper guide, 1 lower guide) Document Printer: Printer Ink Cartridges (10) Document Printer: Kodak Printer Ink Blotters (60) Document Printer: Kodak Printer Ink Cartridge Carrier Enhanced Printer: Black Ink Cartridges (HP C6602A) Enhanced Printer: Red Ink...
User Guide
Page 68
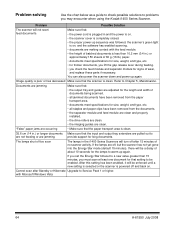
... the i1400 Series Scanners will not scan/ feed documents Make sure that: • the power cord is plugged in and the power is on. • the scanner cover is completely closed. • the proper power-up sequence was followed, the scanner's green light is on . Refer to Chapter 5, Maintenance. The lamps shut off after Standby or Hibernate Upgrade to Service Pack 1 or higher. Problem Possible Solution The scanner will turn off...
... the i1400 Series Scanners will not scan/ feed documents Make sure that: • the power cord is plugged in and the power is on. • the scanner cover is completely closed. • the proper power-up sequence was followed, the scanner's green light is on . Refer to Chapter 5, Maintenance. The lamps shut off after Standby or Hibernate Upgrade to Service Pack 1 or higher. Problem Possible Solution The scanner will turn off...

User Guide
Page 70
.../superuser password. Click OK on the scanner is red even though the scanner is displayed when you are captured. Issue: The LED on the message. 2. Enter your application connects to the scanner. Solution: The LED will be captured in the "Solution" below: Solution: Before checking cable connections and performing the power down list. 6. Known limitations Linux Issue: The number of images that are still having a problem, power down the scanner, then power...
.../superuser password. Click OK on the scanner is red even though the scanner is displayed when you are captured. Issue: The LED on the message. 2. Enter your application connects to the scanner. Solution: The LED will be captured in the "Solution" below: Solution: Before checking cable connections and performing the power down list. 6. Known limitations Linux Issue: The number of images that are still having a problem, power down the scanner, then power...

User Guide
Page 73
... "add-on unpacking, setup, installation and operation. adapters, cables, software, manuals, etc.). Kodak accepts no responsibility for part numbers and replacement packaging ordering information. Purchaser must remove and retain all warranty returns in resolving the problem over the phone. When the original packaging is available Monday - Kodak Scanners provide the productivity needed , a service request will be required, you may be returned with the use and care of the...
... "add-on unpacking, setup, installation and operation. adapters, cables, software, manuals, etc.). Kodak accepts no responsibility for part numbers and replacement packaging ordering information. Purchaser must remove and retain all warranty returns in resolving the problem over the phone. When the original packaging is available Monday - Kodak Scanners provide the productivity needed , a service request will be required, you may be returned with the use and care of the...

User Guide
Page 74
... instructions for eligible purchasers of the replacement product. An Kodak Field Engineer will be dispatched to the product location to perform repair service if the product is located within two business days. For additional information on specific failed or broken Kodak Scanner. and 5 p.m. The AUR provides advance replacement on service areas, visit our website at: www.Kodak.com/go/docimaging. The RMA number should be checked...
... instructions for eligible purchasers of the replacement product. An Kodak Field Engineer will be dispatched to the product location to perform repair service if the product is located within two business days. For additional information on specific failed or broken Kodak Scanner. and 5 p.m. The AUR provides advance replacement on service areas, visit our website at: www.Kodak.com/go/docimaging. The RMA number should be checked...


