User Guide
Page 3
...29 Smart touch edit window 30 Using function numbers 31 Scanning your documents 32 Automatic feeding 32 Continuous feeding 33 Manual feeding 33 Damaged documents 33 4 Document Printing 34 Printer specifications 35 Installing/Replacing the ink cartridge 36 Enhanced Printer 37 Document Printer 39 Changing print positions 41 Changing the print position 41 Replacing...-separation pad 58 Replacing the imaging guides 59 6 Troubleshooting 62 Indicator lights and error codes 62 Service indicator lights 62 Lamps 62 Clearing document jams 63 Problem solving 64 Known limitations -
...29 Smart touch edit window 30 Using function numbers 31 Scanning your documents 32 Automatic feeding 32 Continuous feeding 33 Manual feeding 33 Damaged documents 33 4 Document Printing 34 Printer specifications 35 Installing/Replacing the ink cartridge 36 Enhanced Printer 37 Document Printer 39 Changing print positions 41 Changing the print position 41 Replacing...-separation pad 58 Replacing the imaging guides 59 6 Troubleshooting 62 Indicator lights and error codes 62 Service indicator lights 62 Lamps 62 Clearing document jams 63 Problem solving 64 Known limitations -

User Guide
Page 8
...ensure compliance with the default time set to 15 minutes. Environmental information European Union EMC statements United States • The Kodak i1400 Series Scanners are designed to meet worldwide environmental requirements. • Guidelines are available for the disposal of consumable items that are ... Series Scanners are Energy Star compliant and are shipped from that to which can radiate radio frequency energy and, if not installed and used in a particular installation. This symbol indicates that interference will not occur in accordance with the instruction manual, may cause...
...ensure compliance with the default time set to 15 minutes. Environmental information European Union EMC statements United States • The Kodak i1400 Series Scanners are designed to meet worldwide environmental requirements. • Guidelines are available for the disposal of consumable items that are ... Series Scanners are Energy Star compliant and are shipped from that to which can radiate radio frequency energy and, if not installed and used in a particular installation. This symbol indicates that interference will not occur in accordance with the instruction manual, may cause...

User Guide
Page 9
... residential areas. As this is a Class B product based on the standard of the Voluntary Control Council for household use the equipment according to the instruction manual.
... residential areas. As this is a Class B product based on the standard of the Voluntary Control Council for household use the equipment according to the instruction manual.
User Guide
Page 20
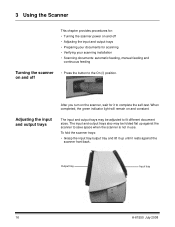
...; Verifying your scanning installation • Scanning documents: automatic feeding, manual feeding and continuous feeding Turning the scanner on and off • Adjusting the input and output trays • Preparing your documents for it rests against the scanner to save space when the scanner is not in use. 3 Using the Scanner This chapter provides procedures for: • Turning...
...; Verifying your scanning installation • Scanning documents: automatic feeding, manual feeding and continuous feeding Turning the scanner on and off • Adjusting the input and output trays • Preparing your documents for it rests against the scanner to save space when the scanner is not in use. 3 Using the Scanner This chapter provides procedures for: • Turning...
User Guide
Page 23
...Kodak i1400 Series A3 Flatbed to scan. • When scanning documents in a clear protective sleeve, the input tray guides must be transported through the scanner. Paper Types: Bond, Laser, Inkjet, Offset NOTE: Chemically coated papers may damage the scanner and documents. • Documents should be adjusted to introduce documents into the scanner... All inks on the paper must be manually fed, one at a time, folded edge first, while lifting the gap release lever. Scanning is started . If in doubt about whether a specific damaged document can be dry before scanning is indicated...
...Kodak i1400 Series A3 Flatbed to scan. • When scanning documents in a clear protective sleeve, the input tray guides must be transported through the scanner. Paper Types: Bond, Laser, Inkjet, Offset NOTE: Chemically coated papers may damage the scanner and documents. • Documents should be adjusted to introduce documents into the scanner... All inks on the paper must be manually fed, one at a time, folded edge first, while lifting the gap release lever. Scanning is started . If in doubt about whether a specific damaged document can be dry before scanning is indicated...
User Guide
Page 27
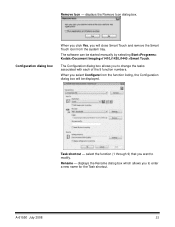
... Yes, you will close Smart Touch and remove the Smart Touch icon from the function listing, the Configuration dialog box will be started manually by selecting Start>Programs> Kodak>Document Imaging>i1410,i1420,i1440 >Smart Touch. When you want to enter a new name for the Task shortcut. Rename - The Configuration dialog box allows you...
... Yes, you will close Smart Touch and remove the Smart Touch icon from the function listing, the Configuration dialog box will be started manually by selecting Start>Programs> Kodak>Document Imaging>i1410,i1420,i1440 >Smart Touch. When you want to enter a new name for the Task shortcut. Rename - The Configuration dialog box allows you...

User Guide
Page 37
... feeding allows you to ease document feeding). 3. A-61550 July 2008 33 Damaged documents You can scan torn or fragile documents through the automatic document feeder if they are placed in the feeder, place the next batch face down , folded edge first, and centered in the automatic document feeder, then start scanning. Manual feeding Follow the guidelines...
... feeding allows you to ease document feeding). 3. A-61550 July 2008 33 Damaged documents You can scan torn or fragile documents through the automatic document feeder if they are placed in the feeder, place the next batch face down , folded edge first, and centered in the automatic document feeder, then start scanning. Manual feeding Follow the guidelines...

User Guide
Page 39
...the characters, such as half-width Katakana. Print side Rear (post-scan) Minimum printing distance 0.89 cm (0.35 in.) from document lead edge Static fields available User-specified messages via capture software application Dynamic fields available Up to 2,000,000 (based on font ... July 2008 35 For example: Dutch, English, French, German, Italian, Portuguese, Spanish, Japanese (half-width Katakana) Document Printer Print locations (horizontal) 14 front manually set Ink cartridge Black: 135 5155 10 cartridges per package Characters per ink cartridge up to 1,500,000 to a nine...
...the characters, such as half-width Katakana. Print side Rear (post-scan) Minimum printing distance 0.89 cm (0.35 in.) from document lead edge Static fields available User-specified messages via capture software application Dynamic fields available Up to 2,000,000 (based on font ... July 2008 35 For example: Dutch, English, French, German, Italian, Portuguese, Spanish, Japanese (half-width Katakana) Document Printer Print locations (horizontal) 14 front manually set Ink cartridge Black: 135 5155 10 cartridges per package Characters per ink cartridge up to 1,500,000 to a nine...
User Guide
Page 45
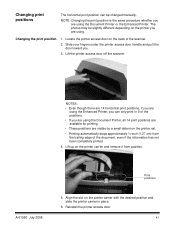
...access door. 41 NOTE: Changing the print position is the same procedure whether you are using the Document Printer, all 14 print positions are available for printing. • These positions are visible by a... slide the printer carrier in 9 of the positions. • If you are using the Document Printer or the Enhanced Printer. Changing the print position 1. NOTES: • Even though there...it from the trailing edge of the document, even if the information has not been completely printed 4. Lift the printer access door off the scanner. Changing print positions The horizontal print ...
...access door. 41 NOTE: Changing the print position is the same procedure whether you are using the Document Printer, all 14 print positions are available for printing. • These positions are visible by a... slide the printer carrier in 9 of the positions. • If you are using the Document Printer or the Enhanced Printer. Changing the print position 1. NOTES: • Even though there...it from the trailing edge of the document, even if the information has not been completely printed 4. Lift the printer access door off the scanner. Changing print positions The horizontal print ...

User Guide
Page 52
Inspect the tires. See the section entitled, "Replacing the separator module and separator module tires" later in this chapter for procedures. 8. Manually rotate and wipe the separator module tires with a roller cleaning pad. 7. Press until the separator module clicks into place. 48 A-61550 July 2008 If the separator module tires show signs of wear or damage, replace the tires or the separator module. Insert the separator module and align the shaft ends. 9. 6.
Inspect the tires. See the section entitled, "Replacing the separator module and separator module tires" later in this chapter for procedures. 8. Manually rotate and wipe the separator module tires with a roller cleaning pad. 7. Press until the separator module clicks into place. 48 A-61550 July 2008 If the separator module tires show signs of wear or damage, replace the tires or the separator module. Insert the separator module and align the shaft ends. 9. 6.

User Guide
Page 54
If the feed module tires show signs of wear or damage, replace the tires or the feed module. Manually rotate and wipe the feed module tires with a roller cleaning pad. 4. Remove any dust or debris from the tray area under the feed module and the front roller cover. 6. Reinstall the front drive roller cover. 50 A-61550 July 2008 3. Inspect the feed module. See the section entitled, "Replacing the feed module and feed module tires" later in this chapter for procedures. 5. Insert the feed module by aligning the pins and pushing it toward the right to fit it into position. 7.
If the feed module tires show signs of wear or damage, replace the tires or the feed module. Manually rotate and wipe the feed module tires with a roller cleaning pad. 4. Remove any dust or debris from the tray area under the feed module and the front roller cover. 6. Reinstall the front drive roller cover. 50 A-61550 July 2008 3. Inspect the feed module. See the section entitled, "Replacing the feed module and feed module tires" later in this chapter for procedures. 5. Insert the feed module by aligning the pins and pushing it toward the right to fit it into position. 7.

User Guide
Page 55
Cleaning the drive rollers and transport area 1. Manually rotate and wipe the drive rollers with a dry Staticide Wipe. 5. Dry the transport area with a roller cleaning pad. 2. Push against the raised edge on the left side of the rear roller cover and pull the cover up and out to remove it. 6. Remove any dust or debris in the slots around the drive rollers. 3. Clean any dust or debris under the rear drive roller cover. 7. Reinstall the rear drive roller cover. A-61550 July 2008 51 Wipe the upper and lower transport areas with a roller cleaning pad. 4.
Cleaning the drive rollers and transport area 1. Manually rotate and wipe the drive rollers with a dry Staticide Wipe. 5. Dry the transport area with a roller cleaning pad. 2. Push against the raised edge on the left side of the rear roller cover and pull the cover up and out to remove it. 6. Remove any dust or debris in the slots around the drive rollers. 3. Clean any dust or debris under the rear drive roller cover. 7. Reinstall the rear drive roller cover. A-61550 July 2008 51 Wipe the upper and lower transport areas with a roller cleaning pad. 4.

User Guide
Page 69
...• power on the scanner • try changing the scanning options (compression, etc.) in contact with the feed rollers. • the feed module and separator module are clean and not worn. • documents with an unusual texture or surface are fed manually. Refer to Chapter 5, ...Maintenance. A-61550 July 2008 65 Problem Possible Solution Documents are skewed during scanning Make sure that: • the host computer meets...
...• power on the scanner • try changing the scanning options (compression, etc.) in contact with the feed rollers. • the feed module and separator module are clean and not worn. • documents with an unusual texture or surface are fed manually. Refer to Chapter 5, ...Maintenance. A-61550 July 2008 65 Problem Possible Solution Documents are skewed during scanning Make sure that: • the host computer meets...
User Guide
Page 73
...cables, software, manuals, etc.). Any defective products or parts replaced by model. Warranty Service descriptions Eastman Kodak Company (Kodak) offers a range of service programs to support its Limited Warranty and to assist with information on " items, (i.e. Kodak Scanners provide the productivity...1414 and within ten (10) business days from shipping damage. Included with the repaired or replacement Kodak Scanner. Kodak accepts no responsibility for Kodak Scanners covered under the Limited Warranty or a purchased Maintenance Agreement, a Return Material Authorization Number (RMA)...
...cables, software, manuals, etc.). Any defective products or parts replaced by model. Warranty Service descriptions Eastman Kodak Company (Kodak) offers a range of service programs to support its Limited Warranty and to assist with information on " items, (i.e. Kodak Scanners provide the productivity...1414 and within ten (10) business days from shipping damage. Included with the repaired or replacement Kodak Scanner. Kodak accepts no responsibility for Kodak Scanners covered under the Limited Warranty or a purchased Maintenance Agreement, a Return Material Authorization Number (RMA)...

