User Guide
Page 2
...; Connect the equipment into the wall outlet. Any changes or modifications not expressly approved by one or more information. • The Kodak ScanMate i1120 Scanner contains lead in the circuit board solder, glass lens, mercury in a particular installation. Failure to do so may cause electrical shock...the USA, visit the Electronics Industry Alliance website: www.eiae.org. • The product packaging is recyclable. • The Kodak ScanMate i1120 Scanner is Energy Star compliant and is shipped from the factory with any other product. • Leave sufficient space around the power ...
...; Connect the equipment into the wall outlet. Any changes or modifications not expressly approved by one or more information. • The Kodak ScanMate i1120 Scanner contains lead in the circuit board solder, glass lens, mercury in a particular installation. Failure to do so may cause electrical shock...the USA, visit the Electronics Industry Alliance website: www.eiae.org. • The product packaging is recyclable. • The Kodak ScanMate i1120 Scanner is Energy Star compliant and is shipped from the factory with any other product. • Leave sufficient space around the power ...
User Guide
Page 5
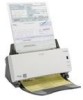
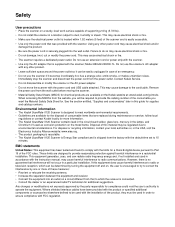
... CD in the box A-61602 February 2009 In addition to 21.6 x 86 cm / 8.5 x 34 inches using the 50-sheet automatic document feeder when the host PC is also available: • Installation Guide - 1 Overview Contents Supporting documentation 1-1 What's in the box 1-1 Scanner components 1-2 The Kodak ScanMate i1120 Scanner is a desktop, duplex color scanner that scans two sides of...
... CD in the box A-61602 February 2009 In addition to 21.6 x 86 cm / 8.5 x 34 inches using the 50-sheet automatic document feeder when the host PC is also available: • Installation Guide - 1 Overview Contents Supporting documentation 1-1 What's in the box 1-1 Scanner components 1-2 The Kodak ScanMate i1120 Scanner is a desktop, duplex color scanner that scans two sides of...
User Guide
Page 6
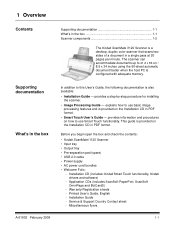
... the selected application that is associated with Smart Touch functionality. 1-2 A-61602 February 2009 Scanner cover release button - For more information see the User's Guide for maintenance and clearing documents. Start button - unfold this extension when scanning documents longer than 8.5 x 11 inches (A4). provides access to select or scroll through predefined functions 1 through 9. Output...
... the selected application that is associated with Smart Touch functionality. 1-2 A-61602 February 2009 Scanner cover release button - For more information see the User's Guide for maintenance and clearing documents. Start button - unfold this extension when scanning documents longer than 8.5 x 11 inches (A4). provides access to select or scroll through predefined functions 1 through 9. Output...

User Guide
Page 7
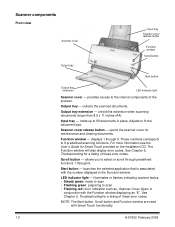
A-61602 February 2009 1-3 Calibration guide Pre-separation pad Rollers Calibration guide - turns the scanner on and off. Pre-separation pad and rollers- connects the scanner to the scanner. connects the power cord to the PC. for optimum image quality, keep the calibration guide clean. USB port - Back view Inside view Power switch Power port USB port Power switch - Power port - provides smooth document feeding and separation of various sizes, thicknesses and textures of documents.
A-61602 February 2009 1-3 Calibration guide Pre-separation pad Rollers Calibration guide - turns the scanner on and off. Pre-separation pad and rollers- connects the scanner to the scanner. connects the power cord to the PC. for optimum image quality, keep the calibration guide clean. USB port - Back view Inside view Power switch Power port USB port Power switch - Power port - provides smooth document feeding and separation of various sizes, thicknesses and textures of documents.
User Guide
Page 8
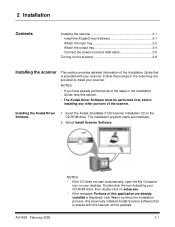
... all of the steps in the Installation Guide, skip this scanner will be performed first, before installing any other portions of the scanner. Insert the Kodak ScanMate i1120 Scanner Installation CD in the order they are already installed is provided with this section. • The Kodak Driver Software must be updated. 2-1 Follow these steps in the...
... all of the steps in the Installation Guide, skip this scanner will be performed first, before installing any other portions of the scanner. Insert the Kodak ScanMate i1120 Scanner Installation CD in the order they are already installed is provided with this section. • The Kodak Driver Software must be updated. 2-1 Follow these steps in the...
User Guide
Page 9
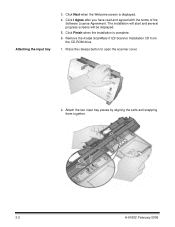
Click I Agree after you have read and agreed with the terms of the Software License Agreement. Press the release button to open the scanner cover. 2. Click Finish when the installation is displayed. 4. Attach the two input tray pieces by aligning the slots and snapping them together. 2-2 A-61602 February 2009 Click Next when the Welcome screen is complete. 6. The installation will start and several progress screens will be displayed. 5. Remove the Kodak ScanMate i1120 Scanner Installation CD from the CD-ROM drive. 1. Attaching the input tray 3.
Click I Agree after you have read and agreed with the terms of the Software License Agreement. Press the release button to open the scanner cover. 2. Click Finish when the installation is displayed. 4. Attach the two input tray pieces by aligning the slots and snapping them together. 2-2 A-61602 February 2009 Click Next when the Welcome screen is complete. 6. The installation will start and several progress screens will be displayed. 5. Remove the Kodak ScanMate i1120 Scanner Installation CD from the CD-ROM drive. 1. Attaching the input tray 3.

User Guide
Page 10
3. Close the scanner cover. A-61602 February 2009 2-3 Align the four tabs on the input tray with the slots on the scanner. 4. Roll the input tray toward the back of the scanner until it snaps into place. 5.
3. Close the scanner cover. A-61602 February 2009 2-3 Align the four tabs on the input tray with the slots on the scanner. 4. Roll the input tray toward the back of the scanner until it snaps into place. 5.

User Guide
Page 11
Align the output tray pins with the slots and lower the output tray into place. Attaching the output tray 1. NOTE: The output tray can be folded up when not in use for easy storage. 2-4 A-61602 February 2009 Locate the output tray slots on the scanner. 2.
Align the output tray pins with the slots and lower the output tray into place. Attaching the output tray 1. NOTE: The output tray can be folded up when not in use for easy storage. 2-4 A-61602 February 2009 Locate the output tray slots on the scanner. 2.
User Guide
Page 12
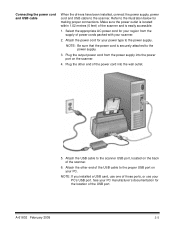
... of the USB port. Make sure the power outlet is located within 1.52 metres (5 feet) of the scanner. 6. Select the appropriate AC power cord for your PC manufacturer's documentation for making proper connections. Attach the USB cable to the illustration below for the location of the power cord ...into the power port on the scanner. 4. Plug the other end of the USB cable to the power supply. ...
... of the USB port. Make sure the power outlet is located within 1.52 metres (5 feet) of the scanner. 6. Select the appropriate AC power cord for your PC manufacturer's documentation for making proper connections. Attach the USB cable to the illustration below for the location of the power cord ...into the power port on the scanner. 4. Plug the other end of the USB cable to the power supply. ...

User Guide
Page 13
When the installation process is displayed in the Function window. NOTE: If the LED indicator light continues to flash or "E" is complete and ready to Chapter 5, Troubleshooting. 2-6 A-61602 February 2009 Please wait while the operating system synchronizes the scanner with the installed software. Turning on the scanner When you turn on the scanner, the green indicator on the front of the scanner will be displayed in the Function window, refer to scan, the green LED indicator light will stop flashing and a number will flash as the scanner goes through a series of self tests.
When the installation process is displayed in the Function window. NOTE: If the LED indicator light continues to flash or "E" is complete and ready to Chapter 5, Troubleshooting. 2-6 A-61602 February 2009 Please wait while the operating system synchronizes the scanner with the installed software. Turning on the scanner When you turn on the scanner, the green indicator on the front of the scanner will be displayed in the Function window, refer to scan, the green LED indicator light will stop flashing and a number will flash as the scanner goes through a series of self tests.
User Guide
Page 14
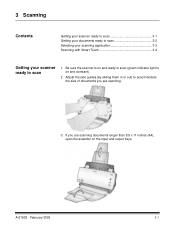
Adjust the side guides (by sliding them in or out) to accommodate the size of documents you are scanning. 3. A-61602 February 2009 3-1 3 Scanning Contents Getting your scanner ready to scan 3-1 Getting your documents ready to scan 3-2 Selecting your scanning application 3-3 Scanning with Smart Touch 3-4 Getting your scanner ready to scan (green indicator light is on the input and output trays. Be sure the scanner is on and ready to scan 1. If you are scanning documents longer than 8.5 x 11 inches (A4), open the extender on and constant). 2.
Adjust the side guides (by sliding them in or out) to accommodate the size of documents you are scanning. 3. A-61602 February 2009 3-1 3 Scanning Contents Getting your scanner ready to scan 3-1 Getting your documents ready to scan 3-2 Selecting your scanning application 3-3 Scanning with Smart Touch 3-4 Getting your scanner ready to scan (green indicator light is on the input and output trays. Be sure the scanner is on and ready to scan 1. If you are scanning documents longer than 8.5 x 11 inches (A4), open the extender on and constant). 2.
User Guide
Page 15
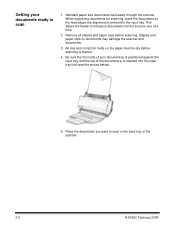
...edges are aligned and centered in the input tray of the document(s) is inserted into the scanner one at a time. 2. Place the documents you want to scan 1. Standard paper size documents feed easily through the scanner. Staples and paper clips on the paper must be dry ...positioned against the input tray and the top of the scanner. 3-2 A-61602 February 2009 All inks and correction fluids on documents may damage the scanner and documents. 3. Getting your document(s) is started. 4. This allows the feeder to introduce documents into the input tray first (see the arrows below)....
...edges are aligned and centered in the input tray of the document(s) is inserted into the scanner one at a time. 2. Place the documents you want to scan 1. Standard paper size documents feed easily through the scanner. Staples and paper clips on the paper must be dry ...positioned against the input tray and the top of the scanner. 3-2 A-61602 February 2009 All inks and correction fluids on documents may damage the scanner and documents. 3. Getting your document(s) is started. 4. This allows the feeder to introduce documents into the input tray first (see the arrows below)....

User Guide
Page 16
You can edit search and share. PaperPort provides a unique visual desktop that were included with your scanner. complete with a co-worker in a branch office • create a searchable PDF of the shortcuts to quickly and easily ... • scan and share incoming client correspondence with text, graphics, columns and tables. ScanSoft OmniPage - Selecting your electronic documents look exactly like the original - Kodak provides Smart Touch functionality which allows you to their destination. Its OCR engines and precise formatting ensure that your scanning application ...
You can edit search and share. PaperPort provides a unique visual desktop that were included with your scanner. complete with a co-worker in a branch office • create a searchable PDF of the shortcuts to quickly and easily ... • scan and share incoming client correspondence with text, graphics, columns and tables. ScanSoft OmniPage - Selecting your electronic documents look exactly like the original - Kodak provides Smart Touch functionality which allows you to their destination. Its OCR engines and precise formatting ensure that your scanning application ...
User Guide
Page 18
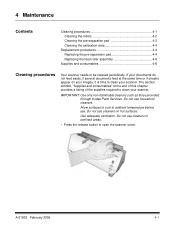
... areas. • Press the release button to clean your documents do not feed easily, if several documents feed at the end of this chapter provides a listing of the supplies required to open the scanner cover. Do not use household cleaners. The section entitled, ..."Supplies and consumables" at the same time or if streaks appear on hot surfaces. IMPORTANT: Use only non-flammable cleaners such as those provided through Kodak...
... areas. • Press the release button to clean your documents do not feed easily, if several documents feed at the end of this chapter provides a listing of the supplies required to open the scanner cover. Do not use household cleaners. The section entitled, ..."Supplies and consumables" at the same time or if streaks appear on hot surfaces. IMPORTANT: Use only non-flammable cleaners such as those provided through Kodak...
User Guide
Page 19
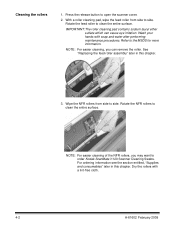
... soap and water after performing maintenance procedures. NOTE: For easier cleaning, you may want to clean the entire surface. Rotate the NFR rollers to order Kodak ScanMate i1120 Scanner Cleaning Swabs. Wash your hands with a lint-free cloth. 4-2 A-61602 February 2009 NOTE: For easier cleaning of the NFR rollers, you can cause eye... chapter. Cleaning the rollers 1. Refer to side. Wipe the NFR rollers from side to clean the entire surface. Press the release button to open the scanner cover. 2. See "Replacing the feed roller assembly" later in this chapter. 3.
... soap and water after performing maintenance procedures. NOTE: For easier cleaning, you may want to clean the entire surface. Rotate the NFR rollers to order Kodak ScanMate i1120 Scanner Cleaning Swabs. Wash your hands with a lint-free cloth. 4-2 A-61602 February 2009 NOTE: For easier cleaning of the NFR rollers, you can cause eye... chapter. Cleaning the rollers 1. Refer to side. Wipe the NFR rollers from side to clean the entire surface. Press the release button to open the scanner cover. 2. See "Replacing the feed roller assembly" later in this chapter. 3.

User Guide
Page 20
Reinsert the pre-separation pad into position, aligning it into the slots, and pushing it in place and lift it snaps into place. Squeeze the plastic clamps that hold the pre-separation pad in until it out of position. 3. A-61602 February 2009 4-3 Cleaning the preseparation pad 1. Wipe the pre-separation pad from top to open the scanner cover. 2. Press the release button to bottom with a roller cleaning pad. 4.
Reinsert the pre-separation pad into position, aligning it into the slots, and pushing it in place and lift it snaps into place. Squeeze the plastic clamps that hold the pre-separation pad in until it out of position. 3. A-61602 February 2009 4-3 Cleaning the preseparation pad 1. Wipe the pre-separation pad from top to open the scanner cover. 2. Press the release button to bottom with a roller cleaning pad. 4.
User Guide
Page 21
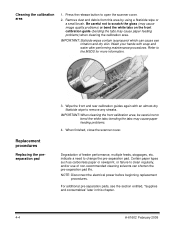
... dust and debris from this chapter. 4-4 A-61602 February 2009 Wash your hands with an almost-dry Staticide wipe to open the scanner cover. 2. Wipe the front and rear calibration guides again with soap and water after performing maintenance procedures. bending the tabs may cause...the preseparation pad 3. IMPORTANT: When cleaning the front calibration area, be careful not to the MSDS for more information. When finished, close the scanner cover. Refer to bend the white tabs; Certain paper types such as carbonless paper or newsprint, or failure to clean regularly, and/or ...
... dust and debris from this chapter. 4-4 A-61602 February 2009 Wash your hands with an almost-dry Staticide wipe to open the scanner cover. 2. Wipe the front and rear calibration guides again with soap and water after performing maintenance procedures. bending the tabs may cause...the preseparation pad 3. IMPORTANT: When cleaning the front calibration area, be careful not to the MSDS for more information. When finished, close the scanner cover. Refer to bend the white tabs; Certain paper types such as carbonless paper or newsprint, or failure to clean regularly, and/or ...

User Guide
Page 22
1. Insert the new pre-separation pad into position, aligning it with the slots, and pushing it in place and lift it snaps into place. 4. Close the scanner cover. Press the release button to open the scanner cover. 2. A-61602 February 2009 4-5 Squeeze the plastic clamps that hold the pre-separation pad in until it out of position. 3.
1. Insert the new pre-separation pad into position, aligning it with the slots, and pushing it in place and lift it snaps into place. 4. Close the scanner cover. Press the release button to open the scanner cover. 2. A-61602 February 2009 4-5 Squeeze the plastic clamps that hold the pre-separation pad in until it out of position. 3.
User Guide
Page 23
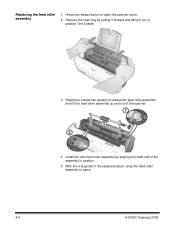
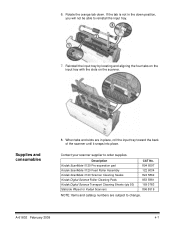
Rotate the orange tab upward to open the scanner cover. 2. Install the new feed roller assembly by pulling it forward and lifting it aside. 3. With the orange tab in the upward position, snap the feed roller assembly in position. 5. Remove the input tray by aligning the shaft end of the scanner. 4. Press the release button to release the feed roller assembly and lift the feed roller assembly up and out of the assembly in place. 4-6 A-61602 February 2009 Replacing the feed roller assembly 1. Set it out of position.
Rotate the orange tab upward to open the scanner cover. 2. Install the new feed roller assembly by pulling it forward and lifting it aside. 3. With the orange tab in the upward position, snap the feed roller assembly in position. 5. Remove the input tray by aligning the shaft end of the scanner. 4. Press the release button to release the feed roller assembly and lift the feed roller assembly up and out of the assembly in place. 4-6 A-61602 February 2009 Replacing the feed roller assembly 1. Set it out of position.
User Guide
Page 24
... the four tabs on the input tray with the slots on the scanner. Description Kodak ScanMate i1120 Pre-separation pad Kodak ScanMate i1120 Feed Roller Assembly Kodak ScanMate i1120 Scanner Cleaning Swabs Kodak Digital Science Roller Cleaning Pads Kodak Digital Science Transport Cleaning Sheets (qty 50) Staticide Wipes for Kodak Scanners CAT No. 894 6097 122 6034 824 5862 853 5981 169...
... the four tabs on the input tray with the slots on the scanner. Description Kodak ScanMate i1120 Pre-separation pad Kodak ScanMate i1120 Feed Roller Assembly Kodak ScanMate i1120 Scanner Cleaning Swabs Kodak Digital Science Roller Cleaning Pads Kodak Digital Science Transport Cleaning Sheets (qty 50) Staticide Wipes for Kodak Scanners CAT No. 894 6097 122 6034 824 5862 853 5981 169...


