
User Manual
Page 1
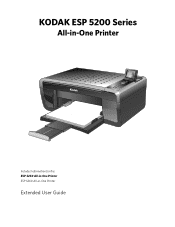
KODAK ESP 5200 Series All-in-One Printer Rotate Back Home MS SD/HC MMC Includes Information for the: ESP 5250 All-in-One Printer ESP 5260 All-in-One Printer Extended User Guide
KODAK ESP 5200 Series All-in-One Printer Rotate Back Home MS SD/HC MMC Includes Information for the: ESP 5250 All-in-One Printer ESP 5260 All-in-One Printer Extended User Guide
User Manual
Page 3
...WINDOWS OS-based computers 3 Home Center Software for MACINTOSH Computers 3 2 Configuring Your Printer Configuring printer settings ...4 Configuring basic printer settings ...4 Setting your printer as the default printer...5 Configuring network settings ...5 Configuring a wireless network connection ...5 Setting up an IP ... Verifying the network configuration...9 Printing the network configuration ...10 Installing your printer on additional computers on the network 10 Connecting to another KODAK All-in-One Printer 10 Adding a network connection to a USB-connected computer 11 For WINDOWS...
...WINDOWS OS-based computers 3 Home Center Software for MACINTOSH Computers 3 2 Configuring Your Printer Configuring printer settings ...4 Configuring basic printer settings ...4 Setting your printer as the default printer...5 Configuring network settings ...5 Configuring a wireless network connection ...5 Setting up an IP ... Verifying the network configuration...9 Printing the network configuration ...10 Installing your printer on additional computers on the network 10 Connecting to another KODAK All-in-One Printer 10 Adding a network connection to a USB-connected computer 11 For WINDOWS...
User Manual
Page 4
... pictures with a WINDOWS OS-based computer 28 Scanning multiple pictures with a MACINTOSH Computer 28 7 Maintaining Your Printer General care and cleaning...29 Cleaning the scanner glass ...30 Cleaning inside the scanner lid ...31 Replacing ink cartridges......32 Replacing the printhead ...35 Upgrading the printer software and firmware ...39 Upgrading software and firmware on a WINDOWS OS-based computer 39 Upgrading software and ...features ...45 Paper tray features...46 Ink cartridges ...46 iv www.kodak.com/go/aiosupport
... pictures with a WINDOWS OS-based computer 28 Scanning multiple pictures with a MACINTOSH Computer 28 7 Maintaining Your Printer General care and cleaning...29 Cleaning the scanner glass ...30 Cleaning inside the scanner lid ...31 Replacing ink cartridges......32 Replacing the printhead ...35 Upgrading the printer software and firmware ...39 Upgrading software and firmware on a WINDOWS OS-based computer 39 Upgrading software and ...features ...45 Paper tray features...46 Ink cartridges ...46 iv www.kodak.com/go/aiosupport
User Manual
Page 5
KODAK ESP 5200 Series All-in-One Printer Connectivity ...46 Software support ...46 Physical specifications ...47 Warranty...47 System requirements...47 Safety information ...49 Regulatory compliance...51 FCC statement ...51 Canadian statements ...51 German compliance statement ...52 REACH Article 33 declarations...52 Waste electrical and electronic equipment labeling 52 ENERGY STAR® Qualified ...52 Warranty Information...53 Declaration of Conformity...54 Index www.kodak.com/go/aiosupport v
KODAK ESP 5200 Series All-in-One Printer Connectivity ...46 Software support ...46 Physical specifications ...47 Warranty...47 System requirements...47 Safety information ...49 Regulatory compliance...51 FCC statement ...51 Canadian statements ...51 German compliance statement ...52 REACH Article 33 declarations...52 Waste electrical and electronic equipment labeling 52 ENERGY STAR® Qualified ...52 Warranty Information...53 Declaration of Conformity...54 Index www.kodak.com/go/aiosupport v

User Manual
Page 6
In addition, this printer supports networking, letting you print, copy, and scan pictures and documents. Components 1 2 34 56 7 Rotate Back Home MS SD/HC MMC 15 14 13 Rotate .../HC MMC 8 12 11 10 9 1 Wi-Fi connectivity LED 2 Memory card slot 3 Control panel 4 LCD 5 USB port 6 Power cord connection port 7 Rear-access cleanout area 8 Printer access door 9 Printhead with ink cartridges installed 10 Right paper-edge guide 11 Paper tray 12 Paper tray extender / paper stop 13 Left paper-edge...
In addition, this printer supports networking, letting you print, copy, and scan pictures and documents. Components 1 2 34 56 7 Rotate Back Home MS SD/HC MMC 15 14 13 Rotate .../HC MMC 8 12 11 10 9 1 Wi-Fi connectivity LED 2 Memory card slot 3 Control panel 4 LCD 5 USB port 6 Power cord connection port 7 Rear-access cleanout area 8 Printer access door 9 Printhead with ink cartridges installed 10 Right paper-edge guide 11 Paper tray 12 Paper tray extender / paper stop 13 Left paper-edge...
User Manual
Page 7
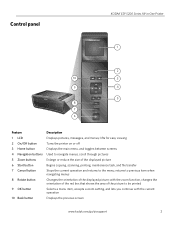
lifts for easy viewing Turns the printer on or off Displays the main menu, and toggles between screens Used to navigate menus, scroll through pictures Enlarge or reduce the size of the ... the red box that shows the area of the displayed picture; with the current operation Displays the previous screen www.kodak.com/go/aiosupport 2 Control panel KODAK ESP 5200 Series All-in-One Printer ESP 5250 1 All-in-One-Printer 2 Back Home 10 3 9 OK 4 Rotate Back Home MS SD/HC MMC 8 Zoom Rotate 5 Cancel 7 Start 6 Feature 1 LCD 2 On/Off...
lifts for easy viewing Turns the printer on or off Displays the main menu, and toggles between screens Used to navigate menus, scroll through pictures Enlarge or reduce the size of the ... the red box that shows the area of the displayed picture; with the current operation Displays the previous screen www.kodak.com/go/aiosupport 2 Control panel KODAK ESP 5200 Series All-in-One Printer ESP 5250 1 All-in-One-Printer 2 Back Home 10 3 9 OK 4 Rotate Back Home MS SD/HC MMC 8 Zoom Rotate 5 Cancel 7 Start 6 Feature 1 LCD 2 On/Off...
User Manual
Page 8
... upload of software and/or firmware. From the File menu of Home Center Software, you to Kodak sites, troubleshooting, and maintenance functions Help - Clicking one printer from your printer from other functions within Home Center Software Tools - Printer Overview Home Center Software KODAK Home Center Software is installed as part of the software installation on your...
... upload of software and/or firmware. From the File menu of Home Center Software, you to Kodak sites, troubleshooting, and maintenance functions Help - Clicking one printer from your printer from other functions within Home Center Software Tools - Printer Overview Home Center Software KODAK Home Center Software is installed as part of the software installation on your...
User Manual
Page 9
...OK. • Reset All Settings (see Printing tagged pictures, page 19) - Press OK, press to 4 hours in Home Center Software. www.kodak.com/go/aiosupport 4 Press to select Year, Month, Day, Hour, or Minute. Press to energy-saving low power (select from Home Center Settings... hour increments). Press OK, then press to select Printer Settings, then press OK. 3. Press to change the time to select one of selecting the Language and Country/Region. 2 Configuring Your Printer This chapter presumes that you have installed the printer software. Press OK, press to select On or ...
...OK. • Reset All Settings (see Printing tagged pictures, page 19) - Press OK, press to 4 hours in Home Center Software. www.kodak.com/go/aiosupport 4 Press to select Year, Month, Day, Hour, or Minute. Press to energy-saving low power (select from Home Center Settings... hour increments). Press OK, then press to select Printer Settings, then press OK. 3. Press to change the time to select one of selecting the Language and Country/Region. 2 Configuring Your Printer This chapter presumes that you have installed the printer software. Press OK, press to select On or ...
User Manual
Page 10
... wireless network network from the drop-down list next to Default Printer. Configuring a If you did not do so during printer setup, you can make your all -in -one printer is not the default printer: 1. If your all -in -one printer your printer from the printer control panel. connection 5 www.kodak.com/go /inkjetnetworking. Configuring network settings To connect your...
... wireless network network from the drop-down list next to Default Printer. Configuring a If you did not do so during printer setup, you can make your all -in -one printer is not the default printer: 1. If your all -in -one printer your printer from the printer control panel. connection 5 www.kodak.com/go /inkjetnetworking. Configuring network settings To connect your...

User Manual
Page 11
... Internet service provider or your network administrator. KODAK ESP 5200 Series All-in order of the items listed above, contact your Internet service provider or your network administrator. For assistance with your wireless system for available wireless networks within range, then displays the list in -One Printer Before you connect to determine what is...
... Internet service provider or your network administrator. KODAK ESP 5200 Series All-in order of the items listed above, contact your Internet service provider or your network administrator. For assistance with your wireless system for available wireless networks within range, then displays the list in -One Printer Before you connect to determine what is...
User Manual
Page 12
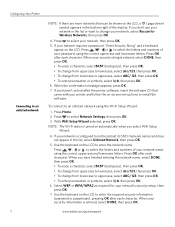
...Rescan for your network is turned on the LCD to enter the network name. www.kodak.com/go/aiosupport If your network's security setup, then press OK. 7. When you haven't yet installed the printer software, insert the software CD that came with your security string is entered, select...When the confirmation message appears, press OK. 7. Select WEP or WPA/WPA2 as required for Wireless Networks, then press OK. 4. When your printer and follow the on the LCD to enter the required security information (password or passphrase), pressing OK after each character. Use the keyboard on...
...Rescan for your network is turned on the LCD to enter the network name. www.kodak.com/go/aiosupport If your network's security setup, then press OK. 7. When you haven't yet installed the printer software, insert the software CD that came with your security string is entered, select...When the confirmation message appears, press OK. 7. Select WEP or WPA/WPA2 as required for Wireless Networks, then press OK. 4. When your printer and follow the on the LCD to enter the required security information (password or passphrase), pressing OK after each character. Use the keyboard on...
User Manual
Page 13
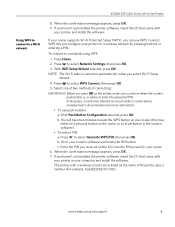
KODAK ESP 5200 Series All-in-One Printer Using WPS to connect to a network using WPS: 1. NOTE: The Wi-Fi radio is turned on the router or a virtual button in your router. 6. b. You will have two minutes to enter the generated PIN. The printer with a wireless connection is , ... for example, KodakESP5200+1133). www.kodak.com/go/aiosupport 8 WPS lets you can use push buttons: a. Press to select WPS Connect, then press OK. 5. Press Home. 2. Press to select Network Settings, then press OK. 3. Select one of two methods of the printer plus a number (for more information...
KODAK ESP 5200 Series All-in-One Printer Using WPS to connect to a network using WPS: 1. NOTE: The Wi-Fi radio is turned on the router or a virtual button in your router. 6. b. You will have two minutes to enter the generated PIN. The printer with a wireless connection is , ... for example, KodakESP5200+1133). www.kodak.com/go/aiosupport 8 WPS lets you can use push buttons: a. Press to select WPS Connect, then press OK. 5. Press Home. 2. Press to select Network Settings, then press OK. 3. Select one of two methods of the printer plus a number (for more information...
User Manual
Page 14
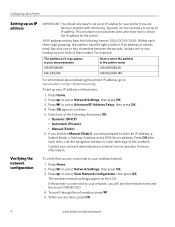
...Press OK again to select Network Settings, then press OK. 3. Select one or two leading zeros in the printer menu 149.089.138.149 149.002.040.149 For information about obtaining the printer IP address, go to www.kodak.com/go /aiosupport Within each digit of that you are done, press ...OK. 9 www.kodak.com/go /inkjetnetworking. If an address or subnet mask has only one or two characters between the periods, include one of the following format:...
...Press OK again to select Network Settings, then press OK. 3. Select one or two leading zeros in the printer menu 149.089.138.149 149.002.040.149 For information about obtaining the printer IP address, go to www.kodak.com/go /aiosupport Within each digit of that you are done, press ...OK. 9 www.kodak.com/go /inkjetnetworking. If an address or subnet mask has only one or two characters between the periods, include one of the following format:...
User Manual
Page 15
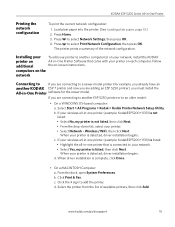
... select Print Network Configuration, then press OK. Installing your To add your wireless all -in -One Printer software for example, you already have an another KODAK ESP 7 printer and now you are adding an ESP 5250 printer), you are connecting to a newer model printer (for the newer model. When driver installation is listed, then click Next. b. Click Print & Fax...
... select Print Network Configuration, then press OK. Installing your To add your wireless all -in -One Printer software for example, you already have an another KODAK ESP 7 printer and now you are adding an ESP 5250 printer), you are connecting to a newer model printer (for the newer model. When driver installation is listed, then click Next. b. Click Print & Fax...
User Manual
Page 16
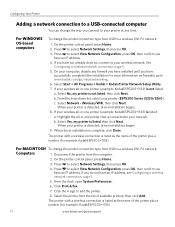
...to a USB-connected computer You can change the way you connect to your printer (ESP5200 Series (5250/5260). See Configuring a wireless network connection, page 5. 5. If your printer is not listed, then click Next. The printer with a wireless connection is not listed: a. If you have an IP...an IP address. When your network. Highlight the all-in -one printer that is listed as the name of the printer plus a number (for example, KodakESP5200+1133). 11 www.kodak.com/go /inkjetnetworking. 6. Select the printer from USB to select Network Settings, then press OK. 4. ...
...to a USB-connected computer You can change the way you connect to your printer (ESP5200 Series (5250/5260). See Configuring a wireless network connection, page 5. 5. If your printer is not listed, then click Next. The printer with a wireless connection is not listed: a. If you have an IP...an IP address. When your network. Highlight the all-in -one printer that is listed as the name of the printer plus a number (for example, KodakESP5200+1133). 11 www.kodak.com/go /inkjetnetworking. 6. Select the printer from USB to select Network Settings, then press OK. 4. ...
User Manual
Page 17
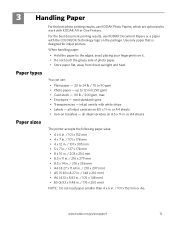
... the package. up to work with white stripe • Labels - all inkjet varieties on 8.5 x 11-in . / 101 x 152 mm or A6. or A4 sheets The printer accepts the following paper sizes: • 4 x 6 in. / 101 x 152 mm • 4 x 7 in. / 101 x 178 mm • 4 x 12 in. / 101 x 305 mm... in . Use only paper that is designed for inkjet printers. all inkjet varieties on 8.5 x 11-in -One Printers. avoid placing your fingerprints on transfers - 3 Handling Paper Paper types Paper sizes For the best photo printing results, use KODAK Photo Papers, which are optimized to 12 mil (290 gsm...
... the package. up to work with white stripe • Labels - all inkjet varieties on 8.5 x 11-in . / 101 x 152 mm or A6. or A4 sheets The printer accepts the following paper sizes: • 4 x 6 in. / 101 x 152 mm • 4 x 7 in. / 101 x 178 mm • 4 x 12 in. / 101 x 305 mm... in . Use only paper that is designed for inkjet printers. all inkjet varieties on 8.5 x 11-in -One Printers. avoid placing your fingerprints on transfers - 3 Handling Paper Paper types Paper sizes For the best photo printing results, use KODAK Photo Papers, which are optimized to 12 mil (290 gsm...
User Manual
Page 18
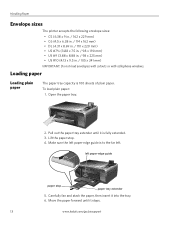
Handling Paper Envelope sizes The printer accepts the following envelope sizes: • C5 (6.38 x 9 in. / 162 x 229 mm) • C6 (4.5 x 6.38 in. / 114 x 162 mm) • DL (4.31 x 8.69 in. / 110 x ... envelopes with cutouts or with cellophane windows. Rotate Back Home MS SD/HC MMC 2. Pull out the paper tray extender until it stops. 13 www.kodak.com/go/aiosupport Carefully fan and stack the paper, then insert it is fully extended. 3. Loading paper Loading plain paper The paper tray capacity is...
Handling Paper Envelope sizes The printer accepts the following envelope sizes: • C5 (6.38 x 9 in. / 162 x 229 mm) • C6 (4.5 x 6.38 in. / 114 x 162 mm) • DL (4.31 x 8.69 in. / 110 x ... envelopes with cutouts or with cellophane windows. Rotate Back Home MS SD/HC MMC 2. Pull out the paper tray extender until it stops. 13 www.kodak.com/go/aiosupport Carefully fan and stack the paper, then insert it is fully extended. 3. Loading paper Loading plain paper The paper tray capacity is...
User Manual
Page 19
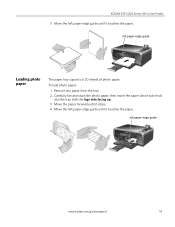
KODAK ESP 5200 Series All-in-One Printer 7. Move the paper forward until it touches the paper. left paper-edge guide until it stops. 4. Remove any paper from the tray. 2. Move the left paper-edge guide Rotate Back Home MS SD/HC MMC www.kodak.com/go/aiosupport 14 Move the left paper-edge guide Rotate...
KODAK ESP 5200 Series All-in-One Printer 7. Move the paper forward until it touches the paper. left paper-edge guide until it stops. 4. Remove any paper from the tray. 2. Move the left paper-edge guide Rotate Back Home MS SD/HC MMC www.kodak.com/go/aiosupport 14 Move the left paper-edge guide Rotate...

User Manual
Page 21
... to PC -- Settings Transfer All to select View and Print Photos, then press OK. 3. www.kodak.com/go/aiosupport 16 Good quality output; If the selected copy size is from a memory card inserted into the printer. The highest quality. Changing Print Photos Options / Defaults You can change the settings and save them...
... to PC -- Settings Transfer All to select View and Print Photos, then press OK. 3. www.kodak.com/go/aiosupport 16 Good quality output; If the selected copy size is from a memory card inserted into the printer. The highest quality. Changing Print Photos Options / Defaults You can change the settings and save them...
User Manual
Page 22
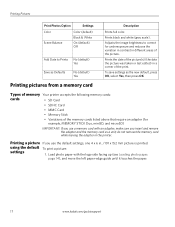
...Loading photo paper, page 14), and move the left paper-edge guide until it touches the paper. 17 www.kodak.com/go/aiosupport Printing pictures from a memory card Types of memory Your printer accepts the following memory cards: cards • SD Card • SDHC Card • MMC Card •...Save as the new default, press OK, select Yes, then press OK. do not remove the memory card while leaving the adapter in the printer. Prints black and white (gray scale). Printing Pictures Print Photos Option Settings Color Scene Balance Color (default) Black & White On (default) Off...
...Loading photo paper, page 14), and move the left paper-edge guide until it touches the paper. 17 www.kodak.com/go/aiosupport Printing pictures from a memory card Types of memory Your printer accepts the following memory cards: cards • SD Card • SDHC Card • MMC Card •...Save as the new default, press OK, select Yes, then press OK. do not remove the memory card while leaving the adapter in the printer. Prints black and white (gray scale). Printing Pictures Print Photos Option Settings Color Scene Balance Color (default) Black & White On (default) Off...


