User Manual
Page 5
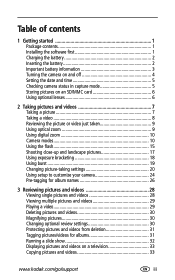
... optional lenses 6 2 Taking pictures and videos 7 Taking a picture 7 Taking a video 8 Reviewing the picture or video just taken 9 Using optical zoom 9 Using digital zoom 10 Camera modes 10 Using the flash 15 Shooting ...videos 28 Viewing multiple pictures and videos 29 Playing a video 29 Deleting pictures and videos 30 Magnifying pictures 30 Changing optional review settings 30 Protecting pictures and videos from deletion 31 Tagging pictures/videos for albums 31 Running a slide show 32 Displaying pictures and videos on a television 33 Copying pictures and videos 33 www.kodak...
... optional lenses 6 2 Taking pictures and videos 7 Taking a picture 7 Taking a video 8 Reviewing the picture or video just taken 9 Using optical zoom 9 Using digital zoom 10 Camera modes 10 Using the flash 15 Shooting ...videos 28 Viewing multiple pictures and videos 29 Playing a video 29 Deleting pictures and videos 30 Magnifying pictures 30 Changing optional review settings 30 Protecting pictures and videos from deletion 31 Tagging pictures/videos for albums 31 Running a slide show 32 Displaying pictures and videos on a television 33 Copying pictures and videos 33 www.kodak...

User Manual
Page 6
... and printing pictures 42 Transferring pictures/videos with the USB cable 42 Printing pictures from your computer 43 Ordering prints online 43 Printing from an optional SD/MMC card 43 Printing without a computer 43 7 Troubleshooting 44 Camera problems 44 Computer/connectivity problems 45 ... Camera ready light status 46 8 Getting help 48 Helpful links 48 Telephone customer support 49 9 Appendix 50 Camera specifications 50 Tips, safety, maintenance 52 Storage capacities 53 Power-saving features 54 Upgrading your software and firmware 55 Regulatory compliance 55 iv www.kodak....
... and printing pictures 42 Transferring pictures/videos with the USB cable 42 Printing pictures from your computer 43 Ordering prints online 43 Printing from an optional SD/MMC card 43 Printing without a computer 43 7 Troubleshooting 44 Camera problems 44 Computer/connectivity problems 45 ... Camera ready light status 46 8 Getting help 48 Helpful links 48 Telephone customer support 49 9 Appendix 50 Camera specifications 50 Tips, safety, maintenance 52 Storage capacities 53 Power-saving features 54 Upgrading your software and firmware 55 Regulatory compliance 55 iv www.kodak....

User Manual
Page 7
... software from the Kodak EasyShare software CD before connecting the camera (or dock) to the computer. Contents may install incorrectly. guide or Installing the software, page 35. See the Start Here! 1 Getting started Package contents 1 2 4 3 5 1 Camera with wrist strap 4 Audio/Video cable (for viewing pictures and videos on television) 2 Custom dock insert (for EasyShare camera dock or printer...
... software from the Kodak EasyShare software CD before connecting the camera (or dock) to the computer. Contents may install incorrectly. guide or Installing the software, page 35. See the Start Here! 1 Getting started Package contents 1 2 4 3 5 1 Camera with wrist strap 4 Audio/Video cable (for viewing pictures and videos on television) 2 Custom dock insert (for EasyShare camera dock or printer...

User Manual
Page 12
... SD/MMC card Your camera has 32 MB of Kodak products or www.kodak.com/go/dx7440accessories. 6 www.kodak.com/go /dx7440accessories. Getting started Storing pictures on the camera body. NOTE: When using a card for your pictures, card, or camera. 1 Turn off the camera. CAUTION: The card ...kodak.com/go /support these cards are designed primarily for storage capacities. See a dealer of internal memory. Do not insert or remove a card when the green ready light is partially ejected, pull it may damage your pictures and videos. To remove the card, turn off the camera...
... SD/MMC card Your camera has 32 MB of Kodak products or www.kodak.com/go/dx7440accessories. 6 www.kodak.com/go /dx7440accessories. Getting started Storing pictures on the camera body. NOTE: When using a card for your pictures, card, or camera. 1 Turn off the camera. CAUTION: The card ...kodak.com/go /support these cards are designed primarily for storage capacities. See a dealer of internal memory. Do not insert or remove a card when the green ready light is partially ejected, pull it may damage your pictures and videos. To remove the card, turn off the camera...
User Manual
Page 13
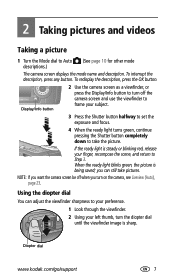
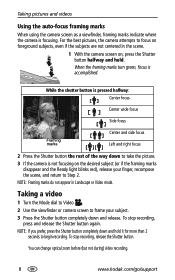
...pictures and videos Taking a picture 1 Turn the Mode dial to Step 3. NOTE: If you want the camera screen be off the camera screen and use the viewfinder to frame your finger, recompose the scene, and return to Auto . (See page 10 for other mode descriptions.) The camera screen displays ...the ready light turns green, continue pressing the Shutter button completely down to take pictures. If the ready light is sharp. Diopter dial www.kodak.com/go/support 7 Using the diopter dial You can adjust the viewfinder sharpness to your preference. 1 Look through the viewfinder. 2 Using ...
...pictures and videos Taking a picture 1 Turn the Mode dial to Step 3. NOTE: If you want the camera screen be off the camera screen and use the viewfinder to frame your finger, recompose the scene, and return to Auto . (See page 10 for other mode descriptions.) The camera screen displays ...the ready light turns green, continue pressing the Shutter button completely down to take pictures. If the ready light is sharp. Diopter dial www.kodak.com/go/support 7 Using the diopter dial You can adjust the viewfinder sharpness to your preference. 1 Look through the viewfinder. 2 Using ...
User Manual
Page 14
..., release the Shutter button. You can change optical zoom before (but not during) video recording. 8 www.kodak.com/go/support For the best pictures, the camera attempts to begin recording. Taking a video 1 Turn the Mode dial to Video . 2 Use the viewfinder or camera screen to frame your finger, recompose the scene, and return to take the...
..., release the Shutter button. You can change optical zoom before (but not during) video recording. 8 www.kodak.com/go/support For the best pictures, the camera attempts to begin recording. Taking a video 1 Turn the Mode dial to Video . 2 Use the viewfinder or camera screen to frame your finger, recompose the scene, and return to take the...

User Manual
Page 15
...Zoom indicator Digital zoom range Optical zoom range 2 Pull or push the Zoom button to take the picture. (When taking videos, press and release the Shutter button.) www.kodak.com/go/support 9 Taking pictures and videos Reviewing the picture or video just taken After you take a picture or video, the camera screen displays...38.) Share ■ Delete: Press the Delete button while the picture/video and are deleted. If the camera screen is turned on, the zoom indicator shows when you are in optical zoom range or in digital zoom range. 3 Press the Shutter button halfway and hold to set the...
...Zoom indicator Digital zoom range Optical zoom range 2 Pull or push the Zoom button to take the picture. (When taking videos, press and release the Shutter button.) www.kodak.com/go/support 9 Taking pictures and videos Reviewing the picture or video just taken After you take a picture or video, the camera screen displays...38.) Share ■ Delete: Press the Delete button while the picture/video and are deleted. If the camera screen is turned on, the zoom indicator shows when you are in optical zoom range or in digital zoom range. 3 Press the Shutter button halfway and hold to set the...
User Manual
Page 16
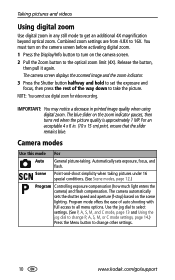
... blue slider on the scene lighting. For an acceptable 4 x 6 in printed image quality when using digital zoom. NOTE: You cannot use digital zoom for video recording. Camera modes Use this mode For Auto General picture-taking pictures under 16 special conditions. (See Scene modes, ...dial to change other settings. 10 www.kodak.com/go/support Automatically sets exposure, focus, and flash. IMPORTANT: You may notice a decrease in . (10 x 15 cm) print, ensure that the slider remains blue. Taking pictures and videos Using digital zoom Use digital zoom in any still mode to change...
... blue slider on the scene lighting. For an acceptable 4 x 6 in printed image quality when using digital zoom. NOTE: You cannot use digital zoom for video recording. Camera modes Use this mode For Auto General picture-taking pictures under 16 special conditions. (See Scene modes, ...dial to change other settings. 10 www.kodak.com/go/support Automatically sets exposure, focus, and flash. IMPORTANT: You may notice a decrease in . (10 x 15 cm) print, ensure that the slider remains blue. Taking pictures and videos Using digital zoom Use digital zoom in any still mode to change...
User Manual
Page 17
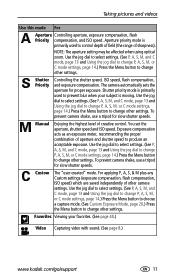
... change other settings. Favorites Viewing your subject is moving. To prevent camera shake, use a tripod for slow shutter speeds. Aperture priority mode is primarily used to prevent blur when your favorites. (See page 40.) Video Capturing video with sound. (See page 8.) www.kodak.com/go/support 11 NOTE: The aperture setting may be affected...
... change other settings. Favorites Viewing your subject is moving. To prevent camera shake, use a tripod for slow shutter speeds. Aperture priority mode is primarily used to prevent blur when your favorites. (See page 40.) Video Capturing video with sound. (See page 8.) www.kodak.com/go/support 11 NOTE: The aperture setting may be affected...
User Manual
Page 18
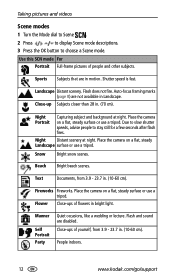
.... Snow Bright snow scenes. Flower Close-ups of flowers in motion. People indoors. 12 www.kodak.com/go/support Sports Subjects that are in bright light. Place the camera on a flat, steady Landscape surface or use a tripod. Close-ups of people and other subjects.... Auto-focus framing marks (page 8) are disabled. Fireworks Fireworks. Due to slow shutter speeds, advise people to choose a Scene mode. Taking pictures and videos Scene modes 1...
.... Snow Bright snow scenes. Flower Close-ups of flowers in motion. People indoors. 12 www.kodak.com/go/support Sports Subjects that are in bright light. Place the camera on a flat, steady Landscape surface or use a tripod. Close-ups of people and other subjects.... Auto-focus framing marks (page 8) are disabled. Fireworks Fireworks. Due to slow shutter speeds, advise people to choose a Scene mode. Taking pictures and videos Scene modes 1...
User Manual
Page 19
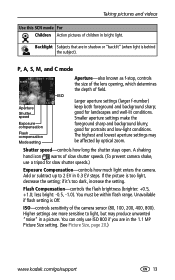
The highest and lowest aperture settings may produce unwanted "noise" in a picture. You must be affected by optical zoom. Taking pictures and videos Use this SCN mode For Children Action pictures of children in 0.3 EV steps. good for portraits and low-light conditions. Add or subtract up... are in the 1.1 MP Picture Size setting. (See Picture Size, page 20.) www.kodak.com/go/support 13 if it's too dark, increase the setting. A shaking hand icon warns of slow shutter speeds. (To prevent camera shake, use ISO 800 if you are in shadow or "backlit" (when light is ...
The highest and lowest aperture settings may produce unwanted "noise" in a picture. You must be affected by optical zoom. Taking pictures and videos Use this SCN mode For Children Action pictures of children in 0.3 EV steps. good for portraits and low-light conditions. Add or subtract up... are in the 1.1 MP Picture Size setting. (See Picture Size, page 20.) www.kodak.com/go/support 13 if it's too dark, increase the setting. A shaking hand icon warns of slow shutter speeds. (To prevent camera shake, use ISO 800 if you are in shadow or "backlit" (when light is ...
User Manual
Page 20
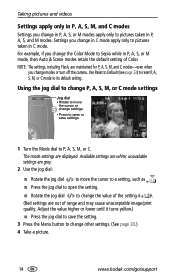
.... unavailable settings are grey. 2 Use the jog dial: ■ Rotate the jog dial to move the cursor or change modes or turn off the camera. Taking pictures and videos Settings apply only in P, A, S, M, and C modes Settings you change the Color Mode to Sepia while in P, A, S, or M mode, then Auto & Scene modes retain...; Press the jog dial to open or save the setting. 3 Press the Menu button to change other settings. (See page 20.) 4 Take a picture. 14 www.kodak.com/go/support
.... unavailable settings are grey. 2 Use the jog dial: ■ Rotate the jog dial to move the cursor or change modes or turn off the camera. Taking pictures and videos Settings apply only in P, A, S, M, and C modes Settings you change the Color Mode to Sepia while in P, A, S, or M mode, then Auto & Scene modes retain...; Press the jog dial to open or save the setting. 3 Press the Menu button to change other settings. (See page 20.) 4 Take a picture. 14 www.kodak.com/go/support
User Manual
Page 21
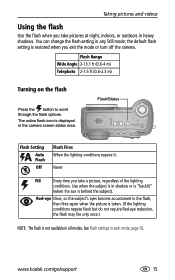
... Flash Fires When the lighting conditions require it. Never Fill Every time you take pictures at night, indoors, or outdoors in any Still mode; www.kodak.com/go/support 15 Flash Range Wide Angle 2-13.1 ft (0.6-4 m) Telephoto 2-7.5 ft (0.6-2.3 m) Turning on the flash Press the button to the flash, ...Red-eye reduction, the flash may fire only once.) NOTE: The flash is restored when you exit the mode or turn off the camera. Taking pictures and videos Using the flash Use the flash when you take a picture, regardless of the lighting conditions. You can change the flash setting in...
... Flash Fires When the lighting conditions require it. Never Fill Every time you take pictures at night, indoors, or outdoors in any Still mode; www.kodak.com/go/support 15 Flash Range Wide Angle 2-13.1 ft (0.6-4 m) Telephoto 2-7.5 ft (0.6-2.3 m) Turning on the flash Press the button to the flash, ...Red-eye reduction, the flash may fire only once.) NOTE: The flash is restored when you exit the mode or turn off the camera. Taking pictures and videos Using the flash Use the flash when you take a picture, regardless of the lighting conditions. You can change the flash setting in...

User Manual
Page 23
...until you change to take pictures of flash if possible. www.kodak.com/go/support 17 Shooting close range. With this setting, the camera uses infinity auto-focus. icon appears 3 Take a picture. The camera automatically sets the focus distance depending on the zoom position: Zoom ...Landscape pictures Use the Landscape setting to gain sharpness and detail in the status bar. Taking pictures and videos Capture mode Backlight Default setting Available settings Fill Fill Video Off Off First burst Off Off Last burst Off Off Exposure Off Off bracketing * When you change ...
...until you change to take pictures of flash if possible. www.kodak.com/go/support 17 Shooting close range. With this setting, the camera uses infinity auto-focus. icon appears 3 Take a picture. The camera automatically sets the focus distance depending on the zoom position: Zoom ...Landscape pictures Use the Landscape setting to gain sharpness and detail in the status bar. Taking pictures and videos Capture mode Backlight Default setting Available settings Fill Fill Video Off Off First burst Off Off Last burst Off Off Exposure Off Off bracketing * When you change ...
User Manual
Page 24
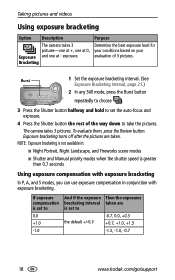
...camera takes 3 pictures. If exposure compensation is set to 0.0 +1.0 -1.0 And if the exposure Then the exposures bracketing interval taken are taken. Bracketing Determine the best exposure level for your conditions based on your evaluation of the way down to the default +/-0.3 -0.7, 0.0, +0.3 +0.7, +1.0, +1.3 -1.3, -1.0, -0.7 18 www.kodak.... 3 Press the Shutter button halfway and hold to set to take the pictures. Taking pictures and videos Using exposure bracketing Option Description Purpose The camera takes 3 pictures-one at +, one at 0, Exposure and one at - exposure.
...camera takes 3 pictures. If exposure compensation is set to 0.0 +1.0 -1.0 And if the exposure Then the exposures bracketing interval taken are taken. Bracketing Determine the best exposure level for your conditions based on your evaluation of the way down to the default +/-0.3 -0.7, 0.0, +0.3 +0.7, +1.0, +1.3 -1.3, -1.0, -0.7 18 www.kodak.... 3 Press the Shutter button halfway and hold to set to take the pictures. Taking pictures and videos Using exposure bracketing Option Description Purpose The camera takes 3 pictures-one at +, one at 0, Exposure and one at - exposure.

User Manual
Page 25
...second for up to 6 pictures while the Shutter button is saved. Last 6 pictures are saved. Example: A person swinging a golf club. The camera stops taking pictures when you release the Shutter button, when the pictures are timing is pressed. uncertain. Example: A child blowing out birthday candles. 1... released, only the last 6 pictures are taken, or when there is pressed. www.kodak.com/go/support 19 Taking pictures and videos Using burst Option Description Purpose First Burst Camera takes up to 15 Capture an event seconds) while the Shutter button is no more storage...
...second for up to 6 pictures while the Shutter button is saved. Last 6 pictures are saved. Example: A person swinging a golf club. The camera stops taking pictures when you release the Shutter button, when the pictures are timing is pressed. uncertain. Example: A child blowing out birthday candles. 1... released, only the last 6 pictures are taken, or when there is pressed. www.kodak.com/go/support 19 Taking pictures and videos Using burst Option Description Purpose First Burst Camera takes up to 15 Capture an event seconds) while the Shutter button is no more storage...
User Manual
Page 26
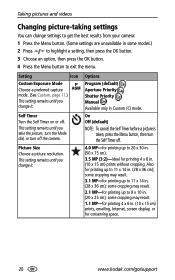
...cropping may result. 2.1 MP-for printing up to 11 x 14 in Custom (C) mode. Taking pictures and videos Changing picture-taking settings You can change settings to get the best results from your camera: 1 Press the Menu button. (Some settings are unavailable in some modes.) 2 Press to highlight a ... x 15 cm) prints without cropping. Self Timer Turn the Self Timer on or off . some cropping may result. 3.1 MP-for conserving space. 20 www.kodak.com/go/support some cropping may result. 1.1 MP-for printing 4 x 6 in. (10 x 15 cm) prints, emailing, Internet, screen display, or ...
...cropping may result. 2.1 MP-for printing up to 11 x 14 in Custom (C) mode. Taking pictures and videos Changing picture-taking settings You can change settings to get the best results from your camera: 1 Press the Menu button. (Some settings are unavailable in some modes.) 2 Press to highlight a ... x 15 cm) prints without cropping. Self Timer Turn the Self Timer on or off . some cropping may result. 3.1 MP-for conserving space. 20 www.kodak.com/go/support some cropping may result. 1.1 MP-for printing 4 x 6 in. (10 x 15 cm) prints, emailing, Internet, screen display, or ...
User Manual
Page 27
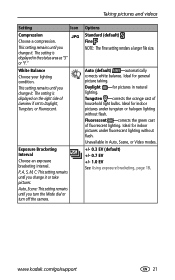
...it . This setting remains until you change it. www.kodak.com/go/support 21 Exposure Bracketing Interval Choose an exposure... for indoor pictures under tungsten or halogen lighting without flash. Ideal for pictures in Auto, Scene, or Video modes. +/- 0.3 EV (default) +/- 0.7 EV +/- 1.0 EV See Using exposure bracketing, page 18.... Unavailable in natural lighting. Tungsten -corrects the orange cast of household light bulbs. Taking pictures and videos Setting Icon Compression JPG Choose a compression. The setting is displayed on the right side of fluorescent lighting...
...it . This setting remains until you change it. www.kodak.com/go/support 21 Exposure Bracketing Interval Choose an exposure... for indoor pictures under tungsten or halogen lighting without flash. Ideal for pictures in Auto, Scene, or Video modes. +/- 0.3 EV (default) +/- 0.7 EV +/- 1.0 EV See Using exposure bracketing, page 18.... Unavailable in natural lighting. Tungsten -corrects the orange cast of household light bulbs. Taking pictures and videos Setting Icon Compression JPG Choose a compression. The setting is displayed on the right side of fluorescent lighting...

User Manual
Page 28
...Liveview if set to Multi-zone when in the viewfinder. (A circle indicates the metering spot.) Ideal when you change it. Unavailable in Video mode. 22 www.kodak.com/go/support Because the camera is always focusing, there is displayed on the right side of a scene. Unavailable in Auto, Scene, or... Video modes. Focus Zone Choose a large or concentrated area of Liveview if set to Single AF or Accessory Lens AF. Unavailable in the ...
...Liveview if set to Multi-zone when in the viewfinder. (A circle indicates the metering spot.) Ideal when you change it. Unavailable in Video mode. 22 www.kodak.com/go/support Because the camera is always focusing, there is displayed on the right side of a scene. Unavailable in Auto, Scene, or... Video modes. Focus Zone Choose a large or concentrated area of Liveview if set to Single AF or Accessory Lens AF. Unavailable in the ...
User Manual
Page 29
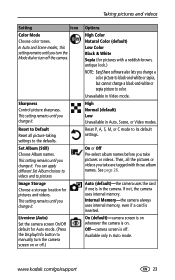
...select album names before you take are tagged with a reddish-brown, antique look.) NOTE: EasyShare software also lets you change it . www.kodak.com/go/support 23 Taking pictures and videos Setting Icon Color Mode Choose color tones. Sharpness Control picture sharpness. Reset to color. Set ...or C mode to pictures Image Storage Choose a storage location for Auto mode. (Press the Display/Info button to the defaults. Internal Memory-the camera always uses internal memory, even if a card is in Auto mode. This setting remains until you change a black-and-white or sepia picture ...
...select album names before you take are tagged with a reddish-brown, antique look.) NOTE: EasyShare software also lets you change it . www.kodak.com/go/support 23 Taking pictures and videos Setting Icon Color Mode Choose color tones. Sharpness Control picture sharpness. Reset to color. Set ...or C mode to pictures Image Storage Choose a storage location for Auto mode. (Press the Display/Info button to the defaults. Internal Memory-the camera always uses internal memory, even if a card is in Auto mode. This setting remains until you change a black-and-white or sepia picture ...


