
Reference Manual
Page 1
Reference Manual KODAK DP900 / DP1100 Digital Projectors with KODAK Image Manager PN 010-0210-00 8/99
Reference Manual KODAK DP900 / DP1100 Digital Projectors with KODAK Image Manager PN 010-0210-00 8/99

Reference Manual
Page 2
...Canadian ICES-003. Operation of the FCC Rules. Declaration of Conformity Manufacturer: Eastman Kodak Company Rochester, New York 14650 USA We declare under our sole responsibility that the KODAK DP900/1100 Digital Projector conforms to radio communications. The typical use is operated in a commercial environment.... Safety Certifications UL, CUL, TÜV, NOM EN 55022 Warning This is a Class A product. Canada This Class A digital apparatus complies with the instruction manual, may cause radio interference, in which case the user will be required to take adequate measures.
...Canadian ICES-003. Operation of the FCC Rules. Declaration of Conformity Manufacturer: Eastman Kodak Company Rochester, New York 14650 USA We declare under our sole responsibility that the KODAK DP900/1100 Digital Projector conforms to radio communications. The typical use is operated in a commercial environment.... Safety Certifications UL, CUL, TÜV, NOM EN 55022 Warning This is a Class A product. Canada This Class A digital apparatus complies with the instruction manual, may cause radio interference, in which case the user will be required to take adequate measures.
Reference Manual
Page 3
Contents Safety Instructions 1 Safety Definitions 1 Safety Symbols 1 Safety Terms 2 Introduction 3 Image Resolution 3 Compatibility 4 Unpacking the Projector 5 Projector Features 6 Front of Projector 6 Rear and Side of Projector 6 Connector Panel 6 Usage Guidelines 7 If You Need Assistance 8 Warranty 10 Setting up the Projector 11 Connecting the Cable Hub Connector 13 Connecting a Video Player 20 Starting the Projector 22 Turning Off the Projector 23 Using the Projector 25 3/99 5
Contents Safety Instructions 1 Safety Definitions 1 Safety Symbols 1 Safety Terms 2 Introduction 3 Image Resolution 3 Compatibility 4 Unpacking the Projector 5 Projector Features 6 Front of Projector 6 Rear and Side of Projector 6 Connector Panel 6 Usage Guidelines 7 If You Need Assistance 8 Warranty 10 Setting up the Projector 11 Connecting the Cable Hub Connector 13 Connecting a Video Player 20 Starting the Projector 22 Turning Off the Projector 23 Using the Projector 25 3/99 5

Reference Manual
Page 4
Reference Manual KODAK DP900 / DP1100 Basic Image Adjustment 25 Using the Remote Control 26 Adjusting the Projector 28 Using the Keypad and Remote Buttons 29 Using the On-Screen Menus 31 Kodak Menu 42 Maintenance & Troubleshooting 45 Cleaning the Lens 45 Replacing the Projection Lamp 46 Replacing the Batteries in the Remote Control 49 Using...
Reference Manual KODAK DP900 / DP1100 Basic Image Adjustment 25 Using the Remote Control 26 Adjusting the Projector 28 Using the Keypad and Remote Buttons 29 Using the On-Screen Menus 31 Kodak Menu 42 Maintenance & Troubleshooting 45 Cleaning the Lens 45 Replacing the Projection Lamp 46 Replacing the Batteries in the Remote Control 49 Using...

Reference Manual
Page 5
...8226; Caution: Statements identify conditions or practices that could result in fire, electrical shock, or personal injury and may result in damage to your new projector. Do not touch. Safety Symbols Attention: For information about use of a feature, please refer to the lamp door on the... projector. 3/99 1 An arrow pointing to the Reference Manual. Failure to comply with safety instructions may damage or impair protection provided by equipment. Safety ...
...8226; Caution: Statements identify conditions or practices that could result in fire, electrical shock, or personal injury and may result in damage to your new projector. Do not touch. Safety Symbols Attention: For information about use of a feature, please refer to the lamp door on the... projector. 3/99 1 An arrow pointing to the Reference Manual. Failure to comply with safety instructions may damage or impair protection provided by equipment. Safety ...

Reference Manual
Page 6
... the power cord to qualified service personnel. To avoid burns, wait 30 minutes before opening the lamp door. Transport the projector in a Kodak-approved case. • Caution: For ceiling mount installations, please use the ceiling mount recommended in the Reference Guide and follow all ...you notice a decrease in the Reference Manual. •Warning: Please use . Follow all service to a receptacle with it. • Caution: The projector lamp bulb is turned on the projector. Reference Manual KODAK DP900 / DP1100 Safety Terms: • Warning: Don't look directly into the lens when the...
... the power cord to qualified service personnel. To avoid burns, wait 30 minutes before opening the lamp door. Transport the projector in a Kodak-approved case. • Caution: For ceiling mount installations, please use the ceiling mount recommended in the Reference Guide and follow all ...you notice a decrease in the Reference Manual. •Warning: Please use . Follow all service to a receptacle with it. • Caution: The projector lamp bulb is turned on the projector. Reference Manual KODAK DP900 / DP1100 Safety Terms: • Warning: Don't look directly into the lens when the...
Reference Manual
Page 7
Introduction The KODAK DP900 /DP1100 Digital Projectors are lightweight multimedia projectors specifically designed for your computer's screen resolution is Kodak's exclusive Image Manager feature. information in this feature you connect the projector. Note: The DP900 automatically expands 640x480 images to transport the 7.4 pound projectors. The DP900 has SVGA 800x600 graphics, the DP1100 has XGA 1024x768 graphics. With this User's Guide applies...
Introduction The KODAK DP900 /DP1100 Digital Projectors are lightweight multimedia projectors specifically designed for your computer's screen resolution is Kodak's exclusive Image Manager feature. information in this feature you connect the projector. Note: The DP900 automatically expands 640x480 images to transport the 7.4 pound projectors. The DP900 has SVGA 800x600 graphics, the DP1100 has XGA 1024x768 graphics. With this User's Guide applies...

Reference Manual
Page 8
Reference Manual KODAK DP900 / DP1100 DP1100 The XGA resolution of computers and video devices, including: • IBM-compatible computers, including laptops, up to 1024x768 resolution at 75 Hz • ... standard VCRs, DVD players, camcorders and laser disc players. 4 3/99 If your computer's screen resolution is 1024x768. See "Auto Resize" on page 35. Compatibility The projector is compatible with a wide variety of the DP1100's projected image is higher than 1024x768, reset it to 1024x768. Note: The DP1100 automatically expands 640x480 and...
Reference Manual KODAK DP900 / DP1100 DP1100 The XGA resolution of computers and video devices, including: • IBM-compatible computers, including laptops, up to 1024x768 resolution at 75 Hz • ... standard VCRs, DVD players, camcorders and laser disc players. 4 3/99 If your computer's screen resolution is 1024x768. See "Auto Resize" on page 35. Compatibility The projector is compatible with a wide variety of the DP1100's projected image is higher than 1024x768, reset it to 1024x768. Note: The DP1100 automatically expands 640x480 and...

Reference Manual
Page 9
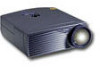
... Projector The projector comes with the items shown in Figure 1. Digital projector and lens cap 2. Audio cable 9. PS/2 mouse cable 10. Soft carry case 3. Power cord 5. MAC adapter 3/99 5 Check to make sure all are included. RCA audio/video cable 7. USB mouse cable 11. DP900 .../ DP1100 User's Guide, Reference Manual, and Online User Guide CD 6. Contact your shipping box may vary depending on the projector configuration you've ordered. 2 1 4 5 3 6 7 8 9 11 10 Figure 1...
... Projector The projector comes with the items shown in Figure 1. Digital projector and lens cap 2. Audio cable 9. PS/2 mouse cable 10. Soft carry case 3. Power cord 5. MAC adapter 3/99 5 Check to make sure all are included. RCA audio/video cable 7. USB mouse cable 11. DP900 .../ DP1100 User's Guide, Reference Manual, and Online User Guide CD 6. Contact your shipping box may vary depending on the projector configuration you've ordered. 2 1 4 5 3 6 7 8 9 11 10 Figure 1...

Reference Manual
Page 10
Reference Manual KODAK DP900 / DP1100 Projector Features Front of Projector focus ring zoom ring elevator button Rear and Side of Projector keypad front of projector connector panel elevator button power cord connector power switch Connector Panel speaker s-video composite connector computer L/R audio in (for video source) cable hub connector audio in 6 3/99
Reference Manual KODAK DP900 / DP1100 Projector Features Front of Projector focus ring zoom ring elevator button Rear and Side of Projector keypad front of projector connector panel elevator button power cord connector power switch Connector Panel speaker s-video composite connector computer L/R audio in (for video source) cable hub connector audio in 6 3/99
Reference Manual
Page 11
..., ANSI/NFPA 75. 3/99 7 If this happens, you would any product with glass components. Projector Features Usage Guidelines • Do not look directly into the projection lens when the projector is not intended for use in mainframe computer rooms as defined in direct sunlight or extreme cold for...not to drop it to reach room temperature before attempting to overheat and turn it back on. • Handle the projector as you must wait a minute before use. • This projector is turned on the projector. The bright light may harm your eyes. • Do not block the grills on .
..., ANSI/NFPA 75. 3/99 7 If this happens, you would any product with glass components. Projector Features Usage Guidelines • Do not look directly into the projection lens when the projector is not intended for use in mainframe computer rooms as defined in direct sunlight or extreme cold for...not to drop it to reach room temperature before attempting to overheat and turn it back on. • Handle the projector as you must wait a minute before use. • This projector is turned on the projector. The bright light may harm your eyes. • Do not block the grills on .
Reference Manual
Page 13
... Support If you have questions concerning the operation of 9:00 a.m. Have the projector serial number ready, and be at your computer with your location, or the U.K. In the U.S. and Canada call toll free, 1-888-375-6325, ... through Friday. toll line, 44-0-131-458-6714, between the hours of your projector when you can speak directly to a customer support representative. In Europe call the Kodak Digital Imaging Support Centre toll free numbers associated with your KODAK projector, you call : Austria/Osterreich Germany/Deutschland Spain/Espana Belgium/Belgique Ireland/Eire Sweden/...
... Support If you have questions concerning the operation of 9:00 a.m. Have the projector serial number ready, and be at your computer with your location, or the U.K. In the U.S. and Canada call toll free, 1-888-375-6325, ... through Friday. toll line, 44-0-131-458-6714, between the hours of your projector when you can speak directly to a customer support representative. In Europe call the Kodak Digital Imaging Support Centre toll free numbers associated with your KODAK projector, you call : Austria/Osterreich Germany/Deutschland Spain/Espana Belgium/Belgique Ireland/Eire Sweden/...

Reference Manual
Page 15
.... 3. If you want to the screen and the zoom setting determine the size of your computer. 2. It must be within 10 feet (3 m) of your projector is sold separately. 1. Figure 2 and Figure 3 show three projected image sizes. Make sure your power source and within 8 feet (2.4 m) of the projected image..."Ceiling Projection" on page 73. 3/99 11 The Ceiling Mount Kit is on the ceiling, refer to reverse the image. Make sure the projector and your screen. See "Rear Projection" on page 38 to the Ceiling Mount Installation Guide that comes with the optional Ceiling Mount Kit for ...
.... 3. If you want to the screen and the zoom setting determine the size of your computer. 2. It must be within 10 feet (3 m) of your projector is sold separately. 1. Figure 2 and Figure 3 show three projected image sizes. Make sure your power source and within 8 feet (2.4 m) of the projected image..."Ceiling Projection" on page 73. 3/99 11 The Ceiling Mount Kit is on the ceiling, refer to reverse the image. Make sure the projector and your screen. See "Rear Projection" on page 38 to the Ceiling Mount Installation Guide that comes with the optional Ceiling Mount Kit for ...

Reference Manual
Page 17
...the cable hub to the projector Note: In some older computers, the monitor connector does not have trouble connecting the cable hub to initialize with the projector; If you have a hole for all the connections between the projector and your computer, contact Kodak Support. Connect the end of... the cable hub to the the projector's connector panel. (Figure 4) connector on and the cable...
...the cable hub to the projector Note: In some older computers, the monitor connector does not have trouble connecting the cable hub to initialize with the projector; If you have a hole for all the connections between the projector and your computer, contact Kodak Support. Connect the end of... the cable hub to the the projector's connector panel. (Figure 4) connector on and the cable...

Reference Manual
Page 18
... types of equipment are turned off. Computers are connected directly to the cable hub. Now you must use the MAC adaptor between it and the projector is 10 feet or less. Equipment you want to connect Page Laptop computer with cable hub page 15 Desktop computer with cable hub page 17... are given on the pages listed here.. If you continue, make sure the distance between the computer and the cable hub. 14 3/99 Reference Manual KODAK DP900 / DP1100 Preparing to Connect Your Equipment to the Projector Note: Before you 're connecting a computer, make sure the...
... types of equipment are turned off. Computers are connected directly to the cable hub. Now you must use the MAC adaptor between it and the projector is 10 feet or less. Equipment you want to connect Page Laptop computer with cable hub page 15 Desktop computer with cable hub page 17... are given on the pages listed here.. If you continue, make sure the distance between the computer and the cable hub. 14 3/99 Reference Manual KODAK DP900 / DP1100 Preparing to Connect Your Equipment to the Projector Note: Before you 're connecting a computer, make sure the...

Reference Manual
Page 19
.... 2. Plug the other end of the mouse cable into the connector on their external video port when a secondary display device such as a projector is connected. Note: If you want to a laptop computer 2. Plug the end of the audio cable into the connector on your laptop. ...Figure 5 Connecting to control the computer's mouse from the projector's remote or keypad? Do you are listed in the Appendix C. 1. Setting up the Projector Connecting a Laptop Computer Note: Many laptop computers do not automatically turn on the cable hub. If ...
.... 2. Plug the other end of the mouse cable into the connector on their external video port when a secondary display device such as a projector is connected. Note: If you want to a laptop computer 2. Plug the end of the audio cable into the connector on your laptop. ...Figure 5 Connecting to control the computer's mouse from the projector's remote or keypad? Do you are listed in the Appendix C. 1. Setting up the Projector Connecting a Laptop Computer Note: Many laptop computers do not automatically turn on the cable hub. If ...

Reference Manual
Page 20
... computer to use the USB feature. Plug the end of the mouse cable into the connector on your laptop. Skip to "Starting the Projector" on your computer. 2. Reference Manual KODAK DP900 / DP1100 audio cable mouse cable Figure 6 Connecting audio and mouse cables to a laptop computer If your computer after connecting the mouse to...
... computer to use the USB feature. Plug the end of the mouse cable into the connector on your laptop. Skip to "Starting the Projector" on your computer. 2. Reference Manual KODAK DP900 / DP1100 audio cable mouse cable Figure 6 Connecting audio and mouse cables to a laptop computer If your computer after connecting the mouse to...

Reference Manual
Page 21
...present, from the computer. Locate the cable that does not have a 15-pin connector, you want to display the image on the projector? 1. Note: The projector must use the Mac adaptor between the computer and the cable hub. 2. Note: If you are connecting an older MACINTOSH computer that ...cable hub into the cable hub. Figure 7 Connecting to your monitor's cable into the monitor connector on the projection screen? Setting up the Projector Connecting a Desktop Computer 1. Plug either end of the audio cable into the audio connector on the cable hub. 3/99 17 Plug the other...
...present, from the computer. Locate the cable that does not have a 15-pin connector, you want to display the image on the projector? 1. Note: The projector must use the Mac adaptor between the computer and the cable hub. 2. Note: If you are connecting an older MACINTOSH computer that ...cable hub into the cable hub. Figure 7 Connecting to your monitor's cable into the monitor connector on the projection screen? Setting up the Projector Connecting a Desktop Computer 1. Plug either end of the audio cable into the audio connector on the cable hub. 3/99 17 Plug the other...

Reference Manual
Page 22
... from the projector's remote or keypad? audio cable mouse cable monitor cable Figure 8 Connecting monitor, audio and mouse cables to a desktop computer 18 3/99 If your computer has a PS/2 connector, use it. Plug the end of the mouse cable into the mouse connector on the cable hub. Reference Manual KODAK DP900 / DP1100 Do...
... from the projector's remote or keypad? audio cable mouse cable monitor cable Figure 8 Connecting monitor, audio and mouse cables to a desktop computer 18 3/99 If your computer has a PS/2 connector, use it. Plug the end of the mouse cable into the mouse connector on the cable hub. Reference Manual KODAK DP900 / DP1100 Do...

Reference Manual
Page 23
You must have the appropriate USB drivers installed on page 22. 3/99 19 Now you computer to "Starting the Projector" on you 're ready to power up the Projector If your computer has a USB connector and is supported for use the USB mouse cable. Plug the end of the mouse cable into the... cable into the mouse connector on the cable hub. Windows 98 ships with Windows 98 only. 1. Skip to use the USB feature. Setting up the projector and your computer.
You must have the appropriate USB drivers installed on page 22. 3/99 19 Now you computer to "Starting the Projector" on you 're ready to power up the Projector If your computer has a USB connector and is supported for use the USB mouse cable. Plug the end of the mouse cable into the... cable into the mouse connector on the cable hub. Windows 98 ships with Windows 98 only. 1. Skip to use the USB feature. Setting up the projector and your computer.