
Reference Manual
Page 3
Contents Safety Instructions 1 Safety Definitions 1 Safety Symbols 1 Safety Terms 2 Introduction 3 Image Resolution 3 Compatibility 4 Unpacking the Projector 5 Projector Features 6 Front of Projector 6 Rear and Side of Projector 6 Connector Panel 6 Usage Guidelines 7 If You Need Assistance 8 Warranty 10 Setting up the Projector 11 Connecting the Cable Hub Connector 13 Connecting a Video Player 20 Starting the Projector 22 Turning Off the Projector 23 Using the Projector 25 3/99 5
Contents Safety Instructions 1 Safety Definitions 1 Safety Symbols 1 Safety Terms 2 Introduction 3 Image Resolution 3 Compatibility 4 Unpacking the Projector 5 Projector Features 6 Front of Projector 6 Rear and Side of Projector 6 Connector Panel 6 Usage Guidelines 7 If You Need Assistance 8 Warranty 10 Setting up the Projector 11 Connecting the Cable Hub Connector 13 Connecting a Video Player 20 Starting the Projector 22 Turning Off the Projector 23 Using the Projector 25 3/99 5

Reference Manual
Page 4
Reference Manual KODAK DP900 / DP1100 Basic Image Adjustment 25 Using the Remote Control 26 Adjusting the Projector 28 Using the Keypad and Remote Buttons 29 Using the On-Screen Menus 31 Kodak Menu 42 Maintenance & Troubleshooting 45 ...Cleaning the Lens 45 Replacing the Projection Lamp 46 Replacing the Batteries in the Remote Control 49 Using the Kensington Lock 49 Troubleshooting 50 Appendix A 55 Specifications 55 Appendix B 59 Accessories 59 Appendix C 61 Portable and Laptop Activation Chart 61 Appendix D 71 Using Video...
Reference Manual KODAK DP900 / DP1100 Basic Image Adjustment 25 Using the Remote Control 26 Adjusting the Projector 28 Using the Keypad and Remote Buttons 29 Using the On-Screen Menus 31 Kodak Menu 42 Maintenance & Troubleshooting 45 ...Cleaning the Lens 45 Replacing the Projection Lamp 46 Replacing the Batteries in the Remote Control 49 Using the Kensington Lock 49 Troubleshooting 50 Appendix A 55 Specifications 55 Appendix B 59 Accessories 59 Appendix C 61 Portable and Laptop Activation Chart 61 Appendix D 71 Using Video...

Reference Manual
Page 8
...DVD players, camcorders and laser disc players. 4 3/99 Compatibility The projector is higher than 1024x768, reset it to a lower resolution before you connect the projector. See "Auto Resize" on page 35. You can display these ...images at 75 Hz • Apple Macintosh and PowerBook computers up to 1024x768. If your computer's screen resolution is compatible with a wide variety of the DP1100's projected image is 1024x768. Reference Manual KODAK DP900 / DP1100 DP1100 The XGA resolution of computers and video...
...DVD players, camcorders and laser disc players. 4 3/99 Compatibility The projector is higher than 1024x768, reset it to a lower resolution before you connect the projector. See "Auto Resize" on page 35. You can display these ...images at 75 Hz • Apple Macintosh and PowerBook computers up to 1024x768. If your computer's screen resolution is compatible with a wide variety of the DP1100's projected image is 1024x768. Reference Manual KODAK DP900 / DP1100 DP1100 The XGA resolution of computers and video...

Reference Manual
Page 9
... 5 Note: The contents of your Kodak dealer immediately if anything is missing. Soft carry case 3. DP900 / DP1100 User's Guide, Reference Manual, and Online User Guide CD 6. Introduction Unpacking the Projector The projector comes with the items shown in Figure 1. Digital projector and lens cap 2. USB mouse cable 11. RCA audio/video cable 7. Contact your shipping box may...
... 5 Note: The contents of your Kodak dealer immediately if anything is missing. Soft carry case 3. DP900 / DP1100 User's Guide, Reference Manual, and Online User Guide CD 6. Introduction Unpacking the Projector The projector comes with the items shown in Figure 1. Digital projector and lens cap 2. USB mouse cable 11. RCA audio/video cable 7. Contact your shipping box may...

Reference Manual
Page 10
Reference Manual KODAK DP900 / DP1100 Projector Features Front of Projector focus ring zoom ring elevator button Rear and Side of Projector keypad front of projector connector panel elevator button power cord connector power switch Connector Panel speaker s-video composite connector computer L/R audio in (for video source) cable hub connector audio in 6 3/99
Reference Manual KODAK DP900 / DP1100 Projector Features Front of Projector focus ring zoom ring elevator button Rear and Side of Projector keypad front of projector connector panel elevator button power cord connector power switch Connector Panel speaker s-video composite connector computer L/R audio in (for video source) cable hub connector audio in 6 3/99

Reference Manual
Page 18
Now you must use the MAC adaptor between it and the projector is 10 feet or less. Video players are turned off. Reference Manual KODAK DP900 / DP1100 Preparing to Connect Your Equipment to the Projector Note: Before you continue, make sure the distance between the computer and the cable hub. 14 3/99 Steps for connecting the...
Now you must use the MAC adaptor between it and the projector is 10 feet or less. Video players are turned off. Reference Manual KODAK DP900 / DP1100 Preparing to Connect Your Equipment to the Projector Note: Before you continue, make sure the distance between the computer and the cable hub. 14 3/99 Steps for connecting the...

Reference Manual
Page 19
...on the cable hub. 3/99 15 Plug the other end of the mouse cable into the video connector on their external video port when a secondary display device such as a projector is connected. If your computer manual for some laptop computers are connecting an older MACINTOSH computer that... activates the external video port. Note: If you are listed in the Appendix C. 1. Activation commands for the command that does not have ...
...on the cable hub. 3/99 15 Plug the other end of the mouse cable into the video connector on their external video port when a secondary display device such as a projector is connected. If your computer manual for some laptop computers are connecting an older MACINTOSH computer that... activates the external video port. Note: If you are listed in the Appendix C. 1. Activation commands for the command that does not have ...

Reference Manual
Page 24
... uses a round, four-prong S-video connector, you 're using S-video, plug the other end of the projector. • If you're using an S-video cable, connect it to the A/V cable. The S-video cable is sold separately. 2. audio/video cable Figure 9 Connecting with the projector. • If your video player (Figure 9). Reference Manual KODAK DP900 / DP1100 Connecting a Video Player 1. Plug the other...
... uses a round, four-prong S-video connector, you 're using S-video, plug the other end of the projector. • If you're using an S-video cable, connect it to the A/V cable. The S-video cable is sold separately. 2. audio/video cable Figure 9 Connecting with the projector. • If your video player (Figure 9). Reference Manual KODAK DP900 / DP1100 Connecting a Video Player 1. Plug the other...

Reference Manual
Page 25
Setting up the Projector S-video cable A/V cable Figure 10 Connecting with an S-video cable 4. Plug the cable's red connector into the left "audio out" port on the video player (Figure 9 and Figure 10). &DXWLRQ Plug the A/V cable's white connector into the right "audio out" port on your video player.
Setting up the Projector S-video cable A/V cable Figure 10 Connecting with an S-video cable 4. Plug the cable's red connector into the left "audio out" port on the video player (Figure 9 and Figure 10). &DXWLRQ Plug the A/V cable's white connector into the right "audio out" port on your video player.
Reference Manual
Page 26
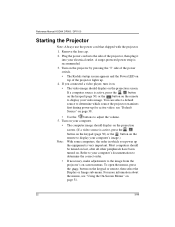
.... You can select a default source to your video image. Turn on your computer. • The computer image should be turned on last, after all other peripherals have been turned on. Reference Manual KODAK DP900 / DP1100 Starting the Projector Note: Always use the power cord that shipped... with the projector. 1. A surge-protected power strip is active, press the Note: button on the keypad...
.... You can select a default source to your video image. Turn on your computer. • The computer image should be turned on last, after all other peripherals have been turned on. Reference Manual KODAK DP900 / DP1100 Starting the Projector Note: Always use the power cord that shipped... with the projector. 1. A surge-protected power strip is active, press the Note: button on the keypad...
Reference Manual
Page 29
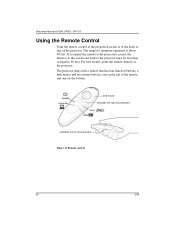
... computer disk mouse simulates the right mouse button menu video simulates the left mouse button Figure 11 Remote control 26 3/99 The range for optimum operation is about 40 feet. If you point the remote at the projector. Reference Manual KODAK DP900 / DP1100 Using the Remote Control Point the remote control at the projection...
... computer disk mouse simulates the right mouse button menu video simulates the left mouse button Figure 11 Remote control 26 3/99 The range for optimum operation is about 40 feet. If you point the remote at the projector. Reference Manual KODAK DP900 / DP1100 Using the Remote Control Point the remote control at the projection...

Reference Manual
Page 32
..."Using the On-Screen Menus" on the screen volume decreases volume volume increases volume standby - Using the Projector Using the Keypad and Remote Buttons The keypad is lit orange when the projector is on and lit green while the menus are displayed, the volume, source, and standby buttons act as... navigation buttons. source button - turns off the image without turning off the projector simulates left and right mouse buttons Figure 14 Keypad 3/99 29 toggles back and forth between video and computer sources menu button -
..."Using the On-Screen Menus" on the screen volume decreases volume volume increases volume standby - Using the Projector Using the Keypad and Remote Buttons The keypad is lit orange when the projector is on and lit green while the menus are displayed, the volume, source, and standby buttons act as... navigation buttons. source button - turns off the image without turning off the projector simulates left and right mouse buttons Figure 14 Keypad 3/99 29 toggles back and forth between video and computer sources menu button -
Reference Manual
Page 33
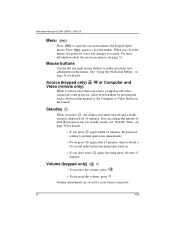
Reference Manual KODAK DP900 / DP1100 Menu Press to make selections and adjustments in standby mode; see page 31. Volume ...mouse buttons to open the on -screen menus, see "Standby Time" on page 38 for details. Source (keypad only) Video (remote only) or Computer and When you don't press again, the lamp turns off and a blank screen is about.... • If you press again after 15 minutes. For more than one source (computer and video) connected to close the menus, the projector saves any changes you press , the display and audio turn off after 15 minutes, there is ...
Reference Manual KODAK DP900 / DP1100 Menu Press to make selections and adjustments in standby mode; see page 31. Volume ...mouse buttons to open the on -screen menus, see "Standby Time" on page 38 for details. Source (keypad only) Video (remote only) or Computer and When you don't press again, the lamp turns off and a blank screen is about.... • If you press again after 15 minutes. For more than one source (computer and video) connected to close the menus, the projector saves any changes you press , the display and audio turn off after 15 minutes, there is ...
Reference Manual
Page 34
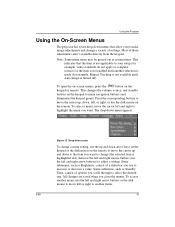
... item you close the menus. All changes are saved when you want . Using the Projector Using the On-Screen Menus The projector has seven drop-down menus that the item is not applicable to your setup (for example, video standards do not apply to computer sources) or the item is not enabled until...
... item you close the menus. All changes are saved when you want . Using the Projector Using the On-Screen Menus The projector has seven drop-down menus that the item is not applicable to your setup (for example, video standards do not apply to computer sources) or the item is not enabled until...
Reference Manual
Page 36
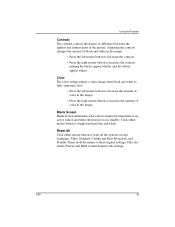
... displayed when there is no active source and when the projector is in the image. • Press the left mouse button to decrease the amount of the picture. Click either mouse button to reset all the options (except Language, Video Standard, Ceiling and Rear Projection, and Standby Time) in... blacks appear blacker and the whites appear whiter. This also returns Freeze and Mute to their default (off) settings. 3/99 33 Using the Projector Contrast The contrast controls the degree of difference between the lightest and darkest parts of color in the image. • Press the right mouse ...
... displayed when there is no active source and when the projector is in the image. • Press the left mouse button to decrease the amount of the picture. Click either mouse button to reset all the options (except Language, Video Standard, Ceiling and Rear Projection, and Standby Time) in... blacks appear blacker and the whites appear whiter. This also returns Freeze and Mute to their default (off) settings. 3/99 33 Using the Projector Contrast The contrast controls the degree of difference between the lightest and darkest parts of color in the image. • Press the right mouse ...

Reference Manual
Page 38
... either cropped or too small for most computers (Auto Image does not apply to video sources). It only affects computer images that are not the projector's native resolution. Image Menu Using the Projector Figure 18 Image menu Auto Image Note: Some screen savers interfere with the operation ...image to the screen. If you want to adjust these features manually, you turn off and back on , the projector makes the best fit of Auto Image. The projector automatically adjusts tracking, signal synchronization and vertical and horizontal position for the screen. 3/99 35 When Auto Resize is ...
... either cropped or too small for most computers (Auto Image does not apply to video sources). It only affects computer images that are not the projector's native resolution. Image Menu Using the Projector Figure 18 Image menu Auto Image Note: Some screen savers interfere with the operation ...image to the screen. If you want to adjust these features manually, you turn off and back on , the projector makes the best fit of Auto Image. The projector automatically adjusts tracking, signal synchronization and vertical and horizontal position for the screen. 3/99 35 When Auto Resize is ...
Reference Manual
Page 39
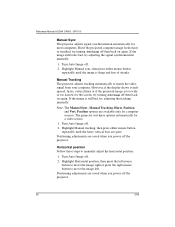
... 1. Turn Auto Image off . 2. Turn Auto Image off . 2. Turn Auto Image off the projector. 36 3/99 If the image is too wide or too narrow for a video source. 1. But if the projected computer image looks fuzzy or streaked, try turning Auto Image off... the right mouse button to match the video signal from your computer. Position options are saved when you power off . 2. Positioning adjustments are available only for most computers. Reference Manual KODAK DP900 / DP1100 Manual Sync The projector adjusts signal synchronization automatically for computer sources....
... 1. Turn Auto Image off . 2. Turn Auto Image off . 2. Turn Auto Image off the projector. 36 3/99 If the image is too wide or too narrow for a video source. 1. But if the projected computer image looks fuzzy or streaked, try turning Auto Image off... the right mouse button to match the video signal from your computer. Position options are saved when you power off . 2. Positioning adjustments are available only for most computers. Reference Manual KODAK DP900 / DP1100 Manual Sync The projector adjusts signal synchronization automatically for computer sources....

Reference Manual
Page 40
... press the right mouse button to manually adjust the vertical position. 1. Controls Menu Figure 19 Controls menu Video Standard Note: If you power off . 2. If the projector is set to Auto, the projector attempts to pick the video standard (NTSC, NTSC 4.43, PAL, PAL-M, PAL-N, or SECAM) automatically based on the input signal it...
... press the right mouse button to manually adjust the vertical position. 1. Controls Menu Figure 19 Controls menu Video Standard Note: If you power off . 2. If the projector is set to Auto, the projector attempts to pick the video standard (NTSC, NTSC 4.43, PAL, PAL-M, PAL-N, or SECAM) automatically based on the input signal it...
Reference Manual
Page 41
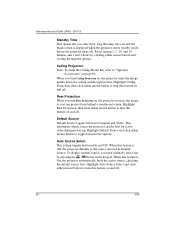
... feature is Off, the projector defaults to "Optional Accessories" on , the projector reverses the image so you can project from behind a translucent screen. Highlight Auto Source Select and click either mouse button to turn this feature on the keypad. Reference Manual KODAK DP900 / DP1100 Standby Time This... option lets you select how long the lamp stays on and off. 38 3/99 When you must manually select one by clicking either mouse button to turn this feature on , the projector turns the image upside down for active video during...
... feature is Off, the projector defaults to "Optional Accessories" on , the projector reverses the image so you can project from behind a translucent screen. Highlight Auto Source Select and click either mouse button to turn this feature on the keypad. Reference Manual KODAK DP900 / DP1100 Standby Time This... option lets you select how long the lamp stays on and off. 38 3/99 When you must manually select one by clicking either mouse button to turn this feature on , the projector turns the image upside down for active video during...

Reference Manual
Page 42
...appear in the lower-right corner of the startup screen. 3/99 39 If the projector's display constantly changes between On and Off. When this feature is On, the Kodak startup screen appears when the projector starts up and remains until an active source is On, most new computers will ... and refresh rate accordingly. The Plug and Play setting does not affect video images. You need to Off. When it is detected. Display Startup Screen This setting toggles between On and Off. Using the Projector Plug and Play This setting toggles between the computer image and the message...
...appear in the lower-right corner of the startup screen. 3/99 39 If the projector's display constantly changes between On and Off. When this feature is On, the Kodak startup screen appears when the projector starts up and remains until an active source is On, most new computers will ... and refresh rate accordingly. The Plug and Play setting does not affect video images. You need to Off. When it is detected. Display Startup Screen This setting toggles between On and Off. Using the Projector Plug and Play This setting toggles between the computer image and the message...