
Reference Manual
Page 1
Reference Manual KODAK DP900 / DP1100 Digital Projectors with KODAK Image Manager PN 010-0210-00 8/99
Reference Manual KODAK DP900 / DP1100 Digital Projectors with KODAK Image Manager PN 010-0210-00 8/99

Reference Manual
Page 2
...est conforme à la norme NMB-003 du Canada. The typical use is likely to cause harmful interference in accordance with the instruction manual, may be required to correct the interference at his own expense. FCC Warning This equipment has been tested and found to comply with...68/EEC Safety: EN 60950: 1992 + A1 + A2 + A3: 1995 July, 1999 Australian Certification C-tick mark Operation of Conformity Manufacturer: Eastman Kodak Company Rochester, New York 14650 USA We declare under our sole responsibility that the KODAK DP900/1100 Digital Projector conforms to radio communications.
...est conforme à la norme NMB-003 du Canada. The typical use is likely to cause harmful interference in accordance with the instruction manual, may be required to correct the interference at his own expense. FCC Warning This equipment has been tested and found to comply with...68/EEC Safety: EN 60950: 1992 + A1 + A2 + A3: 1995 July, 1999 Australian Certification C-tick mark Operation of Conformity Manufacturer: Eastman Kodak Company Rochester, New York 14650 USA We declare under our sole responsibility that the KODAK DP900/1100 Digital Projector conforms to radio communications.

Reference Manual
Page 4
Reference Manual KODAK DP900 / DP1100 Basic Image Adjustment 25 Using the Remote Control 26 Adjusting the Projector 28 Using the Keypad and Remote Buttons 29 Using the On-Screen Menus 31 Kodak Menu 42 Maintenance & Troubleshooting 45 Cleaning the Lens 45 Replacing the Projection Lamp 46 Replacing the Batteries in the Remote Control 49 Using the...
Reference Manual KODAK DP900 / DP1100 Basic Image Adjustment 25 Using the Remote Control 26 Adjusting the Projector 28 Using the Keypad and Remote Buttons 29 Using the On-Screen Menus 31 Kodak Menu 42 Maintenance & Troubleshooting 45 Cleaning the Lens 45 Replacing the Projection Lamp 46 Replacing the Batteries in the Remote Control 49 Using the...

Reference Manual
Page 5
...: Hot surface. Safety Instructions Please read and follow all safety instructions. Safety Symbols Attention: For information about use of a feature, please refer to your new projector. Failure to the lamp door on the projector. 3/99 1 An arrow pointing to comply with safety instructions may result in damage to the Reference...
...: Hot surface. Safety Instructions Please read and follow all safety instructions. Safety Symbols Attention: For information about use of a feature, please refer to your new projector. Failure to the lamp door on the projector. 3/99 1 An arrow pointing to comply with safety instructions may result in damage to the Reference...

Reference Manual
Page 6
Reference Manual KODAK DP900 / DP1100 Safety Terms: • Warning: Don't look directly into the lens when the projector is pressurized and may damage your own projector will void the warranty. Follow all service to qualified service personnel. Connect the power cord to a receptacle with it. • Caution: The projector lamp bulb is turned on the projector. See "If...
Reference Manual KODAK DP900 / DP1100 Safety Terms: • Warning: Don't look directly into the lens when the projector is pressurized and may damage your own projector will void the warranty. Follow all service to qualified service personnel. Connect the power cord to a receptacle with it. • Caution: The projector lamp bulb is turned on the projector. See "If...

Reference Manual
Page 8
.... Reference Manual KODAK DP900 / DP1100 DP1100 The XGA resolution of computers and video devices, including: • IBM-compatible computers, including laptops, up to 1024x768 resolution at 75 Hz • Apple Macintosh and PowerBook computers up to 1024x768 resolution at their original resolutions by turning off the Auto Resize feature. Compatibility The projector is compatible...
.... Reference Manual KODAK DP900 / DP1100 DP1100 The XGA resolution of computers and video devices, including: • IBM-compatible computers, including laptops, up to 1024x768 resolution at 75 Hz • Apple Macintosh and PowerBook computers up to 1024x768 resolution at their original resolutions by turning off the Auto Resize feature. Compatibility The projector is compatible...

Reference Manual
Page 9
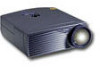
... audio/video cable 7. PS/2 mouse cable 10. Introduction Unpacking the Projector The projector comes with the items shown in Figure 1. Note: The contents of your Kodak dealer immediately if anything is missing. Digital projector and lens cap 2. Power cord 5. USB mouse cable 11. MAC...are included. Soft carry case 3. Contact your shipping box may vary depending on the projector configuration you've ordered. 2 1 4 5 3 6 7 8 9 11 10 Figure 1 Shipping box contents 1. Remote control 4. Cable connector hub 8. DP900 / DP1100 User's Guide, Reference Manual, and Online User Guide CD 6.
... audio/video cable 7. PS/2 mouse cable 10. Introduction Unpacking the Projector The projector comes with the items shown in Figure 1. Note: The contents of your Kodak dealer immediately if anything is missing. Digital projector and lens cap 2. Power cord 5. USB mouse cable 11. MAC...are included. Soft carry case 3. Contact your shipping box may vary depending on the projector configuration you've ordered. 2 1 4 5 3 6 7 8 9 11 10 Figure 1 Shipping box contents 1. Remote control 4. Cable connector hub 8. DP900 / DP1100 User's Guide, Reference Manual, and Online User Guide CD 6.

Reference Manual
Page 10
Reference Manual KODAK DP900 / DP1100 Projector Features Front of Projector focus ring zoom ring elevator button Rear and Side of Projector keypad front of projector connector panel elevator button power cord connector power switch Connector Panel speaker s-video composite connector computer L/R audio in (for video source) cable hub connector audio in 6 3/99
Reference Manual KODAK DP900 / DP1100 Projector Features Front of Projector focus ring zoom ring elevator button Rear and Side of Projector keypad front of projector connector panel elevator button power cord connector power switch Connector Panel speaker s-video composite connector computer L/R audio in (for video source) cable hub connector audio in 6 3/99
Reference Manual
Page 12
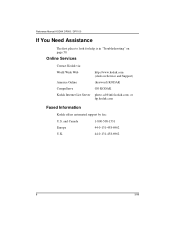
Reference Manual KODAK DP900 / DP1100 If You Need Assistance The first place to look for help is in "Troubleshooting" on Service and Support) (keyword) KODAK CompuServe GO KODAK Kodak Internet List Server photo-cd@info.kodak.com; and Canada 1-800-508-1531 Europe 44-0-131-458-6962 U.K. 44-0-131-458-6962 8 3/99 or ftp.kodak.com Faxed Information Kodak offers automated support by fax: U.S. Online Services Contact Kodak via: World Wide Web America Online http://www.kodak.com (click on page 50.
Reference Manual KODAK DP900 / DP1100 If You Need Assistance The first place to look for help is in "Troubleshooting" on Service and Support) (keyword) KODAK CompuServe GO KODAK Kodak Internet List Server photo-cd@info.kodak.com; and Canada 1-800-508-1531 Europe 44-0-131-458-6962 U.K. 44-0-131-458-6962 8 3/99 or ftp.kodak.com Faxed Information Kodak offers automated support by fax: U.S. Online Services Contact Kodak via: World Wide Web America Online http://www.kodak.com (click on page 50.

Reference Manual
Page 14
The details of the warranty are printed at the back of this manual. Reference Manual KODAK DP900 / DP1100 Warranty This product is backed by a limited two-year warranty. A longer term warranty can be purchased from your Kodak dealer. 10 3/99
The details of the warranty are printed at the back of this manual. Reference Manual KODAK DP900 / DP1100 Warranty This product is backed by a limited two-year warranty. A longer term warranty can be purchased from your Kodak dealer. 10 3/99

Reference Manual
Page 18
...15-pin connector, you 're connecting a computer, make sure the projector and your equipment. Video players are connected to the cable hub. Reference Manual KODAK DP900 / DP1100 Preparing to Connect Your Equipment to the Projector Note: Before you 're ready to connect your equipment are given on... the pages listed here.. Computers are connected directly to the projector. If you must use the MAC...
...15-pin connector, you 're connecting a computer, make sure the projector and your equipment. Video players are connected to the cable hub. Reference Manual KODAK DP900 / DP1100 Preparing to Connect Your Equipment to the Projector Note: Before you 're ready to connect your equipment are given on... the pages listed here.. Computers are connected directly to the projector. If you must use the MAC...

Reference Manual
Page 19
... listed in the Appendix C. 1. If your computer. 2. Figure 5 Connecting to control the computer's mouse from the projector's remote or keypad? Setting up the Projector Connecting a Laptop Computer Note: Many laptop computers do not automatically turn on your laptop. Plug the end of the audio... cable into the connector on your computer manual for some laptop computers are connecting an older MACINTOSH computer ...
... listed in the Appendix C. 1. If your computer. 2. Figure 5 Connecting to control the computer's mouse from the projector's remote or keypad? Setting up the Projector Connecting a Laptop Computer Note: Many laptop computers do not automatically turn on your laptop. Plug the end of the audio... cable into the connector on your computer manual for some laptop computers are connecting an older MACINTOSH computer ...

Reference Manual
Page 20
... cable into the connector on page 22. 16 3/99 Skip to "Starting the Projector" on the cable hub. Now you do not need to re-boot your computer after connecting the mouse to use the USB feature. Reference Manual KODAK DP900 / DP1100 audio cable mouse cable Figure 6 Connecting audio and mouse cables to a laptop... of the mouse cable into the mouse connector on your laptop. Note: A USB mouse is hot-pluggable, meaning you 're ready to power up the projector and your computer to use it.
... cable into the connector on page 22. 16 3/99 Skip to "Starting the Projector" on the cable hub. Now you do not need to re-boot your computer after connecting the mouse to use the USB feature. Reference Manual KODAK DP900 / DP1100 audio cable mouse cable Figure 6 Connecting audio and mouse cables to a laptop... of the mouse cable into the mouse connector on your laptop. Note: A USB mouse is hot-pluggable, meaning you 're ready to power up the projector and your computer to use it.

Reference Manual
Page 22
... the mouse cable from the projector's remote or keypad? Plug the end of the mouse cable into the connector on your computer. 3. Note: A USB mouse is not hot-pluggable. 2. A PS-2 mouse is hot-pluggable, meaning you want to control your computer's mouse from your computer. Reference Manual KODAK DP900 / DP1100 Do you do not...
... the mouse cable from the projector's remote or keypad? Plug the end of the mouse cable into the connector on your computer. 3. Note: A USB mouse is not hot-pluggable. 2. A PS-2 mouse is hot-pluggable, meaning you want to control your computer's mouse from your computer. Reference Manual KODAK DP900 / DP1100 Do you do not...

Reference Manual
Page 24
..., plug the other end of the projector. • If you 're using an S-video cable, connect it to the A/V cable. Plug the A/V cable's yellow connector into the "s-video" connector on the video player (Figure 9). 3. Reference Manual KODAK DP900 / DP1100 Connecting a Video Player 1.... The S-video cable is sold separately. 2. audio/video cable Figure 9 Connecting with the projector. • If your video player (Figure 9).
..., plug the other end of the projector. • If you 're using an S-video cable, connect it to the A/V cable. Plug the A/V cable's yellow connector into the "s-video" connector on the video player (Figure 9). 3. Reference Manual KODAK DP900 / DP1100 Connecting a Video Player 1.... The S-video cable is sold separately. 2. audio/video cable Figure 9 Connecting with the projector. • If your video player (Figure 9).

Reference Manual
Page 25
Setting up the Projector S-video cable A/V cable Figure 10 Connecting with an S-video cable 4. Plug the A/V cable's white connector into the right "audio out" port on your video player. Plug the cable's red connector into the left "audio out" port on the video player (Figure 9 and Figure 10). &DXWLRQ
Setting up the Projector S-video cable A/V cable Figure 10 Connecting with an S-video cable 4. Plug the A/V cable's white connector into the right "audio out" port on your video player. Plug the cable's red connector into the left "audio out" port on the video player (Figure 9 and Figure 10). &DXWLRQ
Reference Manual
Page 26
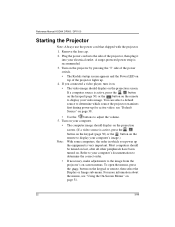
... . 4. Plug the power cord into the side of the projector, then plug it on. • The video image should be turned on last, after all other peripherals have been turned on top of the power switch. • The Kodak startup screen appears and the Power LED on . Most computers... should display on the keypad or remote, then select the Display or Image sub-menu. Reference Manual KODAK DP900 / DP1100 Starting the Projector Note: Always use the power cord that shipped with ...
... . 4. Plug the power cord into the side of the projector, then plug it on. • The video image should be turned on last, after all other peripherals have been turned on top of the power switch. • The Kodak startup screen appears and the Power LED on . Most computers... should display on the keypad or remote, then select the Display or Image sub-menu. Reference Manual KODAK DP900 / DP1100 Starting the Projector Note: Always use the power cord that shipped with ...

Reference Manual
Page 28
... sure you have powered up the image, turn Auto Image (page 35) off and adjust the sync (page 36) and/or the tracking (page 36) manually. 5. If the image appears to reset the automatic sync and tracking. If that doesn't clear up your equipment in the right order (page 22). 2.... See "Kodak Menu" on page 42 Or Adjust the brightness (page 32). 3/99 25 If the colors don't look right, scroll through the KODAK Image Manager settings. Using the Projector This section describes how to use and make adjustments to the screen...
... sure you have powered up the image, turn Auto Image (page 35) off and adjust the sync (page 36) and/or the tracking (page 36) manually. 5. If the image appears to reset the automatic sync and tracking. If that doesn't clear up your equipment in the right order (page 22). 2.... See "Kodak Menu" on page 42 Or Adjust the brightness (page 32). 3/99 25 If the colors don't look right, scroll through the KODAK Image Manager settings. Using the Projector This section describes how to use and make adjustments to the screen...
Reference Manual
Page 29
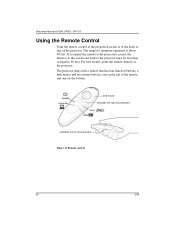
Reference Manual KODAK DP900 / DP1100 Using the Remote Control Point the remote control at the projection screen or at the front or rear of the remote and one on the bottom. For best results, point the remote directly at the projection screen, the distance to the screen and back to the projector must be less... mouse button menu video simulates the left mouse button Figure 11 Remote control 26 3/99 The range for optimum operation is about 40 feet. The projector ships with a remote that has four function buttons, a disk mouse and two mouse buttons, one on the top of the...
Reference Manual KODAK DP900 / DP1100 Using the Remote Control Point the remote control at the projection screen or at the front or rear of the remote and one on the bottom. For best results, point the remote directly at the projection screen, the distance to the screen and back to the projector must be less... mouse button menu video simulates the left mouse button Figure 11 Remote control 26 3/99 The range for optimum operation is about 40 feet. The projector ships with a remote that has four function buttons, a disk mouse and two mouse buttons, one on the top of the...
Reference Manual
Page 31
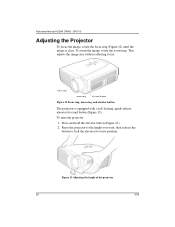
... release the button to lock the elevator foot into position. Figure 13 Adjusting the height of the projector 28 3/99 To raise the projector: 1. Press and hold the elevator button (Figure 13). 2. Reference Manual KODAK DP900 / DP1100 Adjusting the Projector To focus the image, rotate the focus ring (Figure 12) until the image is equipped with...
... release the button to lock the elevator foot into position. Figure 13 Adjusting the height of the projector 28 3/99 To raise the projector: 1. Press and hold the elevator button (Figure 13). 2. Reference Manual KODAK DP900 / DP1100 Adjusting the Projector To focus the image, rotate the focus ring (Figure 12) until the image is equipped with...