
User's Guide
Page 5
...Compatibility 11 Unpacking the Projector 12 Projector Features 13 Usage Guidelines 13 If You Need Assistance 14 Setting up the Projector 17 Connecting the Projector 18 Starting the Projector 22 Turning Off the Projector 23 Using the Projector 25 Basic Image Adjustment 25 Adjusting the Projector 26 Using the ...Menu 35 Image Menu 35 Controls Menu 38 Language Menu 40 Status Menu 41 Using KODAK Image Manager 43 Maintenance & Troubleshooting 45 Cleaning the Lens 45 Replacing the Projection Lamp 46 Replacing the Batteries in the Remote Control 49 Using the Security Lock 49 ...
...Compatibility 11 Unpacking the Projector 12 Projector Features 13 Usage Guidelines 13 If You Need Assistance 14 Setting up the Projector 17 Connecting the Projector 18 Starting the Projector 22 Turning Off the Projector 23 Using the Projector 25 Basic Image Adjustment 25 Adjusting the Projector 26 Using the ...Menu 35 Image Menu 35 Controls Menu 38 Language Menu 40 Status Menu 41 Using KODAK Image Manager 43 Maintenance & Troubleshooting 45 Cleaning the Lens 45 Replacing the Projection Lamp 46 Replacing the Batteries in the Remote Control 49 Using the Security Lock 49 ...

User's Guide
Page 7
vii Safety Symbols Attention: For information about usage of a feature, please refer to the lamp door on the projector. Please save all safety instructions provided before using your equipment. Do not touch. An arrow pointing to the User's Guide. Safety Instructions Please read and .... • Caution: Statements identify conditions or practices that could result in fire, electrical shock, or personal injury and may result in damage to your new projector. Warning: Hot surface.
vii Safety Symbols Attention: For information about usage of a feature, please refer to the lamp door on the projector. Please save all safety instructions provided before using your equipment. Do not touch. An arrow pointing to the User's Guide. Safety Instructions Please read and .... • Caution: Statements identify conditions or practices that could result in fire, electrical shock, or personal injury and may result in damage to your new projector. Warning: Hot surface.

User's Guide
Page 8
.... Follow all service to our Web site at www.kodak.com/go to qualified service personnel. User Guide KODAK DP2900 Digital Projector Safety Issues • Warning: Don't look directly into the lens when the lamp is turned on the projector. To avoid burns, wait 30 minutes before opening the lamp door. In the unlikely event of the bulb...
.... Follow all service to our Web site at www.kodak.com/go to qualified service personnel. User Guide KODAK DP2900 Digital Projector Safety Issues • Warning: Don't look directly into the lens when the lamp is turned on the projector. To avoid burns, wait 30 minutes before opening the lamp door. In the unlikely event of the bulb...
User's Guide
Page 13
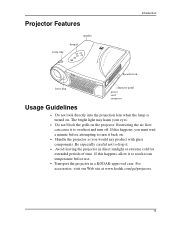
... cause it to overheat and turn it . • Avoid leaving the projector in a KODAK-approved case. If this happens, allow it to reach room temperature before attempting to drop it back on. • Handle the projector as you would any product with glass components. The bright light may harm...Security lock focus ring connector panel power cord connector Usage Guidelines • Do not look directly into the projection lens when the lamp is turned on the projector. Be especially careful not to turn off. For accessories, visit our Web site at www.kodak.com/go/projecors. 13
... cause it to overheat and turn it . • Avoid leaving the projector in a KODAK-approved case. If this happens, allow it to reach room temperature before attempting to drop it back on. • Handle the projector as you would any product with glass components. The bright light may harm...Security lock focus ring connector panel power cord connector Usage Guidelines • Do not look directly into the projection lens when the lamp is turned on the projector. Be especially careful not to turn off. For accessories, visit our Web site at www.kodak.com/go/projecors. 13

User's Guide
Page 22
User Guide KODAK DP2900 Digital Projector Starting the Projector We recommend using a surge protector power strip when connecting your computer to adjust the volume. 22 Use the Wizard to display your electrical outlet. The video image should display on page 39. Turn on the lamp by pressing the lamp on and off button keypad... button on the keypad (page 30) or press the video button on . You can press the lamp on/off button to turn it into the side of the projector lights orange until the software has initialized. Plug the power cord into your video image. The fans ...
User Guide KODAK DP2900 Digital Projector Starting the Projector We recommend using a surge protector power strip when connecting your computer to adjust the volume. 22 Use the Wizard to display your electrical outlet. The video image should display on page 39. Turn on the lamp by pressing the lamp on and off button keypad... button on the keypad (page 30) or press the video button on . You can press the lamp on/off button to turn it into the side of the projector lights orange until the software has initialized. Plug the power cord into your video image. The fans ...
User's Guide
Page 23
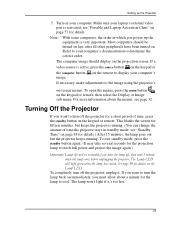
... your computer's documentation to cool. see "Standby Time" on page 38 for fifteen minutes, but the projector keeps running . (You can change the amount of time, press the standby button on page 57 for the lamp to determine the correct order. see page 32. The computer image should be turned on last..., after all other peripherals have been turned on the remote to the image using the projector's on the keypad or remote, then select the Display or Image sub-menu. The lamp won't light if it . If a video source is active, press the source button on the keypad or the...
... your computer's documentation to cool. see "Standby Time" on page 38 for fifteen minutes, but the projector keeps running . (You can change the amount of time, press the standby button on page 57 for the lamp to determine the correct order. see page 32. The computer image should be turned on last..., after all other peripherals have been turned on the remote to the image using the projector's on the keypad or remote, then select the Display or Image sub-menu. The lamp won't light if it . If a video source is active, press the source button on the keypad or the...

User's Guide
Page 29
The Keypad Buttons lamp LED lamp on page 32 for details. turns off the image without turning off source button - See "Using the On-Screen Menus" on /off the projector standby computer disk mouse simulates the right mouse button menu video 29 toggles back and forth between video ...and computer sources volume decreases volume The Remote Control Buttons menu button displays a menu of projector options on the keypad act as menu navigation buttons. Using the Projector Using the Keypad and Remote Buttons While the menus are displayed, the volume, source, and standby ...
The Keypad Buttons lamp LED lamp on page 32 for details. turns off the image without turning off source button - See "Using the On-Screen Menus" on /off the projector standby computer disk mouse simulates the right mouse button menu video 29 toggles back and forth between video ...and computer sources volume decreases volume The Remote Control Buttons menu button displays a menu of projector options on the keypad act as menu navigation buttons. Using the Projector Using the Keypad and Remote Buttons While the menus are displayed, the volume, source, and standby ...

User's Guide
Page 30
Do not press the lamp on or off. User Guide KODAK DP2900 Digital Projector Lamp on/off (keypad only) Press the lamp on/off button to turn the lamp on, or the lamp is currently on -screen menus. A green Lamp LED indicates that you have more information about the on the remote. 30 Source (keypad only) or Computer and Video (remote...
Do not press the lamp on or off. User Guide KODAK DP2900 Digital Projector Lamp on/off (keypad only) Press the lamp on/off button to turn the lamp on, or the lamp is currently on -screen menus. A green Lamp LED indicates that you have more information about the on the remote. 30 Source (keypad only) or Computer and Video (remote...
User's Guide
Page 31
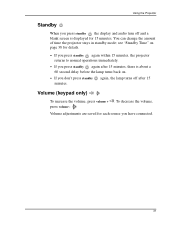
... off and a blank screen is about a 60 second delay before the lamp turns back on. • If you don't press standby minutes. Using the Projector Standby When you press standby , the display and audio turn off after 15 minutes, there is displayed for each source you have connected. 31 ...You can change the amount of time the projector stays in standby mode; Volume adjustments are saved for 15 minutes. To decrease the volume, press volume - . see "Standby Time" on page 38 for...
... off and a blank screen is about a 60 second delay before the lamp turns back on. • If you don't press standby minutes. Using the Projector Standby When you press standby , the display and audio turn off after 15 minutes, there is displayed for each source you have connected. 31 ...You can change the amount of time the projector stays in standby mode; Volume adjustments are saved for 15 minutes. To decrease the volume, press volume - . see "Standby Time" on page 38 for...

User's Guide
Page 38
... select a standard by clicking the left or right navigation button and cycling through the options. Standby Time This option lets you select how long the lamp stays on and the blank screen is similar to pick the video standard (NTSC, NTSC 4.43, PAL, PAL-M, PAL-N, PAL-60, or SECAM) automatically based... your geographical area, it's often best to detect the correct standard, the colors might not look right or the image might appear "torn." User Guide KODAK DP2900 Digital Projector Controls Menu Video Standard Note: If you can project from behind a translucent screen.
... select a standard by clicking the left or right navigation button and cycling through the options. Standby Time This option lets you select how long the lamp stays on and the blank screen is similar to pick the video standard (NTSC, NTSC 4.43, PAL, PAL-M, PAL-N, PAL-60, or SECAM) automatically based... your geographical area, it's often best to detect the correct standard, the colors might not look right or the image might appear "torn." User Guide KODAK DP2900 Digital Projector Controls Menu Video Standard Note: If you can project from behind a translucent screen.
User's Guide
Page 41
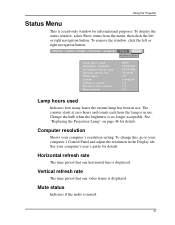
...Control Panel and adjust the resolution in the Display tab. Display Audio Image Controls Language Status >Show status Lamp hours used Computer resolution Horizontal refresh rate Vertical refresh rate Mute status Source Software version Startup screen version ...lamp is displayed. Horizontal refresh rate The time period that one horizontal line is no longer acceptable. To display the status window, select Show status from the menu, then click the left or right navigation button. Mute status Indicates if the audio is a read-only window for informational purposes. Using the Projector...
...Control Panel and adjust the resolution in the Display tab. Display Audio Image Controls Language Status >Show status Lamp hours used Computer resolution Horizontal refresh rate Vertical refresh rate Mute status Source Software version Startup screen version ...lamp is displayed. Horizontal refresh rate The time period that one horizontal line is no longer acceptable. To display the status window, select Show status from the menu, then click the left or right navigation button. Mute status Indicates if the audio is a read-only window for informational purposes. Using the Projector...

User's Guide
Page 45
... This section describes how to: • clean the lens • replace the projection lamp • replace the batteries in a circular motion. 3. Lightly wipe the cleaning cloth over the lens in the remote • use the projector immediately, replace the lens cap. 45 If you don't intend to use the security lock... feature • troubleshoot the projector Cleaning the Lens Follow these steps to a soft, dry cloth. • Avoid using an excessive amount of cleaner. • Abrasive cleaners, solvents or...
... This section describes how to: • clean the lens • replace the projection lamp • replace the batteries in a circular motion. 3. Lightly wipe the cleaning cloth over the lens in the remote • use the projector immediately, replace the lens cap. 45 If you don't intend to use the security lock... feature • troubleshoot the projector Cleaning the Lens Follow these steps to a soft, dry cloth. • Avoid using an excessive amount of cleaner. • Abrasive cleaners, solvents or...
User's Guide
Page 46
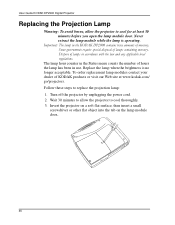
Never extract the lamp module while the lamp is no longer acceptable. Replace the lamp when the brightness is operating. User Guide KODAK DP2900 Digital Projector Replacing the Projection Lamp Warning: To avoid burns, allow the projector to replace the projection lamp: 1. Wait 30 minutes to allow the projector to cool for at www.kodak.com/ go/projectors. Invert the projector on a soft flat surface...
Never extract the lamp module while the lamp is no longer acceptable. Replace the lamp when the brightness is operating. User Guide KODAK DP2900 Digital Projector Replacing the Projection Lamp Warning: To avoid burns, allow the projector to replace the projection lamp: 1. Wait 30 minutes to allow the projector to cool for at www.kodak.com/ go/projectors. Invert the projector on a soft flat surface...
User's Guide
Page 47
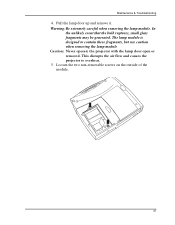
Warning:Be extremely careful when removing the lamp module. The lamp module is designed to contain these fragments, but use caution when removing the lamp module 5. In the unlikely event that the bulb ruptures, small glass fragments may be generated. Loosen the two non-removable screws on the outside of the module. 47 Maintenance & Troubleshooting 4. Pull the lamp door up and remove it.
Warning:Be extremely careful when removing the lamp module. The lamp module is designed to contain these fragments, but use caution when removing the lamp module 5. In the unlikely event that the bulb ruptures, small glass fragments may be generated. Loosen the two non-removable screws on the outside of the module. 47 Maintenance & Troubleshooting 4. Pull the lamp door up and remove it.
User's Guide
Page 48
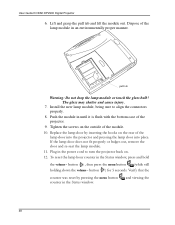
volume - The glass may shatter and cause injury. 7. volume - menu menu 48 pull tab Warning: Do not drop the lamp module or touch the glass bulb! Lift and grasp the pull tab and lift the module out. Push the module in an environmentally proper manner. Tighten the screws on the outside of the projector. 9. Dispose of the lamp module in until it is flush with the bottom case of the module. Install the new lamp module, being sure to align the connectors properly. 8. User Guide KODAK DP2900 Digital Projector 6.
volume - The glass may shatter and cause injury. 7. volume - menu menu 48 pull tab Warning: Do not drop the lamp module or touch the glass bulb! Lift and grasp the pull tab and lift the module out. Push the module in an environmentally proper manner. Tighten the screws on the outside of the projector. 9. Dispose of the lamp module in until it is flush with the bottom case of the module. Install the new lamp module, being sure to align the connectors properly. 8. User Guide KODAK DP2900 Digital Projector 6.
User's Guide
Page 53
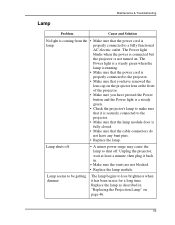
...you have pressed the Power button and the Power light is a steady green. • Check the projector's lamp to make sure that it is securely connected to the projector. • Make sure that the lamp module door is fully closed. • Make sure that you have removed the lens cap on ... connected to lose brightness when it back in "Replacing the Projection Lamp" on the projector lens at least a minute, then plug it has been in use for a long time. Lamp seems to be getting dimmer The lamp begins to the projector. • Make sure that the cable connectors do not have ...
...you have pressed the Power button and the Power light is a steady green. • Check the projector's lamp to make sure that it is securely connected to the projector. • Make sure that the lamp module door is fully closed. • Make sure that you have removed the lens cap on ... connected to lose brightness when it back in "Replacing the Projection Lamp" on the projector lens at least a minute, then plug it has been in use for a long time. Lamp seems to be getting dimmer The lamp begins to the projector. • Make sure that the cable connectors do not have ...
User's Guide
Page 54
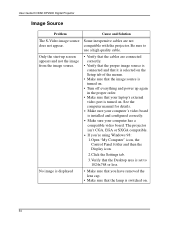
... or SXGA compatible. • If you have removed the lens cap. • Make sure that the lamp is installed and configured correctly. • Make sure your computer's video board is switched on . User Guide KODAK DP2900 Digital Projector Image Source Problem Cause and Solution The S-Video image source Some inexpensive cables are connected correctly. •..., the Control Panel folder and then the Display icon. 2.Click the Settings tab. 3.Verify that the Desktop area is turned on . 54 compatible with the projector.
... or SXGA compatible. • If you have removed the lens cap. • Make sure that the lamp is installed and configured correctly. • Make sure your computer's video board is switched on . User Guide KODAK DP2900 Digital Projector Image Source Problem Cause and Solution The S-Video image source Some inexpensive cables are connected correctly. •..., the Control Panel folder and then the Display icon. 2.Click the Settings tab. 3.Verify that the Desktop area is turned on . 54 compatible with the projector.
User's Guide
Page 56
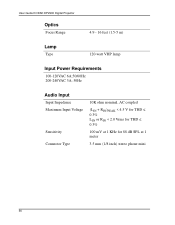
User Guide KODAK DP2900 Digital Projector Optics Focus Range 4.9 - 16 feet (1.5-5 m) Lamp Type 120-watt VHP lamp Input Power Requirements 100-120VAC 6A;50/60Hz 200-240VAC 3A; 50Hz Audio Input Input Impedance Maximum Input Voltage Sensitivity Connector Type 10K ohm nominal, AC coupled (LIN + RIN)PEAK < 4.5 V for THD ≤ 0.3% LIN or RIN < 2.0 Vrms for THD ≤ 0.3% 100 mV at 1 KHz for 88 dB SPL at 1 meter 3.5 mm (1/8 inch) stereo phone mini 56
User Guide KODAK DP2900 Digital Projector Optics Focus Range 4.9 - 16 feet (1.5-5 m) Lamp Type 120-watt VHP lamp Input Power Requirements 100-120VAC 6A;50/60Hz 200-240VAC 3A; 50Hz Audio Input Input Impedance Maximum Input Voltage Sensitivity Connector Type 10K ohm nominal, AC coupled (LIN + RIN)PEAK < 4.5 V for THD ≤ 0.3% LIN or RIN < 2.0 Vrms for THD ≤ 0.3% 100 mV at 1 KHz for 88 dB SPL at 1 meter 3.5 mm (1/8 inch) stereo phone mini 56

User's Guide
Page 71
... 19 Audio menu 35 Audio menu options Volume 35 Auto Source Select 39 B battery use ix Blank Screen 34 brightness, adjusting 33 buttons on keypad Lamp on/off 30 Menu 30 Source 30 Standby 31 Volume 31 C cables audio 19 composite video 20 M1-DA analog 12 M1-DA analog computer...
... 19 Audio menu 35 Audio menu options Volume 35 Auto Source Select 39 B battery use ix Blank Screen 34 brightness, adjusting 33 buttons on keypad Lamp on/off 30 Menu 30 Source 30 Standby 31 Volume 31 C cables audio 19 composite video 20 M1-DA analog 12 M1-DA analog computer...
User's Guide
Page 72
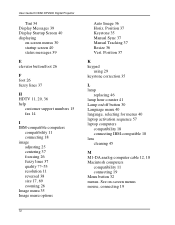
Position 37 Keystone 35 Manual Sync 37 Manual Tracking 37 Resize 36 Vert. Position 37 K keypad using 29 keystone correction 35 L lamp replacing 46 lamp hour counter 41 Lamp on -screen menus 30 startup screen 40 status messages 39 E elevator button/foot 26 F foot 26 fuzzy lines 37 H HDTV 11, ...quality ??-53 resolution 11 reversed 38 size 17, 69 zooming 26 Image menu 35 Image menu options Auto Image 36 Horiz. User Guide KODAK DP2900 Digital Projector Tint 34 Display Messages 39 Display Startup Screen 40 displaying on /off button 30 Language menu 40 language, selecting for menus 40 laptop ...
Position 37 Keystone 35 Manual Sync 37 Manual Tracking 37 Resize 36 Vert. Position 37 K keypad using 29 keystone correction 35 L lamp replacing 46 lamp hour counter 41 Lamp on -screen menus 30 startup screen 40 status messages 39 E elevator button/foot 26 F foot 26 fuzzy lines 37 H HDTV 11, ...quality ??-53 resolution 11 reversed 38 size 17, 69 zooming 26 Image menu 35 Image menu options Auto Image 36 Horiz. User Guide KODAK DP2900 Digital Projector Tint 34 Display Messages 39 Display Startup Screen 40 displaying on /off button 30 Language menu 40 language, selecting for menus 40 laptop ...