User Manual
Page 1
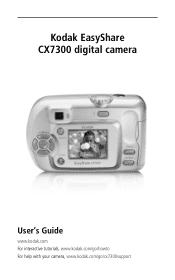
Kodak EasyShare CX7300 digital camera User's Guide www.kodak.com For interactive tutorials, www.kodak.com/go/howto For help with your camera, www.kodak.com/go/cx7300support
Kodak EasyShare CX7300 digital camera User's Guide www.kodak.com For interactive tutorials, www.kodak.com/go/howto For help with your camera, www.kodak.com/go/cx7300support
User Manual
Page 4
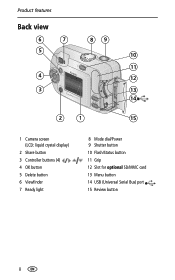
Product features Back view 6 7 5 89 10 11 4 12 3 13 14 2 1 15 1 Camera screen (LCD: liquid crystal display) 2 Share button 3 Controller buttons (4) 4 OK button 5 Delete button 6 Viewfinder 7 Ready light 8 Mode dial/Power 9 Shutter button 10 Flash/Status button 11 Grip 12 Slot for optional SD/MMC card 13 Menu button 14 USB (Universal Serial Bus) port 15 Review button ii
Product features Back view 6 7 5 89 10 11 4 12 3 13 14 2 1 15 1 Camera screen (LCD: liquid crystal display) 2 Share button 3 Controller buttons (4) 4 OK button 5 Delete button 6 Viewfinder 7 Ready light 8 Mode dial/Power 9 Shutter button 10 Flash/Status button 11 Grip 12 Slot for optional SD/MMC card 13 Menu button 14 USB (Universal Serial Bus) port 15 Review button ii
User Manual
Page 6
...an SD/MMC card 7 2 Taking pictures and videos 8 Taking a picture 8 Taking a video 8 Using the camera screen as a viewfinder 9 Reviewing the picture or video just taken 9 Using digital zoom 9 Using the flash 10 Changing picture-taking settings 11 Putting yourself in the picture or video 12 Pre-...tagging for album names 13 Customizing your camera 14 3 Reviewing pictures and videos 16 Viewing single pictures ...
...an SD/MMC card 7 2 Taking pictures and videos 8 Taking a picture 8 Taking a video 8 Using the camera screen as a viewfinder 9 Reviewing the picture or video just taken 9 Using digital zoom 9 Using the flash 10 Changing picture-taking settings 11 Putting yourself in the picture or video 12 Pre-...tagging for album names 13 Customizing your camera 14 3 Reviewing pictures and videos 16 Viewing single pictures ...

User Manual
Page 7
...for printing 24 Tagging pictures and videos for emailing 25 Tagging pictures and videos as favorites 26 Need help 26 6 Connecting camera to computer 27 Transferring pictures and videos with the USB cable 27 Printing pictures from your computer 27 Ordering prints online 28... Printing from an optional SD/MMC card 28 Printing without a computer 28 7 Troubleshooting 29 Camera problems 29 Camera/computer communications 32 Camera screen messages 33 Camera ready light status 35 8 Getting help 36 Helpful Web links 36 Software help 36 Telephone customer support 36 ...
...for printing 24 Tagging pictures and videos for emailing 25 Tagging pictures and videos as favorites 26 Need help 26 6 Connecting camera to computer 27 Transferring pictures and videos with the USB cable 27 Printing pictures from your computer 27 Ordering prints online 28... Printing from an optional SD/MMC card 28 Printing without a computer 28 7 Troubleshooting 29 Camera problems 29 Camera/computer communications 32 Camera screen messages 33 Camera ready light status 35 8 Getting help 36 Helpful Web links 36 Software help 36 Telephone customer support 36 ...
User Manual
Page 8
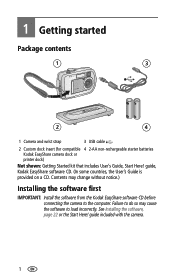
... may change without notice.) Installing the software first IMPORTANT: Install the software from the Kodak EasyShare software CD before connecting the camera to load incorrectly. guide included with the camera. 1 See Installing the software, page 22 or the Start Here! guide, Kodak EasyShare software CD. (In some countries, the User's Guide is provided on a CD. Contents...
... may change without notice.) Installing the software first IMPORTANT: Install the software from the Kodak EasyShare software CD before connecting the camera to load incorrectly. guide included with the camera. 1 See Installing the software, page 22 or the Start Here! guide, Kodak EasyShare software CD. (In some countries, the User's Guide is provided on a CD. Contents...
User Manual
Page 9
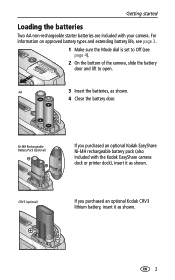
... lithium battery, insert it as shown. CRV3 (optional) If you purchased an optional Kodak EasyShare Ni-MH rechargeable battery pack (also included with your camera. Getting started Loading the batteries Two AA non-rechargeable starter batteries are included with the Kodak EasyShare camera dock or printer dock), insert it as shown. 2 For information on approved battery...
... lithium battery, insert it as shown. CRV3 (optional) If you purchased an optional Kodak EasyShare Ni-MH rechargeable battery pack (also included with your camera. Getting started Loading the batteries Two AA non-rechargeable starter batteries are included with the Kodak EasyShare camera dock or printer dock), insert it as shown. 2 For information on approved battery...
User Manual
Page 10
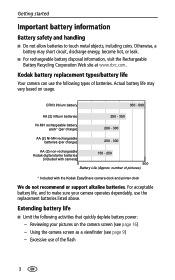
... Ni-MH rechargeable battery pack* (per charge) 200 - 300 AA (2) Ni-MH rechargeable batteries (per charge) 200 - 300 AA (2) non-rechargeable Kodak digital starter batteries 150 - 250 (included with the Kodak EasyShare camera dock and printer dock We do not recommend or support alkaline batteries. For acceptable battery life, and to touch metal objects, including...
... Ni-MH rechargeable battery pack* (per charge) 200 - 300 AA (2) Ni-MH rechargeable batteries (per charge) 200 - 300 AA (2) non-rechargeable Kodak digital starter batteries 150 - 250 (included with the Kodak EasyShare camera dock and printer dock We do not recommend or support alkaline batteries. For acceptable battery life, and to touch metal objects, including...
User Manual
Page 11
...-MH rechargeable battery pack. ■ Dirt on the battery contacts can affect battery life. Then do not work; Getting started ■ Visit www.kodak.com/go/cx7300accessories for: Kodak EasyShare camera dock-powers your camera, transfers pictures to your camera, makes 4 x 6 prints with a clean, dry cloth before loading batteries in cold weather, and keep them warm...
...-MH rechargeable battery pack. ■ Dirt on the battery contacts can affect battery life. Then do not work; Getting started ■ Visit www.kodak.com/go/cx7300accessories for: Kodak EasyShare camera dock-powers your camera, transfers pictures to your camera, makes 4 x 6 prints with a clean, dry cloth before loading batteries in cold weather, and keep them warm...

User Manual
Page 12
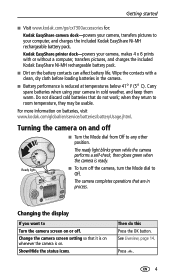
...Setting the date & time, first time The Date & Time have been reset message appears after the Language screen the first time you turn on the camera. ■ Press to highlight a language, then press the OK button. Press the OK button. (Select CANCEL to set the date and time at...the Menu button to exit. Getting started Selecting a language Selecting a language, first time The Language screen is displayed the first time you turn on the camera. The text is displayed in the current language (see Setting the date & time, first time). Selecting a language, anytime 1 In any mode, press...
...Setting the date & time, first time The Date & Time have been reset message appears after the Language screen the first time you turn on the camera. ■ Press to highlight a language, then press the OK button. Press the OK button. (Select CANCEL to set the date and time at...the Menu button to exit. Getting started Selecting a language Selecting a language, first time The Language screen is displayed the first time you turn on the camera. The text is displayed in the current language (see Setting the date & time, first time). Selecting a language, anytime 1 In any mode, press...
User Manual
Page 13
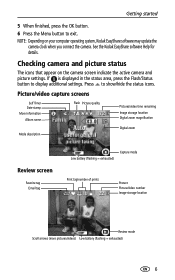
... button. 6 Press the Menu button to exit. Checking camera and picture status The icons that appear on your computer operating system, Kodak EasyShare software may update the camera clock when you connect the camera. Picture/video capture screens Self Timer Date stamp More information... Album name Flash Picture quality Pictures/video time remaining Image storage location Digital zoom magnification Mode description Digital zoom Review...
... button. 6 Press the Menu button to exit. Checking camera and picture status The icons that appear on your computer operating system, Kodak EasyShare software may update the camera clock when you connect the camera. Picture/video capture screens Self Timer Date stamp More information... Album name Flash Picture quality Pictures/video time remaining Image storage location Digital zoom magnification Mode description Digital zoom Review...
User Manual
Page 14
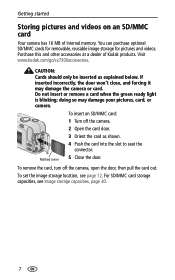
... internal memory. Getting started Storing pictures and videos on an SD/MMC card Your camera has 16 MB of Kodak products. doing so may damage the camera or card. For SD/MMC card storage capacities, see page 12. Visit www.kodak.com/go/cx7300accessories. You can purchase optional SD/MMC cards for removable, reusable...
... internal memory. Getting started Storing pictures and videos on an SD/MMC card Your camera has 16 MB of Kodak products. doing so may damage the camera or card. For SD/MMC card storage capacities, see page 12. Visit www.kodak.com/go/cx7300accessories. You can purchase optional SD/MMC cards for removable, reusable...

User Manual
Page 15
... is full (see Video storage capacity, page 41). 8 When the ready light blinks green, the picture is red, wait until it turns green. Place the camera on a flat, steady surface or use : Auto-for more than 2 seconds to begin recording. See page 9.) 3 Press the Shutter button to take the ...If the ready light is being saved; Automatically sets exposure and flash. Taking a video 1 Turn the Mode dial to Video . 2 Use the viewfinder or camera screen to frame your subject. (Press the OK button to turn it for general picture-taking. you can also press the Shutter button and hold...
... is full (see Video storage capacity, page 41). 8 When the ready light blinks green, the picture is red, wait until it turns green. Place the camera on a flat, steady surface or use : Auto-for more than 2 seconds to begin recording. See page 9.) 3 Press the Shutter button to take the ...If the ready light is being saved; Automatically sets exposure and flash. Taking a video 1 Turn the Mode dial to Video . 2 Use the viewfinder or camera screen to frame your subject. (Press the OK button to turn it for general picture-taking. you can also press the Shutter button and hold...
User Manual
Page 16
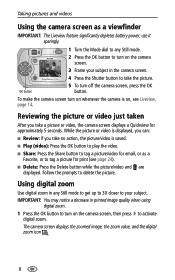
...may notice a decrease in the camera screen. 4 Press the Shutter button to turn off the camera screen, press the OK button. The camera screen displays the zoomed image, the zoom value, and the digital zoom icon . 9 Taking pictures and videos Using the camera screen as a Favorite, or to... turn on whenever the camera is displayed, you can: ...
...may notice a decrease in the camera screen. 4 Press the Shutter button to turn off the camera screen, press the OK button. The camera screen displays the zoomed image, the zoom value, and the digital zoom icon . 9 Taking pictures and videos Using the camera screen as a Favorite, or to... turn on whenever the camera is displayed, you can: ...
User Manual
Page 17
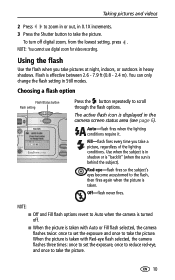
...night, indoors, or outdoors in heavy shadows. NOTE: You cannot use digital zoom for video recording. NOTE: ■ Off and Fill flash options revert to take the picture. Flash is taken with Red-eye flash selected, the camera flashes three times: once to set the exposure and once to the...displayed in Still modes. The active flash icon is taken with Auto or Fill flash selected, the camera flashes twice: once to set the exposure, once to reduce red-eye, and once to Auto when the camera is turned off digital zoom, from the lowest setting, press . Off-flash never fires.
...night, indoors, or outdoors in heavy shadows. NOTE: You cannot use digital zoom for video recording. NOTE: ■ Off and Fill flash options revert to take the picture. Flash is taken with Red-eye flash selected, the camera flashes three times: once to set the exposure and once to the...displayed in Still modes. The active flash icon is taken with Auto or Fill flash selected, the camera flashes twice: once to set the exposure, once to reduce red-eye, and once to Auto when the camera is turned off digital zoom, from the lowest setting, press . Off-flash never fires.

User Manual
Page 18
... any mode, press the Menu button. 2 Press to highlight the setting you change the Mode dial or turn off the camera. See page 12. If pictures are too dark, increase the value. produces highest picture resolution, more detail, and largest file sizes Best...in . (28 x 36 cm); pictures are lowest resolution with smaller file size. Options Exposure Compensation (Still modes) Choose how much light enters the camera. Best (default)- (3.2 MP, low compression) for emailing or screen display; pictures are high resolution with smallest file size. 11 Setting Icon Self ...
... any mode, press the Menu button. 2 Press to highlight the setting you change the Mode dial or turn off the camera. See page 12. If pictures are too dark, increase the value. produces highest picture resolution, more detail, and largest file sizes Best...in . (28 x 36 cm); pictures are lowest resolution with smaller file size. Options Exposure Compensation (Still modes) Choose how much light enters the camera. Best (default)- (3.2 MP, low compression) for emailing or screen display; pictures are high resolution with smallest file size. 11 Setting Icon Self ...

User Manual
Page 19
...Length (Video mode) Choose the amount of recording time for storage capacities. This setting remains until you change the Mode dial or turn off the camera. See page 41 for videos. Color (default)-for pictures with a reddish-brown, antique look. This setting remains until you change it . ...-for the specified time or until image storage is in the status area. 12 Image Storage Choose an image storage location. Internal Memory-the camera always uses internal memory, even if a card is full. See page 14. Seconds-records for black and white pictures. Taking pictures and ...
...Length (Video mode) Choose the amount of recording time for storage capacities. This setting remains until you change the Mode dial or turn off the camera. See page 41 for videos. Color (default)-for pictures with a reddish-brown, antique look. This setting remains until you change it . ...-for the specified time or until image storage is in the status area. 12 Image Storage Choose an image storage location. Internal Memory-the camera always uses internal memory, even if a card is full. See page 14. Seconds-records for black and white pictures. Taking pictures and ...
User Manual
Page 20
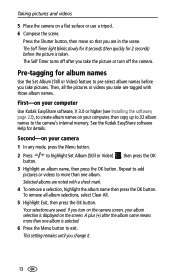
...your album selection is displayed on your computer, then copy up to 32 album names to exit. The Self Timer turns off the camera. See the Kodak EasyShare software Help for album names Use the Set Album (Still or Video) feature to pre-select album names before the picture is ...selected. 6 Press the Menu button to the camera's internal memory. A plus (+) after you change it. 13 Repeat to add pictures or videos to create album names on a flat surface or use a tripod. 6 Compose the scene. First-on your computer Use Kodak EasyShare software, V 3.0 or higher (see Installing the...
...your album selection is displayed on your computer, then copy up to 32 album names to exit. The Self Timer turns off the camera. See the Kodak EasyShare software Help for album names Use the Set Album (Still or Video) feature to pre-select album names before the picture is ...selected. 6 Press the Menu button to the camera's internal memory. A plus (+) after you change it. 13 Repeat to add pictures or videos to create album names on a flat surface or use a tripod. 6 Compose the scene. First-on your computer Use Kodak EasyShare software, V 3.0 or higher (see Installing the...
User Manual
Page 21
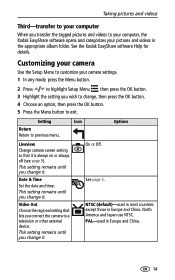
... those in Europe and China. 14 North America and Japan use NTSC. Date & Time Set the date and time. See the Kodak EasyShare software Help for details. Taking pictures and videos Third-transfer to your computer When you transfer the tagged pictures and videos to your ...computer, the Kodak EasyShare software opens and categorizes your camera settings. 1 In any mode, press the Menu button. 2 Press to highlight Setup Menu , then press the OK button. ...
... those in Europe and China. 14 North America and Japan use NTSC. Date & Time Set the date and time. See the Kodak EasyShare software Help for details. Taking pictures and videos Third-transfer to your computer When you transfer the tagged pictures and videos to your ...computer, the Kodak EasyShare software opens and categorizes your camera settings. 1 In any mode, press the Menu button. 2 Press to highlight Setup Menu , then press the OK button. ...
User Manual
Page 22
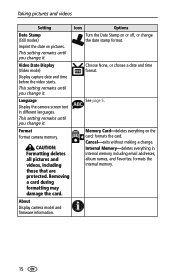
... text in internal memory including email addresses, album names, and Favorites: formats the internal memory. About Display camera model and firmware information. 15 Choose None, or choose a date and time format. Cancel-exits without making a change the date stamp format.... Turn the Date Stamp on the card; Video Date Display (Video mode) Display capture date and time before the video starts. Format Format camera memory. This setting remains until you change it . This setting remains until you change it . See page 5. Memory Card-deletes everything in different ...
... text in internal memory including email addresses, album names, and Favorites: formats the internal memory. About Display camera model and firmware information. 15 Choose None, or choose a date and time format. Cancel-exits without making a change the date stamp format.... Turn the Date Stamp on the card; Video Date Display (Video mode) Display capture date and time before the video starts. Format Format camera memory. This setting remains until you change it . This setting remains until you change it . See page 5. Memory Card-deletes everything in different ...

User Manual
Page 23
... the previous or next row of the screen. NOTE: Pictures taken at the Best (3:2) quality setting are displayed at a 3:2 aspect ratio with your camera in a compatible Kodak EasyShare camera dock or Kodak EasyShare printer dock (sold separately) to exit. NOTE: You can also press the Menu button, highlight Multi-up , then press the OK button. 3 Reviewing...
... the previous or next row of the screen. NOTE: Pictures taken at the Best (3:2) quality setting are displayed at a 3:2 aspect ratio with your camera in a compatible Kodak EasyShare camera dock or Kodak EasyShare printer dock (sold separately) to exit. NOTE: You can also press the Menu button, highlight Multi-up , then press the OK button. 3 Reviewing...


