
User Manual
Page 4
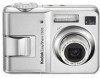
Product features Back view 2 1 18 17 1 LCD 2 Viewfinder 3 Ready light 4 Share button 5 Wide angle button 6 Telephoto button 7 Delete button 8 LCD/Info button 9 Strap post 3 4 16 15 5 6 7 8 9 10 11 12 13 14 10 Slot for optional SD or MMC card 11 12 OK button 13 USB, A/V Out 14 Battery compartment 15 Menu button 16 Review button 17 Dock connector 18 Tripod socket ii www.kodak.com/go/support
Product features Back view 2 1 18 17 1 LCD 2 Viewfinder 3 Ready light 4 Share button 5 Wide angle button 6 Telephoto button 7 Delete button 8 LCD/Info button 9 Strap post 3 4 16 15 5 6 7 8 9 10 11 12 13 14 10 Slot for optional SD or MMC card 11 12 OK button 13 USB, A/V Out 14 Battery compartment 15 Menu button 16 Review button 17 Dock connector 18 Tripod socket ii www.kodak.com/go/support
User Manual
Page 5
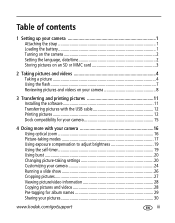
...and videos 4 Taking a picture 4 Using the flash 7 Reviewing pictures and videos on your camera 8 3 Transferring and printing pictures 11 Installing the software 11 Transferring pictures with the USB cable 12 Printing... pictures 12 Dock compatibility for your camera 15 4 Doing more with your camera 16 Using optical zoom 16 Picture-taking modes 17 Using exposure ...Using the self-timer 19 Using burst 20 Changing picture-taking settings 20 Customizing your camera 24 Running a slide show 26 Cropping pictures 27 Viewing picture/video information 28 Copying...
...and videos 4 Taking a picture 4 Using the flash 7 Reviewing pictures and videos on your camera 8 3 Transferring and printing pictures 11 Installing the software 11 Transferring pictures with the USB cable 12 Printing... pictures 12 Dock compatibility for your camera 15 4 Doing more with your camera 16 Using optical zoom 16 Picture-taking modes 17 Using exposure ...Using the self-timer 19 Using burst 20 Changing picture-taking settings 20 Customizing your camera 24 Running a slide show 26 Cropping pictures 27 Viewing picture/video information 28 Copying...

User Manual
Page 6
Table of contents 5 Troubleshooting 35 Camera problems 35 Camera ready light status 37 Camera/computer communications 38 LCD screen messages 39 6 Getting help 42 Helpful links 42 Telephone customer support 43 7 Appendix 44 Camera specifications 44 Storage capacities 47 Important safety instructions 48 Battery life 50 Upgrading your software and firmware 51 Additional care and maintenance 51 Warranty...51 Regulatory compliance 54 iv www.kodak.com/go/support
Table of contents 5 Troubleshooting 35 Camera problems 35 Camera ready light status 37 Camera/computer communications 38 LCD screen messages 39 6 Getting help 42 Helpful links 42 Telephone customer support 43 7 Appendix 44 Camera specifications 44 Storage capacities 47 Important safety instructions 48 Battery life 50 Upgrading your software and firmware 51 Additional care and maintenance 51 Warranty...51 Regulatory compliance 54 iv www.kodak.com/go/support

User Manual
Page 7
www.kodak.com/go/support 1 To extend battery life, see page 46. 1 Setting up your camera Attaching the strap Loading the battery Ni-MH (rechargeable) CRV3 lithium (non-rechargeable) 2 AA (rechargeable or non-rechargeable) For battery types, see page 50.
www.kodak.com/go/support 1 To extend battery life, see page 46. 1 Setting up your camera Attaching the strap Loading the battery Ni-MH (rechargeable) CRV3 lithium (non-rechargeable) 2 AA (rechargeable or non-rechargeable) For battery types, see page 50.

User Manual
Page 8
to highlight Language or Date/Time , then press OK. 2 www.kodak.com/go/support for previous/next field. OK (press) Setting the language, date/time in the future 1 Press Menu. 2 to highlight Setup Menu then press OK. 3 to accept. Setting up your camera Turning on the camera Setting the language, date/time 1 2 OK to change.
to highlight Language or Date/Time , then press OK. 2 www.kodak.com/go/support for previous/next field. OK (press) Setting the language, date/time in the future 1 Press Menu. 2 to highlight Setup Menu then press OK. 3 to accept. Setting up your camera Turning on the camera Setting the language, date/time 1 2 OK to change.

User Manual
Page 9
... cards. See page 47 for the first time, format it may damage the pictures, the card, or the camera. Purchase SD or MMC cards at www.kodak.com/go/c533accessories or www.kodak.com/go /support 3 Inserting or removing a card when the Ready light is blinking may cause damage. NOTE: When using the card... capacities. Notched corner SD or MMC card (optional) CAUTION: A card can purchase an SD or MMC card to conveniently store more pictures and videos. www.kodak.com/go /c503accessories. You can only be inserted one way; Setting up your camera Storing pictures on page 25).
... cards. See page 47 for the first time, format it may damage the pictures, the card, or the camera. Purchase SD or MMC cards at www.kodak.com/go/c533accessories or www.kodak.com/go /support 3 Inserting or removing a card when the Ready light is blinking may cause damage. NOTE: When using the card... capacities. Notched corner SD or MMC card (optional) CAUTION: A card can purchase an SD or MMC card to conveniently store more pictures and videos. www.kodak.com/go /c503accessories. You can only be inserted one way; Setting up your camera Storing pictures on page 25).

User Manual
Page 10
When the Ready light turns green, press the Shutter button completely down and release. To stop recording, press and release the Shutter button again. 4 www.kodak.com/go/support Taking a video 1 2 Press the Shutter button completely down . 2 Taking pictures and videos Taking a picture 1 2 3 LCD/Info Use the LCD or viewfinder. Press LCD/Info for: • LCD on, status icons on • LCD on, status icons off • LCD off (use the viewfinder) Press the Shutter button halfway to focus and set exposure.
When the Ready light turns green, press the Shutter button completely down and release. To stop recording, press and release the Shutter button again. 4 www.kodak.com/go/support Taking a video 1 2 Press the Shutter button completely down . 2 Taking pictures and videos Taking a picture 1 2 3 LCD/Info Use the LCD or viewfinder. Press LCD/Info for: • LCD on, status icons on • LCD on, status icons off • LCD off (use the viewfinder) Press the Shutter button halfway to focus and set exposure.

User Manual
Page 11
... pressed Self-timer Flash mode Date stamp Album Picture size Pictures/time remaining Storage location Zoom: wide telephoto digital Focus Zone White balance ISO speed Low battery Camera mode Exposure compensation www.kodak.com/go/support 5 Understanding picture-taking icons In capture mode-no buttons, the picture/ video is saved. Tag a picture/video for...
... pressed Self-timer Flash mode Date stamp Album Picture size Pictures/time remaining Storage location Zoom: wide telephoto digital Focus Zone White balance ISO speed Low battery Camera mode Exposure compensation www.kodak.com/go/support 5 Understanding picture-taking icons In capture mode-no buttons, the picture/ video is saved. Tag a picture/video for...
User Manual
Page 12
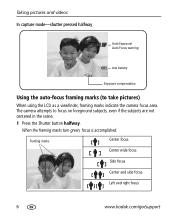
... to take pictures) When using the LCD as a viewfinder, framing marks indicate the camera focus area. Framing marks Center focus Center wide focus Side focus Center and side focus Left and right focus 6 www.kodak.com/go/support Taking pictures and videos In capture mode-shutter pressed halfway Auto Exposure/ Auto Focus warning...
... to take pictures) When using the LCD as a viewfinder, framing marks indicate the camera focus area. Framing marks Center focus Center wide focus Side focus Center and side focus Left and right focus 6 www.kodak.com/go/support Taking pictures and videos In capture mode-shutter pressed halfway Auto Exposure/ Auto Focus warning...

User Manual
Page 13
... require flash but do not appear in heavy shadows. Use when the subject is in the LCD status area. Taking pictures and videos 2 If the camera is not focusing on the desired subject (or if the framing marks disappear), release the Shutter button, recompose the scene, and repeat step 1. 3 Press the..." (when the light is behind the subject). NOTE: Framing marks do not require Red-eye reduction, the flash may fire only once.) Off Never www.kodak.com/go/support 7
... require flash but do not appear in heavy shadows. Use when the subject is in the LCD status area. Taking pictures and videos 2 If the camera is not focusing on the desired subject (or if the framing marks disappear), release the Shutter button, recompose the scene, and repeat step 1. 3 Press the..." (when the light is behind the subject). NOTE: Framing marks do not require Red-eye reduction, the flash may fire only once.) Off Never www.kodak.com/go/support 7

User Manual
Page 14
To save battery power, use an optional Kodak EasyShare dock or Kodak 3-volt AC adapter. (See www.kodak.com/go/c533accessories or www.kodak.com/go /support Viewing multi-up thumbnails. view previous/next thumbnail. Next picture/video (during review view multi-up (thumbnails) during playback). view previous/next row of the...a 3:2 aspect ratio with your pictures and videos. 2 for previous/next. 1 Review. (Press again to 1X. Taking pictures and videos Reviewing pictures and videos on your camera Press the Review button to view and work with black bars at the top of the LCD.
To save battery power, use an optional Kodak EasyShare dock or Kodak 3-volt AC adapter. (See www.kodak.com/go/c533accessories or www.kodak.com/go /support Viewing multi-up thumbnails. view previous/next thumbnail. Next picture/video (during review view multi-up (thumbnails) during playback). view previous/next row of the...a 3:2 aspect ratio with your pictures and videos. 2 for previous/next. 1 Review. (Press again to 1X. Taking pictures and videos Reviewing pictures and videos on your camera Press the Review button to view and work with black bars at the top of the LCD.

User Manual
Page 15
Understanding review icons Pictures Print tag/number of prints Favorite tag Email tag Scroll arrows Videos Video length Favorite tag Email tag Date/Time Scroll arrows Taking pictures and videos Picture number Image storage location Protected Review mode Video number Image storage location Playback time counter Volume control (for Video Out device) Review mode www.kodak.com/go/support 9
Understanding review icons Pictures Print tag/number of prints Favorite tag Email tag Scroll arrows Videos Video length Favorite tag Email tag Date/Time Scroll arrows Taking pictures and videos Picture number Image storage location Protected Review mode Video number Image storage location Playback time counter Volume control (for Video Out device) Review mode www.kodak.com/go/support 9

User Manual
Page 16
The picture or video is larger than 20 MB. appears with 10 www.kodak.com/go/support Using the undo delete feature If you accidentally delete a picture, you delete a picture. Protecting pictures and videos from deletion 1 Press Review. 2 for previous/next. 3 Press ...
The picture or video is larger than 20 MB. appears with 10 www.kodak.com/go/support Using the undo delete feature If you accidentally delete a picture, you delete a picture. Protecting pictures and videos from deletion 1 Press Review. 2 for previous/next. 3 Press ...

User Manual
Page 17
... open on -screen instructions. 5 If prompted, restart the computer. 3 Transferring and printing pictures Installing the software CAUTION: Install EasyShare software before connecting the camera to install. Failure to do so may cause the software to install the software. Windows OS-select Complete to automatically install the... software, turn it back on -screen instructions to load incorrectly. 1 Close all software applications that contains the CD. www.kodak.com/go/support 11 For information on the software applications included on the EasyShare software CD, click the Help button in...
... open on -screen instructions. 5 If prompted, restart the computer. 3 Transferring and printing pictures Installing the software CAUTION: Install EasyShare software before connecting the camera to install. Failure to do so may cause the software to install the software. Windows OS-select Complete to automatically install the... software, turn it back on -screen instructions to load incorrectly. 1 Close all software applications that contains the CD. www.kodak.com/go/support 11 For information on the software applications included on the EasyShare software CD, click the Help button in...

User Manual
Page 18
... this and other accessories at a dealer of Kodak products or www.kodak.com/go/c533accessories or www.kodak.com/go /support Kodak EasyShare software opens on your pictures and videos. I Kodak EasyShare camera dock, Kodak EasyShare printer dock (see page 15) I Kodak multi-card reader, Kodak SD multimedia card reader-writer Purchase these Kodak products to the Kodak EasyShare printer dock and print directly-with the...
... this and other accessories at a dealer of Kodak products or www.kodak.com/go/c533accessories or www.kodak.com/go /support Kodak EasyShare software opens on your pictures and videos. I Kodak EasyShare camera dock, Kodak EasyShare printer dock (see page 15) I Kodak multi-card reader, Kodak SD multimedia card reader-writer Purchase these Kodak products to the Kodak EasyShare printer dock and print directly-with the...

User Manual
Page 19
...menu. (If no pictures are not permanently transferred or saved to choose a picture. Choose the number of paper. You need: I Camera with PictBridge technology, so you tagged for printing and choose a print size. Index Print Print thumbnails of copies. Transferring and printing ... are found, a message is capable, choose a print size. Turn on a card, or in internal memory, on the camera. Image Storage Access internal memory, a card, or Favorites. Tagged Pictures If your printer user guide or visit www.kodak.com/go/c533accessories or www.kodak.com/go /support 13
...menu. (If no pictures are not permanently transferred or saved to choose a picture. Choose the number of paper. You need: I Camera with PictBridge technology, so you tagged for printing and choose a print size. Index Print Print thumbnails of copies. Transferring and printing ... are found, a message is capable, choose a print size. Turn on a card, or in internal memory, on the camera. Image Storage Access internal memory, a card, or Favorites. Tagged Pictures If your printer user guide or visit www.kodak.com/go/c533accessories or www.kodak.com/go /support 13

User Manual
Page 20
...the many online print services offered in EasyShare software. See your local photo retailer for details. I Store pictures, and share them delivered to your printer user's guide for professional printing. 14 www.kodak.com/go/support See www.kodak.com/go/picturemaker.) I Take the... card to your pictures. I Edit, enhance, and add borders to visiting. Printing from the camera and the printer. Transferring and printing pictures Disconnecting the camera from a PictBridge enabled printer 1 Turn off the camera ...
...the many online print services offered in EasyShare software. See your local photo retailer for details. I Store pictures, and share them delivered to your printer user's guide for professional printing. 14 www.kodak.com/go/support See www.kodak.com/go/picturemaker.) I Take the... card to your pictures. I Edit, enhance, and add borders to visiting. Printing from the camera and the printer. Transferring and printing pictures Disconnecting the camera from a PictBridge enabled printer 1 Turn off the camera ...

User Manual
Page 21
... dock plus I printer dock 6000 I camera dock 6000 Custom dock insert Kodak dock adapter kit D-22 Dock I printer dock 4000 I camera dock II I LS420, LS443 camera dock Not compatible Purchase camera docks, printer docks, and other accessories at a dealer of Kodak products or www.kodak.com/go/c533accessories or www.kodak.com/go /support 15 www.kodak.com/go /c503accessories.
... dock plus I printer dock 6000 I camera dock 6000 Custom dock insert Kodak dock adapter kit D-22 Dock I printer dock 4000 I camera dock II I LS420, LS443 camera dock Not compatible Purchase camera docks, printer docks, and other accessories at a dealer of Kodak products or www.kodak.com/go/c533accessories or www.kodak.com/go /support 15 www.kodak.com/go /c503accessories.
User Manual
Page 22
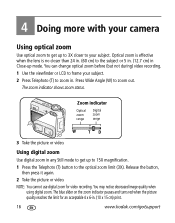
...15X magnification. 1 Press the Telephoto (T) button to the optical zoom limit (3X). NOTE: You cannot use digital zoom for an acceptable 4 x 6-in . You may notice decreased image quality when using digital zoom. You can change optical zoom before (but not during) video recording. 1 Use the viewfinder or LCD...2 Take the picture or video. Using digital zoom Use digital zoom in any Still mode to get up to 3X closer to your subject. 2 Press Telephoto (T) to zoom in . (10 x 15 cm) print. 16 www.kodak.com/go/support 4 Doing more with your camera Using optical zoom Use optical zoom to get...
...15X magnification. 1 Press the Telephoto (T) button to the optical zoom limit (3X). NOTE: You cannot use digital zoom for an acceptable 4 x 6-in . You may notice decreased image quality when using digital zoom. You can change optical zoom before (but not during) video recording. 1 Use the viewfinder or LCD...2 Take the picture or video. Using digital zoom Use digital zoom in any Still mode to get up to 3X closer to your subject. 2 Press Telephoto (T) to zoom in . (10 x 15 cm) print. 16 www.kodak.com/go/support 4 Doing more with your camera Using optical zoom Use optical zoom to get...

User Manual
Page 23
...Landscape Far-away scenes. The camera uses infinity auto-focus. Auto-focus framing marks are not available in Landscape. Close-up Close range. SCN Scene Point-and-shoot simplicity when taking modes Doing more with sound. (See page 4.) www.kodak.com/go/support 17 Picture-taking pictures under... special conditions. (See page 18.) Video Capturing video with your camera Choose the mode that best suits your subjects and surroundings. The camera automatically sets the focus distance depending on the ...
...Landscape Far-away scenes. The camera uses infinity auto-focus. Auto-focus framing marks are not available in Landscape. Close-up Close range. SCN Scene Point-and-shoot simplicity when taking modes Doing more with sound. (See page 4.) www.kodak.com/go/support 17 Picture-taking pictures under... special conditions. (See page 18.) Video Capturing video with your camera Choose the mode that best suits your subjects and surroundings. The camera automatically sets the focus distance depending on the ...


